2020 DODGE GRAND CARAVAN buttons
[x] Cancel search: buttonsPage 304 of 380
302MULTIMEDIA
Playing Audio Files From The Audio Device
You can play songs directly from the external
USB device.
Press the Tracks button to display a list view.
Press the button with the desired list item to
select and play the item.
Press the Info button to display the
track information, press the button a
second time to close the display.
Press the Browse button to browse by
categories.
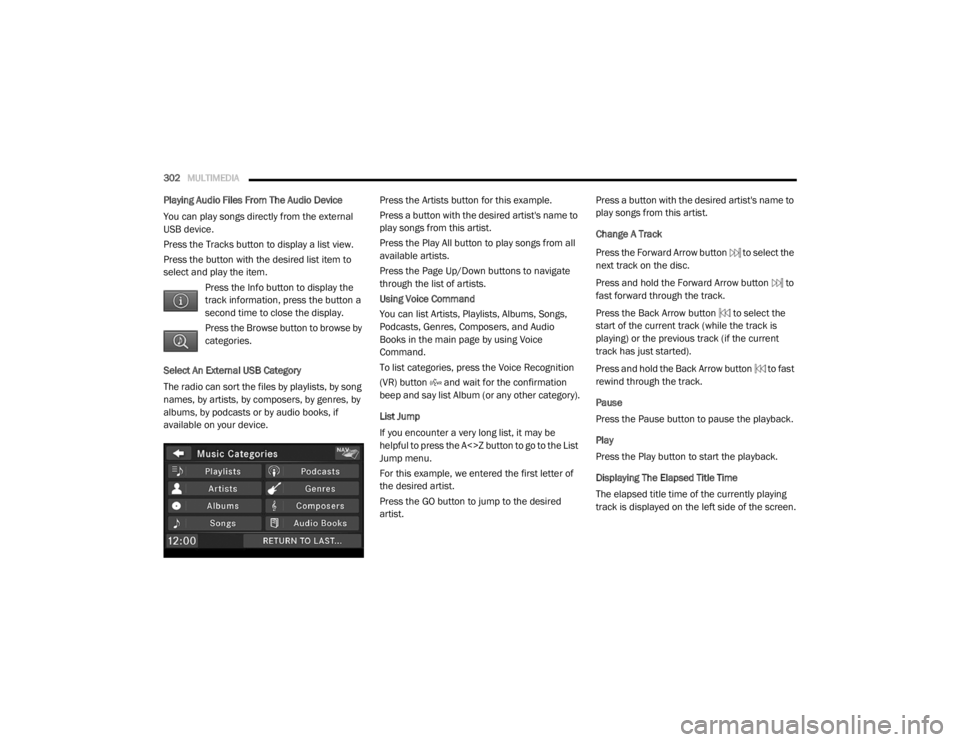
Select An External USB Category
The radio can sort the files by playlists, by song
names, by artists, by composers, by genres, by
albums, by podcasts or by audio books, if
available on your device. Press the Artists button for this example.
Press a button with the desired artist's name to
play songs from this artist.
Press the Play All button to play songs from all
available artists.
Press the Page Up/Down buttons to navigate
through the list of artists.
Using Voice Command
You can list Artists, Playlists, Albums, Songs,
Podcasts, Genres, Composers, and Audio
Books in the main page by using Voice
Command.
To list categories, press the Voice Recognition
(VR) button and wait for the confirmation
beep and say list Album (or any other category).
List Jump
If you encounter a very long list, it may be
helpful to press the A<>Z button to go to the List
Jump menu.
For this example, we entered the first letter of
the desired artist.
Press the GO button to jump to the desired
artist.Press a button with the desired artist's name to
play songs from this artist.
Change A Track
Press the Forward Arrow button to select the
next track on the disc.
Press and hold the Forward Arrow button to
fast forward through the track.
Press the Back Arrow button to select the
start of the current track (while the track is
playing) or the previous track (if the current
track has just started).
Press and hold the Back Arrow button to fast
rewind through the track.
Pause
Press the Pause button to pause the playback.
Play
Press the Play button to start the playback.
Displaying The Elapsed Title Time
The elapsed title time of the currently playing
track is displayed on the left side of the screen.
20_RT_OM_EN_USC_t.book Page 302
Page 307 of 380

MULTIMEDIA305
Uconnect Phone Button
The radio or steering wheel controls (if
equipped) contain the two control buttons
(Uconnect Phone button and Voice
Command button) that enables you to
access the system. When you push the button
you hear the word Uconnect followed by a BEEP.
The beep is your signal to give a command.
NOTE:
The driver side upper windshield trim contains
the microphone for the Uconnect Phone.
Voice Command Button
Actual button location may vary with the radio.
The individual buttons are described in the
“Operation” section. The Uconnect Phone can be used with any
Hands-Free Profile certified Bluetooth® mobile
phone. See the Uconnect website for supported
phones. Refer to your mobile service provider or
the phone manufacturer for details.
The Uconnect Phone is fully integrated with the
vehicle's audio system. The volume of the
Uconnect Phone can be adjusted either from
the radio volume control knob or from the
steering wheel radio control (right switch), if
equipped.
The Uconnect display will be used for visual
prompts from the Uconnect Phone such as
“CELL” or caller ID on certain radios.
Operation
Voice commands can be used to operate the
Uconnect Phone and to navigate through the
Uconnect Phone menu structure. Voice
commands are required after most Uconnect
Phone prompts. You will be prompted for a
specific command and then guided through the
available options.
Prior to giving a voice command, wait for the
beep, which follows the “Ready” prompt or
another prompt.
For certain operations, compound
commands can be used. For example,
instead of saying “Setup” and then “Phone
Pairing,” the following compound command
can be said: “Setup Phone Pairing.”
For each feature explanation in this section,
only the compound form of the voice
command is given. You can also break the
commands into parts and say each part of
the command when you are asked for it. For
example, you can use the compound form
voice command “Phonebook New Entry,” or
you can break the compound form command
into two voice commands: “Phonebook” and
“New Entry.” Please remember, the Uconnect
Phone works best when you talk in a normal
conversational tone, as if speaking to
someone sitting a few feet/meters away from
you.
Help Command
If you need assistance at any prompt, or if you
want to know your options at any prompt, say
“Help” following the beep. The Uconnect Phone
will play all the options at any prompt if you ask
for help.
WARNING!
Any voice commanded system should be
used only in safe driving conditions following
all applicable laws. Your attention should be
focused on safely operating the vehicle.
Failure to do so may result in a collision
causing serious injury or death.
9
20_RT_OM_EN_USC_t.book Page 305
Page 321 of 380

MULTIMEDIA319
Getting Started
To access the Navigation system on your Radio,
press the NAV button in the upper right corner
of the screen during any Radio or Media mode.
Setting Up Your System
When using your navigation system for the first
time, complete the following tasks:
1. Acquire satellites.
2. Understand the main menu.
Acquiring Satellites
The bars indicate satellite strength.
Go to an open area, away from tall buildings and
trees.
Acquiring satellite signals can take a few
minutes. Main Menu
Using The On-Screen Buttons
Press and hold to quickly return to the
main menu.
Press and to see more choices.
Press and hold and to scroll faster.Using The On-screen Keyboard
Press a character on the keyboard to enter a
letter or number.
Press “Space” to add a space.
Press to delete a character.
Press and hold to erase the entire entry.
Press to select the keyboard language
mode.
Press to enter special characters, such as
punctuation marks.
Finding A Point Of Interest
The detailed maps loaded in your navigation
system contain points of interest, such as
restaurants, hotels and auto services.
1. From the main menu, press
Where To? >
Points of Interest
.
2. Select a category.
3. If necessary, select a subcategory.
4. Select a destination.
5. Press Go!1 — Press To Find A Destination
2 — Press To View The Map
3 — Press To Stop A Route
4 — Press To Detour A Route
5 — Press To Open The Menu Of Tools
6 — Press To Open The Menu Of Settings
9
20_RT_OM_EN_USC_t.book Page 319
Page 325 of 380
MULTIMEDIA323
8. Repeat steps four to six to add additional
locations to your trip.
9. Press Next .
10. Enter a name.
11. Press Done .
Editing A Saved Trip
1. From the main menu, press
Where To? >
Trip Planner
.
2. Select a saved trip.
3. Press
4. Select an option:
Press Rename Trip to edit the trip name.
Press Edit Destinations to add or delete
locations.
Press Delete Trip to delete the entire trip.
Press Optimize Order to arrange your trip
locations in the most efficient order. Navigating To A Saved Trip
1. From the main menu, press
Where To? >
Trip Planner
.
2. Select a saved trip.
3. Press Go!
Using The Map Buttons
1. From the main menu, press
Where To? >
Browse Map
.
2. Press anywhere on the map.
Press and to zoom in and out.
Press to switch between 2D and 3D
views.
Press to rotate the view. Browsing The Map By Pressing The Touch
-
screen
Press an area on the map to select a location.
An information box appears next to the loca -
tion.
Press and drag the map to view different
parts of the map.
Press the map twice to zoom in and center on
a location.
Finding A Location Using The Map
1. From the main menu, press
Where To? >
Browse Map
.
2. Press a location. An information box appears next to the loca -
tion.
3. Press the information box.
4. Select an option:
Press > Save .
5. Press Go!
9
20_RT_OM_EN_USC_t.book Page 323
Page 343 of 380

MULTIMEDIA341
Connecting The External USB Device
Use the connection cable to connect a external
USB device to the vehicle's USB connector port
which is located in the glove compartment.
USB Port
NOTE:
The glove compartment will have a position
where the consumer electronic audio device
cable can be routed through without damaging
the cable when closing the lid. This allows
routing of the cable without damaging it while
closing the lid. If a cut out is not available in the
glove compartment, route the cable away from
the lid latch and in a place that will allow the lid
to close without damaging the cable. Once the audio device is connected and
synchronized to the vehicle's USB/MP3 control
system (External USB device may take a few
minutes to connect), the audio device starts
charging and is ready for use by pushing radio
buttons.
NOTE:
If the audio device battery is completely
discharged, it may not communicate with the
USB/MP3 control system until a minimum
charge is attained. Leaving the audio device
connected to the USB/MP3 control system may
charge it to the required level.
Using This Feature
By using an external USB device to connect to
the USB port:
The audio device can be played on the
vehicle’s sound system, providing metadata
(artist, track title, album, etc.) information on
the radio display.
The audio device can be controlled using the
radio buttons to Play, Browse, and List the
audio device’s contents.
The audio device battery charges when
plugged into the USB connector (if supported
by the specific audio device).
Controlling The External USB Device Using
Radio Buttons
To enter the AUX/USB/MP3 control mode and
access a connected audio device, either push
the Aux button on the radio faceplate or push
the VR button and say "USB" or "Switch to USB."
Once in the AUX/USB/MP3 control mode, audio
tracks (if available from audio device) start
playing over the vehicle's audio system.
Play Mode
When switched to AUX/USB/MP3 control mode,
the external USB device automatically starts
Play mode. In Play mode, the following buttons
on the radio faceplate may be used to control
the external USB device and display data:
Use the TUNE control knob to select the next
or previous track.
Turning it clockwise (forward) by one
click, while playing a track, skips to the
next track or push the Voice Recognition
(VR) button and say "Next Track".
9
20_RT_OM_EN_USC_t.book Page 341
Page 344 of 380

342MULTIMEDIA
Turning it counterclockwise (backward)
by one click will jump to the previous
track in the list or push the VR button and
say "Previous Track".
Jump backward in the current track by
pushing and holding the << RW button.
Holding the << RW button long enough will
jump to the beginning of the current track.
Jump forward in the current track by pushing
and holding the FF >> button.
A single push backward << RW or forward FF
>> will jump backward or forward respec -
tively, for five seconds.
Use the << SEEK and SEEK >> buttons to
jump to the previous or next track. Pushing
the SEEK >> button during play mode will
jump to the next track in the list, or push the
VR button and say "Next or Previous Track."
While a track is playing, push the INFO button
to see the associated metadata (artist, track
title, album, etc.) for that track. Pushing the
INFO button again jumps to the next screen
of data for that track. Once all screens have
been viewed, the last INFO button push will
go back to the play mode screen on the radio.
Pushing the Repeat button will change the
audio device mode to repeat the current
playing track or push the VR button and say
"Repeat On" or "Repeat Off".
Push the Scan button to use AUX/USB/MP3
device scan mode, which will play the first 10
seconds of each track in the current list and
then forward to the next song. To stop Scan
mode and start playing the desired track,
when it is playing the track, push the Scan
button again. During Scan mode, pushing the
<< SEEK and SEEK >> buttons will select the
previous and next tracks.
RND button: Pushing this button toggles
between Shuffle ON and Shuffle OFF modes
for the external USB device, or push the VR
button and say "Shuffle On" or "Shuffle Off." If
the RND icon is showing on the radio display,
then the shuffle mode is On.
List Or Browse Mode
During Play mode, pushing any of the buttons
described below will bring up List mode. List
mode enables scrolling through the list of
menus and tracks on the audio device. Tune control knob: The Tune control knob
functions in a similar manner as the scroll
wheel on the audio device or external USB
device.
Turning it clockwise (forward) and counter-
clockwise (backward) scrolls through the
lists, displaying the track detail on the radio
display. Once the track to be played is high-
lighted on the radio display, push the Tune
control knob to select and start playing the
track. Turning the TUNE control knob fast will
scroll through the list faster. During fast
scroll, a slight delay in updating the informa
-
tion on the radio display may be noticeable.
In List mode, the radio Preset buttons are used
as shortcuts to the following lists on the
external USB device:
Preset 1 – Playlists
Preset 2 – Artists
Preset 3 – Albums
Preset 4 – Genres
Preset 5 – Audiobooks
Preset 6 – Podcasts
20_RT_OM_EN_USC_t.book Page 342
Page 345 of 380
MULTIMEDIA343
Pushing a PRESET button will display the
current list on the top line and the first item in
that list on the second line.
To exit List mode without selecting a track, push
the same Preset button again to go back to
Play mode.
List button: The List button will display the top
level menu of the external USB device.
Turn the Tune control knob to list the
top-menu item to be selected and push the
Tune control knob. This will display the next
sub-menu list item on the audio device, then
follow the same steps to go to the desired
track in that list. Not all external USB device
sub-menu levels are available on this system.
Music Type button: The Music Type button is
another shortcut button to the genre listing on
your audio device.
Bluetooth® Streaming Audio (BTSA)
Music can be streamed from your cellular
phone to the Uconnect phone system.
Refer to the Uconnect Owner’s Manual
Supplement for further information on
Bluetooth® connectivity.
Controlling BTSA Using Radio Buttons
To enter BTSA mode, push either AUX button on
the radio or push the VR button and say
“Bluetooth® Streaming Audio”.
Play Mode
When switched to BTSA mode, some audio
devices can start playing music over the
vehicle’s audio system, but some devices
require the music to be initiated on the device
first. Then, it will get streamed to the Uconnect
phone system. Seven devices can be paired to
the Uconnect phone system, but just one can be
selected and played.
Selecting A Different Audio Device
1. Push the Phone button to begin.
2. After the "Ready" prompt and following the beep, say "Setup", then say "Select Audio
Devices".
3. Say the name of the audio device or ask the Uconnect phone system to list the audio
devices.
Next Track
Use the Seek Up button, or push the VR
button on the radio and say “Next Track,” to
jump to the next music track on your cellular
phone.
WARNING!
Do not plug in or remove the iPod® or
external USB device while driving. Failure to
follow this warning could result in an
accident.
CAUTION!
Leaving the iPod® or external USB device
(or any supported device) anywhere in the
vehicle in extreme heat or cold can alter the
operation or damage the device. Follow the
device manufacturer’s guidelines.
Placing items on the iPod® or external USB
device, or connections to the iPod® or
external USB device in the vehicle, can
cause damage to the device and/or to the
connectors.
9
20_RT_OM_EN_USC_t.book Page 343
Page 347 of 380
MULTIMEDIA345
When connecting an external source to the AUX
input, be sure to follow the standard color
coding for the VES jacks.
NOTE:
Certain high-end video game consoles will
exceed the power limit of the vehicle's Power
Inverter. Refer to “Power Inverter — If Equipped”
in “Getting To Know Your Vehicle” for more
information.
Using The Remote Control
1. Push the Mode button on the Remote
Control.
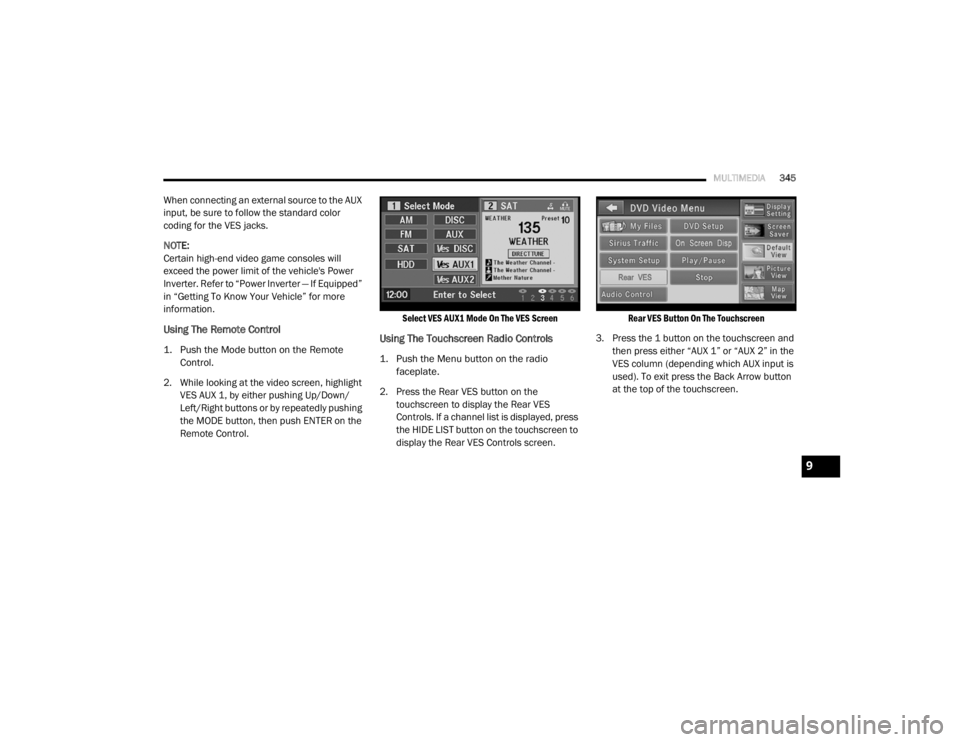
2. While looking at the video screen, highlight VES AUX 1, by either pushing Up/Down/
Left/Right buttons or by repeatedly pushing
the MODE button, then push ENTER on the
Remote Control.
Select VES AUX1 Mode On The VES Screen
Using The Touchscreen Radio Controls
1. Push the Menu button on the radio
faceplate.
2. Press the Rear VES button on the touchscreen to display the Rear VES
Controls. If a channel list is displayed, press
the HIDE LIST button on the touchscreen to
display the Rear VES Controls screen.
Rear VES Button On The Touchscreen
3. Press the 1 button on the touchscreen and then press either “AUX 1” or “AUX 2” in the
VES column (depending which AUX input is
used). To exit press the Back Arrow button
at the top of the touchscreen.
9
20_RT_OM_EN_USC_t.book Page 345