2020 DODGE GRAND CARAVAN ad blue
[x] Cancel search: ad bluePage 345 of 380
MULTIMEDIA343
Pushing a PRESET button will display the
current list on the top line and the first item in
that list on the second line.
To exit List mode without selecting a track, push
the same Preset button again to go back to
Play mode.
List button: The List button will display the top
level menu of the external USB device.
Turn the Tune control knob to list the
top-menu item to be selected and push the
Tune control knob. This will display the next
sub-menu list item on the audio device, then
follow the same steps to go to the desired
track in that list. Not all external USB device
sub-menu levels are available on this system.
Music Type button: The Music Type button is
another shortcut button to the genre listing on
your audio device.
Bluetooth® Streaming Audio (BTSA)
Music can be streamed from your cellular
phone to the Uconnect phone system.
Refer to the Uconnect Owner’s Manual
Supplement for further information on
Bluetooth® connectivity.
Controlling BTSA Using Radio Buttons
To enter BTSA mode, push either AUX button on
the radio or push the VR button and say
“Bluetooth® Streaming Audio”.
Play Mode
When switched to BTSA mode, some audio
devices can start playing music over the
vehicle’s audio system, but some devices
require the music to be initiated on the device
first. Then, it will get streamed to the Uconnect
phone system. Seven devices can be paired to
the Uconnect phone system, but just one can be
selected and played.
Selecting A Different Audio Device
1. Push the Phone button to begin.
2. After the "Ready" prompt and following the beep, say "Setup", then say "Select Audio
Devices".
3. Say the name of the audio device or ask the Uconnect phone system to list the audio
devices.
Next Track
Use the Seek Up button, or push the VR
button on the radio and say “Next Track,” to
jump to the next music track on your cellular
phone.
WARNING!
Do not plug in or remove the iPod® or
external USB device while driving. Failure to
follow this warning could result in an
accident.
CAUTION!
Leaving the iPod® or external USB device
(or any supported device) anywhere in the
vehicle in extreme heat or cold can alter the
operation or damage the device. Follow the
device manufacturer’s guidelines.
Placing items on the iPod® or external USB
device, or connections to the iPod® or
external USB device in the vehicle, can
cause damage to the device and/or to the
connectors.
9
20_RT_OM_EN_USC_t.book Page 343
Page 346 of 380
344MULTIMEDIA
Previous Track
Use the Seek Down button, or push the VR
button on the radio and say “Previous Track,” to
jump to the previous music track on your
cellular phone.
Browse
Browsing is not available on a Bluetooth®
Streaming Audio (BTSA) device. Only the current
song that is playing will display info.
UCONNECT MULTIMEDIA — VIDEO
ENTERTAINMENT SYSTEM (VES) — IF
EQUIPPED
Your rear seat Video Entertainment System
(VES) is designed to give your family years of
enjoyment. You can play your favorite CDs or
DVDs, listen to audio over the wireless
headphones, or plug and play a variety of
standard video games or audio devices. Please
review this Owner's Manual to become familiar
with its features and operation. NOTE:
The screen is located in the 2nd row overhead
console.
Getting Started
Screen located in the overhead console
:
Unfold the overhead LCD screen(s) by
pushing the button on the overhead console
behind the screen(s).
Cycle the ignition to the ON/RUN or ACC
position.
Turn on the Player by pushing the Power
button, located on the far left, or by pushing
the button on the Remote Control.
When the video screen is open and a DVD is
inserted into the VES player, the screen turns
on automatically, the headphone transmit -
ters turn on and playback begins.
The system can be controlled by the front
seat occupants using either the touchscreen
radio, the DVD, or by the rear seat occupants
using the remote control.
Play Video Games
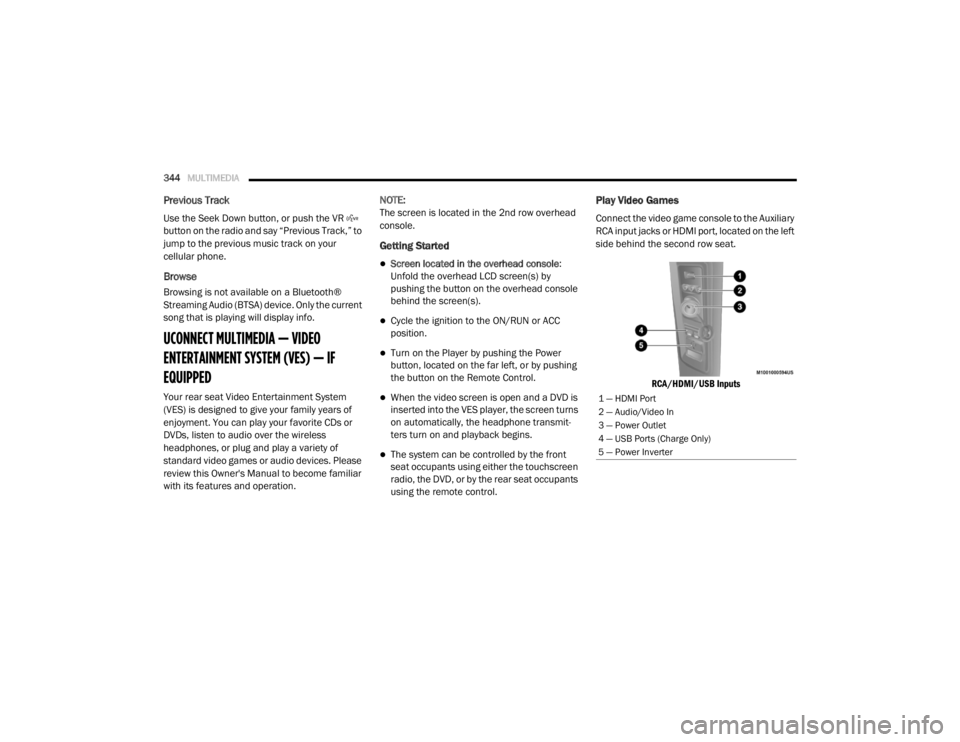
Connect the video game console to the Auxiliary
RCA input jacks or HDMI port, located on the left
side behind the second row seat.
RCA/HDMI/USB Inputs
1 — HDMI Port
2 — Audio/Video In
3 — Power Outlet
4 — USB Ports (Charge Only)
5 — Power Inverter
20_RT_OM_EN_USC_t.book Page 344
Page 362 of 380
360MULTIMEDIA
NOTE:
This equipment has been tested and found to
comply with the limits for a Class B digital
device, pursuant to Part 15 of the FCC Rules.
These limits are designed to provide reason -
able protection against harmful interference
in a residential installation. This equipment
generates, uses and can radiate radio
frequency energy and, if not installed and
used in accordance with the instructions,
may cause harmful interference to radio
communications. However, there is no guar -
antee that interference will not occur in a
particular installation.
If this equipment does cause harmful inter -
ference to radio or television reception,
which can be determined by turning the
equipment off and on, the user is encour -
aged to try to correct the interference by one
or more of the following measures:
a. Increase the separation between the equipment and receiver.
b. Consult an authorized dealer or an expe -
rienced radio technician for help.
VOICE RECOGNITION QUICK TIPS— IF
EQUIPPED
Voice Command System Operation
The Uconnect Voice Command
system allows you to control your AM,
FM radio, disk player, USB mass
storage class device, Apple® family of
devices, Bluetooth® Streaming Audio Device,
satellite radio, and a memo recorder.
NOTE:
Take care to speak into the Voice Interface
System as calmly and normally as possible. The
ability of the Voice Interface System to
recognize user voice commands may be
negatively affected by rapid speaking or a
raised voice level. When you push the Voice Recognition
button, you will hear a beep. The beep is your
signal to give a command.
NOTE:
If you do not say a command within a few
seconds, the system will present you with a list
of options.
If you would like to interrupt the system while it
lists options, push the Voice Recognition
button, listen for the beep, and say your
command.
Pushing the Voice Recognition button while
the system is speaking is known as “barging in”.
The system will be interrupted, and after the
beep, you can add or change commands. This
will become helpful once you start to learn the
options.
NOTE:
At any time, you can say the words “Cancel,”
“Help” or “Main Menu.”
These commands are universal and can be
used from any menu. All other commands can
be used depending upon the active application.
When using this system, you should speak
clearly and at a normal speaking volume.
WARNING!
Any voice commanded system should be
used only in safe driving conditions following
all applicable laws. Your attention should be
focused on safely operating the vehicle.
Failure to do so may result in a collision
causing serious injury or death.
20_RT_OM_EN_USC_t.book Page 360
Page 363 of 380
MULTIMEDIA361
The system will best recognize your speech if
the windows are closed, and the heater/air
conditioning blower is set to low.
At any point, if the system does not recognize
one of your commands, you will be prompted to
repeat it.
To hear the first available Menu, push the Voice
Recognition button and say “Help” or
“Main Menu”.
Commands
The Voice Command system understands two
types of commands, Universal commands, and
Local commands. Universal commands are
available at all times. Local commands are
available if the supported radio mode is active.
Changing The Volume
1. Start a dialogue by pushing the Voice
Recognition button.
2. Say a command (e.g., “Help”). 3. Use the ON/OFF VOLUME rotary knob to
adjust the volume to a comfortable level
while the Voice Recognition system is
speaking. Please note the volume setting
for Voice Recognition is different than the
audio system.
Main Menu
Start a dialogue by pushing the Voice
Recognition button. You may say “Main
Menu” to switch to the main menu.
In this mode, you can say the following
commands:
“Radio AM” (to switch to the radio AM mode)
“Radio FM” (to switch to radio FM mode)
“Sat” (to switch to Satellite radio mode)
“Disc” (to switch to the disc mode)
“USB” (to switch to USB mode)
“Bluetooth® Streaming” (to switch to
Bluetooth® Streaming mode)
“Memo” (to switch to the memo recorder)
“System Setup” (to switch to system setup)
Radio AM
To switch to the AM band, say “AM” or “Radio
AM”. In this mode, you may say the following
commands:
“Frequency #” (to change the frequency)
“Next Station” (to select the next station)
“Previous Station” (to select the previous
station)
“Radio Menu” (to switch to the radio menu)
“Main Menu” (to switch to the main menu)
Radio FM
To switch to the FM band, say “FM” or “Radio
FM”. In this mode, you may say the following
commands:
“Frequency #” (to change the frequency)
“Next Station” (to select the next station)
9
20_RT_OM_EN_USC_t.book Page 361
Page 364 of 380
362MULTIMEDIA
“Previous Station” (to select the previous
station)
“Menu Radio” (to switch to the radio menu)
“Main Menu” (to switch to the main menu)
Satellite Radio
To switch to satellite radio mode, say “Sat” or
“Satellite Radio.” In this mode, you may say the
following commands:
“Channel Number” (to change the channel by
its spoken number)
“Next Channel” (to select the next channel)
“Previous Channel” (to select the previous
channel)
“List Channel” (to hear a list of available
channels)
“Select Name” (to say the name of a channel)
“Menu Radio” (to switch to the radio menu)
“Main Menu” (to switch to the main menu)
Disc Mode
To switch to the disc mode, say “Disc”. In this
mode, you may say the following commands:
“Track” (#) (to change the track)
“Next Track” (to play the next track)
“Previous Track” (to play the previous track)
“Main Menu” (to switch to the main menu)
USB Mode
To switch to USB mode, say “USB”. In this mode,
you may say the following commands:
“Next Track” (to play the next track)
“Previous Track” (to play the previous track)
“Play” (to play an Artist Name, Playlist Name,
Album Name, Track Name, etc.)
Bluetooth® Streaming (BT) Mode
To switch to Bluetooth® Streaming (BT) mode,
say “Bluetooth® Streaming”. In this mode, you
may say the following commands:
“Play” (to play the current track)
“Pause” (to pause the current track)
“Next Track” (to play the next track)
“Previous Track” (to play the previous track)
Memo Mode
To switch to the voice recorder mode, say
“Memo”. In this mode, you may say the
following commands:
“New Memo” (to record a new memo) —
During the recording, you may push the Voice
Command button to stop recording. You
proceed by saying one of the following
commands:
“Save” (to save the memo)
“Continue” (to continue recording)
“Delete” (to delete the recording)
20_RT_OM_EN_USC_t.book Page 362
Page 373 of 380

371
Fluid, Brake
................................................... 274Fluids And Lubricants.................................... 272Fog Lights........................................ 37, 39, 196Fog Lights, Service......................................... 196Fold In Floor (Stow ‘n Go) Seating.................... 21Fold-Flat Seats................................................. 20Freeing A Stuck Vehicle................................. 223Fuel............................................................... 267Adding....................................................... 181Additives................................................... 268Clean Air.................................................... 268Economy Mode.......................................... 167Ethanol...................................................... 268Gasoline.................................................... 267Materials Added........................................ 268Methanol................................................... 268Octane Rating................................. 267, 272Specifications............................................ 272Tank Capacity............................................ 271Fueling........................................................... 181Fuses................................................... 197, 198
G
Garage Door Opener (HomeLink).................... 63Gasoline, (Fuel)............................................. 267Gasoline, Clean Air........................................ 268Gasoline, Reformulated................................. 268Gear Ranges.................................................. 168
Gear Selector Override................................. 222Glass Cleaning.............................................. 265Gross Axle Weight Rating.............................. 183Gross Vehicle Weight Rating......................... 183GVWR............................................................ 182
H
Hands-Free Phone Uconnect
.................................................. 304HazardDriving Through Flowing, Rising,
Or Shallow Standing Water
....................... 192Hazard Warning Flashers.............................. 194Head Restraints............................................... 30Headlights....................................................... 37Automatic.................................................... 38Bulb Replacement.................................... 196Cleaning................................................... 263High Beam/Low Beam Select Switch... 37, 38Lights On Reminder.............................. 37, 39Passing................................................. 37, 38Replacing................................................. 196Switch.......................................................... 37Time Delay............................................ 37, 38Heated Mirrors.......................................... 34, 37Heater, Engine Block.................................... 163
High Beam/Low Beam Select
(Dimmer) Switch..............................................38Hill Start Assist.............................................. 108HitchesTrailer Towing........................................... 184HomeLink (Garage Door Opener).....................63Hood Prop........................................................61Hood Release...................................................61Hook, Coat.......................................................73
I
Ignition.............................................................11Switch..........................................................11Inside Rearview Mirror.....................................35Instrument Cluster...........................................82Descriptions....................................... 84, 100Display.........................................................85Display Controls...........................................85Menu Items.................................................87Instrument Panel Lens Cleaning................... 265Integrated Power Module (Fuses)................. 198Interior And Instrument Lights.........................39Interior Appearance Care.............................. 264Interior Lights...................................................39Intermittent Wipers (Delay Wipers)..................42InverterPower...........................................................77iPod/USB/MP3 Control................................. 340Bluetooth Streaming Audio.............. 343, 362
11
20_RT_OM_EN_USC_t.book Page 371