2020 DODGE GRAND CARAVAN remote control
[x] Cancel search: remote controlPage 42 of 380

40GETTING TO KNOW YOUR VEHICLE
The interior lights will automatically turn off in
approximately 10 minutes for the first
activation and 90 seconds every activation
thereafter until the engine is started, if one of
the following occur:
A door, sliding door or the liftgate is left open.
Any overhead reading light is left on.
NOTE:
The ignition must be placed in the OFF position
for this feature to operate.
The courtesy lights also function as reading
lights. Push in on each lens to turn these lights
on while inside the vehicle. Push a second time
to turn each light off. You may adjust the
direction of these lights by pushing the outside
ring, which is identified with four directional
arrows (LED lamps only).
Rear Courtesy/Reading Lights — If Equipped
The overhead console has two sets of courtesy
lights. The lights turn on when a front door, a
sliding door or the liftgate is opened. If your
vehicle is equipped with Remote Keyless Entry,
the lights will also turn on when the unlock
button on the key fob is pushed.
The courtesy lights also function as reading
lights. Push in on each lens to turn these lights
on while inside the vehicle. Push the lens a
second time to turn each light off. You may
adjust the direction of these lights by pushing
the outside ring, which is identified with four
directional arrows.
Reading Lights
Rear Console Halo Lighting
Halo lights are strategically placed soft lighting
that help to illuminate specific areas to aid the
occupants in locating specific features while
driving at night.
The rear overhead console has recessed halo
lighting around the perimeter of the console
base. This feature provides additional lighting
options while traveling and is controlled by the
ambient light dimmer control of the headlight
switch.
Ambient Light Dimmer Control
20_RT_OM_EN_USC_t.book Page 40
Page 65 of 380

GETTING TO KNOW YOUR VEHICLE63
Using the above ways:
When the liftgate is fully closed, the liftgate
will open
When the liftgate is fully open, the liftgate will
close
When the liftgate is moving, the liftgate will
reverse
Push the Power Liftgate button on the overhead
console to open or close the liftgate.
Push the liftgate button on the key fob twice
within five seconds to open or close the liftgate.
Overhead Console Power Switches
Cargo Area Features
Cargo Area Storage
The liftgate sill plate has a raised line with the
statement “Load To This Line”. This line
indicates how far rearward cargo can be placed
without interfering with liftgate closing.
Rear Cargo Area Loading Limit
NOTE:
With all rear seats stowed or removed, 4 x 8 foot
sheets of building material will fit on the vehicle
floor with the liftgate closed. The front seats
must be moved slightly forward of the rearmost
position.
LOAD LEVELING SYSTEM — IF EQUIPPED
The automatic load leveling system will provide
a level-riding vehicle under most passenger and
cargo loading conditions.
A hydraulic pump contained within the shock
absorbers raises the rear of the vehicle to the
correct height. It takes approximately 1 mile
(1.6 km) of driving for the leveling to complete
depending on road surface conditions.
If the leveled vehicle is not moved for approxi-
mately 15 hours, the leveling system will bleed
itself down. The vehicle must be driven to reset
the system.
GARAGE DOOR OPENER — IF EQUIPPED
HomeLink® replaces up to three remote
controls (hand-held transmitters) that operate
devices such as garage door openers,
motorized gates, lighting or home security
systems. The HomeLink® unit operates off your
vehicle’s battery.
1 — Left Sliding Door
2 — Liftgate
3 — Right Sliding Door
4 — Sliding Door Power Off
2
20_RT_OM_EN_USC_t.book Page 63
Page 301 of 380

MULTIMEDIA299
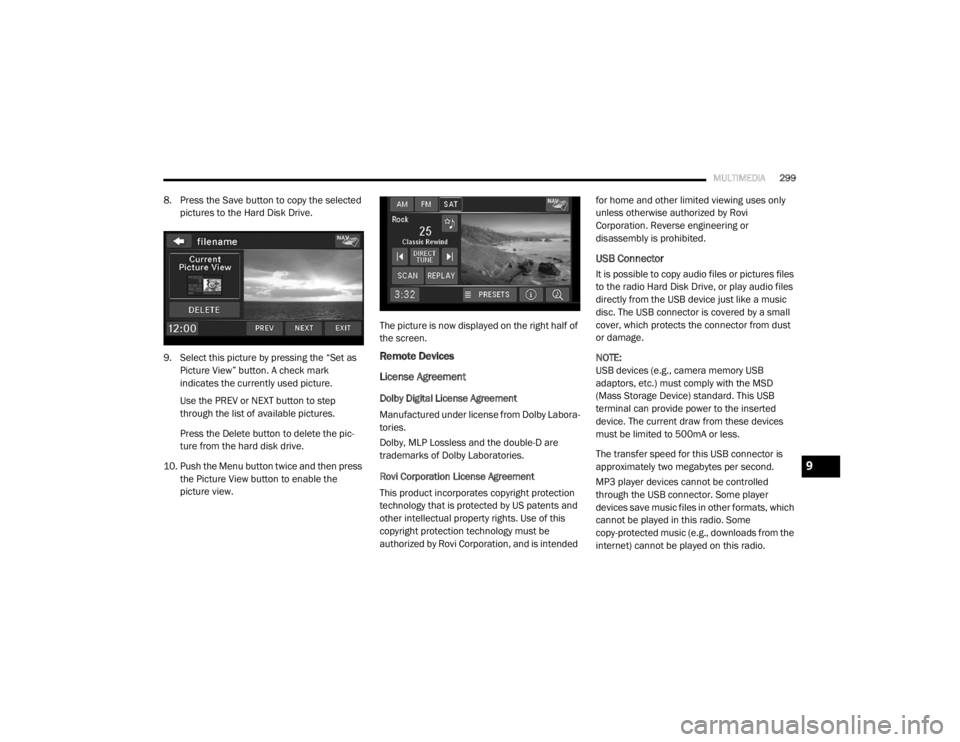
8. Press the Save button to copy the selected
pictures to the Hard Disk Drive.
9. Select this picture by pressing the “Set as Picture View” button. A check mark
indicates the currently used picture.
Use the PREV or NEXT button to step
through the list of available pictures.
Press the Delete button to delete the pic -
ture from the hard disk drive.
10. Push the Menu button twice and then press the Picture View button to enable the
picture view. The picture is now displayed on the right half of
the screen.
Remote Devices
License Agreement
Dolby Digital License Agreement
Manufactured under license from Dolby Labora-
tories.
Dolby, MLP Lossless and the double-D are
trademarks of Dolby Laboratories.
Rovi Corporation License Agreement
This product incorporates copyright protection
technology that is protected by US patents and
other intellectual property rights. Use of this
copyright protection technology must be
authorized by Rovi Corporation, and is intended for home and other limited viewing uses only
unless otherwise authorized by Rovi
Corporation. Reverse engineering or
disassembly is prohibited.
USB Connector
It is possible to copy audio files or pictures files
to the radio Hard Disk Drive, or play audio files
directly from the USB device just like a music
disc. The USB connector is covered by a small
cover, which protects the connector from dust
or damage.
NOTE:
USB devices (e.g., camera memory USB
adaptors, etc.) must comply with the MSD
(Mass Storage Device) standard. This USB
terminal can provide power to the inserted
device. The current draw from these devices
must be limited to 500mA or less.
The transfer speed for this USB connector is
approximately two megabytes per second.
MP3 player devices cannot be controlled
through the USB connector. Some player
devices save music files in other formats, which
cannot be played in this radio. Some
copy-protected music (e.g., downloads from the
internet) cannot be played on this radio.
9
20_RT_OM_EN_USC_t.book Page 299
Page 303 of 380

MULTIMEDIA301
2. Insert the top hooks (1) into the frame first.
3. Then push on the bottom of the flap to
secure in place.
Audio Jack (AUX) Mode
The Audio Jack connector allows you to connect
the headset output of an audio device (e.g.,
MP3 player) to the radio. The audio of the
connected device will then be played through
the radio sound system. Connect a 3.5 mm stereo mini-jack cable as
shown above (not provided with the radio) to the
Audio Jack connector on the radio and to the
earphone connector of your audio device.
The display will switch automatically to the AUX
mode when a 3.5 mm stereo mini-jack cable
has been connected. The radio screen will
revert back to the last tuner mode when the
cable is unplugged.
To change radio modes while the cable is
connected to the unit, push the Media button
located on the faceplate to display the AUX tab.
Press the AUX tab to return to the AUX mode.
Adjust the volume with the On/Off Volume
rotary knob or with the volume of the attached
device.The control of the external device (e.g.,
selecting playlists, play, fast forward, etc.)
cannot be provided by the radio; use the device
controls instead.
NOTE:
Inserting of a mono jack will result in improper
audio playback.
USB Port — If Equipped
The USB Port in the center console or upper
glove box (depending on the vehicle) gives you
access to the audio files on the external USB
device through the AUX Mode. It functions as a
remote control for the currently connected
audio devices mobile digital device, and you can
play audio from the audio device through the
vehicle's speaker system.
Before using the AUX mode, you will need to
connect your audio device to the USB port.
NOTE:The files will not be stored on the internal
hard disk drive and cannot be used in the
HDD mode.
It is recommended you use the latest avail
-
able software for your iPod®/iPhone® and
iTunes®.
CAUTION!
Never force any connector into the ports of
your radio. Make sure your connectors are
the identical shape and size before you
connect.
9
20_RT_OM_EN_USC_t.book Page 301
Page 342 of 380

340MULTIMEDIA
STEERING WHEEL AUDIO CONTROLS — IF
EQUIPPED
Remote Sound System Controls (Back View Of Steering
Wheel)
The remote sound system controls are located
on the rear surface of the steering wheel, at the
three and nine o'clock positions.
The right-hand rocker switch has a push-button
in the center, and controls the volume and
mode of the sound system. Pushing the top of
the rocker switch will increase the volume.
Pushing the bottom of the rocker switch will
decrease the volume. Pushing the center
button changes the operation of the radio from
AM to FM, or to CD mode. The left-hand rocker switch has a push-button in
the center. The function of the left-hand switch
is different, depending on which mode you are
in.
The following describes the left-hand rocker
switch operation in each mode.
Radio Operation
Pushing the top of the switch will Seek Up for
the next listenable station, and pushing the
bottom of the switch will Seek Down for the next
listenable station.
The button located in the center of the left-hand
switch will tune to the next preset station that
you have programmed in the radio preset
push-button.
CD Player
Pushing the top of the switch once will go to the
next track on the CD. Pushing the bottom of the
switch once will go to the beginning of the
current track, or to the beginning of the previous
track if it is within one second after the current
track begins to play.
If you push the switch up or down twice it plays
the second track; three times, it will play the
third, etc.The button in the center of the left-hand switch
has no function in this mode.
USB/MP3 CONTROL — IF EQUIPPED
This feature allows a external USB device to be
plugged into the USB port, located in the glove
compartment. If equipped, there may also be
two USB ports located on the lower trim piece
right behind the driver’s sliding door that are for
charging devices only.
iPod® control supports Mini, 4G, Photo, iPod®
nano, 5G iPod® and iPhone® devices. Some
iPod® software versions may not fully support
the iPod® control features. Please visit
Apple’s® website for software updates.
NOTE:
Connecting a consumer electronic audio device
to the AUX port located in the radio faceplate,
plays media, but does not use the MP3 control
feature to control the connected device.
20_RT_OM_EN_USC_t.book Page 340
Page 346 of 380

344MULTIMEDIA
Previous Track
Use the Seek Down button, or push the VR
button on the radio and say “Previous Track,” to
jump to the previous music track on your
cellular phone.
Browse
Browsing is not available on a Bluetooth®
Streaming Audio (BTSA) device. Only the current
song that is playing will display info.
UCONNECT MULTIMEDIA — VIDEO
ENTERTAINMENT SYSTEM (VES) — IF
EQUIPPED
Your rear seat Video Entertainment System
(VES) is designed to give your family years of
enjoyment. You can play your favorite CDs or
DVDs, listen to audio over the wireless
headphones, or plug and play a variety of
standard video games or audio devices. Please
review this Owner's Manual to become familiar
with its features and operation. NOTE:
The screen is located in the 2nd row overhead
console.
Getting Started
Screen located in the overhead console
:
Unfold the overhead LCD screen(s) by
pushing the button on the overhead console
behind the screen(s).
Cycle the ignition to the ON/RUN or ACC
position.
Turn on the Player by pushing the Power
button, located on the far left, or by pushing
the button on the Remote Control.
When the video screen is open and a DVD is
inserted into the VES player, the screen turns
on automatically, the headphone transmit -
ters turn on and playback begins.
The system can be controlled by the front
seat occupants using either the touchscreen
radio, the DVD, or by the rear seat occupants
using the remote control.
Play Video Games
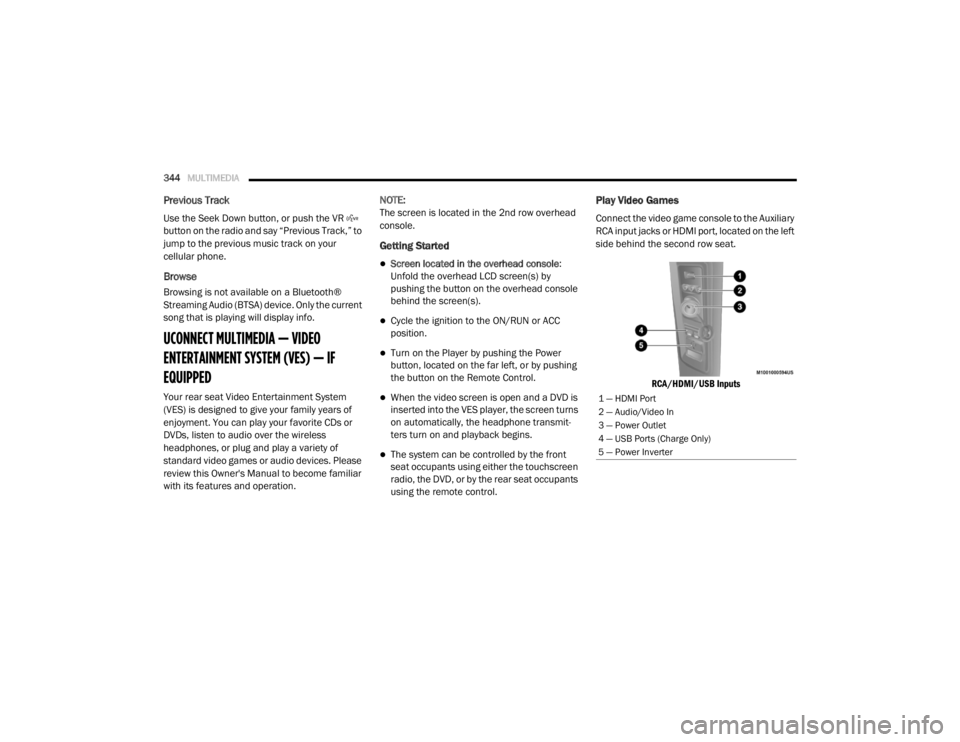
Connect the video game console to the Auxiliary
RCA input jacks or HDMI port, located on the left
side behind the second row seat.
RCA/HDMI/USB Inputs
1 — HDMI Port
2 — Audio/Video In
3 — Power Outlet
4 — USB Ports (Charge Only)
5 — Power Inverter
20_RT_OM_EN_USC_t.book Page 344
Page 347 of 380

MULTIMEDIA345
When connecting an external source to the AUX
input, be sure to follow the standard color
coding for the VES jacks.
NOTE:
Certain high-end video game consoles will
exceed the power limit of the vehicle's Power
Inverter. Refer to “Power Inverter — If Equipped”
in “Getting To Know Your Vehicle” for more
information.
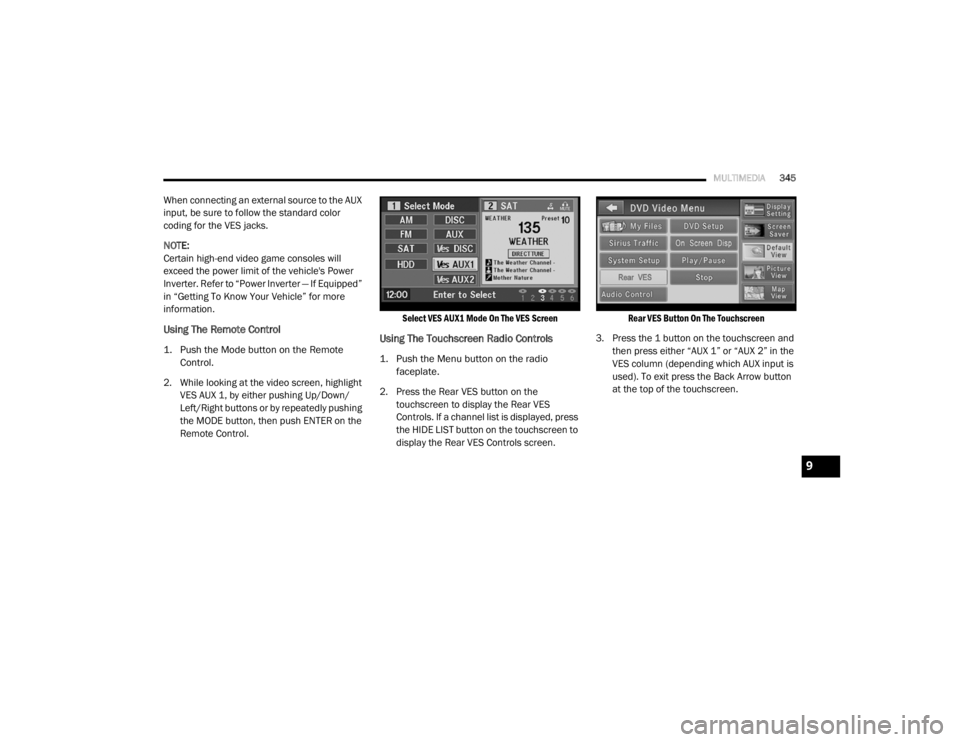
Using The Remote Control
1. Push the Mode button on the Remote
Control.
2. While looking at the video screen, highlight VES AUX 1, by either pushing Up/Down/
Left/Right buttons or by repeatedly pushing
the MODE button, then push ENTER on the
Remote Control.
Select VES AUX1 Mode On The VES Screen
Using The Touchscreen Radio Controls
1. Push the Menu button on the radio
faceplate.
2. Press the Rear VES button on the touchscreen to display the Rear VES
Controls. If a channel list is displayed, press
the HIDE LIST button on the touchscreen to
display the Rear VES Controls screen.
Rear VES Button On The Touchscreen
3. Press the 1 button on the touchscreen and then press either “AUX 1” or “AUX 2” in the
VES column (depending which AUX input is
used). To exit press the Back Arrow button
at the top of the touchscreen.
9
20_RT_OM_EN_USC_t.book Page 345
Page 348 of 380

346MULTIMEDIA
Play A DVD Using The Touchscreen Radio
NOTE:
Headunit DVD player does not play Blu-ray™
Discs.
1. Push the OPEN/CLOSE or LOAD button on
the radio faceplate (Touchscreen).
2. Insert the DVD with the label facing up. The radio automatically selects the appropriate
mode after the disc is recognized and
displays the menu screen or starts playing
the first track.
Using The Remote Control
1. Push the Source button on the Remote Control.
2. Highlight DISC by either pushing Up/Down/ Left/Right buttons or by repeatedly pushing
the Source button, then push “Enter/OK”.
NOTE:
The VES will retain the last setting when turned
off.
Using The Touchscreen Radio Controls
1. Push the Menu button on the radio faceplate.
2. Press the Rear VES button on the touchscreen to display the Rear VES
Controls. If a channel list is displayed, press
the HIDE LIST button on the touchscreen to
display the Rear VES Controls screen.
Rear VES Button On The Touchscreen
3. Press the Disc button on the touchscreen in the Media column. To exit press the Back
Arrow button at the top left of the screen. NOTE:To view a DVD on the radio push the
Radio/Media button on the radio faceplate,
then press the Disc tab button on the
touchscreen and then the View Video button
on the touchscreen.
Viewing a DVD on the Touchscreen radio
screen is not available in all states/prov
-
inces. If available, the vehicle must be
stopped and the gear selector must be in the
PARK position for vehicles with an automatic
transmission. In vehicles with a manual
transmission the parking brake must be
engaged.
Pressing the screen on a Touchscreen radio
while a DVD is playing brings up basic remote
control functions for DVD play such as scene
selection, Play, Pause, FF, RW, and Stop.
Pressing the X in the upper corner will turn off
the remote control screen functions.
20_RT_OM_EN_USC_t.book Page 346