2020 DODGE CHARGER power steering
[x] Cancel search: power steeringPage 270 of 412
268SERVICING AND MAINTENANCE
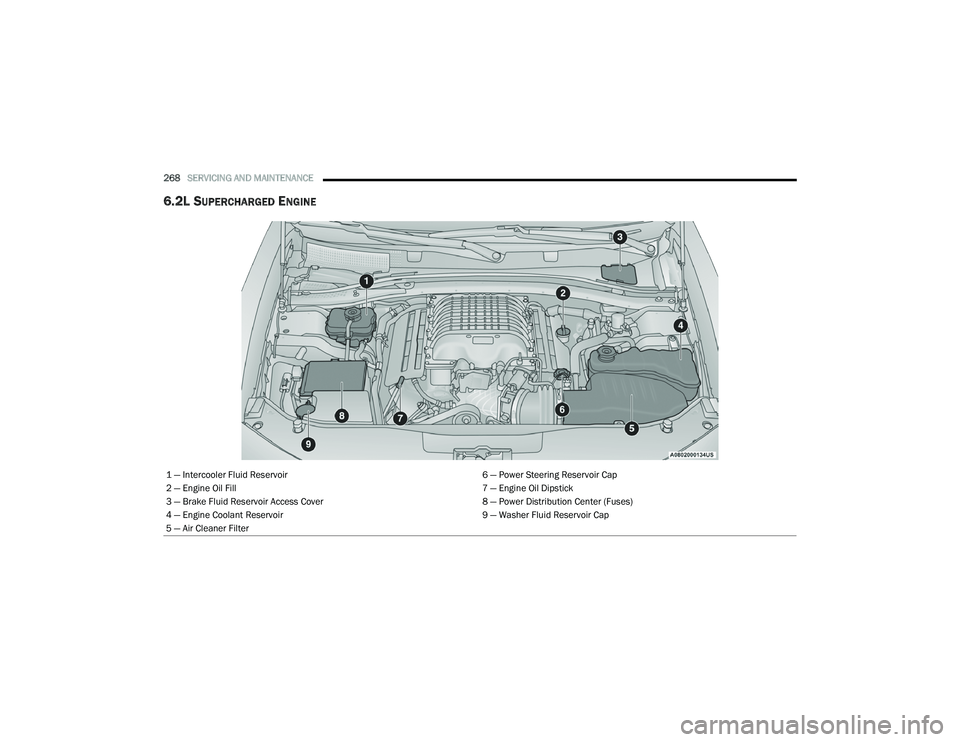
6.2L SUPERCHARGED ENGINE
1 — Intercooler Fluid Reservoir 6 — Power Steering Reservoir Cap
2 — Engine Oil Fill 7 — Engine Oil Dipstick
3 — Brake Fluid Reservoir Access Cover 8 — Power Distribution Center (Fuses)
4 — Engine Coolant Reservoir 9 — Washer Fluid Reservoir Cap
5 — Air Cleaner Filter
20_LD_OM_EN_USC_t.book Page 268
Page 322 of 412

320TECHNICAL SPECIFICATIONS
CHASSIS
Component Fluid, Lubricant, or Genuine Part
Automatic Transmission Use only Mopar ZF 8&9 Speed ATF Automatic Transmission Fluid, or
equivalent. Failure to use the correct fluid may affect the function or
performance of your transmission.
Brake Master Cylinder We recommend you use Mopar DOT 3 brake fluid. If DOT 3 brake fluid is
not available, then DOT 4 is acceptable.
DOT 4 brake fluid must be changed every 24 months. This interval is time
based only, mileage intervals do not apply.
Hydraulic Power Steering Reservoir — If Equipped We recommend you use Mopar Hydraulic System Power Steering Fluid or
equivalent meeting the requirements of FCA Material Standard
MS-10838.
Rear Axle We recommend you use Mopar LSD Synthetic Gear Lubricant SAE
75W85 (API GL-5).
20_LD_OM_EN_USC_t.book Page 320
Page 330 of 412
328MULTIMEDIA
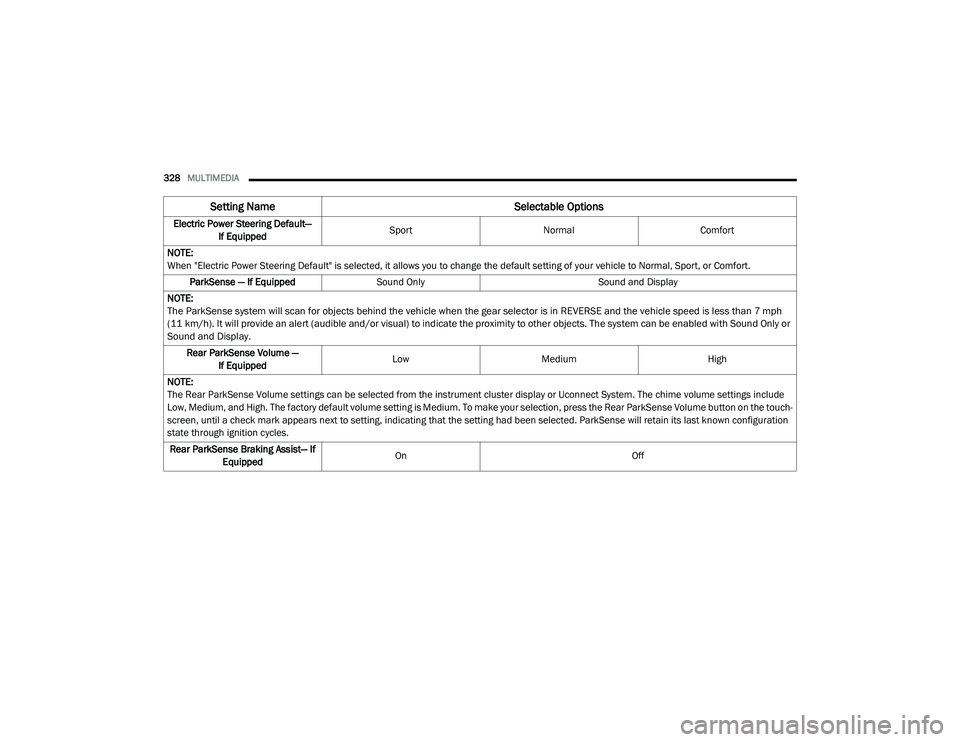
Electric Power Steering Default—
If Equipped Sport
Normal Comfort
NOTE:
When "Electric Power Steering Default" is selected, it allows you to change the default setting of your vehicle to Normal, Sport, or Comfort. ParkSense — If Equipped Sound Only Sound and Display
NOTE:
The ParkSense system will scan for objects behind the vehicle when the gear selector is in REVERSE and the vehicle speed is less than 7 mph
(11 km/h). It will provide an alert (audible and/or visual) to indicate the proximity to other objects. The system can be enabled with Sound Only or
Sound and Display.
Rear ParkSense Volume — If Equipped Low
Medium High
NOTE:
The Rear ParkSense Volume settings can be selected from the instrument cluster display or Uconnect System. The chime volume settings include
Low, Medium, and High. The factory default volume setting is Medium. To make your selection, press the Rear ParkSense Volume button on the touch -
screen, until a check mark appears next to setting, indicating that the setting had been selected. ParkSense will retain its last known configuration
state through ignition cycles.
Rear ParkSense Braking Assist— If Equipped On
Off
Setting Name Selectable Options
20_LD_OM_EN_USC_t.book Page 328
Page 345 of 412
MULTIMEDIA343
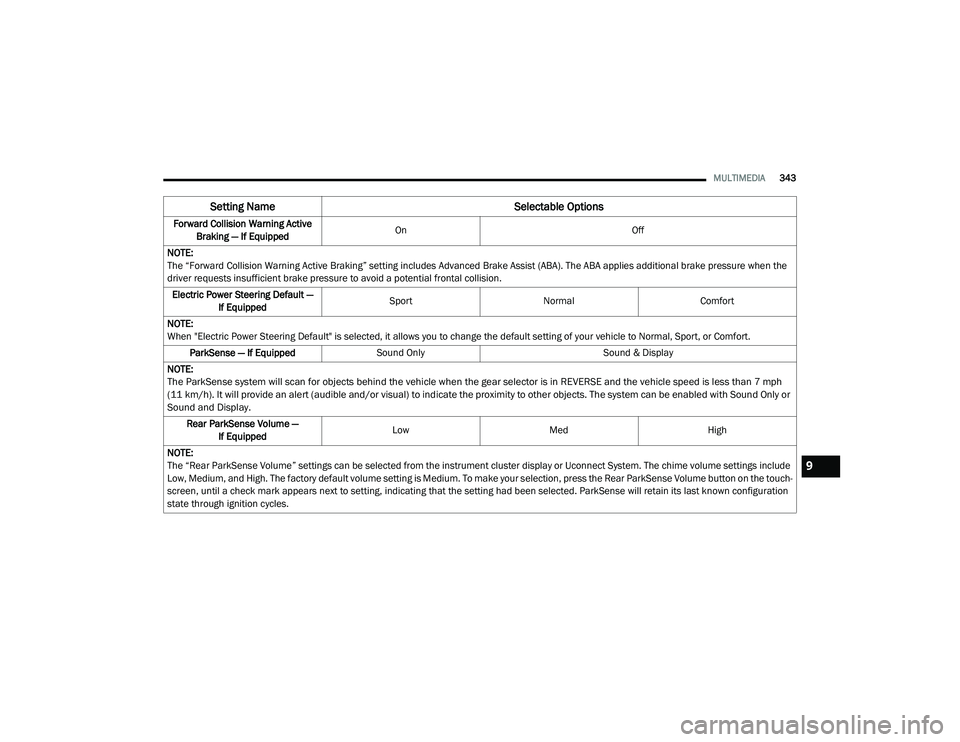
Forward Collision Warning Active
Braking — If Equipped On
Off
NOTE:
The “Forward Collision Warning Active Braking” setting includes Advanced Brake Assist (ABA). The ABA applies additional brake pressure when the
driver requests insufficient brake pressure to avoid a potential frontal collision. Electric Power Steering Default — If Equipped Sport
Normal Comfort
NOTE:
When "Electric Power Steering Default" is selected, it allows you to change the default setting of your vehicle to Normal, Sport, or Comfort. ParkSense — If Equipped Sound Only Sound & Display
NOTE:
The ParkSense system will scan for objects behind the vehicle when the gear selector is in REVERSE and the vehicle speed is less than 7 mph
(11 km/h). It will provide an alert (audible and/or visual) to indicate the proximity to other objects. The system can be enabled with Sound Only or
Sound and Display.
Rear ParkSense Volume — If Equipped Low
Med High
NOTE:
The “Rear ParkSense Volume” settings can be selected from the instrument cluster display or Uconnect System. The chime volume settings include
Low, Medium, and High. The factory default volume setting is Medium. To make your selection, press the Rear ParkSense Volume button on the touch -
screen, until a check mark appears next to setting, indicating that the setting had been selected. ParkSense will retain its last known configuration
state through ignition cycles.
Setting Name Selectable Options
9
20_LD_OM_EN_USC_t.book Page 343
Page 349 of 412
MULTIMEDIA347
NOTE:
When "Driver Door" is programmed with 1st Press Of Key Fob Unlocks, only the driver's door unlocks with the first press of the key fob unlock button.
You must press the key fob unlock button twice to unlock the passengers’ doors. When "All Doors" is selected for 1st Press Of Key Fob Unlocks, all
doors unlock on the first press of the key fob unlock button.
If the vehicle is programmed 1st Press Of Key Fob Unlocks “All Doors,” all doors unlock no matter which Passive Entry equipped door handle is
grasped. If 1st Press Of Key Fob Unlocks “Driver Door” is programmed, only the driver’s door unlocks when the driver’s door is grasped. With Passive
Entry, if 1st Press Of Key Fob Unlocks “Driver Door” is programmed, touching the handle more than once results in only the driver’s door opening.
If “Driver Door” is selected, once the driver door is opened, the interior door lock/unlock switch can be used to unlock all doors (or use key fob).
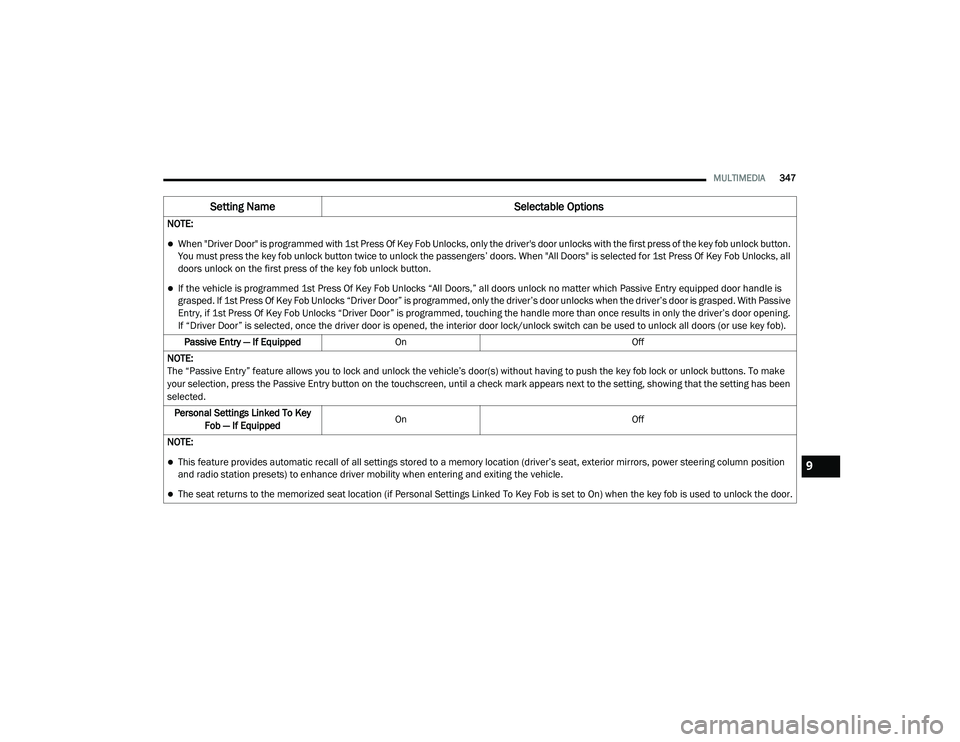
Passive Entry — If Equipped On Off
NOTE:
The “Passive Entry” feature allows you to lock and unlock the vehicle’s door(s) without having to push the key fob lock or unlock buttons. To make
your selection, press the Passive Entry button on the touchscreen, until a check mark appears next to the setting, showing that the setting has been
selected. Personal Settings Linked To Key Fob — If Equipped On
Off
NOTE:
This feature provides automatic recall of all settings stored to a memory location (driver’s seat, exterior mirrors, power steering column position
and radio station presets) to enhance driver mobility when entering and exiting the vehicle.
The seat returns to the memorized seat location (if Personal Settings Linked To Key Fob is set to On) when the key fob is used to unlock the door.
Setting Name Selectable Options
9
20_LD_OM_EN_USC_t.book Page 347
Page 350 of 412
348MULTIMEDIA
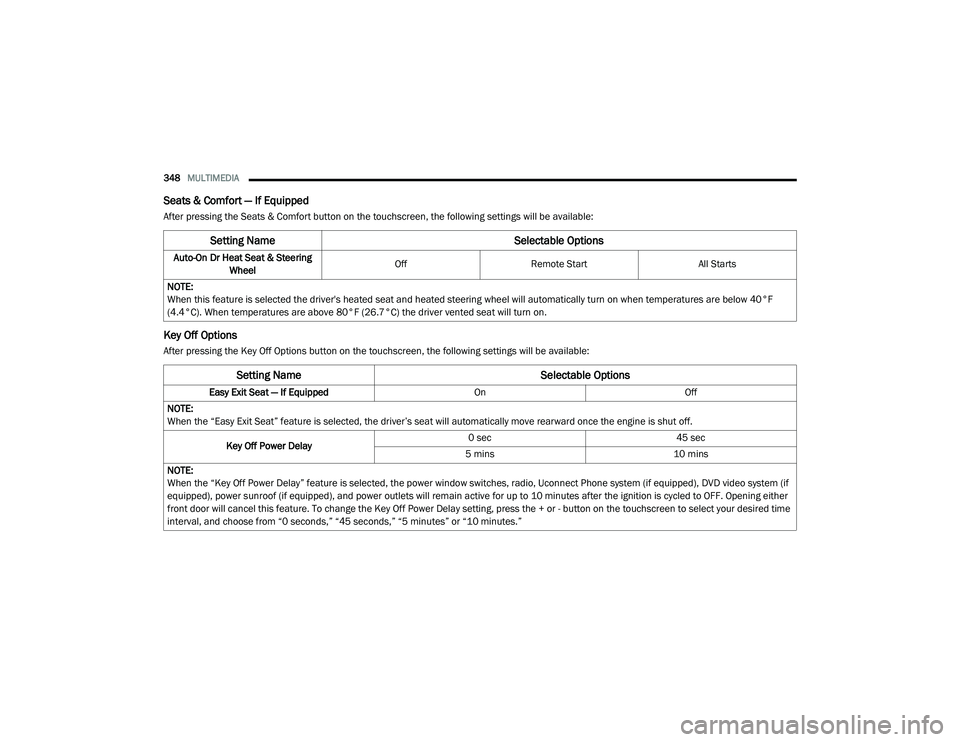
Seats & Comfort — If Equipped
After pressing the Seats & Comfort button on the touchscreen, the following settings will be available:
Key Off Options
After pressing the Key Off Options button on the touchscreen, the following settings will be available:
Setting Name Selectable Options
Auto-On Dr Heat Seat & Steering
Wheel Off
Remote Start All Starts
NOTE:
When this feature is selected the driver's heated seat and heated steering wheel will automatically turn on when temperatures are below 40°F
(4.4°C). When temperatures are above 80°F (26.7°C) the driver vented seat will turn on.
Setting Name Selectable Options
Easy Exit Seat — If EquippedOnOff
NOTE:
When the “Easy Exit Seat” feature is selected, the driver’s seat will automatically move rearward once the engine is shut off.
Key Off Power Delay 0 sec
45 sec
5 mins 10 mins
NOTE:
When the “Key Off Power Delay” feature is selected, the power window switches, radio, Uconnect Phone system (if equipped), DVD video system (if
equipped), power sunroof (if equipped), and power outlets will remain active for up to 10 minutes after the ignition is cycled to OFF. Opening either
front door will cancel this feature. To change the Key Off Power Delay setting, press the + or - button on the touchscreen to select your desired time
interval, and choose from “0 seconds,” “45 seconds,” “5 minutes” or “10 minutes.”
20_LD_OM_EN_USC_t.book Page 348
Page 358 of 412

356MULTIMEDIA
Drag & Drop Menu Bar
The Uconnect features and services in the main
menu bar are easily changed for your
convenience. Simply follow these steps:
Uconnect 4 Main Menu
1. Press the Apps button to open the App screen.
2. Press and hold, then drag the selected App to replace an existing shortcut in the main
menu bar.
The new app shortcut, that was dragged down
onto the main menu bar, will now be an active
App/shortcut.
NOTE:
This feature is only available if the vehicle is in
PARK.
RADIO MODE
Radio Controls
The radio is equipped with the following modes:
AM
FM
SiriusXM® Satellite Radio – If Equipped
Press the Radio button on the touchscreen,
bottom left corner, to enter the Radio Mode. The
different tuner modes, AM, FM, and SXM, can
then be selected by pressing the corresponding
buttons in the Radio mode.
Volume/Power Control
Push the Volume/Power control knob to turn off
the screen and mute the radio. Push the
Volume/Power control knob a second time to
turn the screen back on and unmute the radio.
The electronic volume control turns
continuously (360 degrees) in either direction,
without stopping. Turning the Volume/Power
control knob clockwise increases the volume,
and counterclockwise decreases it. Tune/Scroll Control
When the audio system is turned on, the sound
will be set at the same volume level as last played.
Turn the rotary Tune/Scroll control knob
clockwise to increase or counterclockwise to
decrease the radio station frequency. Push the
Enter/Browse button to choose a selection.
Screen Close
The X button on the touchscreen at the top right,
provides a means to close the Direct Tune
Screen. The Direct Tune Screen also auto
closes if no activity occurs within a few seconds.
Seek And Direct Tune Functions
The Seek Up and Down functions are activated
by pressing the double arrow buttons on the
touchscreen to the right and left of the radio
station display or by pressing the left Steering
Wheel Audio Control up or down.
Seek Up
Press and release the Seek Up button on the
touchscreen to tune the radio to the next
listenable station or channel. During a Seek Up
function, if the radio reaches the starting station
after passing through the entire band two times,
the radio will stop at the station where it began.
20_LD_OM_EN_USC_t.book Page 356
Page 369 of 412
MULTIMEDIA367
number of its apps onto the touchscreen radio
display. Android Auto™ automatically brings you
useful information, and organizes it into simple
cards that appear just when they are needed.
Android Auto™ can be used with Google's
best-in-class speech technology, the steering
wheel controls, the knobs and buttons on your
radio faceplate, and the radio display’s
touchscreen to control many of your apps. To
use Android Auto™, follow the following
procedure:
1. Download the Android Auto™ app from the
Google Play store on your
Android™-powered smartphone.
2. Connect your Android™-powered smartphone to one of the media USB ports
in your vehicle. If the Android Auto™ app
was not downloaded, the first time you plug
your device in, the app will begin to
download.
NOTE:
Be sure to use the factory-provided USB cable
that came with your phone, as aftermarket
cables may not work.
3. Once the device is connected and recognized, the “Phone” icon on the drag & drop menu bar
changes to the Android Auto™ Icon.
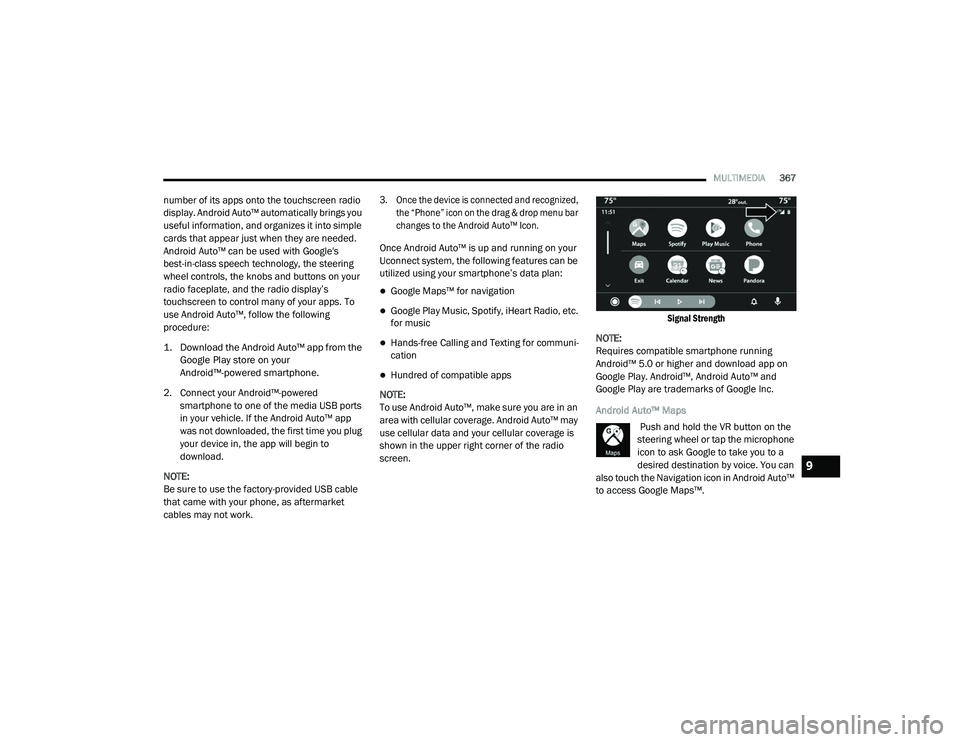
Once Android Auto™ is up and running on your
Uconnect system, the following features can be
utilized using your smartphone’s data plan:
Google Maps™ for navigation
Google Play Music, Spotify, iHeart Radio, etc.
for music
Hands-free Calling and Texting for communi -
cation
Hundred of compatible apps
NOTE:
To use Android Auto™, make sure you are in an
area with cellular coverage. Android Auto™ may
use cellular data and your cellular coverage is
shown in the upper right corner of the radio
screen.
Signal Strength
NOTE:
Requires compatible smartphone running
Android™ 5.0 or higher and download app on
Google Play. Android™, Android Auto™ and
Google Play are trademarks of Google Inc.
Android Auto™ Maps Push and hold the VR button on the
steering wheel or tap the microphone
icon to ask Google to take you to a
desired destination by voice. You can
also touch the Navigation icon in Android Auto™
to access Google Maps™.
9
20_LD_OM_EN_USC_t.book Page 367