2020 DODGE CHARGER tire pressure
[x] Cancel search: tire pressurePage 237 of 412
IN CASE OF EMERGENCY235
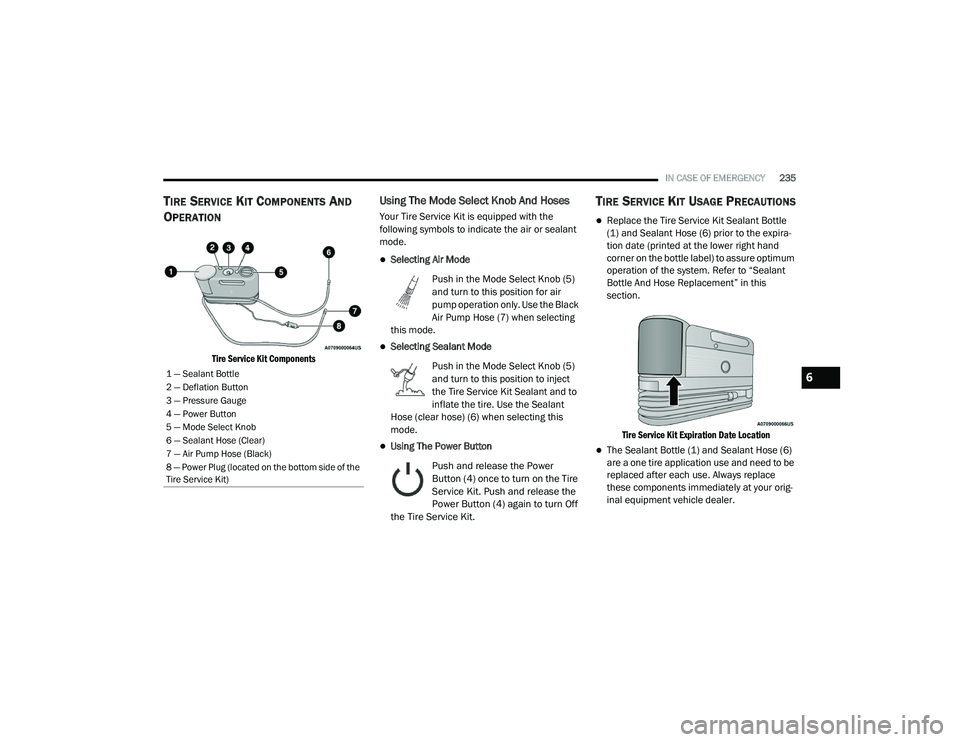
TIRE SERVICE KIT COMPONENTS AND
O
PERATION
Tire Service Kit Components
Using The Mode Select Knob And Hoses
Your Tire Service Kit is equipped with the
following symbols to indicate the air or sealant
mode.
Selecting Air Mode
Push in the Mode Select Knob (5)
and turn to this position for air
pump operation only. Use the Black
Air Pump Hose (7) when selecting
this mode.
Selecting Sealant Mode
Push in the Mode Select Knob (5)
and turn to this position to inject
the Tire Service Kit Sealant and to
inflate the tire. Use the Sealant
Hose (clear hose) (6) when selecting this
mode.
Using The Power Button
Push and release the Power
Button (4) once to turn on the Tire
Service Kit. Push and release the
Power Button (4) again to turn Off
the Tire Service Kit.
TIRE SERVICE KIT USAGE PRECAUTIONS
Replace the Tire Service Kit Sealant Bottle
(1) and Sealant Hose (6) prior to the expira -
tion date (printed at the lower right hand
corner on the bottle label) to assure optimum
operation of the system. Refer to “Sealant
Bottle And Hose Replacement” in this
section.
Tire Service Kit Expiration Date Location
The Sealant Bottle (1) and Sealant Hose (6)
are a one tire application use and need to be
replaced after each use. Always replace
these components immediately at your orig -
inal equipment vehicle dealer.
1 — Sealant Bottle
2 — Deflation Button
3 — Pressure Gauge
4 — Power Button
5 — Mode Select Knob
6 — Sealant Hose (Clear)
7 — Air Pump Hose (Black)
8 — Power Plug (located on the bottom side of the
Tire Service Kit)6
20_LD_OM_EN_USC_t.book Page 235
Page 238 of 412
236IN CASE OF EMERGENCY
(Continued)
When the Tire Service Kit sealant is in a liquid
form, clean water and a damp cloth will
remove the material from the vehicle or tire
and wheel components. Once the sealant
dries, it can easily be peeled off and properly
discarded.
For optimum performance, make sure the
valve stem on the wheel is free of debris
before connecting the Tire Service Kit.
You can use the Tire Service Kit air pump to
inflate bicycle tires. The kit also comes with
two needles, located in the Accessory
Storage Compartment (on the bottom of the
air pump) for inflating sport balls, rafts, or
similar inflatable items. However, use only
the Air Pump Hose (7) and make sure the
Mode Select Knob (5) is in the Air Mode
when inflating such items to avoid injecting
sealant into them. The Tire Service Kit
Sealant is only intended to seal punctures
less than 1/4 inch (6 mm) diameter in the
tread of your tire.
Do not lift or carry the Tire Service Kit by the
hoses.
WARNING!
Do not attempt to seal a tire on the side of
the vehicle closest to traffic. Pull far enough
off the road to avoid the danger of being hit
when using the Tire Service Kit.
Do not use Tire Service Kit or drive the
vehicle under the following circumstances:
If the puncture in the tire tread is
approximately 1/4 inch (6 mm) or
larger.
If the tire has any sidewall damage.
If the tire has any damage from driving
with extremely low tire pressure.
If the tire has any damage from driving
on a flat tire.
If the wheel has any damage.
If you are unsure of the condition of the
tire or the wheel.
Keep Tire Service Kit away from open
flames or heat source.
A loose Tire Service Kit thrown forward in a
collision or hard stop could endanger the
occupants of the vehicle. Always stow the
Tire Service Kit in the place provided.
Failure to follow these warnings can result
in injuries that are serious or fatal to you,
your passengers, and others around you.
Take care not to allow the contents of Tire
Service Kit to come in contact with hair, eyes,
or clothing. Tire Service Kit sealant is
harmful if inhaled, swallowed, or absorbed
through the skin. It causes skin, eye, and
respiratory irritation. Flush immediately with
plenty of water if there is any contact with
eyes or skin. Change clothing as soon as
possible, if there is any contact with clothing.
Tire Service Kit Sealant solution contains
latex. In case of an allergic reaction or rash,
consult a physician immediately. Keep Tire
Service Kit out of reach of children. If swal-
lowed, rinse mouth immediately with plenty of
water and drink plenty of water. Do not induce
vomiting! Consult a physician immediately.
WARNING! (Continued)
20_LD_OM_EN_USC_t.book Page 236
Page 240 of 412
238IN CASE OF EMERGENCY
3. The Sealant Bottle (1) may be empty due to
previous use. Call for assistance.
NOTE:
If the Mode Select Knob (5) is on Air Mode and
the pump is operating, air will dispense from the
Air Pump Hose (7) only, not the Sealant Hose
(6).
If the sealant (white fluid) does flow through the
Sealant Hose (6):
1. Continue to operate the pump until sealant is no longer flowing through the hose
(typically takes 30 - 70 seconds). As the
sealant flows through the Sealant Hose (6),
the Pressure Gauge (3) can read as high as
70 psi (4.8 Bar). The Pressure Gauge (3)
will decrease quickly from approximately
70 psi (4.8 Bar) to the actual tire pressure
when the Sealant Bottle (1) is empty.
2. The pump will start to inject air into the tire immediately after the Sealant Bottle (1) is
empty. Continue to operate the pump and
inflate the tire to the pressure indicated on
the tire pressure label on the driver-side
latch pillar (recommended pressure). Check
the tire pressure by looking at the Pressure
Gauge (3). If the tire does not inflate to at least 26 psi (1.8
Bar) pressure within 15 minutes:
The tire is too badly damaged. Do not attempt
to drive the vehicle further. Call for assis
-
tance.
NOTE:
If the tire becomes overinflated, push the Defla-
tion Button (2) to reduce the tire pressure to the
recommended inflation pressure before
continuing.
If the tire inflates to the recommended pressure
or is at least 26 psi (1.8 Bar) pressure within
15 minutes:
1. Push the Power Button (4) to turn off the Tire Service Kit.
2. Remove the Speed Limit sticker from the top of the Sealant Bottle (1) and place the
sticker on the instrument panel.
3. Immediately disconnect the Sealant Hose (6) from the valve stem, reinstall the cap on
the fitting at the end of the hose, and place
the Tire Service Kit in the vehicle storage
location. Quickly proceed to (D) “Drive
Vehicle.”
(D) Drive Vehicle:
Immediately after injecting sealant and inflating
the tire, drive the vehicle 5 miles (8 km) or
10 minutes to ensure distribution of the Tire
Service Kit Sealant within the tire. Do not
exceed 50 mph (80 km/h).
CAUTION!
The metal end fitting from Power Plug (8)
may get hot after use, so it should be
handled carefully.
Failure to reinstall the cap on the fitting at the
end of the Sealant Hose (6) can result in
sealant contacting your skin, clothing, and the
vehicle’s interior. It can also result in sealant
contacting internal Tire Service Kit components
which may cause permanent damage to the kit.
WARNING!
Tire Service Kit is not a permanent flat tire repair.
Have the tire inspected and repaired or replaced
after using Tire Service Kit. Do not exceed
50 mph (80 km/h) until the tire is repaired or
replaced. Failure to follow this warning can result
in injuries that are serious or fatal to you, your
passengers, and others around you.
20_LD_OM_EN_USC_t.book Page 238
Page 241 of 412

IN CASE OF EMERGENCY239
(E) After Driving:
Pull over to a safe location. Refer to “(A)
Whenever You Stop To Use Tire Service Kit”
before continuing.
1. Push in the Mode Select Knob (5) and turn
to the Air Mode position.
2. Uncoil the power plug and insert the plug into the vehicle's 12 Volt power outlet.
3. Uncoil the Air Pump Hose (7) (black in color) and screw the fitting at the end of hose (7)
onto the valve stem.
4. Check the pressure in the tire by reading the Pressure Gauge (3).
If tire pressure is less than 19 psi (1.3 Bar):
The tire is too badly damaged. Do not attempt to
drive the vehicle further. Call for assistance.
If the tire pressure is 19 psi (1.3 Bar) or higher:
1. Push the Power Button (4) to turn on Tire Service Kit and inflate the tire to the
pressure indicated on the tire and loading
information label on the driver-side door
opening.
NOTE:
If the tire becomes over-inflated, push the
Deflation Button (2) to reduce the tire pressure
to the recommended inflation pressure before
continuing.
2. Disconnect the Tire Service Kit from the
valve stem, reinstall the cap on the valve
stem and unplug from 12 Volt outlet.
3. Place the Tire Service Kit in its proper storage area in the vehicle.
4. Have the tire inspected and repaired or replaced at the earliest opportunity at an
authorized dealer or tire service center.
5. Remove the Speed Limit sticker from the instrument panel after the tire has been
repaired.
6. Replace the Sealant Bottle (1) and Sealant Hose (6) assembly at an authorized dealer
as soon as possible. Refer to “(F) Sealant
Bottle And Hose Replacement”.
NOTE:
When having the tire serviced, advise the autho -
rized dealer or service center that the tire has
been sealed using the Tire Service Kit.
(F) Sealant Bottle And Hose Replacement:
1. Uncoil the Sealant Hose (6) (clear in color).
2. Locate the round Sealant Bottle release button in the recessed area under the
sealant bottle.
3. Push the Sealant Bottle release button. The Sealant Bottle (1) will pop up. Remove the
bottle and dispose of it accordingly.
4. Clean any remaining sealant from the Tire Service Kit housing.
5. Position the new Sealant Bottle (1) in the housing so that the Sealant Hose (6) aligns
with the hose slot in the front of the
housing. Push the bottle into the housing.
An audible click will be heard indicating the
bottle is locked into place.
6. Verify that the cap is installed on the fitting at the end of the Sealant Hose (6) and
return the hose to its storage area (located
on the bottom of the air pump).
7. Return the Tire Service Kit to its storage location in the vehicle.
6
20_LD_OM_EN_USC_t.book Page 239
Page 252 of 412
250
SERVICING AND MAINTENANCE
SCHEDULED SERVICING
3.6L AND 5.7L ENGINES
These vehicles are equipped with an automatic
oil change indicator system. The oil change
indicator system will remind you that it is time to
take your vehicle in for scheduled maintenance.
Based on engine operation conditions, the oil
change indicator message will illuminate. This
means that service is required for your vehicle.
Operating conditions such as frequent
short-trips, trailer tow, and extremely hot or cold
ambient temperatures will influence when the
“Change Oil” or “Oil Change Required” message
is displayed. Severe Operating Conditions can
cause the change oil message to illuminate as
early as 3,500 miles (5,600 km) since last
reset. Have your vehicle serviced as soon as
possible, within the next 500 miles (805 km).
The “Oil Change Required” message will be
displayed in the instrument cluster and a single
chime will sound, indicating that an oil change
is necessary.An authorized dealer will reset the oil change
indicator message after completing the
scheduled oil change. If a scheduled oil change
is performed by someone other than an
authorized dealer, the message can be reset by
referring to “Instrument Cluster Display” in
“Getting To Know Your Instrument Panel” for
further information.
NOTE:
Under no circumstances should oil change
intervals exceed 10,000 miles (16,000 km),
12 months or 350 hours of engine run time,
whichever comes first. The 350 hours of engine
run or idle time is generally only a concern for
fleet customers.
Severe Duty All Models
Change Engine Oil at 4,000 miles (6,500 km) or
350 hours of engine run time if the vehicle is
operated in a dusty and off-road environment,
or is operated predominantly at idle or only very
low engine RPM. This type of vehicle use is
considered Severe Duty.
Once A Month Or Before A Long Trip:
Check engine oil level.
Check windshield washer fluid level.
Check tire pressure and look for unusual
wear or damage. Rotate tires at the first sign
of irregular wear, even if it occurs before your
next scheduled service.
Check the fluid levels of the coolant reservoir,
brake master cylinder, and power steering
(if equipped) and fill as needed.
Check function of all interior and exterior
lights.
Maintenance Plan — 3.6L And 5.7L
Required Maintenance Intervals:
Refer to the maintenance schedules on the
following page for the required maintenance
intervals. More frequent maintenance may be
needed in severe conditions, such as dusty
areas and very short trip driving. In some
extreme conditions, additional maintenance
not specified in the maintenance schedule may
be required.
20_LD_OM_EN_USC_t.book Page 250
Page 257 of 412
SERVICING AND MAINTENANCE255
An authorized dealer will reset the oil change
indicator message after completing the
scheduled oil change. If a scheduled oil change
is performed by someone other than an
authorized dealer, the message can be reset by
referring to the steps described under
“Instrument Cluster Display” in “Getting To
Know Your Instrument Panel” for further
information.
At Each Stop For Fuel
Check the engine oil level. Refer to “Engine
Compartment” in this chapter for further
information.
Check the windshield washer solvent and
add if required. Once A Month
Check tire pressure and look for unusual
wear or damage.
Inspect the battery, and clean and tighten the
terminals as required.
Check the fluid levels of the coolant reservoir,
brake master cylinder, and power steering
(6.2L only), and add as needed.
Check all lights and other electrical items for
correct operation.
At Each Oil Change
Change the engine oil filter.
Inspect the brake hoses and lines.
Inspect the CV/Universal joints.
CAUTION!
Failure to perform the required maintenance
items may result in damage to the vehicle.
7
20_LD_OM_EN_USC_t.book Page 255
Page 283 of 412

SERVICING AND MAINTENANCE281
Coolant Checks
Check engine coolant (antifreeze) protection
every 12 months (before the onset of freezing
weather, where applicable). If the engine
coolant (antifreeze) is dirty, the system should
be drained, flushed, and refilled with fresh OAT
coolant (conforming to MS.90032) by an
authorized dealer. Check the front of the
radiator for any accumulation of bugs, leaves,
etc. If dirty, clean by gently spraying water from
a garden hose vertically down the face of the
condenser.
Check the coolant recovery bottle tubing for
brittle rubber, cracking, tears, cuts, and
tightness of the connection at the bottle and
radiator. Inspect the entire system for leaks. DO
NOT REMOVE THE COOLANT PRESSURE CAP
WHEN THE COOLING SYSTEM IS HOT.
Cooling System — Drain, Flush And Refill
NOTE:
Some vehicles require special tools to add
coolant properly. Failure to fill these systems
properly could lead to severe internal engine
damage. If any coolant is needed to be added to
the system please contact an authorized
dealer. If the engine coolant (antifreeze) is dirty or
contains visible sediment, have an authorized
dealer clean and flush with OAT coolant
(antifreeze) (conforming to MS.90032).
NOTE:
If equipped with the 6.2L Supercharged engine
the intercooler must be vacuum flushed and
filled. If any coolant is needed to be added to
the system please contact an local authorized
dealer.
Refer to the “Maintenance Plan” in this section
for the proper maintenance intervals.
Selection Of Coolant
Refer to “Fluids And Lubricants” in “Technical
Specifications” for further information.
NOTE:
Mixing of engine coolant (antifreeze) other
than specified Organic Additive Technology
(OAT) engine coolant (antifreeze), may result
in engine damage and may decrease corro
-
sion protection. Organic Additive Technology
(OAT) engine coolant is different and should
not be mixed with Hybrid Organic Additive
Technology (HOAT) engine coolant (anti -
freeze) or any “globally compatible” coolant (antifreeze). If a non-OAT engine coolant
(antifreeze) is introduced into the cooling
system in an emergency, the cooling system
will need to be drained, flushed, and refilled
with fresh OAT coolant (conforming to
MS.90032), by an authorized dealer as soon
as possible.
Do not use water alone or alcohol-based
engine coolant (antifreeze) products. Do not
use additional rust inhibitors or antirust prod
-
ucts, as they may not be compatible with the
radiator engine coolant and may plug the
radiator.
This vehicle has not been designed for use
with propylene glycol-based engine coolant
(antifreeze). Use of propylene glycol-based
engine coolant (antifreeze) is not recom -
mended.
Some vehicles require special tools to add
coolant properly. Failure to fill these systems
properly could lead to severe internal engine
damage. If any coolant is needed to be added
to the system please contact an authorized
dealer.
7
20_LD_OM_EN_USC_t.book Page 281
Page 288 of 412

286SERVICING AND MAINTENANCE
Fluid And Filter Changes — Eight-Speed
Transmission
Under normal operating conditions, the fluid
installed at the factory will provide satisfactory
lubrication for the life of the vehicle.
Routine fluid and filter changes are not
required. However, change the fluid and filter if
the fluid becomes contaminated (with water,
etc.), or if the transmission is disassembled for
any reason.
REAR AXLE
For normal service, periodic fluid level checks
are not required. When the vehicle is serviced
for other reasons the exterior surfaces of the
axle assembly should be inspected. If gear oil
leakage is suspected inspect the fluid level.
Refer to “Fluids And Lubricants” in “Technical
Specifications” for further information.
RAISING THE VEHICLE
In the case where it is necessary to raise the
vehicle, go to an authorized dealer or service
station.
TIRES
TIRE SAFETY INFORMATION
Tire safety information will cover aspects of the
following information: Tire Markings, Tire
Identification Numbers, Tire Terminology and
Definitions, Tire Pressures, and Tire Loading.
Tire Markings
Tire Markings
CAUTION!
If a transmission fluid leak occurs, visit an
authorized dealer immediately. Severe
transmission damage may occur. An
authorized dealer has the proper tools to
adjust the fluid level accurately.
1 — US DOT Safety Standards Code
(TIN)
2 — Size Designation
3 — Service Description
4 — Maximum Load
5 — Maximum Pressure
6 — Treadwear, Traction and
Temperature Grades
20_LD_OM_EN_USC_t.book Page 286