2020 DODGE CHARGER spare wheel
[x] Cancel search: spare wheelPage 234 of 412

232IN CASE OF EMERGENCY
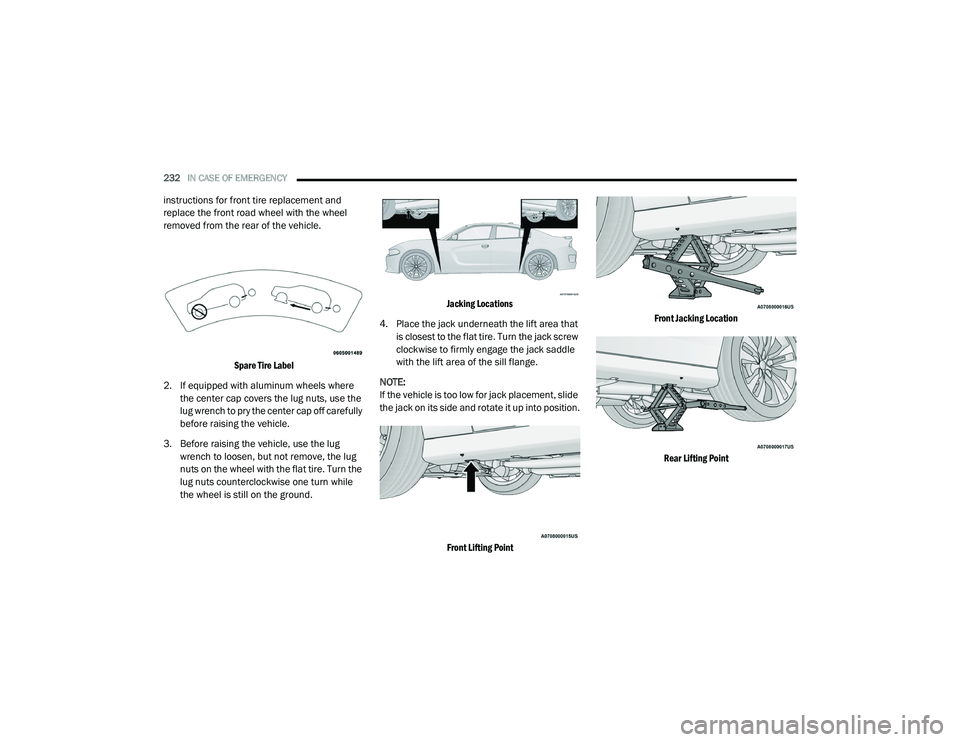
instructions for front tire replacement and
replace the front road wheel with the wheel
removed from the rear of the vehicle.
Spare Tire Label
2. If equipped with aluminum wheels where the center cap covers the lug nuts, use the
lug wrench to pry the center cap off carefully
before raising the vehicle.
3. Before raising the vehicle, use the lug wrench to loosen, but not remove, the lug
nuts on the wheel with the flat tire. Turn the
lug nuts counterclockwise one turn while
the wheel is still on the ground.
Jacking Locations
4. Place the jack underneath the lift area that is closest to the flat tire. Turn the jack screw
clockwise to firmly engage the jack saddle
with the lift area of the sill flange.
NOTE:
If the vehicle is too low for jack placement, slide
the jack on its side and rotate it up into position.
Front Lifting Point Front Jacking Location
Rear Lifting Point
20_LD_OM_EN_USC_t.book Page 232
Page 235 of 412

IN CASE OF EMERGENCY233
Rear Jacking Location
5. Raise the vehicle just enough to remove the flat tire and install the spare tire.
6. Remove the lug nuts and tire.
7. Mount the spare tire.
Mounting Spare Tire
NOTE:
For vehicles that are equipped, do not
attempt to install a center cap or wheel cover
on the compact spare.
Refer to “Tires” in “Servicing And Mainte -
nance” for additional warnings, cautions, and
information about the spare tire, its use, and
operation. 8. Install the lug nuts with the cone shaped
end of the lug nut toward the wheel. Lightly
tighten the lug nuts.
9. Lower the vehicle to the ground by turning the jack handle counterclockwise.
10. Finish tightening the lug nuts. Push down on the wrench while at the end of the handle
for increased leverage. Tighten the lug nuts
in a star pattern until each nut has been
tightened twice. Refer to “Wheel And Tire
Torque Specifications” in “Technical
Specifications” for proper lug nut torque.
11. Stow the wheel chocks, jack, tools and flat tire. Make sure the base of the jack faces
the front of the vehicle before tightening
down the fastener.
WARNING!
Raising the vehicle higher than necessary can
make the vehicle less stable. It could slip off
the jack and hurt someone near it. Raise the
vehicle only enough to remove the tire.
CAUTION!
Be sure to mount the spare tire with the valve
stem facing outward. The vehicle could be
damaged if the spare tire is mounted
incorrectly.
WARNING!
To avoid the risk of forcing the vehicle off the
jack, do not tighten the wheel nuts fully until
the vehicle has been lowered. Failure to
follow this warning may result in serious
injury.
6
20_LD_OM_EN_USC_t.book Page 233
Page 236 of 412

234IN CASE OF EMERGENCY
ROAD TIRE INSTALLATION
1. Mount the road tire on the axle.
2. Install the remaining lug nuts with the cone
shaped end of the nut toward the wheel.
Lightly tighten the lug nuts. 3. Lower the vehicle to the ground by turning
the jack handle counterclockwise.
4. Refer to “Wheel And Tire Torque Specifi -
cations” in “Technical Specifications” for
proper lug nut torque.
5. After 25 miles (40 km), check the lug nut torque with a torque wrench to ensure that
all lug nuts are properly seated against the
wheel.TIRE SERVICE KIT — IF EQUIPPED
Small punctures up to 1/4 inch (6 mm) in the
tire tread can be sealed with Tire Service Kit.
Foreign objects (e.g., screws or nails) should not
be removed from the tire. Tire Service Kit can be
used in outside temperatures down to
approximately -4°F (-20°C). This kit will provide a temporary tire seal,
allowing you to drive your vehicle up to
100 miles (160 km) with a maximum speed of
50 mph (80 km/h).
TIRE SERVICE KIT STORAGE
The Tire Service Kit is located in the trunk.
Tire Service Kit Location
WARNING!
A loose tire or jack thrown forward in a collision
or hard stop could endanger the occupants of
the vehicle. Always stow the jack parts and the
spare tire in the places provided. Have the
deflated (flat) tire repaired or replaced
immediately.
WARNING!
To avoid the risk of forcing the vehicle off the
jack, do not tighten the wheel nuts fully until
the vehicle has been lowered. Failure to
follow this warning may result in serious
injury.
20_LD_OM_EN_USC_t.book Page 234
Page 299 of 412

SERVICING AND MAINTENANCE297
NOTE:
Wheel valve stem must be replaced as well
when installing new tires due to wear and tear
in existing tires.
Keep dismounted tires in a cool, dry place with
as little exposure to light as possible. Protect
tires from contact with oil, grease, and gasoline.
Replacement Tires
The tires on your new vehicle provide a balance
of many characteristics. They should be
inspected regularly for wear and correct cold
tire inflation pressures. The manufacturer
strongly recommends that you use tires
equivalent to the originals in size, quality and
performance when replacement is needed. Refer to the paragraph on “Tread Wear
Indicators” in this section. Refer to the Tire and
Loading Information placard or the Vehicle
Certification Label for the size designation of
your tire. The Load Index and Speed Symbol for
your tire will be found on the original equipment
tire sidewall.
See the Tire Sizing Chart example found in the
“Tire Safety Information” section of this manual
for more information relating to the Load Index
and Speed Symbol of a tire.
It is recommended to replace the two front tires
or two rear tires as a pair. Replacing just one tire
can seriously affect your vehicle’s handling. If
you ever replace a wheel, make sure that the
wheel’s specifications match those of the
original wheels.
It is recommended you contact an authorized
tire dealer or original equipment dealer with any
questions you may have on tire specifications or
capability. Failure to use equivalent
replacement tires may adversely affect the
safety, handling, and ride of your vehicle.
WARNING!
Tires and the spare tire should be replaced
after six years, regardless of the remaining
tread. Failure to follow this warning can result
in sudden tire failure. You could lose control
and have a collision resulting in serious injury
or death.
WARNING!
Do not use a tire, wheel size, load rating, or
speed rating other than that specified for
your vehicle. Some combinations of unap
-
proved tires and wheels may change suspen -
sion dimensions and performance
characteristics, resulting in changes to
steering, handling, and braking of your
vehicle. This can cause unpredictable
handling and stress to steering and suspen -
sion components. You could lose control and
have a collision resulting in serious injury or
death. Use only the tire and wheel sizes with
load ratings approved for your vehicle.
Never use a tire with a smaller load index or
capacity, other than what was originally
equipped on your vehicle. Using a tire with
a smaller load index could result in tire
overloading and failure. You could lose
control and have a collision.
Failure to equip your vehicle with tires
having adequate speed capability can
result in sudden tire failure and loss of
vehicle control.
7
20_LD_OM_EN_USC_t.book Page 297
Page 301 of 412

SERVICING AND MAINTENANCE299
Refer to the “Towing Requirements - Tires” in
“Starting And Operating” for restrictions when
towing with a spare tire designated for
temporary emergency use.
Spare Tire Matching Original Equipped Tire
And Wheel — If Equipped
Your vehicle may be equipped with a spare tire
and wheel equivalent in look and function to the
original equipment tire and wheel found on the
front or rear axle of your vehicle. This spare tire
may be used in the tire rotation for your vehicle.
If your vehicle has this option, refer to an
authorized tire dealer for the recommended tire
rotation pattern.
Compact Spare Tire — If Equipped
The compact spare is for temporary emergency
use only. You can identify if your vehicle is
equipped with a compact spare by looking at
the spare tire description on the Tire and
Loading Information Placard located on the
driver’s side door opening or on the sidewall of
the tire. Compact spare tire descriptions begin
with the letter “T” or “S” preceding the size
designation. Example: T145/80D18 103M.
T, S = Temporary Spare Tire Since this tire has limited tread life, the original
equipment tire should be repaired (or replaced)
and reinstalled on your vehicle at the first
opportunity.
Do not install a wheel cover or attempt to mount
a conventional tire on the compact spare wheel,
since the wheel is designed specifically for the
compact spare tire. Do not install more than
one compact spare tire and wheel on the
vehicle at any given time.
Collapsible Spare Tire — If Equipped
The collapsible spare is for temporary emergency
use only. You can identify if your vehicle is
equipped with a collapsible spare by looking at
the spare tire description on the Tire and Loading
Information Placard located on the driver’s side
door opening or on the sidewall of the tire.
Collapsible spare tire description example:
165/80-17 101P.
Since this tire has limited tread life, the original
equipment tire should be repaired (or replaced)
and reinstalled on your vehicle at the first
opportunity.
Inflate collapsible tire only after the wheel is
properly installed to the vehicle. Inflate the
collapsible tire using the electric air pump
before lowering the vehicle.
Do not install a wheel cover or attempt to mount
a conventional tire on the collapsible spare
wheel, since the wheel is designed specifically
for the collapsible spare tire.
WARNING!
Compact and collapsible spares are for
temporary emergency use only. With these
spares, do not drive more than 50 mph
(80 km/h). Temporary use spares have
limited tread life. When the tread is worn to
the tread wear indicators, the temporary use
spare tire needs to be replaced. Be sure to
follow the warnings, which apply to your
spare. Failure to do so could result in spare
tire failure and loss of vehicle control.
7
20_LD_OM_EN_USC_t.book Page 299
Page 302 of 412

300SERVICING AND MAINTENANCE
Full Size Spare — If Equipped
The full size spare is for temporary emergency
use only. This tire may look like the originally
equipped tire on the front or rear axle of your
vehicle, but it is not. This spare tire may have
limited tread life. When the tread is worn to the
tread wear indicators, the temporary use full
size spare tire needs to be replaced. Since it is
not the same as your original equipment tire,
replace (or repair) the original equipment tire
and reinstall on the vehicle at the first
opportunity.
Limited Use Spare — If Equipped
The limited use spare tire is for temporary
emergency use only. This tire is identified by a
label located on the limited use spare wheel.
This label contains the driving limitations for
this spare. This tire may look like the original
equipped tire on the front or rear axle of your
vehicle, but it is not. Installation of this limited
use spare tire affects vehicle handling. Since it
is not the same as your original equipment tire,
replace (or repair) the original equipment tire
and reinstall on the vehicle at the first
opportunity.
WHEEL AND WHEEL TRIM CARE
All wheels and wheel trim, especially aluminum and
chrome plated wheels, should be cleaned regularly
using mild (neutral Ph) soap and water to maintain
their luster and to prevent corrosion. Wash wheels
with the same soap solution recommended for the
body of the vehicle and remember to always wash
when the surfaces are not hot to the touch.
Your wheels are susceptible to deterioration
caused by salt, sodium chloride, magnesium
chloride, calcium chloride, etc., and other road
chemicals used to melt ice or control dust on dirt
roads. Use a soft cloth or sponge and mild soap
to wipe away promptly. Do not use harsh
chemicals or a stiff brush. They can damage the
wheel’s protective coating that helps keep them
from corroding and tarnishing.
WARNING!
Compact and Collapsible spares are for
temporary emergency use only. With these
spares, do not drive more than 50 mph
(80 km/h). Temporary use spares have
limited tread life. When the tread is worn to
the tread wear indicators, the temporary use
spare tire needs to be replaced. Be sure to
follow the warnings, which apply to your
spare. Failure to do so could result in spare
tire failure and loss of vehicle control.
WARNING!
Limited use spares are for emergency use
only. Installation of this limited use spare tire
affects vehicle handling. With this tire, do not
drive more than the speed listed on the
limited use spare wheel. Keep inflated to the
cold tire inflation pressures listed on your Tire
and Loading Information Placard located on
the driver’s side B-pillar or the rear edge of
the driver’s side door. Replace (or repair) the
original equipment tire at the first opportunity
and reinstall it on your vehicle. Failure to do
so could result in loss of vehicle control.
CAUTION!
Avoid products or automatic car washes that
use acidic solutions or strong alkaline additives
or harsh brushes. Many aftermarket wheel
cleaners and automatic car washes may
damage the wheel's protective finish. Such
damage is not covered by the New Vehicle
Limited Warranty. Only car wash soap, Mopar
Wheel Cleaner or equivalent is recommended.
20_LD_OM_EN_USC_t.book Page 300
Page 398 of 412

396 Autostick Operation
.................................................. 172AUX Cord........................................................ 383Aux Mode....................................................... 365Auxiliary Electrical Outlet (Power Outlet).......... 78AWDTowing....................................................... 249Axle Fluid........................... 315, 317, 318, 320Axle Lubrication................. 315, 317, 318, 320
B
Back-Up......................................................... 199Battery.................................................... 96, 271Charging System Light................................. 96Keyless Key Fob Replacement.................... 15Location.................................................... 271Belts, Seat..................................................... 156BluetoothConnect Or Disconnect Link Between the Uconnect Phone And Mobile Phone
...... 381Connecting To A Particular Mobile Phone Or Audio Device After Pairing................376Bluetooth Mode............................................. 366Body Mechanism Lubrication........................ 277B-Pillar Location............................................. 290Brake Assist System...................................... 107Brake Control System.................................... 107Brake Fluid...............284, 315, 317, 318, 320
Brake System...................................... 284, 308Fluid Check.......... 284, 315, 317, 318, 320Master Cylinder........................................ 284Parking..................................................... 164Warning Light.....................................95, 308Brake/Transmission Interlock...................... 167Break-In Recommendations, New Vehicle.... 163Brightness, Interior Lights................................ 50Bulb Replacement........................................ 217Bulbs, Light.......................................... 157, 217
C
Camera, Rear................................................ 199Capacities, Fluid.................................. 313, 314Caps, FillerOil (Engine)...................................... 266, 274Radiator (Coolant Pressure)..................... 282Car Washes................................................... 305Carbon Monoxide Warning................... 155, 312CargoVehicle Loading........................................ 202Cargo Area Cover............................................. 70Cargo Compartment........................................ 70Cellular Phone.............................................. 383Certification Label......................................... 202Chains, Tire.......................................... 301, 302Changing A Flat Tire...................................... 286Chart, Tire Sizing........................................... 287
Check Engine Light (Malfunction
Indicator Light).............................................. 105Checking Your Vehicle For Safety.................. 155Checks, Safety.............................................. 155Child Restraint.............................................. 143Child RestraintsBooster Seats........................................... 145Child Seat Installation............................... 152How To Stow An unused ALR Seat Belt..... 150Infant And Child Restraints....................... 144Lower Anchors And Tethers For Children.. 147Older Children And Child Restraints.......... 145Seating Positions...................................... 146Child Safety Locks............................................30Clean Air Gasoline......................................... 310CleaningWheels...................................................... 300Climate Control................................................52Automatic....................................................57Manual........................................................53Coin Holder......................................................76Cold Weather Operation................................ 162Compact Spare Tire...................................... 299ConsoleFloor............................................................76Contract, Service........................................... 392Cooling Pressure Cap (Radiator Cap)............ 282
20_LD_OM_EN_USC_t.book Page 396
Page 404 of 412

402 Operating Instructions
............................... 129Pregnant Women...................................... 132Pretensioners............................................ 132Rear Seat.................................................. 127Reminder.................................................. 126Seat Belt Extender.................................... 131Seat Belt Pretensioner.............................. 132Untwisting Procedure................................ 130Seat Belts Maintenance................................ 306Seats................................................. 32, 34, 36Adjustment........................................... 32, 34Easy Entry................................................... 35Head Restraints................................... 38, 39Heated........................................................ 36Height Adjustment....................................... 34Power.......................................................... 34Rear Folding......................................... 32, 33Seatback Release................................ 32, 33Tilting................................................... 32, 34Vented......................................................... 37Ventilated.................................................... 37Security Alarm.......................................... 24, 98Arm The System.......................................... 24Selection Of Coolant (Antifreeze)......... 315, 318Sentry KeyKey Programming........................................ 23Sentry Key (Immobilizer).................................. 22Sentry Key Replacement.......................... 17, 23Service Assistance......................................... 391Service Contract............................................ 392
Service Manuals........................................... 394Shifting......................................................... 165Automatic Transmission.................. 165, 167Shoulder Belts.............................................. 127Side View Mirror Adjustment............................ 43Signals, Turn................................. 48, 103, 157Siri................................................................ 388Sirius Satellite Radio..................................... 358Favorites................................................... 360Replay...................................................... 359SiriusXM Satellite RadioBrowse in SXM......................................... 360Favorites................................................... 360Replay...................................................... 359Snow Chains (Tire Chains)................... 301, 302Snow Tires.................................................... 298Spare Tires........................ 230, 298, 299, 300Spark Plugs.......................................... 315, 318SpecificationsFuel (Gasoline)................................ 315, 318Oil.................................................... 315, 318Speed ControlAccel/Decel..................................... 176, 177Accel/Decel (ACC Only)............................. 181Cancel...................................................... 177Resume.................................................... 177Set............................................................ 176Speed Control (Cruise Control)............ 175, 177Sport Mode................................................... 174
Starting......................................................... 159Automatic Transmission........................... 159Button..........................................................18Cold Weather............................................ 162Engine Fails To Start................................. 162Starting And Operating.................................. 159Starting Procedures...................................... 159Steering...........................................................40Column Lock................................................40Power........................................................ 174Tilt Column...................................................40Wheel, Heated.............................................41Wheel, Tilt....................................................40Steering Wheel Audio Controls...................... 382Steering Wheel Mounted Sound
System Controls............................................ 382Storage.................................................. 76, 304Storage, Vehicle..................................... 63, 304Store Radio Presets...................................... 357Storing Your Vehicle...................................... 304Stuck, Freeing............................................... 244Sun Roof...................................................66, 68Sunglasses Storage.........................................79Supplemental Restraint System – Air Bag.... 135Synthetic Engine Oil...................................... 274
T
Telescoping Steering Column...........................40Temperature Control, Automatic (ATC).............62Tilt Steering Column.........................................40
20_LD_OM_EN_USC_t.book Page 402