2020 DODGE CHALLENGER warning
[x] Cancel search: warningPage 40 of 396

38GETTING TO KNOW YOUR VEHICLE
HEATED STEERING WHEEL — IF
E
QUIPPED
The steering wheel contains a heating element
that helps warm your hands in cold weather.
The heated steering wheel has only one
temperature setting. Once the heated steering
wheel has been turned on, it will stay on for an
average of 80 minutes before automatically
shutting off. This time will vary based on
environmental temperatures. The heated
steering wheel can shut off early or may not turn
on when the steering wheel is already warm.
The heated steering wheel control button is
located within the Uconnect system. You can
gain access to the control button through the
climate screen or the controls screen.
Press the heated steering wheel button
once to turn the heating element on.
Press the heated steering wheel button a
second time to turn the heating element off. NOTE:
The engine must be running for the heated
steering wheel to operate.
Vehicles Equipped With Remote Start
On models that are equipped with remote start,
the heated steering wheel can be programmed
to come on during a remote start through the
Uconnect system. Refer to “Uconnect Settings”
in “Multimedia” for further information.
MIRRORS
AUTOMATIC DIMMING MIRROR
The mirror head can be adjusted up, down, left,
and right for various drivers. The mirror should
be adjusted to center on the view through the
rear window.
This mirror automatically adjusts for headlight
glare from vehicles behind you.
NOTE:
The Automatic Dimming feature is disabled
when the vehicle is in REVERSE to improve rear
view viewing.
The Automatic Dimming feature can be turned
on or off through the touchscreen.
Press the mirror dimmer button once to turn
the feature on. The soft key button will illumi
-
nate when activated.
Press the mirror dimmer button a second
time to turn the feature off, and the soft key
button will no longer be illuminated.
WARNING!
Persons who are unable to feel pain to the
skin because of advanced age, chronic
illness, diabetes, spinal cord injury, medica -
tion, alcohol use, exhaustion, or other phys -
ical conditions must exercise care when
using the steering wheel heater. It may
cause burns even at low temperatures,
especially if used for long periods.
Do not place anything on the steering wheel
that insulates against heat, such as a
blanket or steering wheel covers of any type
and material. This may cause the steering
wheel heater to overheat.
20_LA_OM_EN_USC_t.book Page 38
Page 41 of 396

GETTING TO KNOW YOUR VEHICLE39
Automatic Dimming Mirror
OUTSIDE MIRRORS
To receive maximum benefit, adjust the outside
mirror(s) to center on the adjacent lane of traffic
and a slight overlap of the view obtained from
the inside mirror.
NOTE:
The passenger side convex outside mirror will
give a much wider view to the rear, and espe -
cially of the lane next to your vehicle.
POWER MIRRORS
The power mirror controls are located on the
driver's door trim panel.
Power Mirror Control
The power mirror controls consist of mirror
select buttons and a four-way mirror control
switch. To adjust a mirror, push either the
L (left) or R (right) button to select the mirror
that you want to adjust.
NOTE:
A light in the select button will illuminate indi
-
cating the mirror is activated and can be
adjusted.
Using the mirror control switch, push on any of
the four arrows for the direction that you want
the mirror to move.
HEATED MIRRORS — IF EQUIPPED
These mirrors are heated to melt frost
or ice. This feature will be activated
whenever you turn on the rear window
defroster (if equipped). Refer to “Climate
Controls” in this chapter for further information.
CAUTION!
To avoid damage to the mirror during
cleaning, never spray any cleaning solution
directly onto the mirror. Apply the solution
onto a clean cloth and wipe the mirror clean.
WARNING!
Vehicles and other objects seen in an outside
convex mirror will look smaller and farther
away than they really are. Relying too much
on side convex mirrors could cause you to
collide with another vehicle or other object.
Use your inside mirror when judging the size
or distance of a vehicle seen in a side convex
mirror.
1 — Mirror Adjustment
2 — Left Mirror Selection
3 — Right Mirror Selection
2
20_LA_OM_EN_USC_t.book Page 39
Page 43 of 396

GETTING TO KNOW YOUR VEHICLE41
MULTIFUNCTION LEVER
The multifunction lever controls the operation
of the turn signals, headlight beam selection
and passing lights. The multifunction lever is
located on the left side of the steering column.
Multifunction Lever
DAYTIME RUNNING LIGHTS (DRLS) — IF
E
QUIPPED
The Daytime Running Lights will turn on when
the engine is started and will remain on unless
the headlamps are turned to the on position,
the parking brake is applied, or the ignition is
placed in the OFF position. NOTE:
If allowed by law in the country in which the
vehicle was purchased, the Daytime Running
Lights can be turned on and off using the
Uconnect System, refer to “Uconnect
Settings” in “Multimedia” for further
information.
On some vehicles, the Daytime Running
Lights may deactivate, or reduce intensity, on
one side of the vehicle (when a turn signal is
activated on that side), or on both sides of
the vehicle (when the hazard warning lights
are activated).
HIGH/LOW BEAM SWITCH
Push the multifunction lever away from you to
switch the headlights to high beam. Pull the
multifunction lever toward you to switch the
headlights back to low beam.
AUTOMATIC HIGH BEAM HEADLAMP
C
ONTROL — IF EQUIPPED
The Automatic High Beam Headlamp Control
system provides increased forward lighting at
night by automating high beam control through
the use of a digital camera mounted on the
windshield. This camera detects vehicle specific light and automatically switches from
high beams to low beams until the approaching
vehicle is out of view.
NOTE:
The Automatic High Beam Headlamp Control
can be turned on or off using the Uconnect
System. Refer to “Uconnect Settings” in
“Multimedia” for further information.
Broken, muddy, or obstructed headlights and
taillights of vehicles in the field of view will
cause headlights to remain on longer (closer
to the vehicle). Also, dirt, film, and other
obstructions on the windshield or camera
lens will cause the system to function improp
-
erly.
To opt out of the Advanced Auto High-Beam
Sensitivity Control (default) and enter
Reduced High-Beam Sensitivity Control (not
recommended), toggle the high beam lever
six full on/off cycles within 10 seconds of
placing the ignition in the ON position. The
system will return to the default setting upon
placing the ignition in the OFF position.
If the windshield or Automatic High Beam
Headlamp Control mirror is replaced, the mirror
must be re-aimed to ensure proper
performance. See a local authorized dealer.
2
20_LA_OM_EN_USC_t.book Page 41
Page 47 of 396

GETTING TO KNOW YOUR VEHICLE45
WINDSHIELD WIPERS AND WASHERS
The multifunction lever operates the windshield
wipers and washer when the ignition is placed
in the ACC or ON/RUN position. The
multifunction lever is located on the left side of
the steering column.
Windshield Wiper/Washer Control
WIPER OPERATION
Rotate the end of the multifunction lever to the
first detent, past the intermittent settings for
low-speed wiper operation, or to the second
detent past the intermittent settings for
high-speed wiper operation.
Intermittent Wiper System
Use the intermittent wiper when weather
conditions make a single wiping cycle with a
variable pause between cycles desirable.
Rotate the end of the multifunction lever to the
first detent position, and then turn the end of
the lever to select the desired delay interval. There are four delay settings, which allow you to
regulate the wipe interval from a minimum of
one cycle every second to a maximum of
approximately 36 seconds between cycles. The
delay intervals will double in duration when the
vehicle speed is 10 mph (16 km/h) or less.
Windshield Washers
To use the washer, push the multifunction lever
inward (toward the steering column) and hold it
for as long as washer spray is desired.
If you activate the washer while the windshield
wiper control is in the delay range, the wipers
will operate for two wipe cycles after releasing
the lever and then resume the intermittent
interval previously selected.
If you activate the washer while the windshield
wiper is turned off, the wipers will operate for
three wipe cycles and then turn off.
CAUTION!
Turn the windshield wipers off when driving
through an automatic car wash. Damage to
the windshield wipers may result if the
wiper control is left in any position other
than off.
In cold weather, always turn off the wiper
switch and allow the wipers to return to the
park position before turning off the engine.
If the wiper switch is left on and the wipers
freeze to the windshield, damage to the
wiper motor may occur when the vehicle is
restarted.
Always remove any buildup of snow that
prevents the windshield wiper blades from
returning to the off position. If the wind
-
shield wiper control is turned off and the
blades cannot return to the off position,
damage to the wiper motor may occur.
WARNING!
Sudden loss of visibility through the
windshield could lead to a collision. You might
not see other vehicles or other obstacles. To
avoid sudden icing of the windshield during
freezing weather, warm the windshield with
the defroster before and during windshield
washer use.
2
20_LA_OM_EN_USC_t.book Page 45
Page 57 of 396

GETTING TO KNOW YOUR VEHICLE55
(Continued)
Auto-Down Feature
The driver and, in some models, passenger
power window switches have an Auto-Down
feature. Push the window switch to the second
detent, release, and the window will go down
automatically.
To open the window part way, push the window
switch to the first detent and release it when
you want the window to stop. To stop the window from going all the way down
during the Auto-Down operation, pull up on the
switch briefly.
WIND BUFFETING
Wind buffeting can be described as the
perception of pressure on the ears or a
helicopter-type sound in the ears. Your vehicle
may exhibit wind buffeting with the windows
down, or the sunroof (if equipped) in certain
open or partially open positions. This is a normal
occurrence and can be minimized. If the
buffeting occurs with the rear windows open,
open the front and rear windows together to
minimize the buffeting. If the buffeting occurs
with the sunroof open, adjust the sunroof
opening to minimize the buffeting or open any
window.
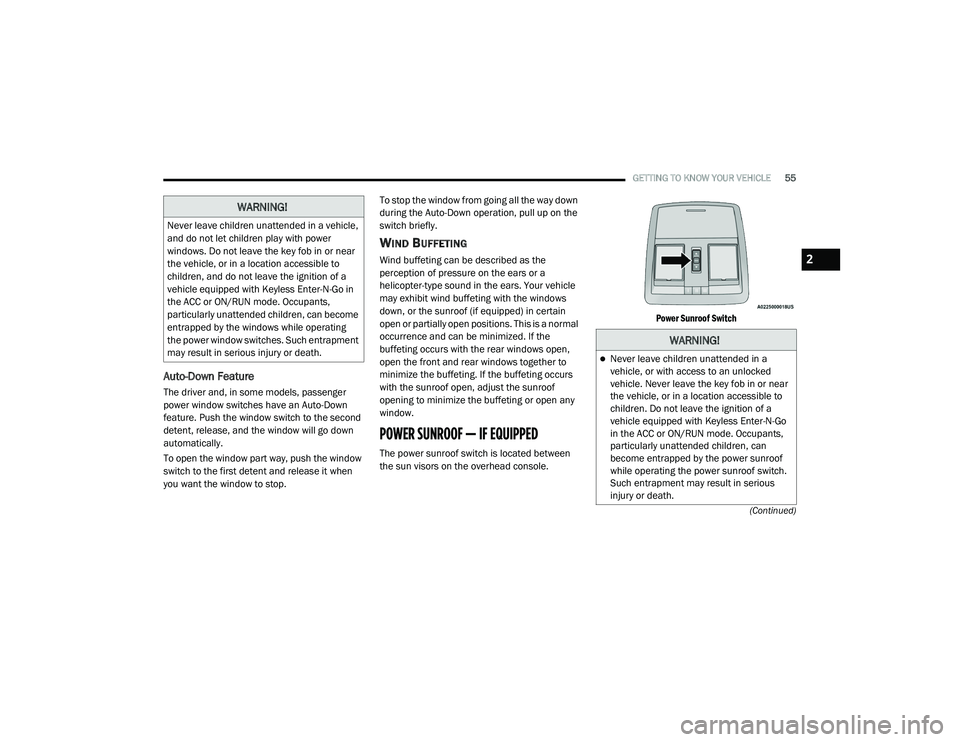
POWER SUNROOF — IF EQUIPPED
The power sunroof switch is located between
the sun visors on the overhead console.
Power Sunroof Switch
WARNING!
Never leave children unattended in a vehicle,
and do not let children play with power
windows. Do not leave the key fob in or near
the vehicle, or in a location accessible to
children, and do not leave the ignition of a
vehicle equipped with Keyless Enter-N-Go in
the ACC or ON/RUN mode. Occupants,
particularly unattended children, can become
entrapped by the windows while operating
the power window switches. Such entrapment
may result in serious injury or death.
WARNING!
Never leave children unattended in a
vehicle, or with access to an unlocked
vehicle. Never leave the key fob in or near
the vehicle, or in a location accessible to
children. Do not leave the ignition of a
vehicle equipped with Keyless Enter-N-Go
in the ACC or ON/RUN mode. Occupants,
particularly unattended children, can
become entrapped by the power sunroof
while operating the power sunroof switch.
Such entrapment may result in serious
injury or death.
2
20_LA_OM_EN_USC_t.book Page 55
Page 58 of 396

56GETTING TO KNOW YOUR VEHICLE
OPENING SUNROOF
Express
Push the switch rearward and release it within
one-half second, the sunroof and sunshade will
open automatically and stop at full open
position. During Express Open operation, any
other actuation of the sunroof switches will stop
the sunroof in a partially open position.
Manual Mode
Push and hold the switch rearward, the sunroof
and sunshade will open and automatically stop
at full open position. Releasing the switch while
the sunroof is in motion will stop the sunroof in
a partially open position. Vent Open
Push and release the Vent switch within one
half second and the sunroof will open to the
vent position. During Express Vent operation,
any other actuation of the sunroof switches will
stop the sunroof operation.
CLOSING SUNROOF
Express
Push the switch forward and release it within
one-half second and the sunroof will close
automatically from any position. During Express
Close operation, any other actuation of the
sunroof switches will stop the sunroof in a
partially open position.
Manual Mode
Push and hold the switch forward and the
sunroof will close from any position and stop at
a full closed position. Releasing the switch while
the sunroof is in motion will stop the sunroof in
a partially open position.
WIND BUFFETING
Wind buffeting can be described as the
perception of pressure on the ears or a
helicopter-type sound in the ears. Your vehicle
may exhibit wind buffeting with the windows
down, or the sunroof (if equipped) in certain open or partially open positions. This is a normal
occurrence and can be minimized. If the
buffeting occurs with the rear windows open,
then open the front and rear windows together
to minimize the buffeting. If the buffeting occurs
with the sunroof open, adjust the sunroof
opening to minimize the buffeting or open any
window.
SUNSHADE OPERATION
The sunshade can be opened manually.
However, the sunshade will open automatically
as the sunroof opens.
NOTE:
The sunshade cannot be closed if the sunroof is
open.
PINCH PROTECT FEATURE
This feature will detect an obstruction in the
closing of the sunroof during the Express Close
operation. If an obstruction in the path of the
sunroof is detected, the sunroof will
automatically retract. Remove the obstruction if
this occurs.
In a collision, there is a greater risk of being
thrown from a vehicle with an open sunroof.
You could also be seriously injured or killed.
Always fasten your seat belt properly and
make sure all passengers are also properly
secured.
Do not allow small children to operate the
sunroof. Never allow your fingers, other
body parts, or any object, to project through
the sunroof opening. Injury may result.
WARNING!
(Continued)
20_LA_OM_EN_USC_t.book Page 56
Page 59 of 396

GETTING TO KNOW YOUR VEHICLE57
NOTE:
If three consecutive sunroof close attempts
result in Pinch Protect reversals, Pinch Protect
will disable and the sunroof must be closed in
Manual Mode.
SUNROOF MAINTENANCE
Use only a non-abrasive cleaner and a soft cloth
to clean the glass panel. Periodically check for
and clear out any debris that may have
collected in the tracks.
IGNITION OFF OPERATION
NOTE:
The power sunroof switch can remain active
in Accessory Delay for up to approximately
10 minutes after the vehicle’s ignition is
placed to the OFF position. Opening either
front door will cancel this feature.
This feature is programmable using the Ucon -
nect System. Refer to “Uconnect Settings” in
“Multimedia” for further information.
HOOD
TO OPEN THE HOOD
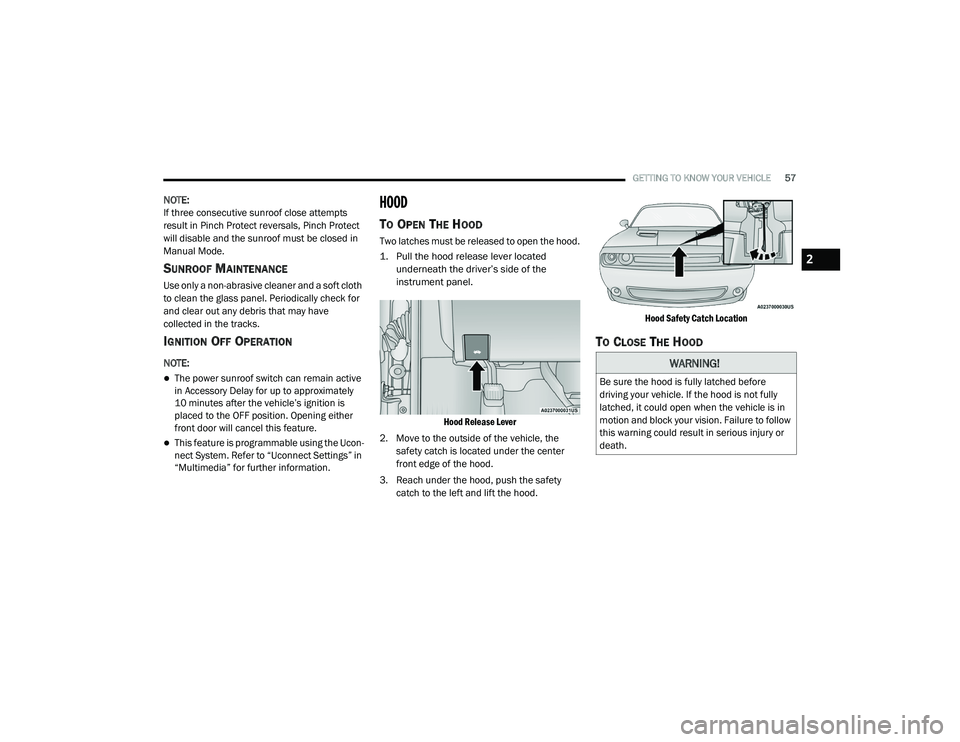
Two latches must be released to open the hood.
1. Pull the hood release lever located
underneath the driver’s side of the
instrument panel.
Hood Release Lever
2. Move to the outside of the vehicle, the safety catch is located under the center
front edge of the hood.
3. Reach under the hood, push the safety catch to the left and lift the hood.
Hood Safety Catch Location
TO CLOSE THE HOOD
WARNING!
Be sure the hood is fully latched before
driving your vehicle. If the hood is not fully
latched, it could open when the vehicle is in
motion and block your vision. Failure to follow
this warning could result in serious injury or
death.
2
20_LA_OM_EN_USC_t.book Page 57
Page 61 of 396

GETTING TO KNOW YOUR VEHICLE59
NOTE:
Before closing the trunk lid make sure your key
fob isn’t inside the trunk area. The trunk will
latch then automatically unlock if the key fob is
sensed, not allowing the key fob to be locked in
the trunk area.
TRUNK SAFETY
Trunk Emergency Release
As a security measure, a trunk internal
emergency release lever is built into the trunk
latching mechanism. In the event of an
individual being locked inside the trunk, the
trunk can be opened by actuating the
glow-in-the-dark handle attached to the trunk
latching mechanism.
Trunk Emergency Release
GARAGE DOOR OPENER — IF EQUIPPED
HomeLink® replaces up to three hand-held
transmitters that operate devices such as
garage door openers, motorized gates, lighting,
or home security systems. The HomeLink® unit
is powered by your vehicle’s battery.
The HomeLink® buttons that are located in the
overhead console designate the three different
HomeLink® channels. The HomeLink®
indicator is located on the left side of the first
button.
HomeLink® Buttons
NOTE:
HomeLink® is disabled when the Vehicle
Security Alarm is active.BEFORE YOU BEGIN PROGRAMMING
H
OMELINK®
Be sure that your vehicle is parked outside of
the garage before you begin programming.
For more efficient programming and accurate
transmission of the radio-frequency signal it is
recommended that a new battery be placed in
the hand-held transmitter of the device that is
being programmed to the HomeLink® system.
WARNING!
Do not allow children to have access to the
trunk, either by climbing into the trunk from
outside, or through the inside of the vehicle.
Always close the trunk lid when your vehicle is
unattended. Once in the trunk, young children
may not be able to escape, even if they
entered through the rear seat. If trapped in
the trunk, children can die from suffocation
or heat stroke.
2
20_LA_OM_EN_USC_t.book Page 59