2020 DODGE CHALLENGER light
[x] Cancel search: lightPage 43 of 396

GETTING TO KNOW YOUR VEHICLE41
MULTIFUNCTION LEVER
The multifunction lever controls the operation
of the turn signals, headlight beam selection
and passing lights. The multifunction lever is
located on the left side of the steering column.
Multifunction Lever
DAYTIME RUNNING LIGHTS (DRLS) — IF
E
QUIPPED
The Daytime Running Lights will turn on when
the engine is started and will remain on unless
the headlamps are turned to the on position,
the parking brake is applied, or the ignition is
placed in the OFF position. NOTE:
If allowed by law in the country in which the
vehicle was purchased, the Daytime Running
Lights can be turned on and off using the
Uconnect System, refer to “Uconnect
Settings” in “Multimedia” for further
information.
On some vehicles, the Daytime Running
Lights may deactivate, or reduce intensity, on
one side of the vehicle (when a turn signal is
activated on that side), or on both sides of
the vehicle (when the hazard warning lights
are activated).
HIGH/LOW BEAM SWITCH
Push the multifunction lever away from you to
switch the headlights to high beam. Pull the
multifunction lever toward you to switch the
headlights back to low beam.
AUTOMATIC HIGH BEAM HEADLAMP
C
ONTROL — IF EQUIPPED
The Automatic High Beam Headlamp Control
system provides increased forward lighting at
night by automating high beam control through
the use of a digital camera mounted on the
windshield. This camera detects vehicle specific light and automatically switches from
high beams to low beams until the approaching
vehicle is out of view.
NOTE:
The Automatic High Beam Headlamp Control
can be turned on or off using the Uconnect
System. Refer to “Uconnect Settings” in
“Multimedia” for further information.
Broken, muddy, or obstructed headlights and
taillights of vehicles in the field of view will
cause headlights to remain on longer (closer
to the vehicle). Also, dirt, film, and other
obstructions on the windshield or camera
lens will cause the system to function improp
-
erly.
To opt out of the Advanced Auto High-Beam
Sensitivity Control (default) and enter
Reduced High-Beam Sensitivity Control (not
recommended), toggle the high beam lever
six full on/off cycles within 10 seconds of
placing the ignition in the ON position. The
system will return to the default setting upon
placing the ignition in the OFF position.
If the windshield or Automatic High Beam
Headlamp Control mirror is replaced, the mirror
must be re-aimed to ensure proper
performance. See a local authorized dealer.
2
20_LA_OM_EN_USC_t.book Page 41
Page 44 of 396

42GETTING TO KNOW YOUR VEHICLE
FLASH-TO-PASS
You can signal another vehicle with your
headlights by lightly pulling the multifunction
lever toward you. This will turn on the high beam
headlights until the lever is released.
NOTE:
If the multifunction lever is held in the flash-to
pass position for more than 20 seconds, the
high beams will shut off.
AUTOMATIC HEADLIGHTS
This system automatically turns the headlights
on or off according to ambient light levels. To
turn the system on, rotate the headlight switch
counterclockwise to the AUTO position. When
the system is on, the headlight time delay
feature is also on. This means the headlights
will stay on for up to 90 seconds after you place
the ignition into the OFF position. The headlight
time delay can be programmed 0/30/60/
90 seconds.
Refer to “Uconnect Settings” in “Multimedia”
for further information.
To turn the automatic system off, move the
headlight switch out of the AUTO position. NOTE:
The engine must be running before the head
-
lights will come on in the automatic mode.
PARKING LIGHTS
Turn the headlight switch knob to the first
detent to turn the parking lights on. This also
turns on all instrument panel lighting.
HEADLIGHTS ON WITH WIPERS
When this feature is active, the headlights will
turn on after the wipers are turned on if the
headlight switch is placed in the AUTO position
and the programmable feature is set to on. In
addition, the headlights will turn off when the
wipers are turned off if they were turned on by
this feature.
NOTE:
The “Headlights On With Wipers” feature can be
turned on or off using the Uconnect System.
Refer to “Uconnect Settings” in “Multimedia”
for further information.
HEADLIGHT TIME DELAY
This feature provides the safety of headlight
illumination for up to 90 seconds when leaving
your vehicle in an unlit area with the headlight
switch in the O (off) position. To activate the delay feature, place the ignition
in the OFF position while the headlights are still
on. Then, turn off the headlights within 45
seconds. The delay interval begins when the
headlight switch is turned off.
NOTE:
The lights must be turned off within 45 seconds
of placing the ignition in the OFF position to acti
-
vate this feature.
If you turn the headlights, park lights or ignition
switch ON again, the system will cancel the
delay.
If you turn the headlights off before the ignition,
they will turn off in the normal manner.
NOTE:
The Headlight Time Delay is programmable
using the Uconnect System, refer to “Uconnect
Settings” in “Multimedia” for further
information.
LIGHTS-ON REMINDER
If the headlights or parking lights are on after
the ignition is placed in the OFF position, a
chime will sound to alert the driver when the
driver's door is opened.
20_LA_OM_EN_USC_t.book Page 42
Page 45 of 396

GETTING TO KNOW YOUR VEHICLE43
FOG LIGHTS — IF EQUIPPED
The front fog light switch is built into the
headlight switch.
Fog Light Switch
To activate the front fog lights, turn on the
parking lights or the low beam headlights and
push the headlight switch. To turn off the front
fog lights, either push the headlight switch a
second time or turn off the headlight switch.
An indicator light in the instrument cluster
display illuminates when the fog lights are
turned on. NOTE:
The fog lights will operate with the low beam
headlights or parking lights on. However,
selecting the high beam headlights will turn off
the fog lights.
TURN SIGNALS
Move the multifunction lever up or down and
the arrows on each side of the instrument
cluster display flash to show proper operation of
the front and rear turn signal lights.
NOTE:
If either light remains on and does not flash,
or there is a very fast flash rate, check for a
defective outside light bulb. If an indicator
fails to light when the lever is moved, it would
suggest that the indicator bulb is defective.
A “Turn Signal On” message will appear in
the instrument cluster display and a contin
-
uous chime will sound if the vehicle is driven
more than 1 mile (1.6 km) with either turn
signal on.
LANE CHANGE ASSIST — IF EQUIPPED
Tap the multifunction lever up or down once,
without moving beyond the detent, and the turn
signal (right or left) will flash three times then
automatically turn off.
INTERIOR LIGHTS
The interior lights come on when a door is
opened.
To protect the battery, the interior lights will turn
off automatically 10 minutes after the ignition is
placed in the OFF position. This will occur if the
interior lights were switched on manually or are
on because a door is open. The Battery
Protection also includes the glove compartment
light and the trunk light. To restore interior light
operation after automatic battery protection is
enabled (lights off), either place the ignition in
the ON/RUN position or cycle the light switch.
MAP/READING LIGHTS
These lights are mounted between the sun
visors on the overhead console. Each light is
turned on by pushing the lens. Push the lens a
second time to turn off the light.
2
20_LA_OM_EN_USC_t.book Page 43
Page 46 of 396

44GETTING TO KNOW YOUR VEHICLE
These lights also turn on when a door is opened,
when the unlock button on the remote keyless
entry key fob is pushed, or when the dimmer
control is turned fully upward, to the second
detent.
Map/Reading Lights
AMBIENT LIGHT — IF EQUIPPED
The overhead console is equipped with an
ambient light feature. This light casts
illumination for improved visibility of the floor
and center console area. Rotate the right dimmer control upward or
downward to increase or decrease the
brightness of the door handle lights, map
pocket lights, and ambient light located in the
overhead console.
Door Handle/Ambient Light Dimmer
DIMMER CONTROLS
The dimmer control is part of the headlight
switch and is located on the left side of the
instrument panel.
With the parking lights or headlights on, rotating
the left dimmer control upward will increase the
brightness of the instrument panel lights and
lighted cupholders (if equipped).
Instrument Panel Dimmer
Dome Light Position
Rotate the dimmer control completely upward
to the second detent to turn on the interior
lights. The interior lights will remain on when the
dimmer control is in this position.
Interior Light Defeat (Off)
Rotate the instrument panel dimmer control to
the extreme bottom (O) off position. The interior
lights will remain off when the doors are open.
Parade Mode (Daytime Brightness Feature)
Rotate the instrument panel dimmer control
upward to the first detent. This feature
brightens all text displays such as the
odometer, instrument cluster display, and radio
when the parking lights or headlights are on.
20_LA_OM_EN_USC_t.book Page 44
Page 53 of 396

GETTING TO KNOW YOUR VEHICLE51
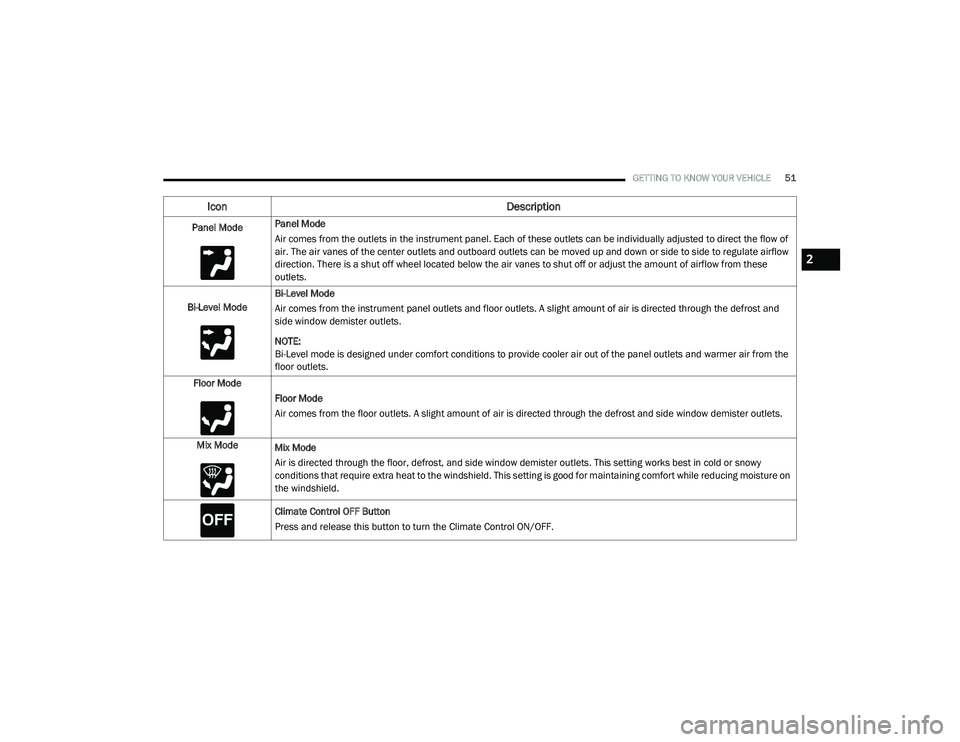
Panel ModePanel Mode
Air comes from the outlets in the instrument panel. Each of these outlets can be individually adjusted to direct the flow of
air. The air vanes of the center outlets and outboard outlets can be moved up and down or side to side to regulate airflow
direction. There is a shut off wheel located below the air vanes to shut off or adjust the amount of airflow from these
outlets.
Bi-Level Mode Bi-Level Mode
Air comes from the instrument panel outlets and floor outlets. A slight amount of air is directed through the defrost and
side window demister outlets.
NOTE:
Bi-Level mode is designed under comfort conditions to provide cooler air out of the panel outlets and warmer air from the
floor outlets.
Floor Mode Floor Mode
Air comes from the floor outlets. A slight amount of air is directed through the defrost and side window demister outlets.
Mix Mode Mix Mode
Air is directed through the floor, defrost, and side window demister outlets. This setting works best in cold or snowy
conditions that require extra heat to the windshield. This setting is good for maintaining comfort while reducing moisture on
the windshield.
Climate Control OFF Button
Press and release this button to turn the Climate Control ON/OFF.
Icon Description
2
20_LA_OM_EN_USC_t.book Page 51
Page 61 of 396

GETTING TO KNOW YOUR VEHICLE59
NOTE:
Before closing the trunk lid make sure your key
fob isn’t inside the trunk area. The trunk will
latch then automatically unlock if the key fob is
sensed, not allowing the key fob to be locked in
the trunk area.
TRUNK SAFETY
Trunk Emergency Release
As a security measure, a trunk internal
emergency release lever is built into the trunk
latching mechanism. In the event of an
individual being locked inside the trunk, the
trunk can be opened by actuating the
glow-in-the-dark handle attached to the trunk
latching mechanism.
Trunk Emergency Release
GARAGE DOOR OPENER — IF EQUIPPED
HomeLink® replaces up to three hand-held
transmitters that operate devices such as
garage door openers, motorized gates, lighting,
or home security systems. The HomeLink® unit
is powered by your vehicle’s battery.
The HomeLink® buttons that are located in the
overhead console designate the three different
HomeLink® channels. The HomeLink®
indicator is located on the left side of the first
button.
HomeLink® Buttons
NOTE:
HomeLink® is disabled when the Vehicle
Security Alarm is active.BEFORE YOU BEGIN PROGRAMMING
H
OMELINK®
Be sure that your vehicle is parked outside of
the garage before you begin programming.
For more efficient programming and accurate
transmission of the radio-frequency signal it is
recommended that a new battery be placed in
the hand-held transmitter of the device that is
being programmed to the HomeLink® system.
WARNING!
Do not allow children to have access to the
trunk, either by climbing into the trunk from
outside, or through the inside of the vehicle.
Always close the trunk lid when your vehicle is
unattended. Once in the trunk, young children
may not be able to escape, even if they
entered through the rear seat. If trapped in
the trunk, children can die from suffocation
or heat stroke.
2
20_LA_OM_EN_USC_t.book Page 59
Page 62 of 396

60GETTING TO KNOW YOUR VEHICLE
To erase the channels, place the ignition in the
ON/RUN position, and push and hold the two
outside HomeLink® buttons (I and III) for up to
20 seconds or until the orange indicator
flashes.
NOTE:
Erasing all channels should only be
performed when programming HomeLink®
for the first time. Do not erase channels when
programming additional buttons.
If you have any problems, or require assis -
tance, please call toll-free 1-800-355-3515
or, on the Internet at HomeLink.com for infor -
mation or assistance.
Programming A Rolling Code
For programming garage door openers that
were manufactured after 1995. These garage
door openers can be identified by the “LEARN”
or “TRAIN” button located where the hanging
antenna is attached to the garage door opener.
NOTE:
It is NOT the button that is normally used to
open and close the door. The name and color of
the button may vary by manufacturer.
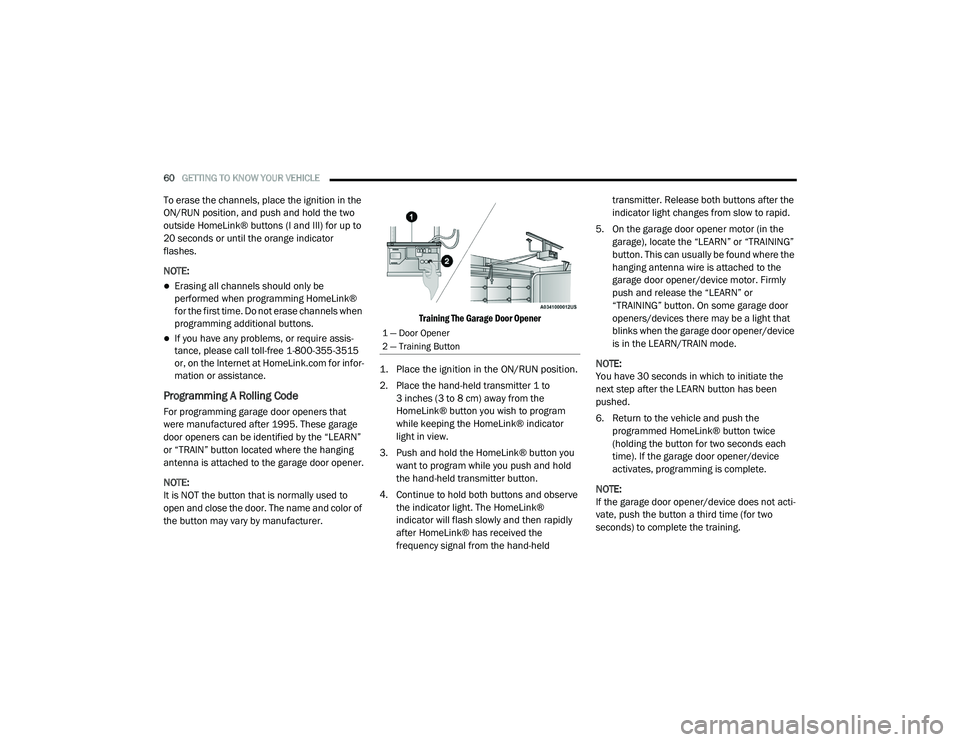
Training The Garage Door Opener
1. Place the ignition in the ON/RUN position.
2. Place the hand-held transmitter 1 to 3 inches (3 to 8 cm) away from the
HomeLink® button you wish to program
while keeping the HomeLink® indicator
light in view.
3. Push and hold the HomeLink® button you want to program while you push and hold
the hand-held transmitter button.
4. Continue to hold both buttons and observe the indicator light. The HomeLink®
indicator will flash slowly and then rapidly
after HomeLink® has received the
frequency signal from the hand-held transmitter. Release both buttons after the
indicator light changes from slow to rapid.
5. On the garage door opener motor (in the garage), locate the “LEARN” or “TRAINING”
button. This can usually be found where the
hanging antenna wire is attached to the
garage door opener/device motor. Firmly
push and release the “LEARN” or
“TRAINING” button. On some garage door
openers/devices there may be a light that
blinks when the garage door opener/device
is in the LEARN/TRAIN mode.
NOTE:
You have 30 seconds in which to initiate the
next step after the LEARN button has been
pushed.
6. Return to the vehicle and push the programmed HomeLink® button twice
(holding the button for two seconds each
time). If the garage door opener/device
activates, programming is complete.
NOTE:
If the garage door opener/device does not acti -
vate, push the button a third time (for two
seconds) to complete the training.
1 — Door Opener
2 — Training Button
20_LA_OM_EN_USC_t.book Page 60
Page 63 of 396

GETTING TO KNOW YOUR VEHICLE61
To program the remaining two HomeLink®
buttons, repeat each step for each remain -
ing button. DO NOT erase the channels.
Reprogramming A Single HomeLink® Button
(Rolling Code)
To reprogram a channel that has been
previously trained, follow these steps:
1. Place the ignition in the ON/RUN position.
2. Push and hold the desired HomeLink® button until the indicator light begins to
flash after 20 seconds. Do not release the
button.
3. Without releasing the button proceed with “Programming A Rolling Code” step 2 and
follow all remaining steps.
Programming A Non-Rolling Code
For programming garage door openers
manufactured before 1995.
1. Place the ignition in the ON/RUN position.
2. Place the hand-held transmitter 1 to 3 inches (3 to 8 cm) away from the
HomeLink® button you wish to program
while keeping the HomeLink® indicator
light in view. 3. Press and hold the HomeLink® button you
want to program while you press and hold
the hand-held transmitter button.
4. Continue to hold both buttons and observe the indicator light. The HomeLink®
indicator will flash slowly and then rapidly
after HomeLink® has received the
frequency signal from the hand-held
transmitter. Release both buttons after the
indicator light changes from slow to rapid.
5. Press and hold the programmed HomeLink® button and observe the
indicator light.
If the indicator light stays on constantly,
programming is complete and the garage
door/device should activate when the
HomeLink® button is pressed.
To program the two remaining
HomeLink® buttons, repeat each step
for each remaining button. DO NOT erase
the channels. Reprogramming A Single HomeLink® Button
(Non-Rolling Code)
To reprogram a channel that has been
previously trained, follow these steps:
1. Place the ignition in the ON/RUN position.
2. Press and hold the desired HomeLink®
button until the indicator light begins to
flash after 20 seconds. Do not release the
button.
3. Without releasing the button, proceed with “Programming A Non-Rolling Code” step 2
and follow all remaining steps.
CANADIAN/GATE OPERATOR
P
ROGRAMMING
For programming transmitters in Canada/
United States that require the transmitter
signals to “time-out” after several seconds of
transmission.
Canadian radio frequency laws require
transmitter signals to time-out (or quit) after
several seconds of transmission – which may
not be long enough for HomeLink® to pick up
the signal during programming. Similar to this
Canadian law, some U.S. gate operators are
designed to time-out in the same manner.
2
20_LA_OM_EN_USC_t.book Page 61