2020 CITROEN RELAY relay
[x] Cancel search: relayPage 118 of 196

11 6
In the event of a breakdown
Changing a fuse
The three fuseboxes are located on the
dashboard on the left-hand side, in the pillar
on the right-hand side and in the engine
compartment.
The designations provided are only for the fuses
that can be replaced by the user. For any other
work, visit a CITROËN dealer or a qualified
workshop.
Professional repairers: for full information
on the fuses and relays, consult the
wiring information and diagrams available
from a CITROËN dealer.
Removing and fitting a fuse
Good
Failed
Before changing a fuse, the cause of the fault
must be found and rectified. The numbers of the
fuses are indicated on the fuse box.
Always replace a faulty fuse with a fuse of
the same rating.
CITROËN accepts no responsibility for
the cost incurred in repairing your vehicle
or for rectifying malfunctions resulting from
the installation of accessories not supplied or
not recommended by CITROËN and not
installed in accordance with its
recommendations, in particular when the
combined power consumption of all of the
additional equipment connected exceeds 10
milliamperes.
Left-hand side dashboard
fuses
► Remove the screws and tilt the casing to
access the fuses.
Fuses A (amperes)Allocation
12 7.5Right-hand dipped beam headlamp
13 7.5Left-hand dipped beam headlamp
Page 150 of 196

148
Special features
– Never work under a tipper body that is not
supported,
– Switch off the power supply to the electro-
hydraulic unit using the circuit breaker,
– Vehicle stationary, engine off.
For safety reasons, we very strongly
advise against doing anything under the
tipper body while it is being operated or while
it is being serviced.
Maintenance
Reservoir
Regularly check and top up the engine oil level.
Change the oil once a year. If the oil contains
water, change it.
Regularly check the condition of the hose and
ensure the hydraulic system is properly sealed.
Pump and motor
No servicing required. The rolling elements are
permanently lubricated and the bearings are
lubricated by the pumped oil.
Lubrication
The pins of the tipper truck and the ram do not
contain lubricant. Regularly lubricate the hinges
and the grab handles of the side boards as well
as the retaining hooks of the rear board.
Sub-frame and tipper truck
For maximum service life, you are advised to
maintain your tipper truck by regularly washing it
using a power washer.
Carry out any required paint touch-ups quickly to
prevent the spread of rust.
After 8 months of use, check the tightening torque of the connection
between the chassis and the underbody (in
accordance with the manufacturer's
bodybuilding recommendations).
Cleaning the slide valve
► Loosen cap 244A, taking care with the ball
and retrieving it.
► Using a wide screwdriver, unscrew the banjo
bolt/piston assembly.
► Check that the piston slides freely and
remove any foreign bodies. Use a magnet to
remove any metal filings.
► Refit the assembly and make sure that the
piston slides freely. Retain the ball with a little
grease on the cap for refitting.
► Bleed the hydraulic unit.
Bleeding the hydraulic unit
► Unscrew hexagonal cap 257.
► Loosen internal screw 587 by half a turn,
using a 6 mm hex key.
► Operate the unit for a few seconds by
pressing the raise button.
The tipper truck does not rise or rises very
slowly. When the oil exits through this opening,
the unit is bled.
► Retighten screw 587 and replace cap 257.
Check that the tipper truck lowers correctly.
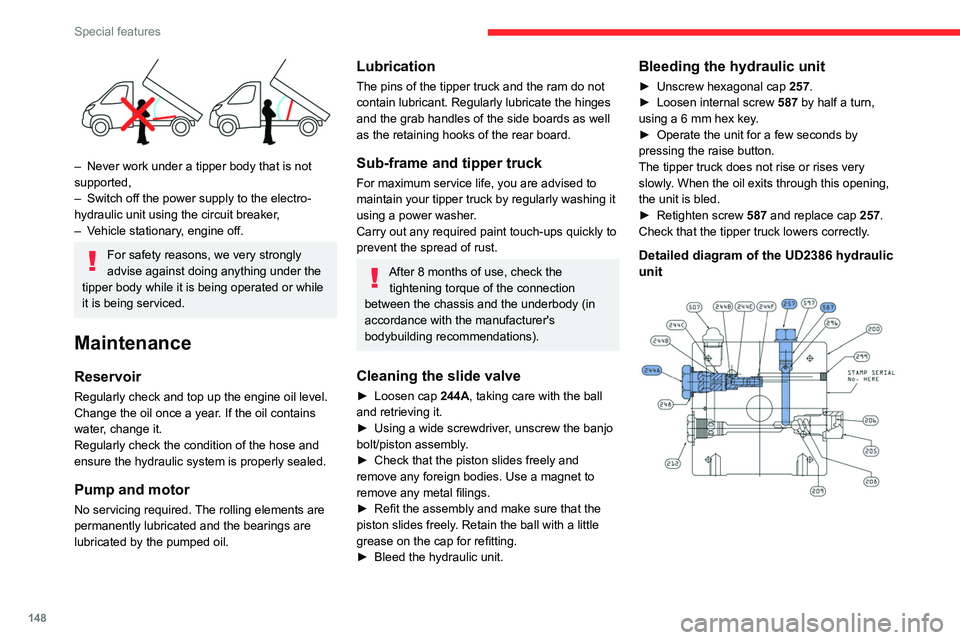
Detailed diagram of the UD2386 hydraulic
unit
Diagnostics
Symptoms ElectricHydraulic Verification/Check
The hydraulic unit does not work. XPower harness and unit relay.
X Control harness (control unit).
X Circuit-breaker.
Very noisy unit, rises slowly. XSuction strainer clogged or crushed at the bottom of the tank.
Very noisy new unit, rises quickly. XPump alignment, change the unit.
The ram lowers by itself. XLowering valve crushed or blocked.
The ram does not lower. XYes, check the slide valve and bleed.
Refer to the "Maintenance" section.
X No, check the coil and the electrical connections of the valve.
X No, replace the solenoid valve.
X No, check the alignment of the ram.
The unit works but its pressure does
not increase. X
Slide valve jammed if no solenoid valve on the unit.
Refer to the "Maintenance" section.
X Pressure relief device, setting, dirt.
X Pump seal out of service.
X Motor/pump coupling.
X Pump loose from its support.
The hydraulic unit does not work. XSolenoid valve blocked, replace it or retighten the nut behind the strainer .
The control unit does not work. XCheck connection and contacts.
Emulsion in the tank. XIncorrectly positioned return pipe.
X Insufficient oil level.
Page 151 of 196

149
Special features
10Diagnostics
SymptomsElectricHydraulic Verification/Check
The hydraulic unit does not work. XPower harness and unit relay.
X Control harness (control unit).
X Circuit-breaker.
Very noisy unit, rises slowly. XSuction strainer clogged or crushed at the bottom of the tank.
Very noisy new unit, rises quickly. XPump alignment, change the unit.
The ram lowers by itself. XLowering valve crushed or blocked.
The ram does not lower. XYes, check the slide valve and bleed.
Refer to the "Maintenance" section.
X No, check the coil and the electrical connections of the valve.
X No, replace the solenoid valve.
X No, check the alignment of the ram.
The unit works but its pressure does
not increase. X
Slide valve jammed if no solenoid valve on the unit.
Refer to the "Maintenance" section.
X Pressure relief device, setting, dirt.
X Pump seal out of service.
X Motor/pump coupling.
X Pump loose from its support.
The hydraulic unit does not work. XSolenoid valve blocked, replace it or retighten the nut behind the strainer .
The control unit does not work. XCheck connection and contacts.
Emulsion in the tank. XIncorrectly positioned return pipe.
X Insufficient oil level.
Page 168 of 196

166
Touch screen audio and telematics system
If the USB device contains new software,
the system starts by updating the navigation
software. Once the software is updated, the
system must restart.
► Select "OK".
Before the system starts updating the map,
it warns you that a minimum of 30 minutes is
required to install the map.
Do not remove the USB device or turn off
the system until the update is complete.
You cannot use the system until the update is
complete. If the update is interrupted, restart
the system update.
Once the map is updated, the message below
appears:
"Updates completed"
You can now safely remove the USB device.
► Click on “Close”.
The new map is now available on the system.
Troubleshooting
During an update, the following issues may
occur:
– The map on the USB device is invalid. If this is
the case, download the map to the USB device
again using "TomTom HOME".
You may need to prepare the USB device again.
– The version of the map on the USB device is
the same as the version on the system, or older.
If this is the case, download the map to the USB
device again using "TomTom HOME".
You may need to prepare the USB device again.
Telephone
Press "PHONE" to display the telephone
menus:
– Mobile phone .
– Display and call the contacts in the mobile
phone directory.
– Press on the 5 or 6 buttons to scroll through
the contacts.
– Skip directly to the desired letter in the list.
Recent calls
– All calls, In, Out, Missed .
– Display and call recent call log contacts.
The system memory contains predefined text
messages, which can be sent to reply to a
received message or as a new message.
Upon receipt of a text message (depending on
the telephone version), the system also relays
the message in question to you.
Settings
– Connected tels. Add device, Connected
audio.
– Combine up to 10 telephones/audio devices to
make it easier and faster to access and connect.
Dial the telephone number using the on-screen
virtual keypad.
Transf.
– Transf..
– Transfer calls from the system to the mobile
phone and vice versa.
– Mute.
– Disable the system microphone's audio for
private conversations.
Pairing a Bluetooth®
telephone
For safety reasons and because it
requires sustained attention by the driver,
the pairing of a Bluetooth
® mobile phone with
the hands-free kit of your audio system must
be done with the vehicle stationary.
Activate the telephone's Bluetooth function
and ensure that it is "visible to all" (telephone
configuration).
Press on "PHONE".
If no mobile phone has yet been paired
with the system, a special page is displayed on
the screen.
Select "Yes" to start the pairing procedure, and
then search for the name of the system on the
mobile phone (on the other hand, by selecting
"No", the main screen page of the Telephone is
displayed).
Select the name of the system and, depending
on the telephone, using the telephone keypad,
enter the PIN displayed on the screen of the