2020 CHRYSLER 300 display
[x] Cancel search: displayPage 233 of 328

231
SERVICING AND MAINTENANCE
SCHEDULED SERVICING
This vehicle is equipped with an automatic oil
change indicator system. The oil change
indicator system will remind you that it is time to
take your vehicle in for scheduled maintenance.
Based on engine operation conditions, the oil
change indicator message will illuminate. This
means that service is required for the vehicle.
Operating conditions such as frequent
short-trips, trailer tow, and extremely hot or cold
ambient temperatures will influence when the
“Change Oil” or “Oil Change Required” message
is displayed. Severe Operating Conditions can
cause the change oil message to illuminate as
early as 3,500 miles (5,600 km) since last
reset. Have your vehicle serviced as soon as
possible, within the next 500 miles (805 km).
The “Oil Change Required” message will be
displayed in the instrument cluster and a single
chime will sound, indicating that an oil change
is necessary.An authorized dealer will reset the oil change
indicator message after completing the
scheduled oil change. If a scheduled oil change
is performed by someone other than an
authorized dealer, the message can be reset by
referring to “Instrument Cluster Display” in
“Getting To Know Your Instrument Panel” for
further information.
NOTE:
Under no circumstances should oil change
intervals exceed 10,000 miles (16,000 km),
12 months or 350 hours of engine run time,
whichever comes first. The 350 hours of engine
run or idle time is generally only a concern for
fleet customers.
Severe Duty All Models
Change Engine Oil at 4,000 miles (6,500 km) or
350 hours of engine run time if the vehicle is
operated in a dusty and off-road environment,
or is operated predominantly at idle or only very
low engine RPM. This type of vehicle use is
considered Severe Duty.Once A Month Or Before A Long Trip:Check engine oil level.
Check windshield washer fluid level.
Check tire pressure and look for unusual
wear or damage. Rotate tires at the first sign
of irregular wear, even if it occurs before your
next scheduled service.
Check the fluid levels of the coolant reservoir,
brake master cylinder, and power steering (if
equipped) and fill as needed.
Check function of all interior and exterior
lights.
7
20_LX_OM_EN_USC_t.book Page 231
Page 273 of 328
SERVICING AND MAINTENANCE271
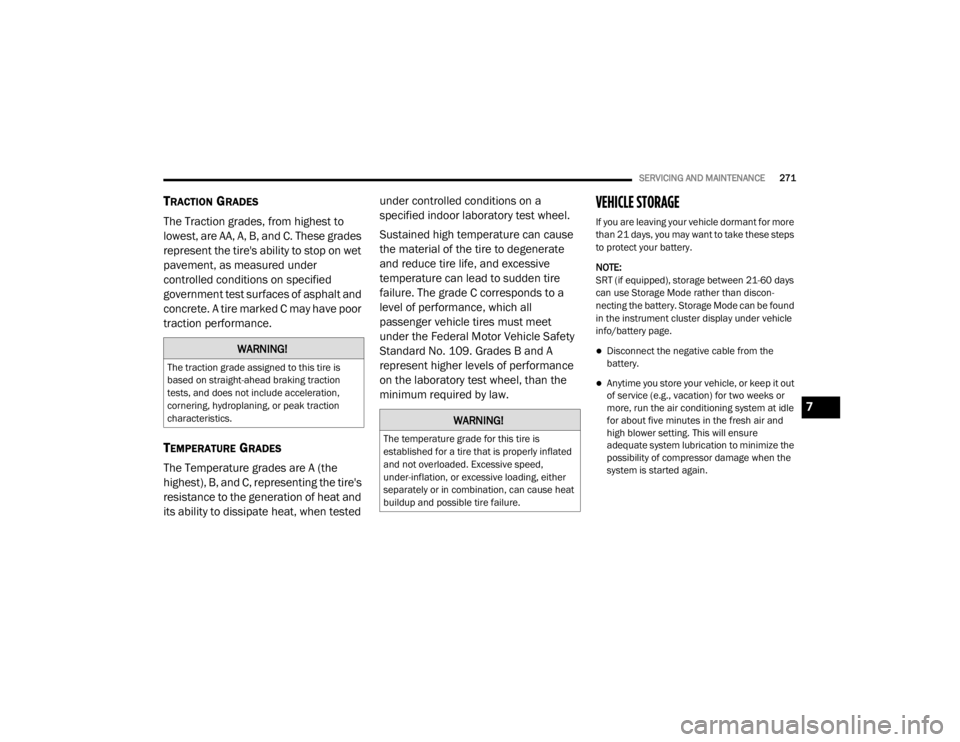
TRACTION GRADES
The Traction grades, from highest to
lowest, are AA, A, B, and C. These grades
represent the tire's ability to stop on wet
pavement, as measured under
controlled conditions on specified
government test surfaces of asphalt and
concrete. A tire marked C may have poor
traction performance.
TEMPERATURE GRADES
The Temperature grades are A (the
highest), B, and C, representing the tire's
resistance to the generation of heat and
its ability to dissipate heat, when tested under controlled conditions on a
specified indoor laboratory test wheel.
Sustained high temperature can cause
the material of the tire to degenerate
and reduce tire life, and excessive
temperature can lead to sudden tire
failure. The grade C corresponds to a
level of performance, which all
passenger vehicle tires must meet
under the Federal Motor Vehicle Safety
Standard No. 109. Grades B and A
represent higher levels of performance
on the laboratory test wheel, than the
minimum required by law.
VEHICLE STORAGE
If you are leaving your vehicle dormant for more
than 21 days, you may want to take these steps
to protect your battery.
NOTE:
SRT (if equipped), storage between 21-60 days
can use Storage Mode rather than discon
-
necting the battery. Storage Mode can be found
in the instrument cluster display under vehicle
info/battery page.
Disconnect the negative cable from the
battery.
Anytime you store your vehicle, or keep it out
of service (e.g., vacation) for two weeks or
more, run the air conditioning system at idle
for about five minutes in the fresh air and
high blower setting. This will ensure
adequate system lubrication to minimize the
possibility of compressor damage when the
system is started again.
WARNING!
The traction grade assigned to this tire is
based on straight-ahead braking traction
tests, and does not include acceleration,
cornering, hydroplaning, or peak traction
characteristics.
WARNING!
The temperature grade for this tire is
established for a tire that is properly inflated
and not overloaded. Excessive speed,
under-inflation, or excessive loading, either
separately or in combination, can cause heat
buildup and possible tire failure.
7
20_LX_OM_EN_USC_t.book Page 271
Page 287 of 328
MULTIMEDIA285
consent. For further information, refer to “Data
Collection & Privacy” in your Uconnect Owner’s
Manual Supplement or “Onboard Diagnostic
System (OBD II) Cybersecurity” in “Getting To
Know Your Instrument Panel”.
UCONNECT SETTINGS
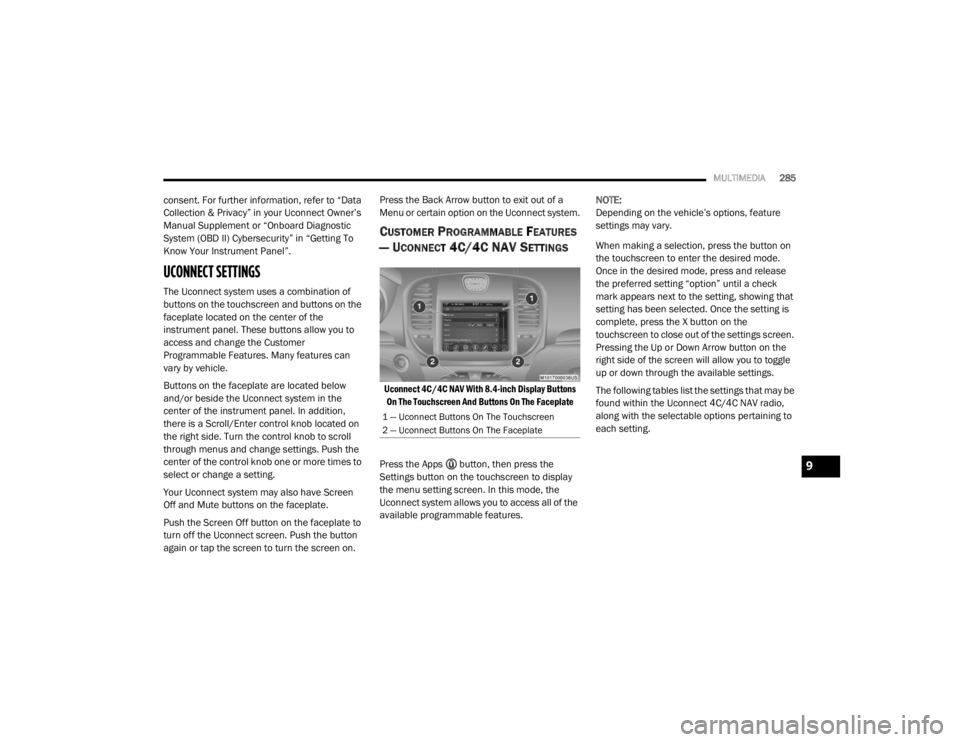
The Uconnect system uses a combination of
buttons on the touchscreen and buttons on the
faceplate located on the center of the
instrument panel. These buttons allow you to
access and change the Customer
Programmable Features. Many features can
vary by vehicle.
Buttons on the faceplate are located below
and/or beside the Uconnect system in the
center of the instrument panel. In addition,
there is a Scroll/Enter control knob located on
the right side. Turn the control knob to scroll
through menus and change settings. Push the
center of the control knob one or more times to
select or change a setting.
Your Uconnect system may also have Screen
Off and Mute buttons on the faceplate.
Push the Screen Off button on the faceplate to
turn off the Uconnect screen. Push the button
again or tap the screen to turn the screen on. Press the Back Arrow button to exit out of a
Menu or certain option on the Uconnect system.
CUSTOMER PROGRAMMABLE FEATURES
— U
CONNECT 4C/4C NAV SETTINGS
Uconnect 4C/4C NAV With 8.4-inch Display Buttons
On The Touchscreen And Buttons On The Faceplate
Press the Apps button, then press the
Settings button on the touchscreen to display
the menu setting screen. In this mode, the
Uconnect system allows you to access all of the
available programmable features. NOTE:
Depending on the vehicle’s options, feature
settings may vary.
When making a selection, press the button on
the touchscreen to enter the desired mode.
Once in the desired mode, press and release
the preferred setting “option” until a check
mark appears next to the setting, showing that
setting has been selected. Once the setting is
complete, press the X button on the
touchscreen to close out of the settings screen.
Pressing the Up or Down Arrow button on the
right side of the screen will allow you to toggle
up or down through the available settings.
The following tables list the settings that may be
found within the Uconnect 4C/4C NAV radio,
along with the selectable options pertaining to
each setting.
1 — Uconnect Buttons On The Touchscreen
2 — Uconnect Buttons On The Faceplate
9
20_LX_OM_EN_USC_t.book Page 285
Page 288 of 328
286MULTIMEDIA
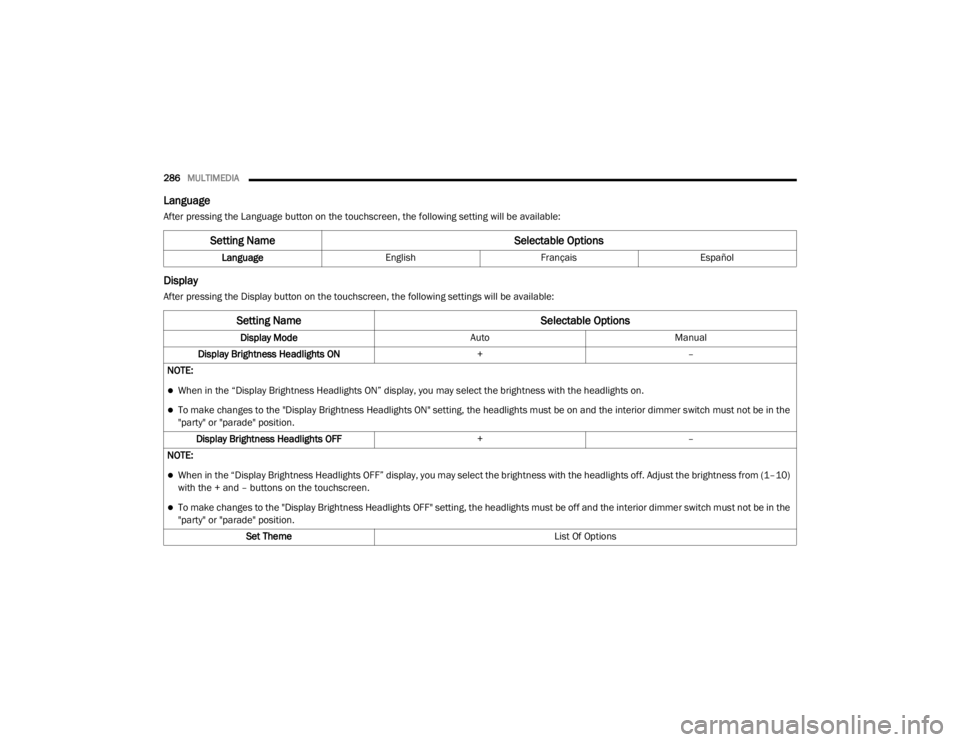
Language
After pressing the Language button on the touchscreen, the following setting will be available:
Display
After pressing the Display button on the touchscreen, the following settings will be available:
Setting Name Selectable Options
LanguageEnglishFrançais Español
Setting Name Selectable Options
Display ModeAutoManual
Display Brightness Headlights ON +–
NOTE:
When in the “Display Brightness Headlights ON” display, you may select the brightness with the headlights on.
To make changes to the "Display Brightness Headlights ON" setting, the headlights must be on and the interior dimmer switch must not be in the
"party" or "parade" position. Display Brightness Headlights OFF +–
NOTE:
When in the “Display Brightness Headlights OFF” display, you may select the brightness with the headlights off. Adjust the brightness from (1–10)
with the + and – buttons on the touchscreen.
To make changes to the "Display Brightness Headlights OFF" setting, the headlights must be off and the interior dimmer switch must not be in the
"party" or "parade" position. Set Theme List Of Options
20_LX_OM_EN_USC_t.book Page 286
Page 289 of 328
MULTIMEDIA287
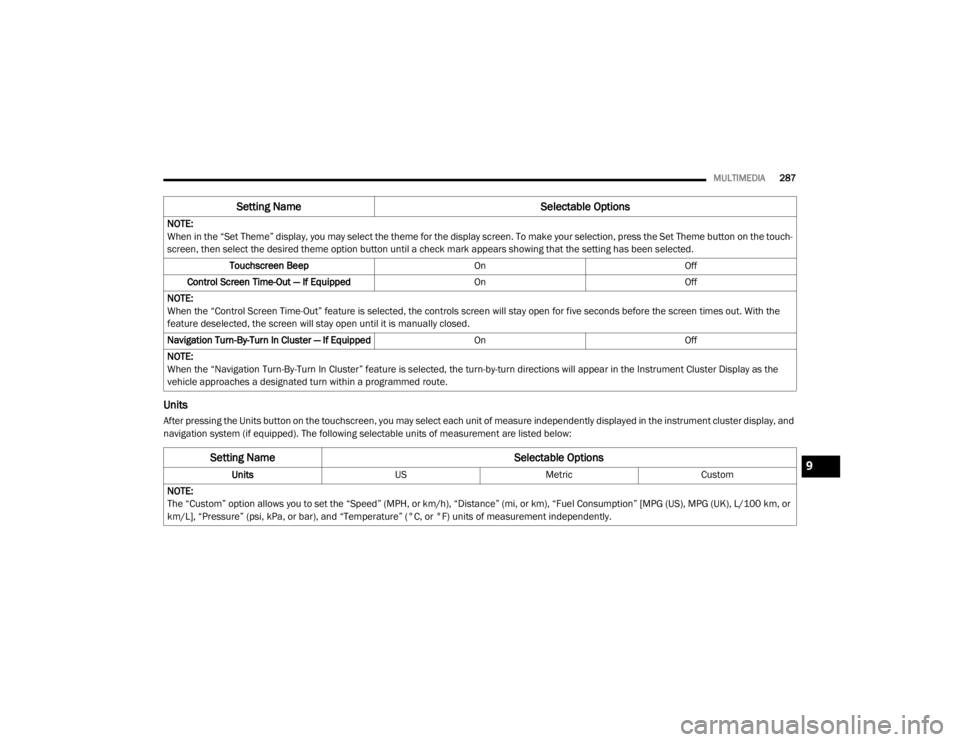
Units
After pressing the Units button on the touchscreen, you may select each unit of measure independently displayed in the instrument cluster display, and
navigation system (if equipped). The following selectable units of measurement are listed below:NOTE:
When in the “Set Theme” display, you may select the theme for the display screen. To make your selection, press the Set Theme button on the touch
-
screen, then select the desired theme option button until a check mark appears showing that the setting has been selected.
Touchscreen Beep OnOff
Control Screen Time-Out — If Equipped OnOff
NOTE:
When the “Control Screen Time-Out” feature is selected, the controls screen will stay open for five seconds before the screen times out. With the
feature deselected, the screen will stay open until it is manually closed.
Navigation Turn-By-Turn In Cluster — If Equipped OnOff
NOTE:
When the “Navigation Turn-By-Turn In Cluster” feature is selected, the turn-by-turn directions will appear in the Instrument Cluster Display as the
vehicle approaches a designated turn within a programmed route.
Setting Name Selectable Options
Setting NameSelectable Options
UnitsUSMetric Custom
NOTE:
The “Custom” option allows you to set the “Speed” (MPH, or km/h), “Distance” (mi, or km), “Fuel Consumption” [MPG (US), MPG (UK), L/100 km, or
km/L], “Pressure” (psi, kPa, or bar), and “Temperature” (°C, or °F) units of measurement independently.9
20_LX_OM_EN_USC_t.book Page 287
Page 291 of 328
MULTIMEDIA289
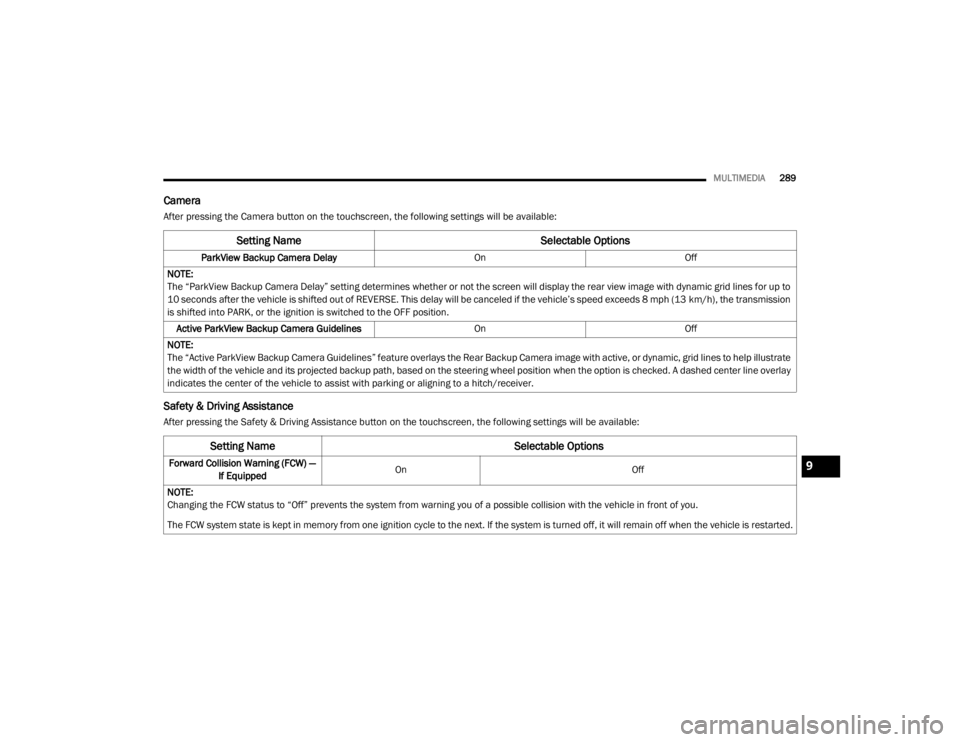
Camera
After pressing the Camera button on the touchscreen, the following settings will be available:
Safety & Driving Assistance
After pressing the Safety & Driving Assistance button on the touchscreen, the following settings will be available:
Setting Name Selectable Options
ParkView Backup Camera Delay OnOff
NOTE:
The “ParkView Backup Camera Delay” setting determines whether or not the screen will display the rear view image with dynamic grid lines for up to
10 seconds after the vehicle is shifted out of REVERSE. This delay will be canceled if the vehicle’s speed exceeds 8 mph (13 km/h), the transmission
is shifted into PARK, or the ignition is switched to the OFF position.
Active ParkView Backup Camera Guidelines OnOff
NOTE:
The “Active ParkView Backup Camera Guidelines” feature overlays the Rear Backup Camera image with active, or dynamic, grid lines to help illustrate
the width of the vehicle and its projected backup path, based on the steering wheel position when the option is checked. A dashed center line overlay
indicates the center of the vehicle to assist with parking or aligning to a hitch/receiver.
Setting Name Selectable Options
Forward Collision Warning (FCW) —
If Equipped On
Off
NOTE:
Changing the FCW status to “Off” prevents the system from warning you of a possible collision with the vehicle in front of you.
The FCW system state is kept in memory from one ignition cycle to the next. If the system is turned off, it will remain off when the vehicle is restarted.9
20_LX_OM_EN_USC_t.book Page 289
Page 293 of 328
MULTIMEDIA291
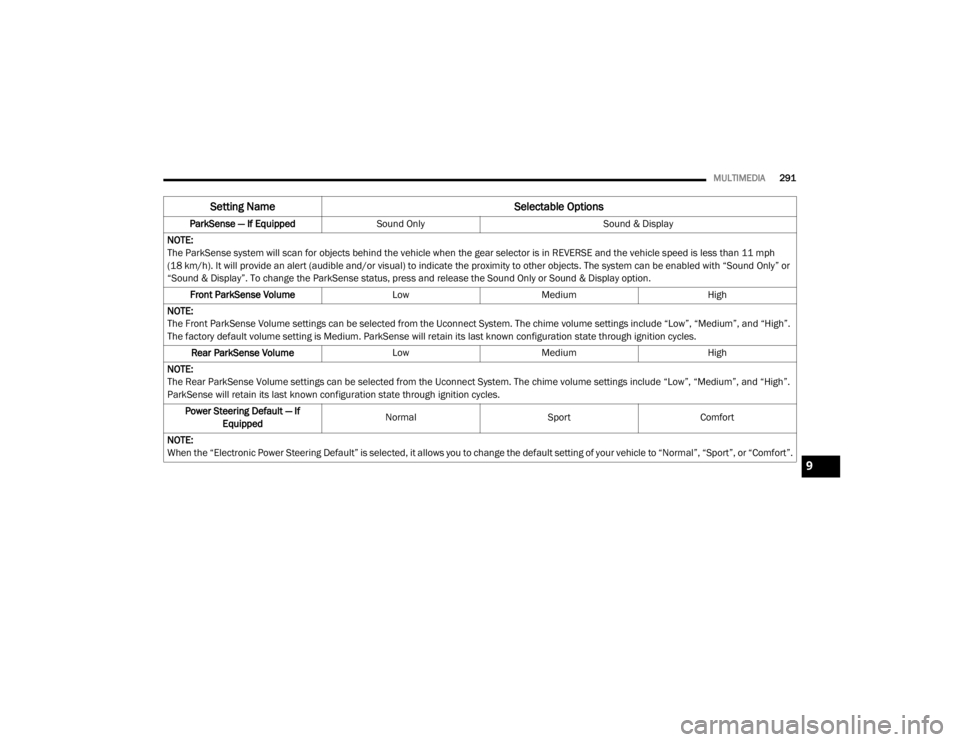
ParkSense — If Equipped Sound Only Sound & Display
NOTE:
The ParkSense system will scan for objects behind the vehicle when the gear selector is in REVERSE and the vehicle speed is less than 11 mph
(18 km/h). It will provide an alert (audible and/or visual) to indicate the proximity to other objects. The system can be enabled with “Sound Only” or
“Sound & Display”. To change the ParkSense status, press and release the Sound Only or Sound & Display option. Front ParkSense Volume LowMedium High
NOTE:
The Front ParkSense Volume settings can be selected from the Uconnect System. The chime volume settings include “Low”, “Medium”, and “High”.
The factory default volume setting is Medium. ParkSense will retain its last known configuration state through ignition cycles. Rear ParkSense Volume LowMedium High
NOTE:
The Rear ParkSense Volume settings can be selected from the Uconnect System. The chime volume settings include “Low”, “Medium”, and “High”.
ParkSense will retain its last known configuration state through ignition cycles. Power Steering Default — If Equipped Normal
SportComfort
NOTE:
When the “Electronic Power Steering Default” is selected, it allows you to change the default setting of your vehicle to “Normal”, “Sport”, or “Comfort”.
Setting Name Selectable Options
9
20_LX_OM_EN_USC_t.book Page 291
Page 303 of 328

MULTIMEDIA301
Reset
After pressing the Reset button on the touchscreen, the following settings will be available:
System Information — If Equipped
After pressing the System Information button on the touchscreen, the following setting will be available:
Setting Name Selectable Options
Restore SettingsOKCancel X
NOTE:
When this feature is selected, it will reset all settings to their default settings. To restore the settings to their default setting, press the Restore Settings
button on the touchscreen. A pop-up will appear asking "Are you sure you want to reset your settings to default?” Restore App Drawer OK Cancel
Restore Apps — If Equipped OK Cancel
Clear Personal Data OKCancel X
NOTE:
When this feature is selected, it will remove all personal data including Bluetooth® devices and presets. To remove personal information, press the
Clear Personal Data button and a pop-up will appear asking "Are you sure you want to clear all personal data?” Modem Reset — If Equipped OK Cancel
Setting Name Selectable Options
Software License System Software Information Screen
NOTE:
When the “System Information” feature is selected, a “System Software Information” screen will appear, displaying the system software version.
9
20_LX_OM_EN_USC_t.book Page 301