2020 CHRYSLER 300 automatic transmission
[x] Cancel search: automatic transmissionPage 196 of 328
194STARTING AND OPERATING
TRAILER TOWING WEIGHTS (MAXIMUM TRAILER WEIGHT RATINGS)
NOTE:
The trailer tongue weight must be considered as
part of the combined weight of occupants and
cargo, and it should never exceed the weight
referenced on the “Tire and Loading Informa -
tion” placard. Refer to “Tire Safety Information”
in “Servicing And Maintenance” for further infor -
mation.TRAILER AND TONGUE WEIGHT
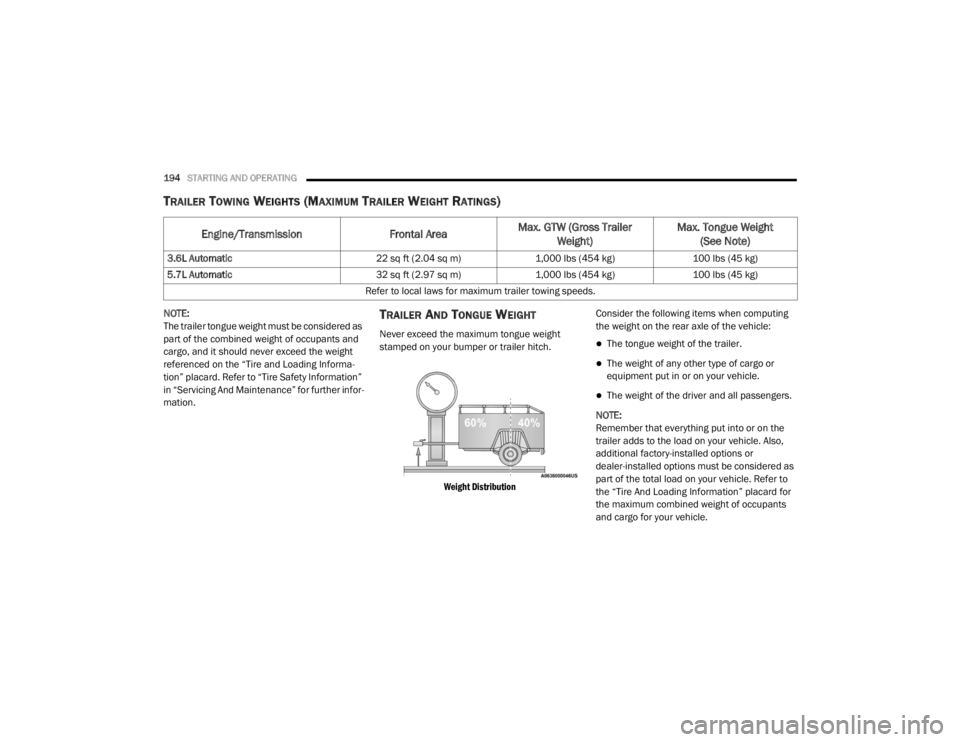
Never exceed the maximum tongue weight
stamped on your bumper or trailer hitch.
Weight Distribution
Consider the following items when computing
the weight on the rear axle of the vehicle:The tongue weight of the trailer.
The weight of any other type of cargo or
equipment put in or on your vehicle.
The weight of the driver and all passengers.
NOTE:
Remember that everything put into or on the
trailer adds to the load on your vehicle. Also,
additional factory-installed options or
dealer-installed options must be considered as
part of the total load on your vehicle. Refer to
the “Tire And Loading Information” placard for
the maximum combined weight of occupants
and cargo for your vehicle.
Engine/Transmission Frontal AreaMax. GTW (Gross Trailer
Weight) Max. Tongue Weight
(See Note)
3.6L Automatic 22 sq ft (2.04 sq m)1,000 lbs (454 kg)100 lbs (45 kg)
5.7L Automatic 32 sq ft (2.97 sq m)1,000 lbs (454 kg)100 lbs (45 kg)
Refer to local laws for maximum trailer towing speeds.
20_LX_OM_EN_USC_t.book Page 194
Page 199 of 328

STARTING AND OPERATING197
Four-Pin Connector
Seven-Pin Connector
TOWING TIPS
Before setting out on a trip, practice turning,
stopping, and backing up the trailer in an area
located away from heavy traffic.
Automatic Transmission
Select the DRIVE range when towing. The
transmission controls include a drive strategy to
avoid frequent shifting when towing. However, if
frequent shifting does occur while in DRIVE, you
can use the AutoStick shift control (if equipped)
to manually select a lower gear.
NOTE:
Using a lower gear while operating the vehicle
under heavy loading conditions will improve
performance and extend transmission life by
reducing excessive shifting and heat buildup.
This action will also provide better engine
braking.
Speed Control — If Equipped
Do not use on hilly terrain or with heavy
loads.
When using the Speed Control, if you experi-
ence speed drops greater than 10 mph
(16 km/h), disengage until you can get back
to cruising speed.
Use Speed Control in flat terrain and with
light loads to maximize fuel efficiency.
1 — Ground
2 — Park
3 — Left Stop/Turn
4 — Right Stop/Turn1 — Battery
2 — Backup Lamps
3 — Right Stop/Turn
4 — Electric Brakes
5 — Ground
6 — Left Stop/Turn
7 — Running Lamps
5
20_LX_OM_EN_USC_t.book Page 197
Page 225 of 328
IN CASE OF EMERGENCY223
1. Apply the parking brake, shift the
automatic transmission into PARK and
cycle the ignition to OFF.
2. Turn off the heater, radio, and all electrical accessories.
3. If using another vehicle to jump start the battery, park the vehicle within the jumper
cables’ reach, set the parking brake and
make sure the ignition is OFF.
JUMP STARTING PROCEDURE
NOTE:
Make sure at all times that unused ends of
jumper cables are not contacting each other or
either vehicle while making connections.
Connecting The Jumper Cables
1. Connect the positive
(+) end of the jumper
cable to the remote positive (+)
post of the
discharged vehicle.
2. Connect the opposite end of the positive (+)
jumper cable to the positive (+) post of the
booster battery. 3. Connect the negative end
(-) of the jumper
cable to the negative (-) post of the booster
battery.
4. Connect the opposite end of the negative (-)
jumper cable to a good engine ground. A
“ground” is an exposed metallic/unpainted
part of the engine, frame or chassis, such as
an accessory bracket or large bolt. The
ground must be away from the battery and
the fuel injection system.
5. Start the engine in the vehicle that has the booster battery, let the engine idle a few
minutes, and then start the engine in the
vehicle with the discharged battery.
Remove any metal jewelry such as rings,
watch bands and bracelets that could
make an inadvertent electrical contact. You
could be seriously injured.
Batteries contain sulfuric acid that can
burn your skin or eyes and generate
hydrogen gas which is flammable and
explosive. Keep open flames or sparks
away from the battery.
WARNING!
Do not allow vehicles to touch each other as
this could establish a ground connection and
personal injury could result.
WARNING! (Continued)
WARNING!
Failure to follow this jump starting procedure
could result in personal injury or property
damage due to battery explosion.
CAUTION!
Failure to follow these procedures could
result in damage to the charging system of
the booster vehicle or the discharged vehicle.
WARNING!
Do not connect the jumper cable to the
negative (-) post of the discharged battery.
The resulting electrical spark could cause the
battery to explode and could result in
personal injury.
6
20_LX_OM_EN_USC_t.book Page 223
Page 231 of 328
IN CASE OF EMERGENCY229
(Continued)
ALL WHEEL DRIVE (AWD) MODELS
The manufacturer recommends towing your
vehicle with all four wheels OFF the ground
using a flatbed.
If the transmission and driveline are operable,
AWD models can also be towed with the ignition
in the ON/RUN mode, the transmission in
NEUTRAL (N) (not in PARK!), and the rear
wheels OFF the ground with no limitation on
speed or distance. Since the ignition MUST be in
the ON/RUN mode to tow in this manner, AWD
vehicles must be towed with ALL FOUR wheels
OFF the ground (e.g. on a flatbed truck) if the
key fob is unavailable.
REAR-WHEEL DRIVE (RWD) MODELS
The manufacturer recommends towing your
vehicle with all four wheels OFF the ground
using a flatbed.
If flatbed equipment is not available, and the
transmission is operable, this vehicle may be
flat towed (with all four wheels on the ground)
under the following conditions:
The automatic transmission must be in
NEUTRAL (N). Refer to “Manual Park
Release” in this section for instructions on
shifting the transmission to NEUTRAL when
the engine is off.
The towing speed must not exceed 30 mph
(48 km/h).
The towing distance must not exceed
30 miles (48 km). If the transmission is not operable, or the
vehicle must be towed faster than 30 mph
(48 km/h) or farther than 30 miles (48 km),
then the only acceptable method of towing is
with a flatbed truck.
The manufacturer does not recommend
towing this vehicle using a tow dolly.
Vehicle damage may occur.
CAUTION!
Towing this vehicle using any other method
can cause severe transmission and/or
transfer case damage.
CAUTION!
(Continued)
Damage from improper towing is not
covered under the New Vehicle Limited
Warranty.
CAUTION! (Continued)
CAUTION!
Towing this vehicle in violation of the above
requirements can cause severe transmission
damage. Damage from improper towing is not
covered under the New Vehicle Limited
Warranty.
6
20_LX_OM_EN_USC_t.book Page 229
Page 253 of 328
SERVICING AND MAINTENANCE251
(Continued)
Fluid Level Check — Brake Master Cylinder
Check the fluid level in the master cylinder
immediately if the brake system warning light
indicates system failure.
Check the fluid level in the master cylinder
when performing underhood services.
Clean the top of the master cylinder area before
removing the cap. Add fluid to bring the level up
to the top of the “FULL” mark on the side of the
master cylinder reservoir.
Overfilling of fluid is not recommended because
it may cause leaking in the system.
Add enough fluid to bring the level up to the
requirements described on the brake fluid
reservoir. With disc brakes, fluid level can be
expected to fall as the brake pads wear.
However, low fluid level may be caused by a
leak and a checkup may be needed.
Use only brake fluid that has been
recommended by the manufacturer, and has
been kept in a tightly closed container to avoid
contamination from foreign matter or moisture.
Refer to “Fluids And Lubricants” in “Technical
Specifications” for further information.
AUTOMATIC TRANSMISSION
Selection Of Lubricant
It is important to use the proper transmission
fluid to ensure optimum transmission
performance and life. Use only the
manufacturer's specified transmission fluid.
Refer to “Fluids And Lubricants” in “Technical
Specifications” for fluid specifications. It is
important to maintain the transmission fluid at
the correct level using the recommended fluid.
WARNING!
Use only manufacturer's recommended
brake fluid. Refer to “Fluids And Lubri -
cants” in “Technical Specifications” for
further information. Using the wrong type of
brake fluid can severely damage your brake
system and/or impair its performance. The
proper type of brake fluid for your vehicle is
also identified on the original factory
installed hydraulic master cylinder reser -
voir.
To avoid contamination from foreign matter
or moisture, use only new brake fluid or
fluid that has been in a tightly closed
container. Keep the master cylinder reser -
voir cap secured at all times. Brake fluid in
a open container absorbs moisture from
the air resulting in a lower boiling point. This
may cause it to boil unexpectedly during
hard or prolonged braking, resulting in
sudden brake failure. This could result in a
collision.
Overfilling the brake fluid reservoir can
result in spilling brake fluid on hot engine
parts, causing the brake fluid to catch fire.
Brake fluid can also damage painted and
vinyl surfaces, care should be taken to
avoid its contact with these surfaces.
Do not allow petroleum based fluid to
contaminate the brake fluid. Brake seal
components could be damaged, causing
partial or complete brake failure. This could
result in a collision.
WARNING! (Continued)
7
20_LX_OM_EN_USC_t.book Page 251
Page 254 of 328

252SERVICING AND MAINTENANCE
NOTE:
No chemical flushes should be used in any
transmission; only the approved lubricant
should be used.
Special Additives
The manufacturer strongly recommends
against using any special additives in the
transmission. Automatic Transmission Fluid
(ATF) is an engineered product and its
performance may be impaired by supplemental
additives. Therefore, do not add any fluid
additives to the transmission. Avoid using
transmission sealers as they may adversely
affect seals.
Fluid Level Check
The fluid level is preset at the factory and does
not require adjustment under normal operating
conditions. Routine fluid level checks are not
required; therefore the transmission has no
dipstick. An authorized dealer can check your
transmission fluid level using special service
tools. If you notice fluid leakage or transmission
malfunction, visit an authorized dealer
immediately to have the transmission fluid level
checked. Operating the vehicle with an
improper fluid level can cause severe
transmission damage.
Fluid And Filter Changes
Under normal operating conditions, the fluid
installed at the factory will provide satisfactory
lubrication for the life of the vehicle.
Routine fluid and filter changes are not
required. However, change the fluid and filter if
the fluid becomes contaminated (with water,
etc.), or if the transmission is disassembled for
any reason.
CAUTION!
Using a transmission fluid other than the
manufacturer’s recommended fluid may
cause deterioration in transmission shift
quality and/or torque converter shudder.
Refer to “Fluids And Lubricants” in “Technical
Specifications” for fluid specifications.
CAUTION!
Do not use chemical flushes in your
transmission as the chemicals can damage
your transmission components. Such damage
is not covered by the New Vehicle Limited
Warranty.
CAUTION!
If a transmission fluid leak occurs, visit an
authorized dealer immediately. Severe
transmission damage may occur. An
authorized dealer has the proper tools to
adjust the fluid level accurately.
20_LX_OM_EN_USC_t.book Page 252
Page 285 of 328
TECHNICAL SPECIFICATIONS283
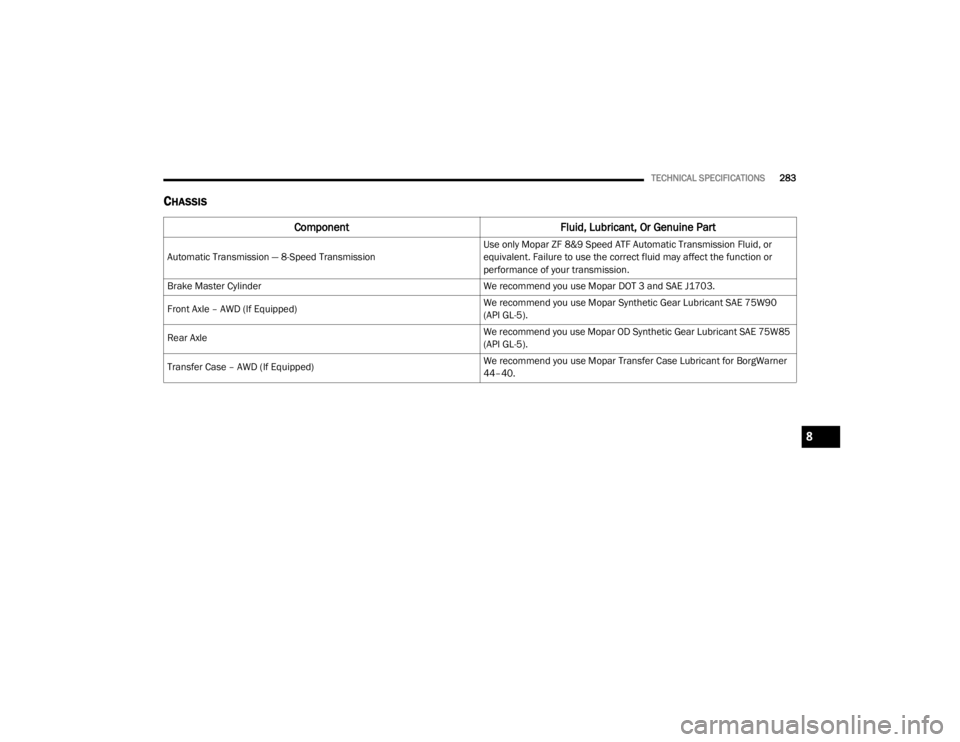
CHASSIS
Component Fluid, Lubricant, Or Genuine Part
Automatic Transmission — 8-Speed Transmission Use only Mopar ZF 8&9 Speed ATF Automatic Transmission Fluid, or
equivalent. Failure to use the correct fluid may affect the function or
performance of your transmission.
Brake Master Cylinder We recommend you use Mopar DOT 3 and SAE J1703.
Front Axle – AWD (If Equipped) We recommend you use Mopar Synthetic Gear Lubricant SAE 75W90
(API GL-5).
Rear Axle We recommend you use Mopar OD Synthetic Gear Lubricant SAE 75W85
(API GL-5).
Transfer Case – AWD (If Equipped) We recommend you use Mopar Transfer Case Lubricant for BorgWarner
44–40.
8
20_LX_OM_EN_USC_t.book Page 283
Page 317 of 328

315
INDEX
A
About Your Brakes......................................... 275Adaptive Cruise Control (ACC)
(Cruise Control).............................................. 163Adding Engine Coolant (Antifreeze)............... 248Adding Fuel.................................................... 188Adding Washing Fluid.................................... 238Additives, Fuel............................................... 277AdjustForward....................................................... 31Rearward..................................................... 31Air Bag........................................................... 123Advance Front Air Bag............................... 123Air Bag Operation...................................... 124Air Bag Warning Light................................ 122Driver Knee Air Bag................................... 125Enhanced Accident Response......... 129, 230Event Data Recorder (EDR)....................... 230Front Air Bag............................................. 123If Deployment Occurs................................ 128Knee Impact Bolsters................................ 125Maintaining Your Air Bag System.............. 129Maintenance............................................. 129Redundant Air Bag Warning Light.............123Side Air Bags............................................. 125Transporting Pets...................................... 142
Air Bag Light.................................. 85, 122, 143Air Cleaner, Engine
(Engine Air Cleaner Filter)............................. 241Air Conditioner Maintenance........................ 242Air Conditioner Refrigerant........................... 242Air Conditioner System...........................50, 242Air Conditioning Filter..............................57, 243Air Conditioning, Operating Tips....................... 56Air Filter........................................................ 241Air PressureTires......................................................... 261AlarmArm The System................................... 22, 23Panic........................................................... 13Rearm The System...................................... 23Security Alarm...................................... 22, 87Alarm SystemSecurity Alarm............................................. 22All Wheel DriveTowing...................................................... 229All Wheel Drive (AWD)................................... 253Alterations/ModificationsVehicle........................................................... 9Android Auto................................................. 308Antifreeze (Engine Coolant)................. 248, 280Disposal................................................... 249
Anti-Lock Brake System (ABS)..........................95Anti-Lock Warning Light...................................90Apple CarPlay................................................ 309Arming SystemSecurity Alarm.............................................22Assist, Hill Start............................................. 100Audio Systems (Radio).................................. 284Auto Down Power Windows..............................58Auto Up Power Windows..................................58Automatic Door Locks...............................27, 28Automatic Headlights.......................................44Automatic High Beams.....................................43Automatic Temperature Control (ATC)..............55Automatic Transmission................................ 153Adding Fluid............................ 252, 281, 283Fluid And Filter Change............................. 252Fluid Change............................................. 252Fluid Level Check............................. 251, 252Fluid Type............................... 251, 281, 283Special Additives...................................... 252Automatic Transmission Limp
Home Mode........................................... 27, 157AutostickOperation.................................................. 158AUX Cord....................................................... 302Auxiliary Electrical Outlet (Power Outlet)..........74
11
20_LX_OM_EN_USC_t.book Page 315