2020 CHRYSLER 300 seats
[x] Cancel search: seatsPage 37 of 328
GETTING TO KNOW YOUR VEHICLE35
(Continued)
FRONT VENTILATED SEATS — IF
E
QUIPPED
Located in the seat cushion and seat back are
fans that draw the air from the passenger
compartment and move air through fine
perforations in the seat cover to help keep the
driver and front passenger cooler in higher
ambient temperatures. The fans operate at
two speeds, HI and LO.
The front ventilated seats control buttons are
located within the Uconnect system. You can
gain access to the control buttons through the
climate screen or the controls screen.
Press the ventilated seat button once to
choose HI.
Press the ventilated seat button a second
time to choose LO.
Press the ventilated seat button a third
time to turn the ventilated seat off.
NOTE:
The engine must be running for the ventilated
seats to operate. Vehicles Equipped With Remote Start
On models that are equipped with remote start,
the ventilated seats can be programmed to
come on during a remote start.
This feature can be programmed through the
Uconnect system. Refer to “Uconnect Settings”
in “Multimedia” for further information.
HEAD RESTRAINTS
Head restraints are designed to reduce the risk
of injury by restricting head movement in the
event of a rear impact. Head restraints should
be adjusted so that the top of the head restraint
is located above the top of your ear.
NOTE:
Do not reverse the head restraints (making the
rear of the head restraint face forward) in an
attempt to gain additional clearance to the back
of your head.
REACTIVE HEAD RESTRAINTS — FRONT
S
EATS
The front driver and passenger seats are
equipped with Reactive Head Restraints (RHR).
In the event of a rear impact, the RHR will
automatically extend forward minimizing the
gap between the back of the occupant’s head
and the RHR.
The RHR will automatically return to their
normal position following a rear impact. If the
RHR do not return to their normal position, see
an authorized dealer immediately.WARNING!
All occupants, including the driver, should
not operate a vehicle or sit in a vehicle’s
seat until the head restraints are placed in
their proper positions in order to minimize
the risk of neck injury in the event of a
crash.
Head restraints should never be adjusted
while the vehicle is in motion. Driving a
vehicle with the head restraints improperly
adjusted or removed could cause serious
injury or death in the event of a collision.
WARNING! (Continued)
2
20_LX_OM_EN_USC_t.book Page 35
Page 66 of 328
64GETTING TO KNOW YOUR VEHICLE
(Continued)
CARGO AREA FEATURES
Cargo Area — Vehicles Equipped With 60/
40 Split-Folding Rear Seat
The 60/40 split-folding rear seat provides
cargo-carrying versatility. The seatbacks fold
down easily by pulling nylon tabs between the
seatbacks and the bolsters. When the seats are
folded down, they provide a continuous,
nearly-flat extension of the load floor.
When the seatback is folded to the upright
position, make sure it is latched by strongly
pulling on the top of the seatback above the
seat strap.
Trunk Mat — If Equipped
A trunk mat covers the bottom of the cargo
area. The trunk mat is used to protect the
interior of the trunk from mud, snow, and
debris.
WARNING!
Do not allow children to have access to the
trunk, either by climbing into the trunk from
outside, or through the inside of the vehicle.
Always close the trunk lid when your vehicle is
unattended. Once in the trunk, young children
may not be able to escape, even if they
entered through the rear seat. If trapped in
the trunk, children can die from suffocation
or heat stroke.
WARNING!
Be certain that the seatback is securely
locked into position. If the seatback is not
securely locked into position, the seat will
not provide the proper stability for child
seats and/or passengers. An improperly
latched seat could cause serious injury.
The cargo area in the rear of the vehicle
(with the rear seatbacks in the locked-up or
folded down position) should not be used
as a play area by children at any time. They
could be seriously injured in a collision.
Children should be seated and using the
proper restraint system.
To help protect against personal injury,
passengers should not be seated in the
rear cargo area. The rear cargo space is
intended for load carrying purposes only,
not for passengers, who should sit in seats
and use seat belts.
The weight and position of cargo and
passengers can change the vehicle center of
gravity and vehicle handling. To avoid loss of
control resulting in personal injury, follow
these guidelines for loading your vehicle:
Always place cargo evenly on the cargo
floor. Put heavier objects as low and as far
forward as possible.
Place as much cargo as possible in front of
the rear axle. Too much weight or improp-
erly placed weight over or behind the rear
axle can cause the rear of the vehicle to
sway.
Do not pile luggage or cargo higher than the
top of the seatback. This could impair visi-
bility or become a dangerous projectile in a
sudden stop or collision.
WARNING! (Continued)
20_LX_OM_EN_USC_t.book Page 64
Page 74 of 328
72GETTING TO KNOW YOUR VEHICLE
CUPHOLDERS
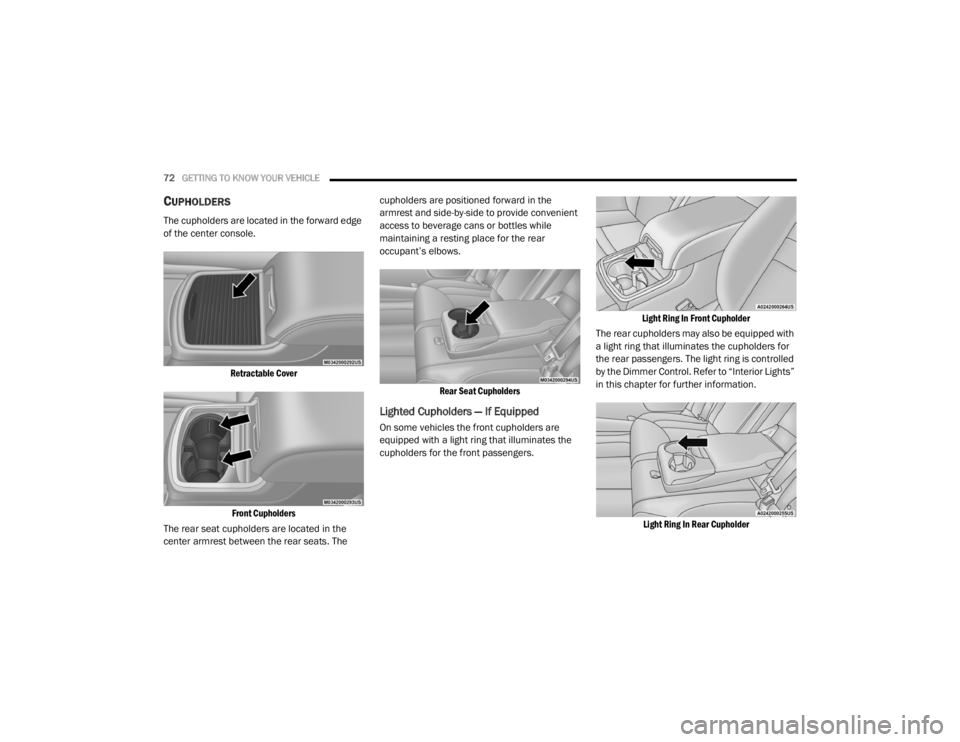
The cupholders are located in the forward edge
of the center console.
Retractable CoverFront Cupholders
The rear seat cupholders are located in the
center armrest between the rear seats. The cupholders are positioned forward in the
armrest and side-by-side to provide convenient
access to beverage cans or bottles while
maintaining a resting place for the rear
occupant’s elbows.
Rear Seat Cupholders
Lighted Cupholders — If Equipped
On some vehicles the front cupholders are
equipped with a light ring that illuminates the
cupholders for the front passengers.
Light Ring In Front Cupholder
The rear cupholders may also be equipped with
a light ring that illuminates the cupholders for
the rear passengers. The light ring is controlled
by the Dimmer Control. Refer to “Interior Lights”
in this chapter for further information.
Light Ring In Rear Cupholder
20_LX_OM_EN_USC_t.book Page 72
Page 75 of 328
GETTING TO KNOW YOUR VEHICLE73
Heated And Cooled Cupholders — If
Equipped
Your vehicle may be equipped with heated and
cooled cupholders. The cupholders are
designed to help keep warm beverages warm
and cool beverages cool.
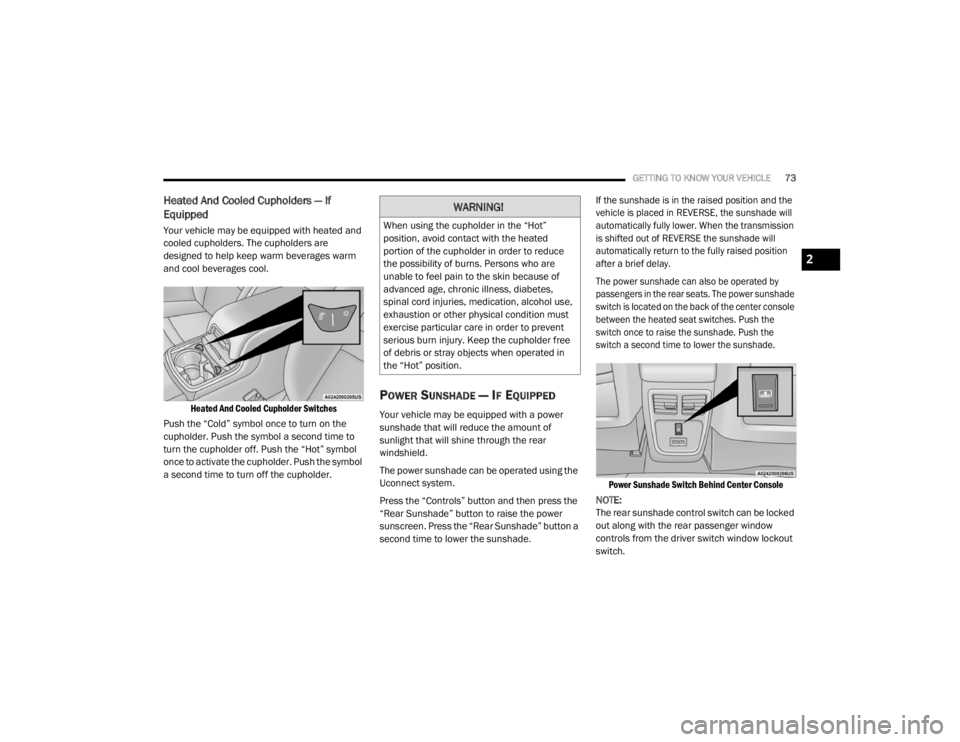
Heated And Cooled Cupholder Switches
Push the “Cold” symbol once to turn on the
cupholder. Push the symbol a second time to
turn the cupholder off. Push the “Hot” symbol
once to activate the cupholder. Push the symbol
a second time to turn off the cupholder.
POWER SUNSHADE — IF EQUIPPED
Your vehicle may be equipped with a power
sunshade that will reduce the amount of
sunlight that will shine through the rear
windshield.
The power sunshade can be operated using the
Uconnect system.
Press the “Controls” button and then press the
“Rear Sunshade” button to raise the power
sunscreen. Press the “Rear Sunshade” button a
second time to lower the sunshade.
If the sunshade is in the raised position and the
vehicle is placed in REVERSE, the sunshade will
automatically fully lower. When the transmission
is shifted out of REVERSE the sunshade will
automatically return to the fully raised position
after a brief delay.
The power sunshade can also be operated by
passengers in the rear seats. The power sunshade
switch is located on the back of the center console
between the heated seat switches. Push the
switch once to raise the sunshade. Push the
switch a second time to lower the sunshade.
Power Sunshade Switch Behind Center Console
NOTE:
The rear sunshade control switch can be locked
out along with the rear passenger window
controls from the driver switch window lockout
switch.
WARNING!
When using the cupholder in the “Hot”
position, avoid contact with the heated
portion of the cupholder in order to reduce
the possibility of burns. Persons who are
unable to feel pain to the skin because of
advanced age, chronic illness, diabetes,
spinal cord injuries, medication, alcohol use,
exhaustion or other physical condition must
exercise particular care in order to prevent
serious burn injury. Keep the cupholder free
of debris or stray objects when operated in
the “Hot” position.
2
20_LX_OM_EN_USC_t.book Page 73
Page 85 of 328

GETTING TO KNOW YOUR INSTRUMENT PANEL83
Outside Temp.
Time
Range to Empty
Average (MPG, L/100 km, or km/L)
Current (MPG, L/100 km, or km/L)
Trip A Distance
Trip B Distance
Audio Information
Digital Speed
None
4. Current Gear
On
Off (default)
5. Odometer
Show (default)
Hide
6. Fuel Gauge
Standard (default)
Detailed 7. Restore Default
OK
Cancel
BATTERY SAVER ON/BATTERY SAVER
M
ODE MESSAGE — ELECTRICAL LOAD
R
EDUCTION ACTIONS — IF EQUIPPED
This vehicle is equipped with an Intelligent
Battery Sensor (IBS) to perform additional
monitoring of the electrical system and status
of the vehicle battery.
In cases when the IBS detects charging system
failure, or the vehicle battery conditions are
deteriorating, electrical load reduction actions
will take place to extend the driving time and
distance of the vehicle. This is done by reducing
power to or turning off non-essential electrical
loads.
Load reduction is only active when the engine is
running. It will display a message if there is a
risk of battery depletion to the point where the
vehicle may stall due to lack of electrical supply,
or will not restart after the current drive cycle. When load reduction is activated, the message
“Battery Saver On” or “Battery Saver Mode” will
appear in the instrument cluster.
These messages indicate the vehicle battery
has a low state of charge and continues to lose
electrical charge at a rate that the charging
system cannot sustain.
NOTE:The charging system is independent from
load reduction. The charging system
performs a diagnostic on the charging
system continuously.
If the Battery Charge Warning Light is on it
may indicate a problem with the charging
system. Refer to “Battery Charge Warning
Light” in this section for further information.
The electrical loads that may be switched off (if
equipped), and vehicle functions which can be
affected by load reduction:
Heated Seat/Vented Seats/Heated Wheel —
If Equipped
Heated/Cooled Cup Holders — If Equipped
Rear Defroster And Heated Mirrors
HVAC System
3
20_LX_OM_EN_USC_t.book Page 83
Page 116 of 328
114SAFETY
IMPORTANT SAFETY PRECAUTIONS
Please pay close attention to the information in
this section. It tells you how to use your restraint
system properly, to keep you and your
passengers as safe as possible.
Here are some simple steps you can take to
minimize the risk of harm from a deploying air
bag:
1. Children 12 years old and under should
always ride buckled up in the rear seat of a
vehicle with a rear seat.
2. A child who is not big enough to wear the vehicle seat belt properly (Refer to “Child
Restraints” in this section for further
information) must be secured in the
appropriate child restraint or
belt-positioning booster seat in a rear
seating position.
3. If a child from 2 to 12 years old (not in a rear-facing child restraint) must ride in the
front passenger seat, move the seat as far
back as possible and use the proper child
restraint (Refer to “Child Restraints” in this
section for further information). 4. Never allow children to slide the shoulder
belt behind them or under their arm.
5. You should read the instructions provided with your child restraint to make sure that
you are using it properly.
6. All occupants should always wear their lap and shoulder belts properly.
7. The driver and front passenger seats should be moved back as far as practical to allow
the front air bags room to inflate.
8. Do not lean against the door or window. If your vehicle has side air bags, and
deployment occurs, the side air bags will
inflate forcefully into the space between
occupants and the door and occupants
could be injured.
9. If the air bag system in this vehicle needs to be modified to accommodate a disabled
person, refer to the “Customer Assistance”
section for customer service contact
information.
SEAT BELT SYSTEMS
Buckle up even though you are an excellent
driver, even on short trips. Someone on the road
may be a poor driver and could cause a collision
that includes you. This can happen far away
from home or on your own street.
Research has shown that seat belts save lives,
and they can reduce the seriousness of injuries
in a collision. Some of the worst injuries happen
when people are thrown from the vehicle. Seat
belts reduce the possibility of ejection and the
WARNING!
Never place a rear-facing child restraint in
front of an air bag. A deploying passenger
front air bag can cause death or serious
injury to a child 12 years or younger,
including a child in a rear-facing child
restraint.
Never install a rear-facing child restraint in
the front seat of a vehicle. Only use a
rear-facing child restraint in the rear seat. If
the vehicle does not have a rear seat, do
not transport a rear-facing child restraint in
that vehicle.
20_LX_OM_EN_USC_t.book Page 114
Page 118 of 328
116SAFETY
(Continued)
(Continued)
to move freely with you under normal
conditions. However, in a collision the seat belt
will lock and reduce your risk of striking the
inside of the vehicle or being thrown out of the
vehicle.
WARNING!
Relying on the air bags alone could lead to
more severe injuries in a collision. The air
bags work with your seat belt to restrain you
properly. In some collisions, the air bags
won’t deploy at all. Always wear your seat
belt even though you have air bags.
In a collision, you and your passengers can
suffer much greater injuries if you are not
properly buckled up. You can strike the inte
-
rior of your vehicle or other passengers, or
you can be thrown out of the vehicle. Always
be sure you and others in your vehicle are
buckled up properly.
It is dangerous to ride in a cargo area,
inside or outside of a vehicle. In a collision,
people riding in these areas are more likely
to be seriously injured or killed.
Do not allow people to ride in any area of
your vehicle that is not equipped with seats
and seat belts.
Be sure everyone in your vehicle is in a seat
and using a seat belt properly. Occupants,
including the driver, should always wear
their seat belts whether or not an air bag is
also provided at their seating position to
minimize the risk of severe injury or death
in the event of a crash.
Wearing your seat belt incorrectly could
make your injuries in a collision much
worse. You might suffer internal injuries, or
you could even slide out of the seat belt.
Follow these instructions to wear your seat
belt safely and to keep your passengers
safe, too.
Two people should never be belted into a
single seat belt. People belted together can
crash into one another in a collision, hurting
one another badly. Never use a lap/
shoulder belt or a lap belt for more than one
person, no matter what their size.
WARNING! (Continued)WARNING!
A lap belt worn too high can increase the
risk of injury in a collision. The seat belt
forces won’t be at the strong hip and pelvic
bones, but across your abdomen. Always
wear the lap part of your seat belt as low as
possible and keep it snug.
A twisted seat belt may not protect you
properly. In a collision, it could even cut into
you. Be sure the seat belt is flat against
your body, without twists. If you can’t
straighten a seat belt in your vehicle, take it
to an authorized dealer immediately and
have it fixed.
A seat belt that is buckled into the wrong
buckle will not protect you properly. The lap
portion could ride too high on your body,
possibly causing internal injuries. Always
buckle your seat belt into the buckle
nearest you.
A seat belt that is too loose will not protect
you properly. In a sudden stop, you could
move too far forward, increasing the possi -
bility of injury. Wear your seat belt snugly.
20_LX_OM_EN_USC_t.book Page 116
Page 120 of 328
118SAFETY
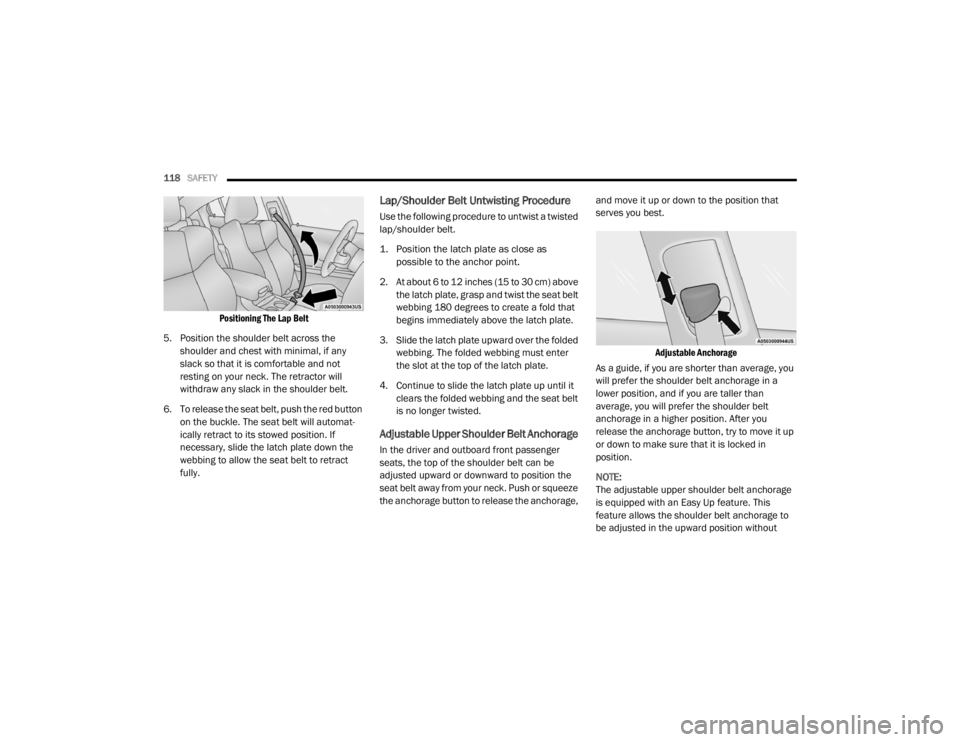
Positioning The Lap Belt
5. Position the shoulder belt across the shoulder and chest with minimal, if any
slack so that it is comfortable and not
resting on your neck. The retractor will
withdraw any slack in the shoulder belt.
6. To release the seat belt, push the red button on the buckle. The seat belt will automat -
ically retract to its stowed position. If
necessary, slide the latch plate down the
webbing to allow the seat belt to retract
fully.
Lap/Shoulder Belt Untwisting Procedure
Use the following procedure to untwist a twisted
lap/shoulder belt.
1. Position the latch plate as close as possible to the anchor point.
2. At about 6 to 12 inches (15 to 30 cm) above the latch plate, grasp and twist the seat belt
webbing 180 degrees to create a fold that
begins immediately above the latch plate.
3. Slide the latch plate upward over the folded webbing. The folded webbing must enter
the slot at the top of the latch plate.
4. Continue to slide the latch plate up until it clears the folded webbing and the seat belt
is no longer twisted.
Adjustable Upper Shoulder Belt Anchorage
In the driver and outboard front passenger
seats, the top of the shoulder belt can be
adjusted upward or downward to position the
seat belt away from your neck. Push or squeeze
the anchorage button to release the anchorage, and move it up or down to the position that
serves you best.
Adjustable Anchorage
As a guide, if you are shorter than average, you
will prefer the shoulder belt anchorage in a
lower position, and if you are taller than
average, you will prefer the shoulder belt
anchorage in a higher position. After you
release the anchorage button, try to move it up
or down to make sure that it is locked in
position.
NOTE:
The adjustable upper shoulder belt anchorage
is equipped with an Easy Up feature. This
feature allows the shoulder belt anchorage to
be adjusted in the upward position without
20_LX_OM_EN_USC_t.book Page 118