2020 CHRYSLER 300 trunk release
[x] Cancel search: trunk releasePage 14 of 328

12GETTING TO KNOW YOUR VEHICLE
To remove the emergency key, slide the
mechanical release button on the back of the
key fob sideways with your thumb and then pull
the key out with your other hand.
Emergency Key Removal Process
In case the ignition switch does not change with
the push of a button, the key fob may have a low
or fully depleted battery. A low key fob battery
can be verified by referring to the instrument
cluster, which will display directions to follow.
NOTE:
In a situation of a low or fully depleted battery, a
backup method can be used to operate the igni -
tion switch. Put the nose side of the key fob (side opposite of the emergency key) against
the START/STOP ignition button and push to
operate the ignition switch.
To Unlock The Doors
Push and release the unlock button on the key
fob once to unlock the driver's door or twice
within five seconds to unlock all doors.
The turn signal lights will flash to acknowledge
the unlock signal. The illuminated entry system
will also be activated.
NOTE:
All door unlock settings can be programmed to
your convenience through Uconnect Settings.
Refer to “Uconnect Settings” in “Multimedia”
for further information.
Unlock the driver door on the first push of the
key fob unlock button.
Unlock all doors on the first push of the key
fob unlock button.
NOTE:
To unlock doors and trunk with passive entry,
Refer to “Keyless Enter-N-Go — Passive Entry” in
“Doors” in this chapter for further information. NOTE:
When you use the key fob to open any door, the
courtesy lights, overhead lights, and approach
lighting in the outside mirrors (if equipped) will
turn on. Refer to “Interior Lights” in this chapter
for further information.
1st Press Of Key Fob Unlocks
This feature lets you program the system to
unlock either the driver's door or all doors
on the first push of the unlock button on the
key fob.
To change the current setting, refer to
“Uconnect Settings” in “Multimedia” for further
information.
Flash Lights With Lock
This feature will cause the turn signal lights to
flash when the doors are locked with the key
fob. This feature can be turned on or turned off.
To change the current setting, refer to
“Uconnect Settings” in “Multimedia” for further
information.
1 — Mechanical Release Button
2 — Emergency Key
20_LX_OM_EN_USC_t.book Page 12
Page 15 of 328

GETTING TO KNOW YOUR VEHICLE13
Headlight Illumination On Approach
This feature activates the headlights for up to
90 seconds when the doors are unlocked with
the key fob. The time for this feature is
programmable, on vehicles equipped, through
Uconnect Settings. To change the current
setting, refer to “Uconnect Settings” in
“Multimedia” for further information.
To Unlatch The Trunk
Push the trunk button on the key fob two times
within five seconds to unlatch the trunk.
If the vehicle is equipped with Passive Entry,
refer to “Keyless Enter-N-Go — Passive Entry” in
“Doors” in this chapter for further information.
To Lock The Doors And Trunk
Push and release the lock button on the key fob
to lock all doors.
The turn signal lights will flash and the horn will
chirp to acknowledge the signal if programmed.
Refer to “Uconnect Settings” in “Multimedia”
for further programmable information.
NOTE:
To lock the doors with passive entry, refer to
“Keyless Enter-N-Go — Passive Entry” in “Doors”
in this chapter for further information. If one or more doors are open, or the trunk is
open, the doors will lock. The doors will unlock
automatically if the key fob is left inside the
passenger compartment, otherwise the doors
will stay locked.
Sound Horn With Lock
This feature will cause the horn to chirp when the
doors are locked with the key fob. This feature
can be turned on or turned off. To change the
current setting, refer to “Uconnect Settings” in
“Multimedia” for further information.
Using The Panic Alarm
To turn the Panic Alarm feature on or off, push
the Panic button on the key fob. When the Panic
Alarm is activated, the turn signals will flash, the
horn will pulse on and off, and the interior lights
will turn on.
The Panic Alarm will stay on for three minutes
unless you turn it off by either pushing the Panic
button a second time or drive the vehicle at a
speed of 15 mph (24 km/h) or greater.
NOTE:
The interior lights will turn off if you place the
ignition in the ACC or ON/RUN position while the Panic Alarm is activated. However, the
exterior lights and horn will remain on.
You may need to be less than 35 ft (11 m)
from the vehicle when using the key fob to
turn off the Panic Alarm due to the radio
frequency noises emitted by the system.
Key Fob Battery Replacement
The recommended replacement battery is one
CR2032 battery.
NOTE:
Perchlorate Material — special handling may
apply. See www.dtsc.ca.gov/hazard
-
ouswaste/perchlorate for further informa -
tion.
Do not touch the battery terminals that are
on the back housing or the printed circuit
board.
1. Remove the emergency key by sliding the mechanical latch on the back of the key
fob sideways with your thumb and then pull
the emergency key out with your other
hand.
2
20_LX_OM_EN_USC_t.book Page 13
Page 21 of 328

GETTING TO KNOW YOUR VEHICLE19
REMOTE START ABORT MESSAGE ON
T
HE INSTRUMENT CLUSTER DISPLAY —
I
F EQUIPPED
The following messages will display in the
instrument cluster display if the vehicle fails to
remote start or exits remote start prematurely:
Remote Start Aborted — Door Open
Remote Start Aborted — Hood Open
Remote Start Aborted — Fuel Low
Remote Start Aborted — Trunk Open
Remote Start Disabled — Start Vehicle To
Reset
Remote Start Aborted — Too Cold
Remote Start Aborted — Time Expired
The message will stay active until the ignition is
placed in the ON/RUN position.
TO ENTER REMOTE START MODE
Push and release the remote start button on the
key fob twice within five seconds. The vehicle
doors will lock, the parking lights will flash, and
the horn will chirp twice (if programmed). Then,
the engine will start, and the vehicle will remain
in the Remote Start mode for a 15 minute cycle.
NOTE:
If an engine fault is present or fuel level is
low, the vehicle will start and then shut down
in 10 seconds.
The park lamps will turn on and remain on
during Remote Start mode.
For security, power window and power
sunroof operation (if equipped) are disabled
when the vehicle is in the Remote Start
mode.
The engine can be started two consecutive
times with the key fob. However, the ignition
must be cycled by pushing the START/STOP
ignition button twice (or the ignition switch
must be placed in the ON/RUN position)
before you can repeat the start sequence for
a third cycle.
TO EXIT REMOTE START MODE
W
ITHOUT DRIVING THE VEHICLE
Push and release the remote start button one
time or allow the engine to run for the entire
15 minute cycle.
NOTE:
To avoid unintentional shutdowns, the system
will disable for two seconds after receiving a
valid remote start request.
TO EXIT REMOTE START MODE AND
D
RIVE THE VEHICLE
Before the end of 15 minute cycle, push and
release the unlock button on the key fob to
unlock the doors and disarm the vehicle
security alarm (if equipped). Then, prior to the
end of the 15 minute cycle, push and release
the START/STOP ignition button.
NOTE:
For vehicles not equipped with the Keyless
Enter-N-Go — Passive Entry feature, the igni -
tion switch must be in the ON/RUN position
in order to drive the vehicle.
Keep key fobs away from children. Opera -
tion of the Remote Start System, windows,
door locks or other controls could cause
serious injury or death.
WARNING! (Continued)
2
20_LX_OM_EN_USC_t.book Page 19
Page 24 of 328

22GETTING TO KNOW YOUR VEHICLE
GENERAL INFORMATION
The following regulatory statement applies to all
Radio Frequency (RF) devices equipped in this
vehicle:
This device complies with Part 15 of the FCC
Rules and with Innovation, Science and
Economic Development Canada license-exempt
RSS standard(s). Operation is subject to the
following two conditions:
1. This device may not cause harmful
interference, and
2. This device must accept any interference received, including interference that may
cause undesired operation.
Le présent appareil est conforme aux CNR
d`Innovation, Science and Economic
Development applicables aux appareils radio
exempts de licence. L'exploitation est autorisée
aux deux conditions suivantes:
1. l'appareil ne doit pas produire de brouillage, et
2. l'utilisateur de l'appareil doit accepter tout brouillage radioélectrique subi, même si le brouillage est susceptible d'en compro
-
mettre le fonctionnement.
La operación de este equipo está sujeta a las
siguientes dos condiciones:
1. es posible que este equipo o dispositivo no cause interferencia perjudicial y
2. este equipo o dispositivo debe aceptar cualquier interferencia, incluyendo la que
pueda causar su operación no deseada.
NOTE:
Changes or modifications not expressly
approved by the party responsible for compli -
ance could void the user’s authority to operate
the equipment.
VEHICLE SECURITY ALARM — IF EQUIPPED
The vehicle security alarm monitors the vehicle
doors for unauthorized entry and the keyless
push button ignition for unauthorized operation.
While the vehicle security alarm is armed,
interior switches for door locks and trunk
release are disabled. If something triggers the
alarm, the vehicle security alarm will provide the
following audible and visible signals: the horn will pulse, the park lamps and/or turn signals
will flash, and the vehicle security light in the
instrument cluster will flash.
TO ARM THE SYSTEM
Follow these steps to arm the vehicle security
alarm:
1. Make sure the vehicle’s ignition is placed
in the OFF position. Refer to "Ignition
Switch" in this chapter for further
information.
2. Perform one of the following methods to lock the vehicle:
Push lock on the interior power door lock
switch with the driver and/or passenger
door open.
Push the lock button on the exterior
Passive Entry Door Handle with a valid
key fob available in the same exterior
zone (refer to "Keyless Enter-N-Go —
Passive Entry," in “Doors” in this chapter
for further information).
Push the lock button on the key fob.
3. If any doors are open, close them.
20_LX_OM_EN_USC_t.book Page 22
Page 64 of 328

62GETTING TO KNOW YOUR VEHICLE
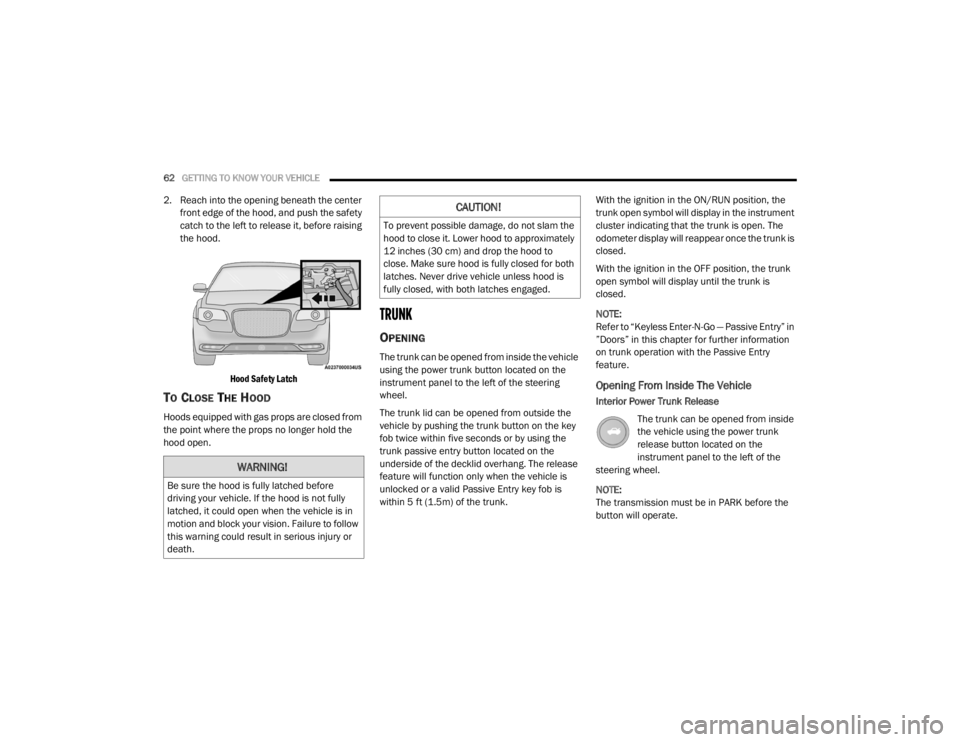
2. Reach into the opening beneath the center
front edge of the hood, and push the safety
catch to the left to release it, before raising
the hood.
Hood Safety Latch
TO CLOSE THE HOOD
Hoods equipped with gas props are closed from
the point where the props no longer hold the
hood open.
TRUNK
OPENING
The trunk can be opened from inside the vehicle
using the power trunk button located on the
instrument panel to the left of the steering
wheel.
The trunk lid can be opened from outside the
vehicle by pushing the trunk button on the key
fob twice within five seconds or by using the
trunk passive entry button located on the
underside of the decklid overhang. The release
feature will function only when the vehicle is
unlocked or a valid Passive Entry key fob is
within 5 ft (1.5m) of the trunk. With the ignition in the ON/RUN position, the
trunk open symbol will display in the instrument
cluster indicating that the trunk is open. The
odometer display will reappear once the trunk is
closed.
With the ignition in the OFF position, the trunk
open symbol will display until the trunk is
closed.
NOTE:
Refer to “Keyless Enter-N-Go — Passive Entry” in
”Doors” in this chapter for further information
on trunk operation with the Passive Entry
feature.
Opening From Inside The Vehicle
Interior Power Trunk Release
The trunk can be opened from inside
the vehicle using the power trunk
release button located on the
instrument panel to the left of the
steering wheel.
NOTE:
The transmission must be in PARK before the
button will operate.
WARNING!
Be sure the hood is fully latched before
driving your vehicle. If the hood is not fully
latched, it could open when the vehicle is in
motion and block your vision. Failure to follow
this warning could result in serious injury or
death.
CAUTION!
To prevent possible damage, do not slam the
hood to close it. Lower hood to approximately
12 inches (30 cm) and drop the hood to
close. Make sure hood is fully closed for both
latches. Never drive vehicle unless hood is
fully closed, with both latches engaged.
20_LX_OM_EN_USC_t.book Page 62
Page 65 of 328

GETTING TO KNOW YOUR VEHICLE63
Opening From Outside The Vehicle
To Unlock/Open The Trunk
The trunk may be unlocked/opened using
either of the following methods:
Key Fob Trunk Release Button
Passive Entry Button
Key Fob Trunk Release Button Push the power trunk button on the
key fob twice within five seconds to
open the trunk.
Passive Entry Button
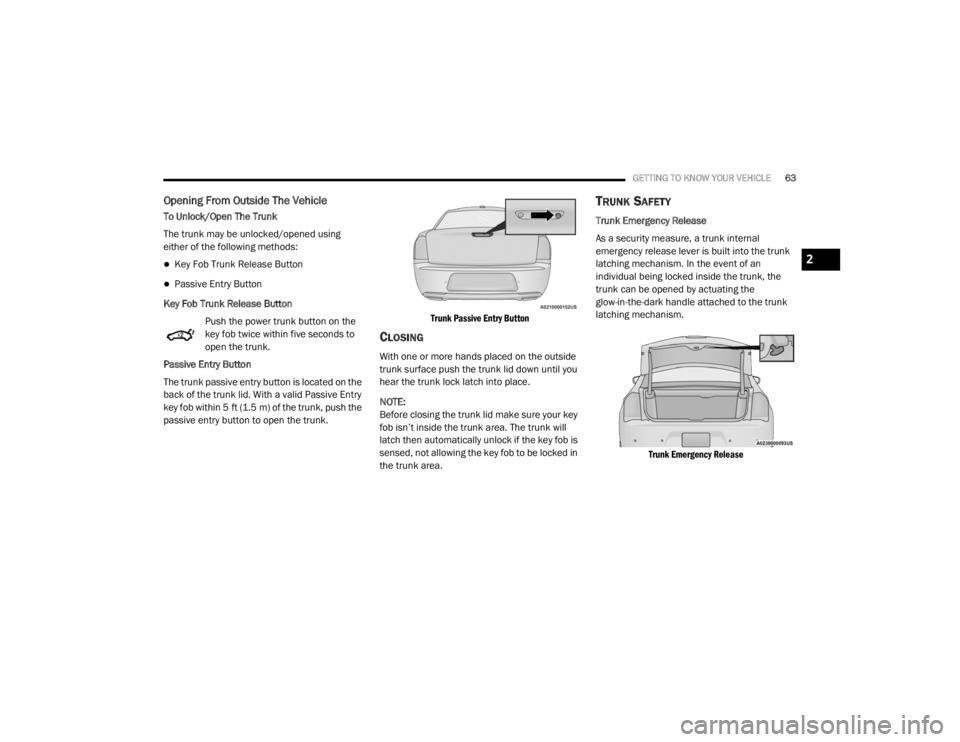
The trunk passive entry button is located on the
back of the trunk lid. With a valid Passive Entry
key fob within 5 ft (1.5 m) of the trunk, push the
passive entry button to open the trunk.
Trunk Passive Entry Button
CLOSING
With one or more hands placed on the outside
trunk surface push the trunk lid down until you
hear the trunk lock latch into place.
NOTE:
Before closing the trunk lid make sure your key
fob isn’t inside the trunk area. The trunk will
latch then automatically unlock if the key fob is
sensed, not allowing the key fob to be locked in
the trunk area.
TRUNK SAFETY
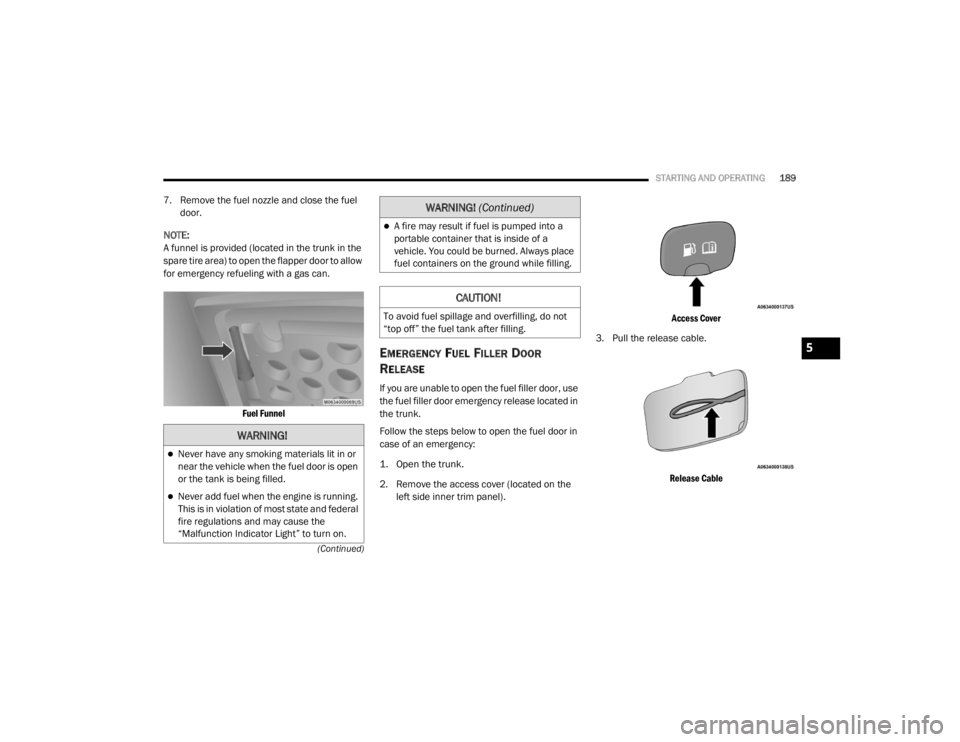
Trunk Emergency Release
As a security measure, a trunk internal
emergency release lever is built into the trunk
latching mechanism. In the event of an
individual being locked inside the trunk, the
trunk can be opened by actuating the
glow-in-the-dark handle attached to the trunk
latching mechanism.
Trunk Emergency Release
2
20_LX_OM_EN_USC_t.book Page 63
Page 191 of 328

STARTING AND OPERATING189
(Continued)
7. Remove the fuel nozzle and close the fuel door.
NOTE:
A funnel is provided (located in the trunk in the
spare tire area) to open the flapper door to allow
for emergency refueling with a gas can.
Fuel Funnel
EMERGENCY FUEL FILLER DOOR
R
ELEASE
If you are unable to open the fuel filler door, use
the fuel filler door emergency release located in
the trunk.
Follow the steps below to open the fuel door in
case of an emergency:
1. Open the trunk.
2. Remove the access cover (located on the
left side inner trim panel).
Access Cover
3. Pull the release cable.
Release Cable
WARNING!
Never have any smoking materials lit in or
near the vehicle when the fuel door is open
or the tank is being filled.
Never add fuel when the engine is running.
This is in violation of most state and federal
fire regulations and may cause the
“Malfunction Indicator Light” to turn on.
A fire may result if fuel is pumped into a
portable container that is inside of a
vehicle. You could be burned. Always place
fuel containers on the ground while filling.
CAUTION!
To avoid fuel spillage and overfilling, do not
“top off” the fuel tank after filling.
WARNING! (Continued)
5
20_LX_OM_EN_USC_t.book Page 189
Page 323 of 328

321
Power Seats Forward
....................................................... 31Lumbar........................................................ 32Rearward..................................................... 31Recline........................................................ 32Power Steering Fluid...................................... 281Pregnant Women And Seat Belts...................119Preparation For Jacking................................. 218PretensionersSeat Belts.................................................. 120
R
Radial Ply Tires.............................................. 262Radiator Cap (Coolant Pressure Cap)............ 249Radio Operation............................................ 303Rain Sensitive Wiper System........................... 49Rear Axle (Differential)................................... 253Rear Camera................................................. 186Rear Cross Path............................................. 105Rear ParkSense System................................ 177Rear Seats, Folding......................................... 30Rear Wheel Drive (RWD)Towing....................................................... 229Recreational Towing...................................... 198Reformulated Gasoline.................................. 277Refrigerant.................................................... 242Release, Hood................................................. 61Reminder, Lights On........................................ 45Reminder, Seat Belt...................................... 115
Remote Keyless EntryArm The Alarm............................................. 22Panic Alarm................................................. 13Programming Additional Key Fobs........ 15, 21Unlatch The Trunk....................................... 13Remote StartingExit Remote Start Mode.............................. 19Uconnect Customer ProgrammableFeatures.................................................. 20Uconnect Settings....................................... 20Remote Trunk Release.................................... 62Replacement Bulbs...................................... 206Replacement Keys.................................... 15, 21Replacement Tires........................................ 264Reporting Safety Defects.............................. 313Restraints, Child........................................... 130Restraints, Head....................................... 35, 36Rocking Vehicle When Stuck........................ 227Rotation, Tires.............................................. 270
S
Safety Checks Inside Vehicle........................ 143Safety Checks Outside Vehicle..................... 145Safety Defects, Reporting............................. 313Safety Information, Tire................................ 253Safety Tips.................................................... 142Safety, Exhaust Gas...................................... 143Schedule, Maintenance....................... 231, 232Seat Belt Reminder.......................................... 87
Seat Belts............................................ 114, 143Adjustable Shoulder Belt.......................... 118Adjustable Upper Shoulder Anchorage..... 118Adjustable Upper Shoulder BeltAnchorage............................................ 118Automatic Locking Retractor (ALR)........... 120Child Restraints........................................ 130Energy Management Feature................... 120Extender................................................... 119Front Seat............................... 114, 115, 117Inspection................................................. 143Lap/Shoulder Belt Operation.................... 117Lap/Shoulder Belt Untwisting................... 118Lap/Shoulder Belts................................... 115Operating Instructions.............................. 117Pregnant Women...................................... 119Pretensioners........................................... 120Rear Seat.................................................. 115Reminder.................................................. 115Seat Belt Extender.................................... 119Seat Belt Pretensioner.............................. 120Untwisting Procedure................................ 118Seat Belts Maintenance................................ 273Seats.................................................. 30, 31, 33Adjustment...........................................30, 31Easy Entry....................................................32Head Restraints....................................35, 36Heated.........................................................33Height Adjustment.......................................31
11
20_LX_OM_EN_USC_t.book Page 321