2020 CHEVROLET SILVERADO Capacities and Specifications
[x] Cancel search: Capacities and SpecificationsPage 337 of 495

Chevrolet Silverado Owner Manual (GMNA-Localizing-U.S./Canada/Mexico-
13337620) - 2020 - CTC - 1/27/20
336 Vehicle Care
If a low oil Driver Information Center
(DIC) message displays, check the
oil level.
Follow these guidelines:
.To get an accurate reading, park
the vehicle on level ground.
Check the engine oil level after
the engine has been off for at
least two hours. Checking the
engine oil level on steep grades
or too soon after engine shutoff
can result in incorrect readings.
Accuracy improves when
checking a cold engine prior to
starting. Remove the dipstick
and check the level.
. If unable to wait two hours, the
engine must be off for at least
15 minutes if the engine is
warm, or at least 30 minutes if
the engine is not warm. Pull out
the dipstick, wipe it with a clean
paper towel or cloth, then push it
back in all the way. Remove it
again, keeping the tip down, and
check the level.When to Add Engine Oil
If the oil is below the cross-hatched
area at the tip of the dipstick and
the engine has been off for at least
15 minutes, add 1 L (1 qt) of the
recommended oil and then recheck
the level. See “Selecting the Right
Engine Oil” later in this section for
an explanation of what kind of oil to
use. For engine oil crankcase
capacity, see Capacities and
Specifications 0454.
Caution
Do not add too much oil. Oil
levels above or below the
acceptable operating range
shown on the dipstick are harmful
to the engine. If the oil level is
(Continued)
Caution (Continued)
above the operating range (i.e.,
the engine has so much oil that
the oil level gets above the
cross-hatched area that shows
the proper operating range), the
engine could be damaged. Drain
the excess oil or limit driving of
the vehicle, and seek a service
professional to remove the
excess oil.
See Engine Compartment Overview
0 328 for the location of the engine
oil fill cap.
Add enough oil to put the level
somewhere in the proper operating
range. Push the dipstick all the way
back in when through.
Selecting the Right Engine Oil
Selecting the right engine oil
depends on both the proper oil
specification and viscosity grade.
See Recommended Fluids and
Lubricants 0448.
Page 353 of 495

Chevrolet Silverado Owner Manual (GMNA-Localizing-U.S./Canada/Mexico-
13337620) - 2020 - CTC - 1/27/20
352 Vehicle Care
Caution
Continuing to drive with worn-out
brake pads could result in costly
brake repair.
Some driving conditions or climates
can cause a brake squeal when the
brakes are first applied or lightly
applied. This does not mean
something is wrong with the brakes.
Properly torqued wheel nuts are
necessary to help prevent brake
pulsation. When tires are rotated,
inspect brake pads for wear and
evenly tighten wheel nuts in the
proper sequence to torque
specifications in Capacities and
Specifications 0454.
Brake linings should always be
replaced as complete axle sets.
Brake Pedal Travel
See your dealer if the brake pedal
does not return to normal height,
or if there is a rapid increase in
pedal travel. This could be a sign
that brake service may be required.
Replacing Brake System Parts
Always replace brake system parts
with new, approved replacement
parts. If this is not done, the brakes
may not work properly. The braking
performance expected can change
in many other ways if the wrong
replacement brake parts are
installed or parts are improperly
installed.
Brake Pad Life System
When to Change Brake Pads
This vehicle has a system that
estimates the remaining life of the
front and rear brake pads. Brake
pad life is displayed in the Driver
Information Center (DIC), along with
a percentage for each axle. The
system must be reset every time the
brake pads are changed.
When the system has determined
that the brake pads need to be
replaced, a message will display,
which may include mileage
remaining.
Brake pads should always be
replaced as complete axle sets.
How to Reset the Brake Pad
Life System
The system will automatically detect
when significantly worn brake pads
are replaced. When the ignition is
turned on after new pads and wear
sensors are installed, a message
will display. Follow the prompts to
reset the system.
The brake pad life system can also
be manually reset: 1. Display Brake Pad Life on the DIC. See Driver Information
Center (DIC) (Base Level)
0 145 or
Driver Information Center (DIC)
(Midlevel and Uplevel) 0146.
2. Press the thumbwheel or the trip odometer reset stem if the
vehicle does not have DIC
buttons. Select front or rear
pads as appropriate.
3. Select YES on the confirmation message, or press the trip
odometer reset stem on a base
level DIC. Repeat for pads on
the other axle if they were also
replaced.
Page 394 of 495
Chevrolet Silverado Owner Manual (GMNA-Localizing-U.S./Canada/Mexico-
13337620) - 2020 - CTC - 1/27/20
Vehicle Care 393
information, see“Removing the
Flat Tire and Installing the Spare
Tire” under Tire Changing 0402
and “Wheel Nut Torque” under
Capacities and Specifications
0 454 and “Removing the Flat
Tire and Installing the Spare
Tire” under Tire Changing 0402.
The outer tire on a dual wheel
setup generally wears faster
than the inner tire. Tires last
longer and wear more evenly if
they are rotated. See Tire
Inspection 0392 and
Tire Rotation 0392. Also see
Maintenance Schedule 0437.
{Warning
If the vehicle is operated with a
tire that is underinflated, the tire
can overheat. An overheated tire
can lose air suddenly or catch
fire. You or others could be
injured. Properly inflate all tires,
including the spare.
See Tire Pressure 0383, for
information on proper tire
inflation.
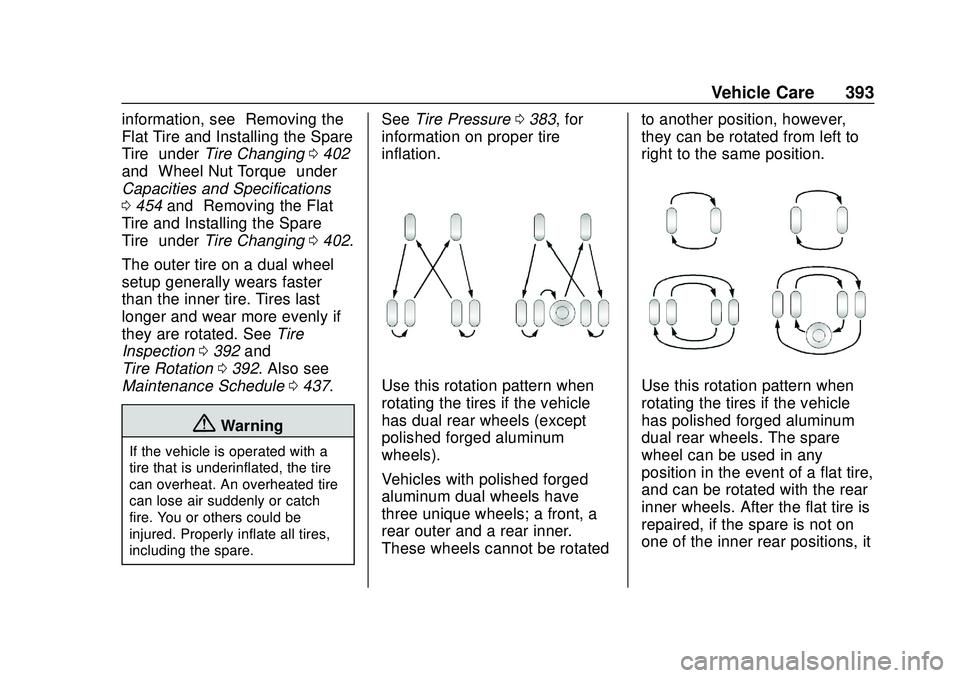
Use this rotation pattern when
rotating the tires if the vehicle
has dual rear wheels (except
polished forged aluminum
wheels).
Vehicles with polished forged
aluminum dual wheels have
three unique wheels; a front, a
rear outer and a rear inner.
These wheels cannot be rotated to another position, however,
they can be rotated from left to
right to the same position.Use this rotation pattern when
rotating the tires if the vehicle
has polished forged aluminum
dual rear wheels. The spare
wheel can be used in any
position in the event of a flat tire,
and can be rotated with the rear
inner wheels. After the flat tire is
repaired, if the spare is not on
one of the inner rear positions, it
Page 395 of 495

Chevrolet Silverado Owner Manual (GMNA-Localizing-U.S./Canada/Mexico-
13337620) - 2020 - CTC - 1/27/20
394 Vehicle Care
must be replaced by the correct
wheel in the front or rear outer
positions.
When installing dual wheels,
check that the vent holes in the
inner and outer wheels on each
side are lined up.
Adjust the front and rear tires to
the recommended inflation
pressure on the Tire and
Loading Information label after
the tires have been rotated. See
Tire Pressure0383 and
Vehicle Load Limits 0197.
Check that all wheel nuts are
properly tightened. See “Wheel
Nut Torque” underCapacities
and Specifications 0454, and
“Removing the Flat Tire and
Installing the Spare Tire” under
Tire Changing 0402.
{Warning
Rust or dirt on a wheel, or on
the parts to which it is
fastened, can make wheel
nuts become loose after time.
The wheel could come off and
cause a crash. When
changing a wheel, remove any
rust or dirt from places where
the wheel attaches to the
vehicle. In an emergency, a
cloth or a paper towel can be
used; however, use a scraper
or wire brush later to remove
all rust or dirt.
Lightly coat the inner diameter of
the wheel hub opening with
wheel bearing grease after a
wheel change or tire rotation to
prevent corrosion or rust
build-up. Do not get grease on
the flat wheel mounting surface
or on the wheel nuts or bolts. Reset the Tire Pressure Monitor
System (TPMS), if the vehicle
has one. See
Tire Pressure
Monitor Operation 0386.
If the full-size tire is part of the
tire rotation, make sure the tire
rotated into the spare position is
stored securely. Push, pull, and
then try to rotate or turn the tire.
If it moves, use the wheel
wrench/hoist shaft to tighten the
cable. See Tire Changing 0402.
When It Is Time for New
Tires
Factors, such as maintenance,
temperatures, driving speeds,
vehicle loading, and road conditions
affect the wear rate of the tires.
Page 401 of 495
Chevrolet Silverado Owner Manual (GMNA-Localizing-U.S./Canada/Mexico-
13337620) - 2020 - CTC - 1/27/20
400 Vehicle Care
Whenever a wheel, wheel bolt,
or wheel nut is replaced on a dual
wheel setup, check the wheel nut
torque after 160,1 600, and
10 000 km (100,1,000, and
6,000 mi) of driving. For proper
torque, see“Wheel Nut Torque”
under Capacities and Specifications
0 454.
See If a Tire Goes Flat 0401 for
more information.
Used Replacement Wheels
{Warning
Replacing a wheel with a used
one is dangerous. How it has
been used or how far it has been
driven may be unknown. It could
fail suddenly and cause a crash.
When replacing wheels, use a
new GM original equipment
wheel.
Tire Chains
{Warning
If the vehicle has LT275/65R18,
275/60R20, LT275/65R20,
or 275/50R22 size tires, do not
use tire chains. If the vehicle is a
1500 Series with LT265/70R17
size tires, do not use tire chains.
They can damage the vehicle
because there is not enough
clearance. Tire chains used on a
vehicle without the proper amount
of clearance can cause damage
to the brakes, suspension,
or other vehicle parts. The area
damaged by the tire chains could
cause you to lose control of the
vehicle, and you or others may be
injured in a crash.
Use another type of traction
device only if its manufacturer
recommends it for use on the
vehicle's tire size combination
and road conditions. Follow that
(Continued)
Warning (Continued)
manufacturer's instructions. To
help avoid damage to the vehicle,
drive slowly, readjust, or remove
the device if it is contacting the
vehicle, and do not spin the
vehicle's wheels.
If you do find traction devices that
will fit, install them on the rear
tires.
Caution
Use tire chains only where legal
and only when necessary. Use
chains that are the proper size
for the tires. If the vehicle has
265/70R17 or 265/65R18 size
tires, they may be installed on the
tires of the rear axle only. If the
vehicle is a dual rear wheel model
and has LT235/80R17 tires,
chains may be installed on the
tires of the rear axle only. If the(Continued)
Page 410 of 495
Chevrolet Silverado Owner Manual (GMNA-Localizing-U.S./Canada/Mexico-
13337620) - 2020 - CTC - 1/27/20
Vehicle Care 409
{Warning
Never use oil or grease on bolts
or nuts because the nuts might
come loose. The vehicle's wheel
could fall off, causing a crash.
10. Put the wheel nuts back on with the rounded end of the
nuts toward the wheel.
11. Tighten each wheel nut by hand. Then use the wheel
wrench to tighten the nuts until
the wheel is held against
the hub.
12. Turn the wheel wrench counterclockwise to lower the
vehicle. Lower the jack
completely.
{Warning
If wheel studs are damaged, they
can break. If all the studs on a
wheel broke, the wheel could
come off and cause a crash.
(Continued)
Warning (Continued)
If any stud is damaged because
of a loose-running wheel, it could
be that all of the studs are
damaged. To be sure, replace all
studs on the wheel. If the stud
holes in a wheel have become
larger, the wheel could collapse in
operation. Replace any wheel if
its stud holes have become larger
or distorted in any way. Inspect
hubs and hub‐piloted wheels for
damage. Because of loose
running wheels, piloting pad
damage may occur and require
replacement of the entire hub, for
proper centering of the wheels.
When replacing studs, hubs,
wheel nuts or wheels, be sure to
use GM original equipment parts.
{Warning
Wheel nuts that are improperly or
incorrectly tightened can cause
the wheels to become loose or
come off. The wheel nuts should
be tightened with a torque wrench
to the proper torque specification
after replacing. Follow the torque
specification supplied by the
aftermarket manufacturer when
using accessory locking wheel
nuts. SeeCapacities and
Specifications 0454 for original
equipment wheel nut torque
specifications.
Caution
Improperly tightened wheel nuts
can lead to brake pulsation and
rotor damage. To avoid expensive
brake repairs, evenly tighten the
wheel nuts in the proper
sequence and to the proper
(Continued)
Page 411 of 495
Chevrolet Silverado Owner Manual (GMNA-Localizing-U.S./Canada/Mexico-
13337620) - 2020 - CTC - 1/27/20
410 Vehicle Care
Caution (Continued)
torque specification. See
Capacities and Specifications
0454 for the wheel nut torque
specification.
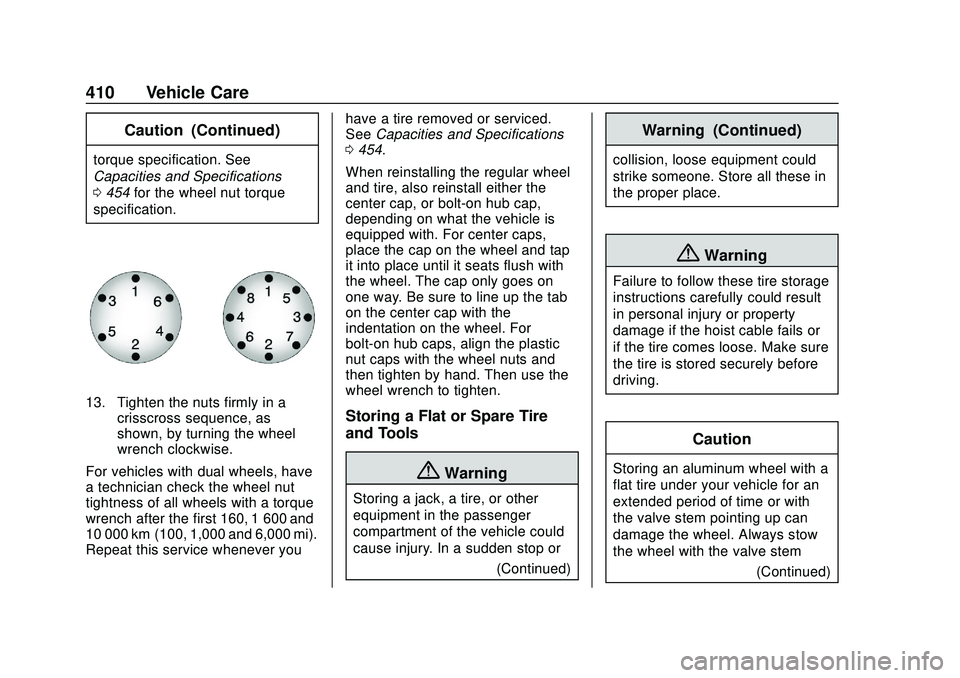
13. Tighten the nuts firmly in a crisscross sequence, as
shown, by turning the wheel
wrench clockwise.
For vehicles with dual wheels, have
a technician check the wheel nut
tightness of all wheels with a torque
wrench after the first 160, 1 600 and
10 000 km (100, 1,000 and 6,000 mi).
Repeat this service whenever you have a tire removed or serviced.
See
Capacities and Specifications
0 454.
When reinstalling the regular wheel
and tire, also reinstall either the
center cap, or bolt-on hub cap,
depending on what the vehicle is
equipped with. For center caps,
place the cap on the wheel and tap
it into place until it seats flush with
the wheel. The cap only goes on
one way. Be sure to line up the tab
on the center cap with the
indentation on the wheel. For
bolt-on hub caps, align the plastic
nut caps with the wheel nuts and
then tighten by hand. Then use the
wheel wrench to tighten.Storing a Flat or Spare Tire
and Tools
{Warning
Storing a jack, a tire, or other
equipment in the passenger
compartment of the vehicle could
cause injury. In a sudden stop or (Continued)
Warning (Continued)
collision, loose equipment could
strike someone. Store all these in
the proper place.
{Warning
Failure to follow these tire storage
instructions carefully could result
in personal injury or property
damage if the hoist cable fails or
if the tire comes loose. Make sure
the tire is stored securely before
driving.
Caution
Storing an aluminum wheel with a
flat tire under your vehicle for an
extended period of time or with
the valve stem pointing up can
damage the wheel. Always stow
the wheel with the valve stem(Continued)
Page 454 of 495

Chevrolet Silverado Owner Manual (GMNA-Localizing-U.S./Canada/Mexico-
13337620) - 2020 - CTC - 1/27/20
Technical Data 453
Technical Data
Vehicle Identification
Vehicle IdentificationNumber (VIN) . . . . . . . . . . . . . . . 453
Service Parts Identification . . . 453
Vehicle Data
Capacities and Specifications . . . . . . . . . . . . . . . 454
Engine Drive Belt Routing . . . . 457
Vehicle Identification
Vehicle Identification
Number (VIN)
This legal identifier is in the front
corner of the instrument panel, on
the driver side of the vehicle. It can
be seen through the windshield from
outside. The Vehicle Identification
Number (VIN) also appears on the
Vehicle Certification and Service
Parts labels and certificates of title
and registration.
Engine Identification
The eighth character in the VIN is
the engine code. This code
identifies the vehicle's engine,
specifications, and replacement
parts. See “Engine Specifications”
under Capacities and Specifications
0 454 for the vehicle's engine code.
Service Parts
Identification
There may be a large barcode on
the certification label on the center
pillar that you can scan for the
following information:
.
Vehicle Identification
Number (VIN)
. Model designation
. Paint information
. Production options
If there is not a large barcode on
this label, then you will find this
same information on a label inside
of the glove box.