2020 CHEVROLET SILVERADO torque
[x] Cancel search: torquePage 239 of 495

Chevrolet Silverado Owner Manual (GMNA-Localizing-U.S./Canada/Mexico-
13337620) - 2020 - CTC - 1/27/20
238 Driving and Operating
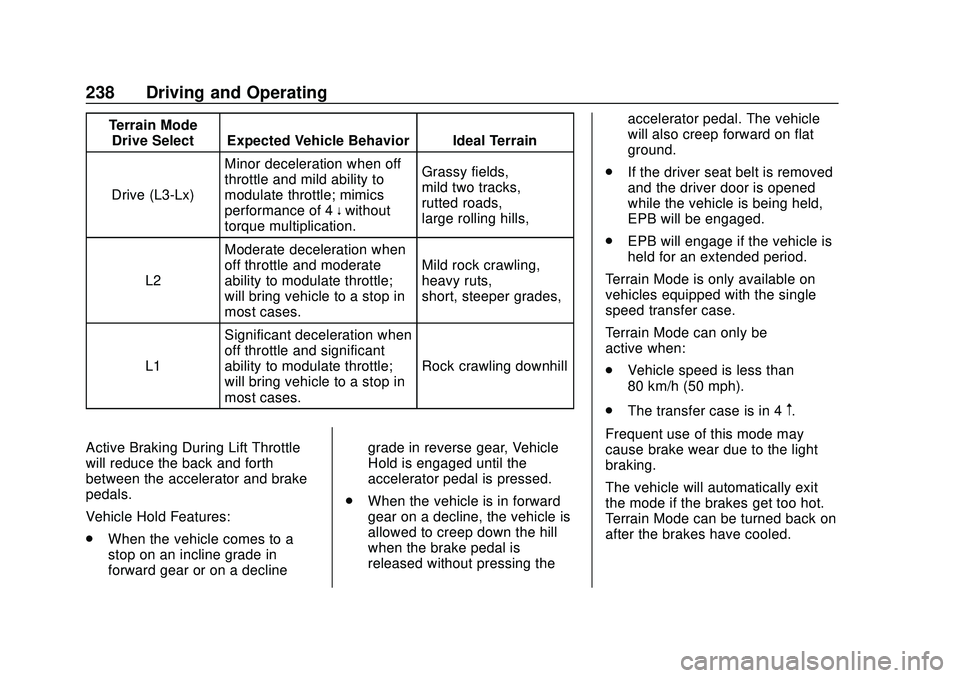
Terrain ModeDrive Select Expected Vehicle Behavior Ideal Terrain
Drive (L3-Lx) Minor deceleration when off
throttle and mild ability to
modulate throttle; mimics
performance of 4
nwithout
torque multiplication. Grassy fields,
mild two tracks,
rutted roads,
large rolling hills,
L2 Moderate deceleration when
off throttle and moderate
ability to modulate throttle;
will bring vehicle to a stop in
most cases. Mild rock crawling,
heavy ruts,
short, steeper grades,
L1 Significant deceleration when
off throttle and significant
ability to modulate throttle;
will bring vehicle to a stop in
most cases. Rock crawling downhill
Active Braking During Lift Throttle
will reduce the back and forth
between the accelerator and brake
pedals.
Vehicle Hold Features:
. When the vehicle comes to a
stop on an incline grade in
forward gear or on a decline grade in reverse gear, Vehicle
Hold is engaged until the
accelerator pedal is pressed.
. When the vehicle is in forward
gear on a decline, the vehicle is
allowed to creep down the hill
when the brake pedal is
released without pressing the accelerator pedal. The vehicle
will also creep forward on flat
ground.
. If the driver seat belt is removed
and the driver door is opened
while the vehicle is being held,
EPB will be engaged.
. EPB will engage if the vehicle is
held for an extended period.
Terrain Mode is only available on
vehicles equipped with the single
speed transfer case.
Terrain Mode can only be
active when:
. Vehicle speed is less than
80 km/h (50 mph).
. The transfer case is in 4
m.
Frequent use of this mode may
cause brake wear due to the light
braking.
The vehicle will automatically exit
the mode if the brakes get too hot.
Terrain Mode can be turned back on
after the brakes have cooled.
Page 305 of 495

Chevrolet Silverado Owner Manual (GMNA-Localizing-U.S./Canada/Mexico-
13337620) - 2020 - CTC - 1/27/20
304 Driving and Operating
4. If the CHECK TRAILERWIRING message reappears,
the electrical fault is on the
vehicle side.
If the CHECK TRAILER WIRING
message only reappears when
connecting the trailer wiring harness
to the vehicle, the electrical fault is
on the trailer side.
SERVICE TRAILER BRAKE
SYSTEM: This message will display
when there is a problem with the
ITBC system. If this message
continues over multiple ignition
cycles, have the vehicle serviced.
If either the CHECK TRAILER
WIRING or SERVICE TRAILER
BRAKE SYSTEM message displays
while driving, the ITBC system may
not be fully functional or may not
function at all. When traffic
conditions allow, carefully pull the
vehicle over to the side of the road
and turn the ignition off. Check the
wiring connection to the trailer and
turn the ignition back on. If either of
these messages continues, either
the vehicle or trailer needs service. A GM dealer may be able to
diagnose and repair problems with
the trailer. However, any diagnosis
and repair of the trailer is not
covered under the vehicle warranty.
Contact your trailer dealer for
assistance with trailer repairs and
trailer warranty information.
Trailer Sway
Control (TSC)
Vehicles with StabiliTrak/Electronic
Stability Control (ESC) have a
Trailer Sway Control (TSC) feature.
Trailer sway is unintended
side-to-side motion of a trailer while
towing. If the vehicle is towing a
trailer and the TSC detects that
sway is increasing, the vehicle
brakes are selectively applied at
each wheel, to help reduce
excessive trailer sway. If equipped
with the Integrated Trailer Brake
Control (ITBC) system, and the
trailer has an electric brake system,
StabiliTrak/ESC may also apply the
trailer brakes.
If TSC is enabled, the Traction
Control System (TCS)/StabiliTrak/
ESC warning light will flash on the
instrument cluster. Reduce vehicle
speed by gradually removing your
foot from the accelerator. If trailer
sway continues, StabiliTrak/ESC
can reduce engine torque to help
slow the vehicle. TSC will not
function if StabiliTrak/ESC is turned
off. See
Traction Control/Electronic
Stability Control 0231.
Page 353 of 495

Chevrolet Silverado Owner Manual (GMNA-Localizing-U.S./Canada/Mexico-
13337620) - 2020 - CTC - 1/27/20
352 Vehicle Care
Caution
Continuing to drive with worn-out
brake pads could result in costly
brake repair.
Some driving conditions or climates
can cause a brake squeal when the
brakes are first applied or lightly
applied. This does not mean
something is wrong with the brakes.
Properly torqued wheel nuts are
necessary to help prevent brake
pulsation. When tires are rotated,
inspect brake pads for wear and
evenly tighten wheel nuts in the
proper sequence to torque
specifications in Capacities and
Specifications 0454.
Brake linings should always be
replaced as complete axle sets.
Brake Pedal Travel
See your dealer if the brake pedal
does not return to normal height,
or if there is a rapid increase in
pedal travel. This could be a sign
that brake service may be required.
Replacing Brake System Parts
Always replace brake system parts
with new, approved replacement
parts. If this is not done, the brakes
may not work properly. The braking
performance expected can change
in many other ways if the wrong
replacement brake parts are
installed or parts are improperly
installed.
Brake Pad Life System
When to Change Brake Pads
This vehicle has a system that
estimates the remaining life of the
front and rear brake pads. Brake
pad life is displayed in the Driver
Information Center (DIC), along with
a percentage for each axle. The
system must be reset every time the
brake pads are changed.
When the system has determined
that the brake pads need to be
replaced, a message will display,
which may include mileage
remaining.
Brake pads should always be
replaced as complete axle sets.
How to Reset the Brake Pad
Life System
The system will automatically detect
when significantly worn brake pads
are replaced. When the ignition is
turned on after new pads and wear
sensors are installed, a message
will display. Follow the prompts to
reset the system.
The brake pad life system can also
be manually reset: 1. Display Brake Pad Life on the DIC. See Driver Information
Center (DIC) (Base Level)
0 145 or
Driver Information Center (DIC)
(Midlevel and Uplevel) 0146.
2. Press the thumbwheel or the trip odometer reset stem if the
vehicle does not have DIC
buttons. Select front or rear
pads as appropriate.
3. Select YES on the confirmation message, or press the trip
odometer reset stem on a base
level DIC. Repeat for pads on
the other axle if they were also
replaced.
Page 393 of 495

Chevrolet Silverado Owner Manual (GMNA-Localizing-U.S./Canada/Mexico-
13337620) - 2020 - CTC - 1/27/20
392 Vehicle Care
for service if the DIC message
comes on and stays on when the
trailer tire pressures have been
checked and determined to be
correct.
Tire Inspection
We recommend that the tires,
including the spare tire, if the
vehicle has one, be inspected
for signs of wear or damage at
least once a month.
Replace the tire if:
.The indicators at three or
more places around the tire
can be seen.
.There is cord or fabric
showing through the tire's
rubber.
.The tread or sidewall is
cracked, cut, or snagged
deep enough to show cord or
fabric.
.The tire has a bump, bulge,
or split.
.The tire has a puncture, cut,
or other damage that cannot
be repaired well because of
the size or location of the
damage.
Tire Rotation
Tires should be rotated every
12 000 km (7,500 mi). See
Maintenance Schedule0437.
Tires are rotated to achieve a
more uniform wear for all tires.
The first rotation is the most
important.
Anytime unusual wear is
noticed, rotate the tires as soon
as possible, check for proper tire
inflation pressure, and check for
damaged tires or wheels. If the
unusual wear continues after the
rotation, check the wheel
alignment. See When It Is Time
for New Tires 0394 and
Wheel Replacement 0399.
Use this rotation pattern when
rotating the tires if the vehicle
has single rear wheels.
Dual Tire Rotation
When the vehicle is new,
or whenever a wheel, wheel
bolt, or wheel nut is replaced or
serviced, check the wheel nut
torque after 160, 1 600, and
10 000 km (100, 1,000, and
6,000 mi) of driving. For proper
torque and wheel nut tightening
Page 394 of 495

Chevrolet Silverado Owner Manual (GMNA-Localizing-U.S./Canada/Mexico-
13337620) - 2020 - CTC - 1/27/20
Vehicle Care 393
information, see“Removing the
Flat Tire and Installing the Spare
Tire” under Tire Changing 0402
and “Wheel Nut Torque” under
Capacities and Specifications
0 454 and “Removing the Flat
Tire and Installing the Spare
Tire” under Tire Changing 0402.
The outer tire on a dual wheel
setup generally wears faster
than the inner tire. Tires last
longer and wear more evenly if
they are rotated. See Tire
Inspection 0392 and
Tire Rotation 0392. Also see
Maintenance Schedule 0437.
{Warning
If the vehicle is operated with a
tire that is underinflated, the tire
can overheat. An overheated tire
can lose air suddenly or catch
fire. You or others could be
injured. Properly inflate all tires,
including the spare.
See Tire Pressure 0383, for
information on proper tire
inflation.
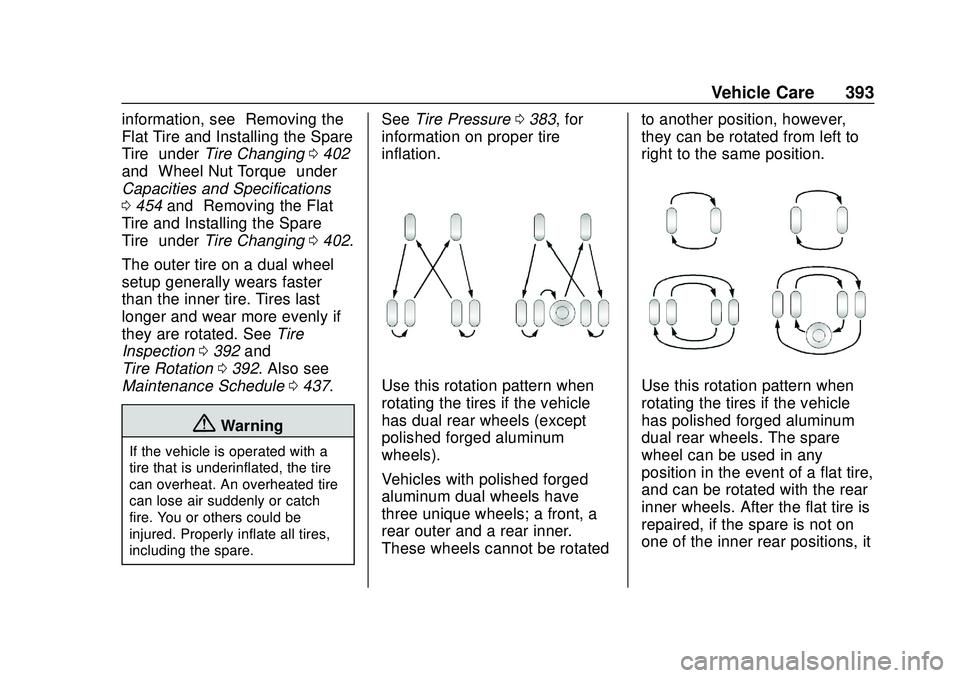
Use this rotation pattern when
rotating the tires if the vehicle
has dual rear wheels (except
polished forged aluminum
wheels).
Vehicles with polished forged
aluminum dual wheels have
three unique wheels; a front, a
rear outer and a rear inner.
These wheels cannot be rotated to another position, however,
they can be rotated from left to
right to the same position.Use this rotation pattern when
rotating the tires if the vehicle
has polished forged aluminum
dual rear wheels. The spare
wheel can be used in any
position in the event of a flat tire,
and can be rotated with the rear
inner wheels. After the flat tire is
repaired, if the spare is not on
one of the inner rear positions, it
Page 395 of 495

Chevrolet Silverado Owner Manual (GMNA-Localizing-U.S./Canada/Mexico-
13337620) - 2020 - CTC - 1/27/20
394 Vehicle Care
must be replaced by the correct
wheel in the front or rear outer
positions.
When installing dual wheels,
check that the vent holes in the
inner and outer wheels on each
side are lined up.
Adjust the front and rear tires to
the recommended inflation
pressure on the Tire and
Loading Information label after
the tires have been rotated. See
Tire Pressure0383 and
Vehicle Load Limits 0197.
Check that all wheel nuts are
properly tightened. See “Wheel
Nut Torque” underCapacities
and Specifications 0454, and
“Removing the Flat Tire and
Installing the Spare Tire” under
Tire Changing 0402.
{Warning
Rust or dirt on a wheel, or on
the parts to which it is
fastened, can make wheel
nuts become loose after time.
The wheel could come off and
cause a crash. When
changing a wheel, remove any
rust or dirt from places where
the wheel attaches to the
vehicle. In an emergency, a
cloth or a paper towel can be
used; however, use a scraper
or wire brush later to remove
all rust or dirt.
Lightly coat the inner diameter of
the wheel hub opening with
wheel bearing grease after a
wheel change or tire rotation to
prevent corrosion or rust
build-up. Do not get grease on
the flat wheel mounting surface
or on the wheel nuts or bolts. Reset the Tire Pressure Monitor
System (TPMS), if the vehicle
has one. See
Tire Pressure
Monitor Operation 0386.
If the full-size tire is part of the
tire rotation, make sure the tire
rotated into the spare position is
stored securely. Push, pull, and
then try to rotate or turn the tire.
If it moves, use the wheel
wrench/hoist shaft to tighten the
cable. See Tire Changing 0402.
When It Is Time for New
Tires
Factors, such as maintenance,
temperatures, driving speeds,
vehicle loading, and road conditions
affect the wear rate of the tires.
Page 401 of 495

Chevrolet Silverado Owner Manual (GMNA-Localizing-U.S./Canada/Mexico-
13337620) - 2020 - CTC - 1/27/20
400 Vehicle Care
Whenever a wheel, wheel bolt,
or wheel nut is replaced on a dual
wheel setup, check the wheel nut
torque after 160,1 600, and
10 000 km (100,1,000, and
6,000 mi) of driving. For proper
torque, see“Wheel Nut Torque”
under Capacities and Specifications
0 454.
See If a Tire Goes Flat 0401 for
more information.
Used Replacement Wheels
{Warning
Replacing a wheel with a used
one is dangerous. How it has
been used or how far it has been
driven may be unknown. It could
fail suddenly and cause a crash.
When replacing wheels, use a
new GM original equipment
wheel.
Tire Chains
{Warning
If the vehicle has LT275/65R18,
275/60R20, LT275/65R20,
or 275/50R22 size tires, do not
use tire chains. If the vehicle is a
1500 Series with LT265/70R17
size tires, do not use tire chains.
They can damage the vehicle
because there is not enough
clearance. Tire chains used on a
vehicle without the proper amount
of clearance can cause damage
to the brakes, suspension,
or other vehicle parts. The area
damaged by the tire chains could
cause you to lose control of the
vehicle, and you or others may be
injured in a crash.
Use another type of traction
device only if its manufacturer
recommends it for use on the
vehicle's tire size combination
and road conditions. Follow that
(Continued)
Warning (Continued)
manufacturer's instructions. To
help avoid damage to the vehicle,
drive slowly, readjust, or remove
the device if it is contacting the
vehicle, and do not spin the
vehicle's wheels.
If you do find traction devices that
will fit, install them on the rear
tires.
Caution
Use tire chains only where legal
and only when necessary. Use
chains that are the proper size
for the tires. If the vehicle has
265/70R17 or 265/65R18 size
tires, they may be installed on the
tires of the rear axle only. If the
vehicle is a dual rear wheel model
and has LT235/80R17 tires,
chains may be installed on the
tires of the rear axle only. If the(Continued)
Page 410 of 495

Chevrolet Silverado Owner Manual (GMNA-Localizing-U.S./Canada/Mexico-
13337620) - 2020 - CTC - 1/27/20
Vehicle Care 409
{Warning
Never use oil or grease on bolts
or nuts because the nuts might
come loose. The vehicle's wheel
could fall off, causing a crash.
10. Put the wheel nuts back on with the rounded end of the
nuts toward the wheel.
11. Tighten each wheel nut by hand. Then use the wheel
wrench to tighten the nuts until
the wheel is held against
the hub.
12. Turn the wheel wrench counterclockwise to lower the
vehicle. Lower the jack
completely.
{Warning
If wheel studs are damaged, they
can break. If all the studs on a
wheel broke, the wheel could
come off and cause a crash.
(Continued)
Warning (Continued)
If any stud is damaged because
of a loose-running wheel, it could
be that all of the studs are
damaged. To be sure, replace all
studs on the wheel. If the stud
holes in a wheel have become
larger, the wheel could collapse in
operation. Replace any wheel if
its stud holes have become larger
or distorted in any way. Inspect
hubs and hub‐piloted wheels for
damage. Because of loose
running wheels, piloting pad
damage may occur and require
replacement of the entire hub, for
proper centering of the wheels.
When replacing studs, hubs,
wheel nuts or wheels, be sure to
use GM original equipment parts.
{Warning
Wheel nuts that are improperly or
incorrectly tightened can cause
the wheels to become loose or
come off. The wheel nuts should
be tightened with a torque wrench
to the proper torque specification
after replacing. Follow the torque
specification supplied by the
aftermarket manufacturer when
using accessory locking wheel
nuts. SeeCapacities and
Specifications 0454 for original
equipment wheel nut torque
specifications.
Caution
Improperly tightened wheel nuts
can lead to brake pulsation and
rotor damage. To avoid expensive
brake repairs, evenly tighten the
wheel nuts in the proper
sequence and to the proper
(Continued)