2020 CHEVROLET SILVERADO 2500 warning light
[x] Cancel search: warning lightPage 4 of 500

Chevrolet Silverado Owner Manual (GMNA-Localizing-U.S./Canada/Mexico-
13337620) - 2020 - CRC - 4/2/19
Introduction 3
{Danger
Danger indicates a hazard with a
high level of risk which will result
in serious injury or death.
{Warning
Warning indicates a hazard that
could result in injury or death.
Caution
Caution indicates a hazard that
could result in property or vehicle
damage.
A circle with a slash through it is a
safety symbol which means“Do
Not,” “Do not do this,” or“Do not let
this happen.”
Symbols
The vehicle has components and
labels that use symbols instead of
text. Symbols are shown along with
the text describing the operation or
information relating to a specific
component, control, message,
gauge, or indicator.
M: Shown when the owner ’s
manual has additional instructions
or information.
*: Shown when the service
manual has additional instructions
or information.
0: Shown when there is more
information on another page —
“see page.” Vehicle Symbol Chart
Here are some additional symbols
that may be found on the vehicle
and what they mean. See the
features in this manual for
information.
u:
Air Conditioning System
G:Air Conditioning Refrigerant Oil
9:Airbag Readiness Light
!:Antilock Brake System (ABS)
$:Brake System Warning Light
9:Dispose of Used Components
Properly
P: Do Not Apply High Pressure
Water
B: Engine Coolant Temperature
_: Flame/Fire Prohibited
H:Flammable
[:Forward Collision Alert
R: Fuse Block Cover Lock
Location
+: Fuses
j:ISOFIX/LATCH System Child
Restraints
Page 7 of 500

Chevrolet Silverado Owner Manual (GMNA-Localizing-U.S./Canada/Mexico-
13337620) - 2020 - CRC - 4/2/19
6 Introduction
1. Tow/Haul Mode (On SomeModels). See Driver Mode
Control 0238.
Automatic Transfer Case
Control (If Equipped). See
Four-Wheel Drive 0227.
Driver Mode Control 0238 (If
Equipped).
2. Air Vents 0182.
3. Turn Signal Lever. See Turn
and Lane-Change Signals
0 170.
Windshield Wiper/Washer
0 120.
4. Head-Up Display (HUD) 0152
(If Equipped).
5. Instrument Cluster 0127.
6. Shift Lever. See Automatic
Transmission 0221.
Range Selection Mode. See
Manual Mode 0224.
7. Light Sensor. See Automatic
Headlamp System 0168.
8. Infotainment 0176. 9.
Climate Control Systems 0177
(If Equipped).
Dual Automatic Climate Control
System 0179 (If Equipped).
10. Heated and Ventilated Front
Seats 061 (If Equipped).
11.
XPark Assist Switch (If
Equipped). See Assistance
Systems for Parking or Backing
0 257.
gTraction Control/Electronic
Stability Control 0235.
|Hazard Warning Flashers
0 169.
ALane Keep Assist (LKA)
(1500 Series) 0278 (If
Equipped).
@Lane Departure Warning
(LDW) (2500/3500 Series)
0 277 (If Equipped).
5Hill Descent Control Switch
(If Equipped). See Hill Descent
Control (HDC) 0237.
jPower Assist Steps 036 (If
Equipped).
5Power Release Tailgate
(If Equipped). See Tailgate
0 28.
DC/AC Switch. See Power
Outlets 0122.
hAuto Stop Disable Switch
(If Equipped). See Stop/Start
System 0213.
LExpress Window Down
Button (If Equipped). See
Power Windows 049.
Tow/Haul Mode 0226 (On
Some Models).
12. Power Outlet (Alternating Current) (If Equipped). See
Power Outlets 0122.
13. Power Outlets 0122.
14. USB Port. See the infotainment manual.
15. Wireless Charging 0124 (If
Equipped).
Page 11 of 500
Chevrolet Silverado Owner Manual (GMNA-Localizing-U.S./Canada/Mexico-
13337620) - 2020 - CRC - 4/2/19
10 Keys, Doors, and Windows
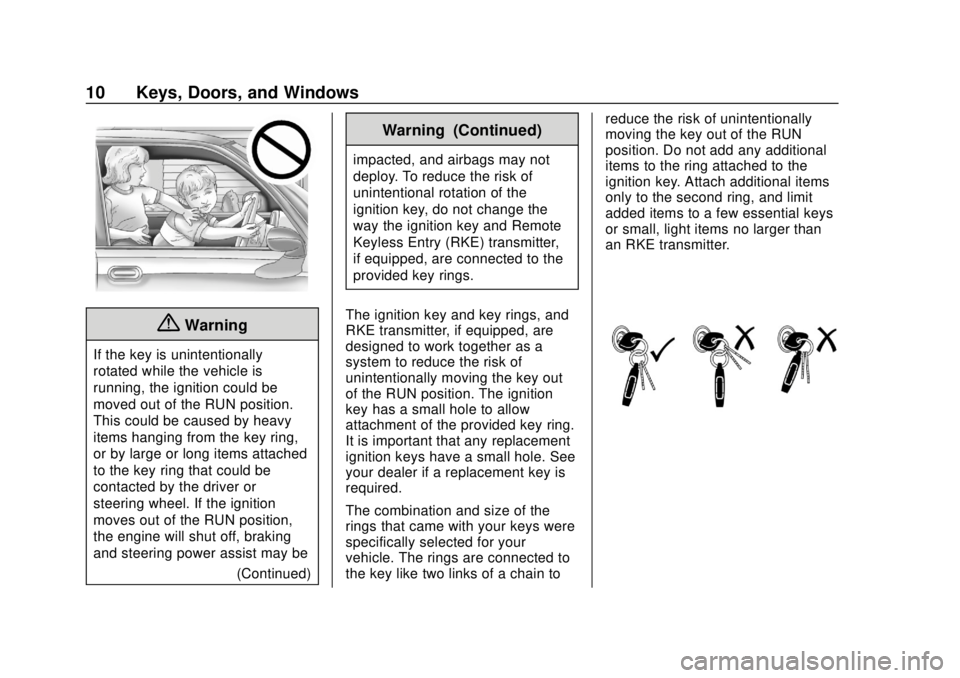
{Warning
If the key is unintentionally
rotated while the vehicle is
running, the ignition could be
moved out of the RUN position.
This could be caused by heavy
items hanging from the key ring,
or by large or long items attached
to the key ring that could be
contacted by the driver or
steering wheel. If the ignition
moves out of the RUN position,
the engine will shut off, braking
and steering power assist may be(Continued)
Warning (Continued)
impacted, and airbags may not
deploy. To reduce the risk of
unintentional rotation of the
ignition key, do not change the
way the ignition key and Remote
Keyless Entry (RKE) transmitter,
if equipped, are connected to the
provided key rings.
The ignition key and key rings, and
RKE transmitter, if equipped, are
designed to work together as a
system to reduce the risk of
unintentionally moving the key out
of the RUN position. The ignition
key has a small hole to allow
attachment of the provided key ring.
It is important that any replacement
ignition keys have a small hole. See
your dealer if a replacement key is
required.
The combination and size of the
rings that came with your keys were
specifically selected for your
vehicle. The rings are connected to
the key like two links of a chain to reduce the risk of unintentionally
moving the key out of the RUN
position. Do not add any additional
items to the ring attached to the
ignition key. Attach additional items
only to the second ring, and limit
added items to a few essential keys
or small, light items no larger than
an RKE transmitter.
Page 37 of 500
Chevrolet Silverado Owner Manual (GMNA-Localizing-U.S./Canada/Mexico-
13337620) - 2020 - CRC - 4/2/19
36 Keys, Doors, and Windows
Power Assist Steps
{Warning
To avoid personal injury or
property damage, before entering
or exiting the vehicle, be sure the
power assist step is fully
extended. Do not step on the
power assist step while it is
moving. Never place hands or
other body parts between the
extended power assist step and
the vehicle.
If equipped, the power assist steps,
when enabled, will extend when the
door is opened. They will retract
three seconds after the door is
closed or immediately if the vehicle
starts moving.
Keep hands, children, pets, objects,
and clothing clear of the power
assist steps when in motion.
The steps will reverse direction if
there is an obstruction. If possible,
carefully remove the obstruction,
then open and close the door on the same side to complete the motion.
If the obstruction is not cleared, the
assist steps remain extended.
Slight movement of the steps while
extended is normal.
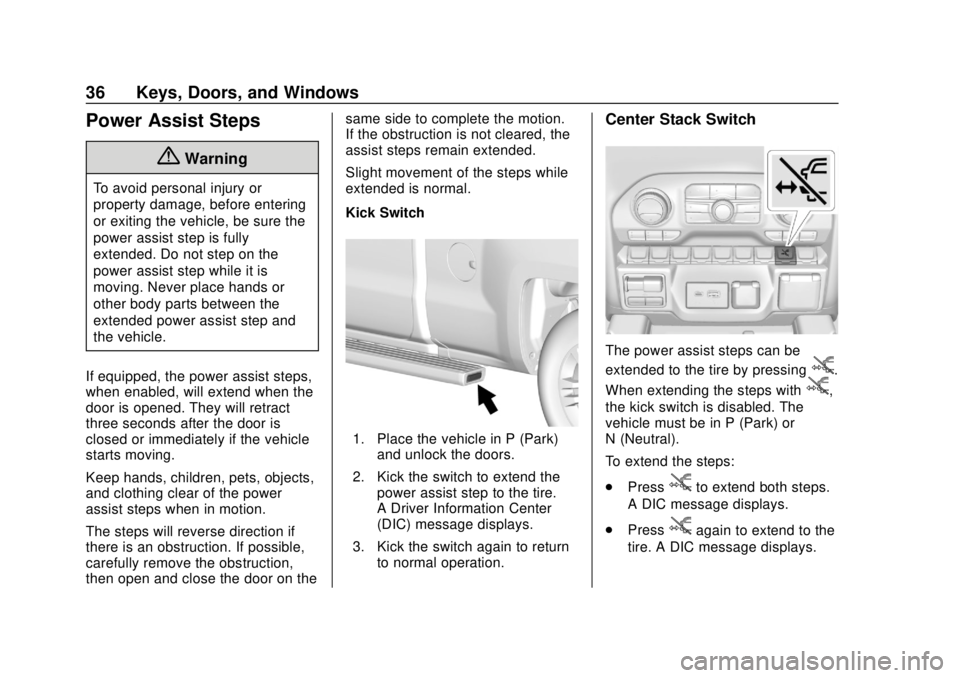
Kick Switch
1. Place the vehicle in P (Park)
and unlock the doors.
2. Kick the switch to extend the power assist step to the tire.
A Driver Information Center
(DIC) message displays.
3. Kick the switch again to return to normal operation.
Center Stack Switch
The power assist steps can be
extended to the tire by pressing
j.
When extending the steps with
j,
the kick switch is disabled. The
vehicle must be in P (Park) or
N (Neutral).
To extend the steps:
. Press
jto extend both steps.
A DIC message displays.
. Press
jagain to extend to the
tire. A DIC message displays.
Page 50 of 500
Chevrolet Silverado Owner Manual (GMNA-Localizing-U.S./Canada/Mexico-
13337620) - 2020 - CRC - 4/2/19
Keys, Doors, and Windows 49
The vehicle aerodynamics are
designed to improve fuel economy
performance. This may result in a
pulsing sound when either rear
window is down and the front
windows are up. To reduce the
sound, open either a front window
or the sunroof, if equipped.
Manual Windows
If equipped, turn the hand crank on
each door to manually raise or lower
the manual windows.
Power Windows
{Warning
Children could be seriously
injured or killed if caught in the
path of a closing window. Never
leave the Remote Keyless Entry
(RKE) transmitter or keys in a
vehicle with children. When there
are children in the rear seat, use
the window lockout button to(Continued)
Warning (Continued)
prevent operation of the windows.
SeeKeys (Key Access) 09or
Keys (Keyless Access) 012.
The power windows work when the
ignition is on, in ACC/ACCESSORY,
or when Retained Accessory Power
(RAP) is active. See Retained
Accessory Power (RAP) 0216.
Using the window switch, press to
open or pull to close the window. The windows may be temporarily
disabled if they are used repeatedly
within a short time.
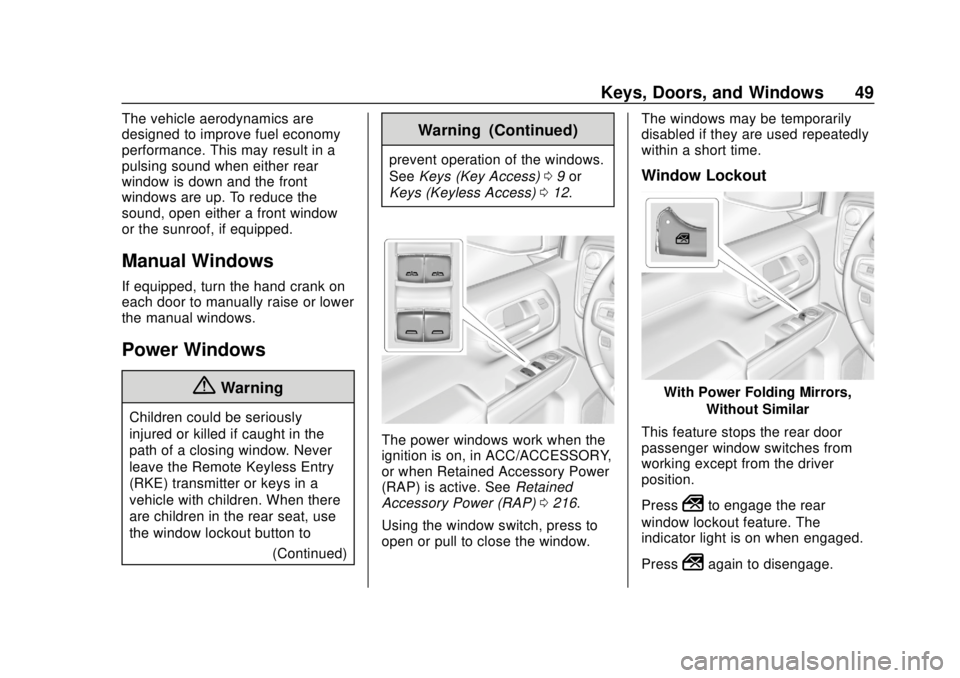
Window Lockout
With Power Folding Mirrors,
Without Similar
This feature stops the rear door
passenger window switches from
working except from the driver
position.
Press
2to engage the rear
window lockout feature. The
indicator light is on when engaged.
Press
2again to disengage.
Page 63 of 500
Chevrolet Silverado Owner Manual (GMNA-Localizing-U.S./Canada/Mexico-
13337620) - 2020 - CRC - 4/2/19
62 Seats and Restraints
Warning (Continued)
overheat. An overheated seat
heater may cause a burn or may
damage the seat.
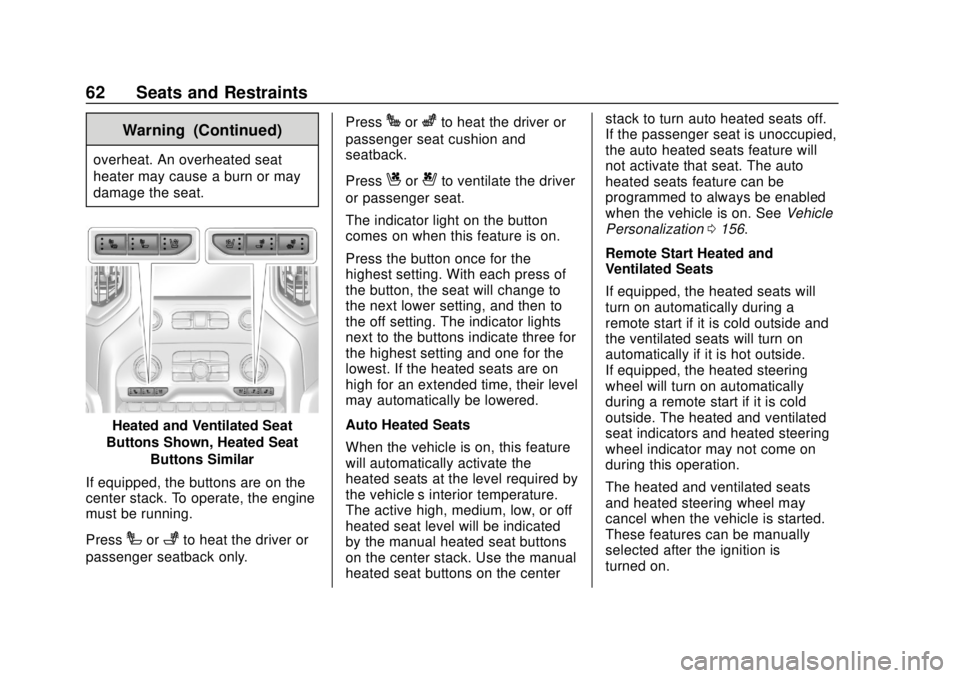
Heated and Ventilated Seat
Buttons Shown, Heated Seat
Buttons Similar
If equipped, the buttons are on the
center stack. To operate, the engine
must be running.
Press
Ior+to heat the driver or
passenger seatback only. Press
Jorzto heat the driver or
passenger seat cushion and
seatback.
Press
Cor{to ventilate the driver
or passenger seat.
The indicator light on the button
comes on when this feature is on.
Press the button once for the
highest setting. With each press of
the button, the seat will change to
the next lower setting, and then to
the off setting. The indicator lights
next to the buttons indicate three for
the highest setting and one for the
lowest. If the heated seats are on
high for an extended time, their level
may automatically be lowered.
Auto Heated Seats
When the vehicle is on, this feature
will automatically activate the
heated seats at the level required by
the vehicle’ s interior temperature.
The active high, medium, low, or off
heated seat level will be indicated
by the manual heated seat buttons
on the center stack. Use the manual
heated seat buttons on the center stack to turn auto heated seats off.
If the passenger seat is unoccupied,
the auto heated seats feature will
not activate that seat. The auto
heated seats feature can be
programmed to always be enabled
when the vehicle is on. See
Vehicle
Personalization 0156.
Remote Start Heated and
Ventilated Seats
If equipped, the heated seats will
turn on automatically during a
remote start if it is cold outside and
the ventilated seats will turn on
automatically if it is hot outside.
If equipped, the heated steering
wheel will turn on automatically
during a remote start if it is cold
outside. The heated and ventilated
seat indicators and heated steering
wheel indicator may not come on
during this operation.
The heated and ventilated seats
and heated steering wheel may
cancel when the vehicle is started.
These features can be manually
selected after the ignition is
turned on.
Page 65 of 500

Chevrolet Silverado Owner Manual (GMNA-Localizing-U.S./Canada/Mexico-
13337620) - 2020 - CRC - 4/2/19
64 Seats and Restraints
To fold the seat, slowly pull the seat
cushion up.
To return the seat to the normal
seating position, slowly pull the seat
cushion down.
{Warning
A seat belt that is improperly
routed, not properly attached,
or twisted will not provide the
protection needed in a crash. The
person wearing the belt could be
seriously injured. After raising the
rear seatback, always check to be(Continued)
Warning (Continued)
sure that the seat belts are
properly routed and attached, and
are not twisted.
Heated Rear Seats
{Warning
If you cannot feel temperature
change or pain to the skin, the
seat heater may cause burns.
See the Warning under Heated
and Ventilated Front Seats 061.If available, the buttons are on the
rear of the center console. To
operate, the engine must be
running.
Press
MorLto heat the left or
right outboard seat cushion. An
indicator on the climate control
display appears when this feature
is on.
This feature turns on at the highest
setting. With each press of the
button, the heated seat changes to
the next lower setting, and then the
off setting. Three lights indicate the
highest setting, and one light
indicates the lowest. If the heated
Page 69 of 500
Chevrolet Silverado Owner Manual (GMNA-Localizing-U.S./Canada/Mexico-
13337620) - 2020 - CRC - 4/2/19
68 Seats and Restraints
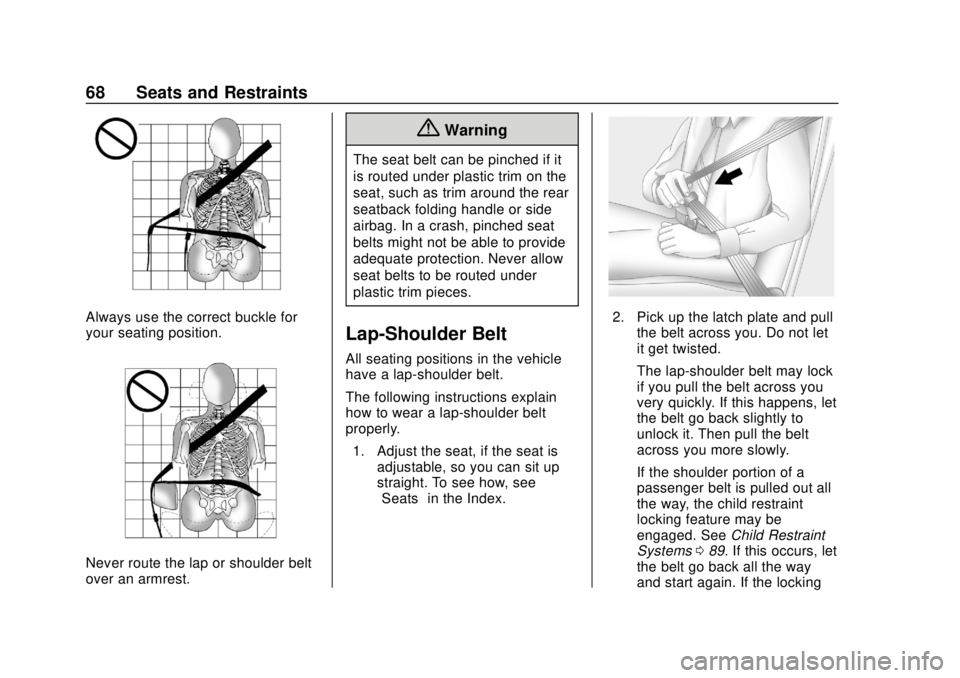
Always use the correct buckle for
your seating position.
Never route the lap or shoulder belt
over an armrest.
{Warning
The seat belt can be pinched if it
is routed under plastic trim on the
seat, such as trim around the rear
seatback folding handle or side
airbag. In a crash, pinched seat
belts might not be able to provide
adequate protection. Never allow
seat belts to be routed under
plastic trim pieces.
Lap-Shoulder Belt
All seating positions in the vehicle
have a lap-shoulder belt.
The following instructions explain
how to wear a lap-shoulder belt
properly.1. Adjust the seat, if the seat is adjustable, so you can sit up
straight. To see how, see
“Seats” in the Index.
2. Pick up the latch plate and pull
the belt across you. Do not let
it get twisted.
The lap-shoulder belt may lock
if you pull the belt across you
very quickly. If this happens, let
the belt go back slightly to
unlock it. Then pull the belt
across you more slowly.
If the shoulder portion of a
passenger belt is pulled out all
the way, the child restraint
locking feature may be
engaged. See Child Restraint
Systems 089. If this occurs, let
the belt go back all the way
and start again. If the locking