2020 CHEVROLET SILVERADO 2500 flat tire
[x] Cancel search: flat tirePage 413 of 500
Chevrolet Silverado Owner Manual (GMNA-Localizing-U.S./Canada/Mexico-
13337620) - 2020 - CRC - 4/10/19
412 Vehicle Care
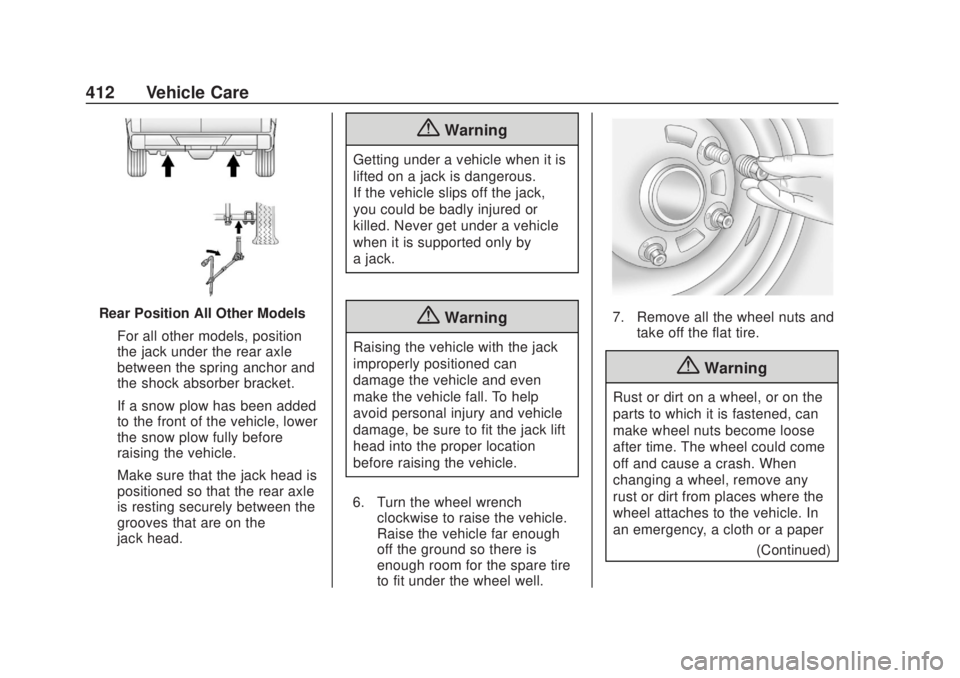
Rear Position All Other ModelsFor all other models, position
the jack under the rear axle
between the spring anchor and
the shock absorber bracket.
If a snow plow has been added
to the front of the vehicle, lower
the snow plow fully before
raising the vehicle.
Make sure that the jack head is
positioned so that the rear axle
is resting securely between the
grooves that are on the
jack head.
{Warning
Getting under a vehicle when it is
lifted on a jack is dangerous.
If the vehicle slips off the jack,
you could be badly injured or
killed. Never get under a vehicle
when it is supported only by
a jack.
{Warning
Raising the vehicle with the jack
improperly positioned can
damage the vehicle and even
make the vehicle fall. To help
avoid personal injury and vehicle
damage, be sure to fit the jack lift
head into the proper location
before raising the vehicle.
6. Turn the wheel wrench clockwise to raise the vehicle.
Raise the vehicle far enough
off the ground so there is
enough room for the spare tire
to fit under the wheel well.
7. Remove all the wheel nuts andtake off the flat tire.
{Warning
Rust or dirt on a wheel, or on the
parts to which it is fastened, can
make wheel nuts become loose
after time. The wheel could come
off and cause a crash. When
changing a wheel, remove any
rust or dirt from places where the
wheel attaches to the vehicle. In
an emergency, a cloth or a paper
(Continued)
Page 415 of 500
Chevrolet Silverado Owner Manual (GMNA-Localizing-U.S./Canada/Mexico-
13337620) - 2020 - CRC - 4/10/19
414 Vehicle Care
{Warning
Wheel nuts that are improperly or
incorrectly tightened can cause
the wheels to become loose or
come off. The wheel nuts should
be tightened with a torque wrench
to the proper torque specification
after replacing. Follow the torque
specification supplied by the
aftermarket manufacturer when
using accessory locking wheel
nuts. SeeCapacities and
Specifications 0457 for original
equipment wheel nut torque
specifications.
Caution
Improperly tightened wheel nuts
can lead to brake pulsation and
rotor damage. To avoid expensive
brake repairs, evenly tighten the
wheel nuts in the proper
sequence and to the proper
(Continued)
Caution (Continued)
torque specification. See
Capacities and Specifications
0457 for the wheel nut torque
specification.
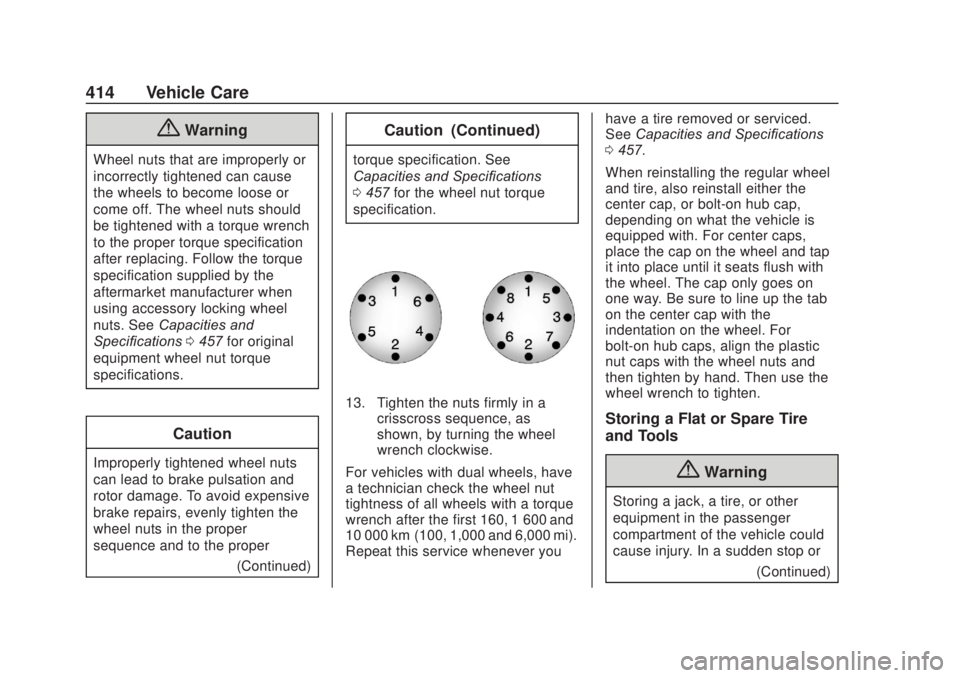
13. Tighten the nuts firmly in a crisscross sequence, as
shown, by turning the wheel
wrench clockwise.
For vehicles with dual wheels, have
a technician check the wheel nut
tightness of all wheels with a torque
wrench after the first 160, 1 600 and
10 000 km (100, 1,000 and 6,000 mi).
Repeat this service whenever you have a tire removed or serviced.
See
Capacities and Specifications
0 457.
When reinstalling the regular wheel
and tire, also reinstall either the
center cap, or bolt-on hub cap,
depending on what the vehicle is
equipped with. For center caps,
place the cap on the wheel and tap
it into place until it seats flush with
the wheel. The cap only goes on
one way. Be sure to line up the tab
on the center cap with the
indentation on the wheel. For
bolt-on hub caps, align the plastic
nut caps with the wheel nuts and
then tighten by hand. Then use the
wheel wrench to tighten.
Storing a Flat or Spare Tire
and Tools
{Warning
Storing a jack, a tire, or other
equipment in the passenger
compartment of the vehicle could
cause injury. In a sudden stop or (Continued)
Page 416 of 500
Chevrolet Silverado Owner Manual (GMNA-Localizing-U.S./Canada/Mexico-
13337620) - 2020 - CRC - 4/10/19
Vehicle Care 415
Warning (Continued)
collision, loose equipment could
strike someone. Store all these in
the proper place.
{Warning
Failure to follow these tire storage
instructions carefully could result
in personal injury or property
damage if the hoist cable fails or
if the tire comes loose. Make sure
the tire is stored securely before
driving.
Caution
Storing an aluminum wheel with a
flat tire under your vehicle for an
extended period of time or with
the valve stem pointing up can
damage the wheel. Always stow
the wheel with the valve stem(Continued)
Caution (Continued)
pointing down and have the
wheel/tire repaired as soon as
possible.
Caution
The tire hoist can be damaged if
there is no tension on the cable
when using it. To have the
necessary tension, the spare or
road tire and wheel assembly
must be installed on the tire hoist
to use it.
{Warning
An improperly stored spare tire
could come loose and cause a
crash. To avoid personal injury or
property damage, always store
the spare tire when the vehicle is
parked on a level surface. Store the tire under the rear of the
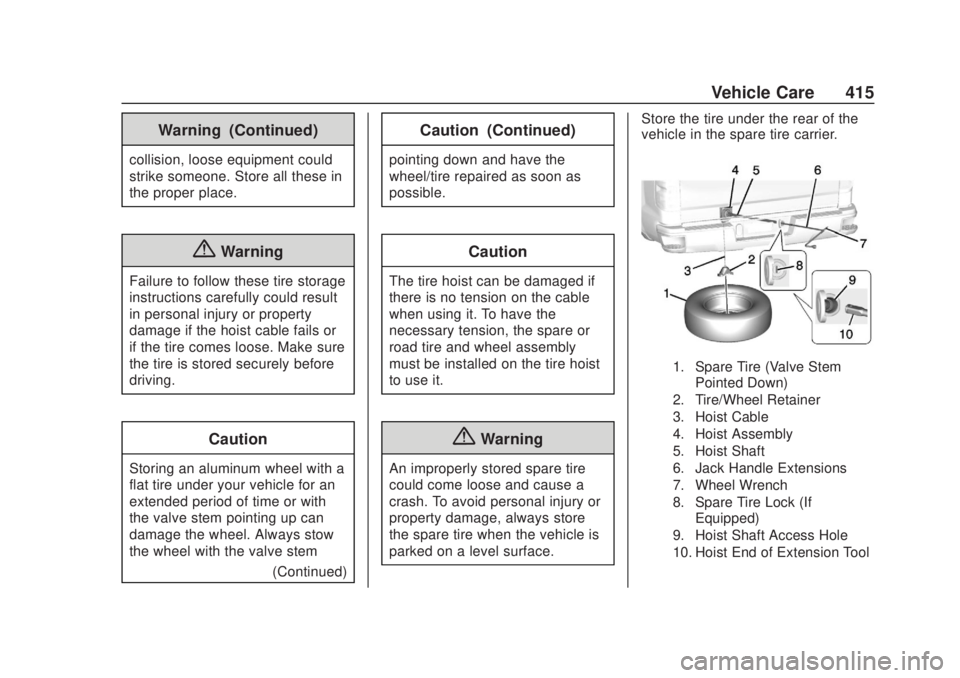
vehicle in the spare tire carrier.
1. Spare Tire (Valve Stem
Pointed Down)
2. Tire/Wheel Retainer
3. Hoist Cable
4. Hoist Assembly
5. Hoist Shaft
6. Jack Handle Extensions
7. Wheel Wrench
8. Spare Tire Lock (If Equipped)
9. Hoist Shaft Access Hole
10. Hoist End of Extension Tool
Page 419 of 500
Chevrolet Silverado Owner Manual (GMNA-Localizing-U.S./Canada/Mexico-
13337620) - 2020 - CRC - 4/10/19
418 Vehicle Care
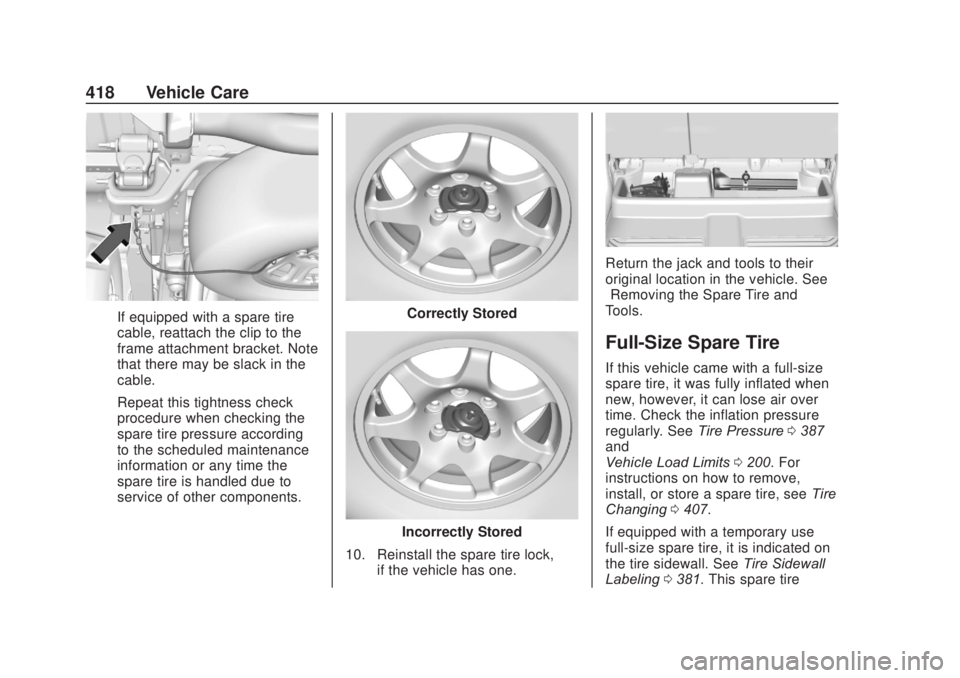
If equipped with a spare tire
cable, reattach the clip to the
frame attachment bracket. Note
that there may be slack in the
cable.
Repeat this tightness check
procedure when checking the
spare tire pressure according
to the scheduled maintenance
information or any time the
spare tire is handled due to
service of other components.Correctly Stored
Incorrectly Stored
10. Reinstall the spare tire lock, if the vehicle has one.
Return the jack and tools to their
original location in the vehicle. See
“Removing the Spare Tire and
Tools.”
Full-Size Spare Tire
If this vehicle came with a full-size
spare tire, it was fully inflated when
new, however, it can lose air over
time. Check the inflation pressure
regularly. See Tire Pressure0387
and
Vehicle Load Limits 0200. For
instructions on how to remove,
install, or store a spare tire, see Tire
Changing 0407.
If equipped with a temporary use
full-size spare tire, it is indicated on
the tire sidewall. See Tire Sidewall
Labeling 0381. This spare tire
Page 420 of 500
Chevrolet Silverado Owner Manual (GMNA-Localizing-U.S./Canada/Mexico-
13337620) - 2020 - CRC - 4/10/19
Vehicle Care 419
should not be driven on over
112 km/h (70 mph), or 88 km/h
(55 mph) when pulling a trailer, at
the proper inflation pressure. Repair
and replace the road tire as soon as
it is convenient, and stow the spare
tire for future use.
Caution
If the vehicle has four-wheel drive
and a different size spare tire is
installed, do not drive in
four-wheel drive until the flat tire
is repaired and/or replaced. The
vehicle could be damaged and
the repairs would not be covered
by the warranty. Never use
four-wheel drive when a different
size spare tire is installed on the
vehicle.
The vehicle may have a different
size spare tire than the road tires
originally installed on the vehicle.
This spare tire was developed for
use on this vehicle, so it is all right
to drive on it. If the vehicle has four-wheel drive and a different size
spare tire is installed, drive only in
two-wheel drive.
After installing the spare tire on the
vehicle, stop as soon as possible
and check that the spare tire is
correctly inflated.
Have the damaged or flat road tire
repaired or replaced and installed
back onto the vehicle as soon as
possible so the spare tire will be
available in case it is needed again.
Do not mix tires and wheels of
different sizes, because they will not
fit. Keep your spare tire and its
wheel together. If the vehicle has a
spare tire that does not match the
original road tires and wheels in size
and type, do not include the spare in
the tire rotation.
Jump Starting
Jump Starting - North
America
For more information about the
vehicle battery, see
Battery - North
America 0358.
If the vehicle's battery (or batteries)
has run down, you may want to use
another vehicle and some jumper
cables to start your vehicle. Be sure
to use the following steps to do it
safely.
{Warning
WARNING: Battery posts,
terminals, and related
accessories contain lead and lead
compounds, chemicals known to
the State of California to cause
cancer and birth defects or other
reproductive harm. Batteries also
contain other chemicals known to
the State of California to cause
cancer. WASH HANDS AFTER
(Continued)
Page 425 of 500
Chevrolet Silverado Owner Manual (GMNA-Localizing-U.S./Canada/Mexico-
13337620) - 2020 - CRC - 4/10/19
424 Vehicle Care
Towing the Vehicle
Caution
Incorrectly towing a disabled
vehicle may cause damage. The
damage would not be covered by
the vehicle warranty. Do not lash
or hook to suspension
components. Use the proper
straps around the tires to secure
the vehicle. Do not drag a locked
wheel/tire. Use tire skates or
dollies under any locked wheel/
tire while loading the vehicle. Do
not use a sling type lift to tow the
vehicle. This could damage the
vehicle.
Caution
If the vehicle cannot be shifted
into Neutral (N), do not use the
tow eye to tow the vehicle.
Vehicle damage may occur.GM recommends a flatbed tow truck
to transport a disabled vehicle. Use
ramps to help reduce approach
angles, if necessary. A towed
vehicle should have its drive wheels
off the ground. Contact Roadside
Assistance or a professional towing
service if the disabled vehicle must
be towed.
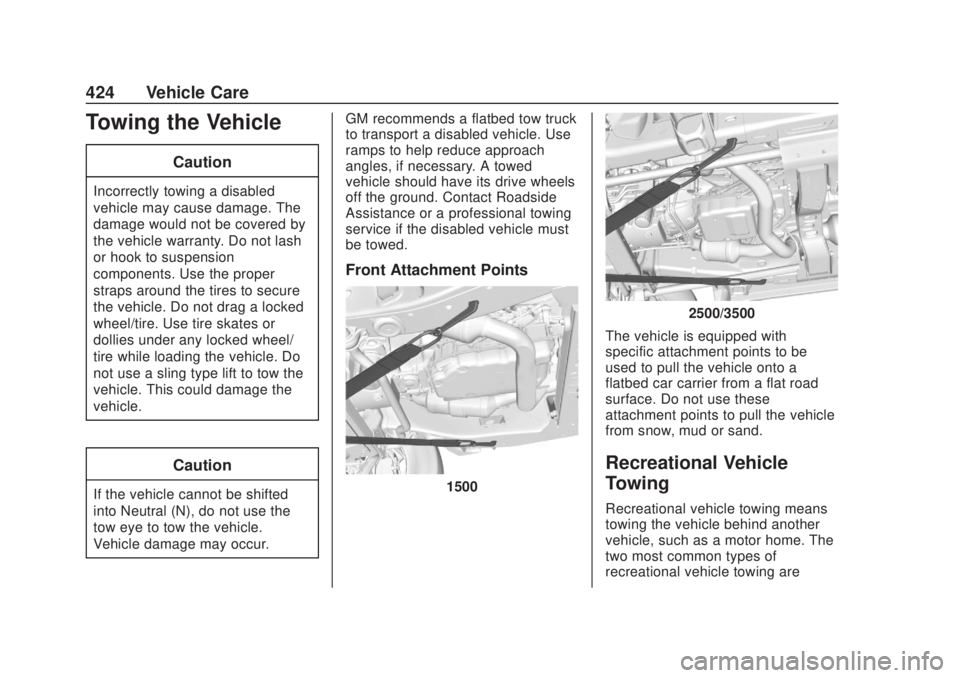
Front Attachment Points
1500
2500/3500
The vehicle is equipped with
specific attachment points to be
used to pull the vehicle onto a
flatbed car carrier from a flat road
surface. Do not use these
attachment points to pull the vehicle
from snow, mud or sand.
Recreational Vehicle
Towing
Recreational vehicle towing means
towing the vehicle behind another
vehicle, such as a motor home. The
two most common types of
recreational vehicle towing are
Page 431 of 500
Chevrolet Silverado Owner Manual (GMNA-Localizing-U.S./Canada/Mexico-
13337620) - 2020 - CRC - 4/10/19
430 Vehicle Care
Automatic Car Wash
Caution
Some automatic car washes can
cause damage to the vehicle,
wheels and ground effects.
Automatic car washes are not
recommended, due to lack of
clearance for the undercarriage
and/or wide rear tires and wheels.
Caution
Automatic car washes can cause
damage to the vehicle, wheels,
ground effects, and convertible
top (if equipped).
Do not use automatic car washes
due to lack of clearance for the
undercarriage, wide rear tires,
and wheels.
If using an automatic car wash,
follow with the car wash
instructions. The windshield wiper
and rear window wiper, if equipped, must be turned off. Remove any
accessories that may be damaged
or interfere with the car wash
equipment.
See
Power Assist Steps 036 for
cleaning information.
Rinse the vehicle well, before
washing and after, to remove all
cleaning agents completely. If they
are allowed to dry on the surface,
they could stain.
Dry the finish with a soft, clean
chamois or an all-cotton towel to
avoid surface scratches and water
spotting.Finish Care
Application of aftermarket clearcoat
sealant/wax materials is not
recommended. If painted surfaces
are damaged, see your dealer to
have the damage assessed and
repaired. Foreign materials such as
calcium chloride and other salts, ice
melting agents, road oil and tar, tree
sap, bird droppings, chemicals from
industrial chimneys, etc., can
damage the vehicle's finish if they
remain on painted surfaces. Wash the vehicle as soon as possible.
If necessary, use non-abrasive
cleaners that are marked safe for
painted surfaces to remove foreign
matter.
Occasional hand waxing or mild
polishing should be done to remove
residue from the paint finish. See
your dealer for approved cleaning
products.
Do not apply waxes or polishes to
uncoated plastic, vinyl, rubber,
decals, simulated wood, or flat paint
as damage can occur.
Caution
Machine compounding or
aggressive polishing on a
basecoat/clearcoat paint finish
may damage it. Use only
non-abrasive waxes and polishes
that are made for a basecoat/
clearcoat paint finish on the
vehicle.
Page 442 of 500
Chevrolet Silverado Owner Manual (GMNA-Localizing-U.S./Canada/Mexico-
13337620) - 2020 - CRC - 4/2/19
Service and Maintenance 441
Maintenance
Schedule
Owner Checks and Services
At Each Fuel Stop
.Check the engine oil level. See
Engine Oil 0339.
Once a Month
. Check the tire inflation
pressures, including the spare.
See Tire Pressure 0387.
. Inspect the tires for wear. See
Tire Inspection 0396.
. Check the windshield washer
fluid level. See Washer Fluid
0 354.
Engine Oil Change
When the CHANGE ENGINE OIL
SOON message displays, have the
engine oil and filter changed within
the next 1 000 km/600 mi. If driven
under the best conditions, the
engine oil life system may not
indicate the need for vehicle service
for up to a year. The engine oil and filter must be changed at least once
a year and the oil life system must
be reset. Your trained dealer
technician can perform this work.
If the engine oil life system is reset
accidentally, service the vehicle
within 5 000 km/3,000 mi since the
last service. Reset the oil life
system when the oil is changed.
See
Engine Oil Life System 0341.
Engine Air Filter Change
When the REPLACE AT NEXT OIL
CHANGE message displays, the
engine air filter should be replaced
at the next engine oil change. When
the REPLACE ENGINE AIR FILTER
SOON message displays, the
engine air filter should be replaced
at the earliest convenience. Reset
the engine air filter life system after
the engine air filter is replaced. See
Engine Air Filter Life System 0343.
Passenger Compartment Air
Filter
The passenger compartment air
filter removes dust, pollen, and
other airborne irritants from outside
air that is pulled into the vehicle. The filter should be replaced as part
of routine scheduled maintenance.
Inspect the passenger compartment
air filter every 36 000 km/
22,500 miles or two years,
whichever comes first. Replace if
necessary. More frequent
replacement may be needed if the
vehicle is driven in areas with heavy
traffic, areas with poor air quality,
or areas with high dust levels.
Replacement may also be needed if
there is a reduction in air flow,
excessive window fogging, or odors.
Power Take Off (PTO) and
Extended Idle Use
When the vehicle is used with the
PTO equipment or used in a way
that requires extended idle time,
one hour of use shall be deemed
the same as 53 km (33 mi). See
Driver Information Center (DIC)
(Base Level)
0148 or
Driver Information Center (DIC)
(Midlevel and Uplevel) 0149 for
hourmeter, if equipped.