Page 414 of 500

Chevrolet Silverado Owner Manual (GMNA-Localizing-U.S./Canada/Mexico-
13337620) - 2020 - CRC - 4/10/19
Vehicle Care 413
Warning (Continued)
towel can be used; however, use
a scraper or wire brush later to
remove all rust or dirt.
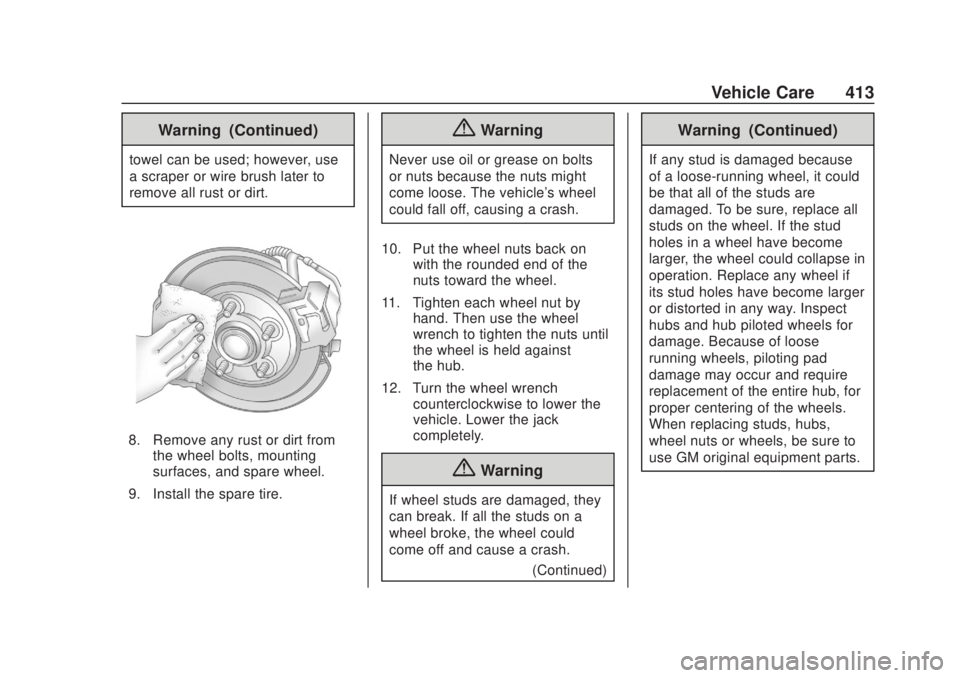
8. Remove any rust or dirt fromthe wheel bolts, mounting
surfaces, and spare wheel.
9. Install the spare tire.
{Warning
Never use oil or grease on bolts
or nuts because the nuts might
come loose. The vehicle's wheel
could fall off, causing a crash.
10. Put the wheel nuts back on with the rounded end of the
nuts toward the wheel.
11. Tighten each wheel nut by hand. Then use the wheel
wrench to tighten the nuts until
the wheel is held against
the hub.
12. Turn the wheel wrench counterclockwise to lower the
vehicle. Lower the jack
completely.
{Warning
If wheel studs are damaged, they
can break. If all the studs on a
wheel broke, the wheel could
come off and cause a crash.
(Continued)
Warning (Continued)
If any stud is damaged because
of a loose-running wheel, it could
be that all of the studs are
damaged. To be sure, replace all
studs on the wheel. If the stud
holes in a wheel have become
larger, the wheel could collapse in
operation. Replace any wheel if
its stud holes have become larger
or distorted in any way. Inspect
hubs and hub‐piloted wheels for
damage. Because of loose
running wheels, piloting pad
damage may occur and require
replacement of the entire hub, for
proper centering of the wheels.
When replacing studs, hubs,
wheel nuts or wheels, be sure to
use GM original equipment parts.
Page 415 of 500

Chevrolet Silverado Owner Manual (GMNA-Localizing-U.S./Canada/Mexico-
13337620) - 2020 - CRC - 4/10/19
414 Vehicle Care
{Warning
Wheel nuts that are improperly or
incorrectly tightened can cause
the wheels to become loose or
come off. The wheel nuts should
be tightened with a torque wrench
to the proper torque specification
after replacing. Follow the torque
specification supplied by the
aftermarket manufacturer when
using accessory locking wheel
nuts. SeeCapacities and
Specifications 0457 for original
equipment wheel nut torque
specifications.
Caution
Improperly tightened wheel nuts
can lead to brake pulsation and
rotor damage. To avoid expensive
brake repairs, evenly tighten the
wheel nuts in the proper
sequence and to the proper
(Continued)
Caution (Continued)
torque specification. See
Capacities and Specifications
0457 for the wheel nut torque
specification.
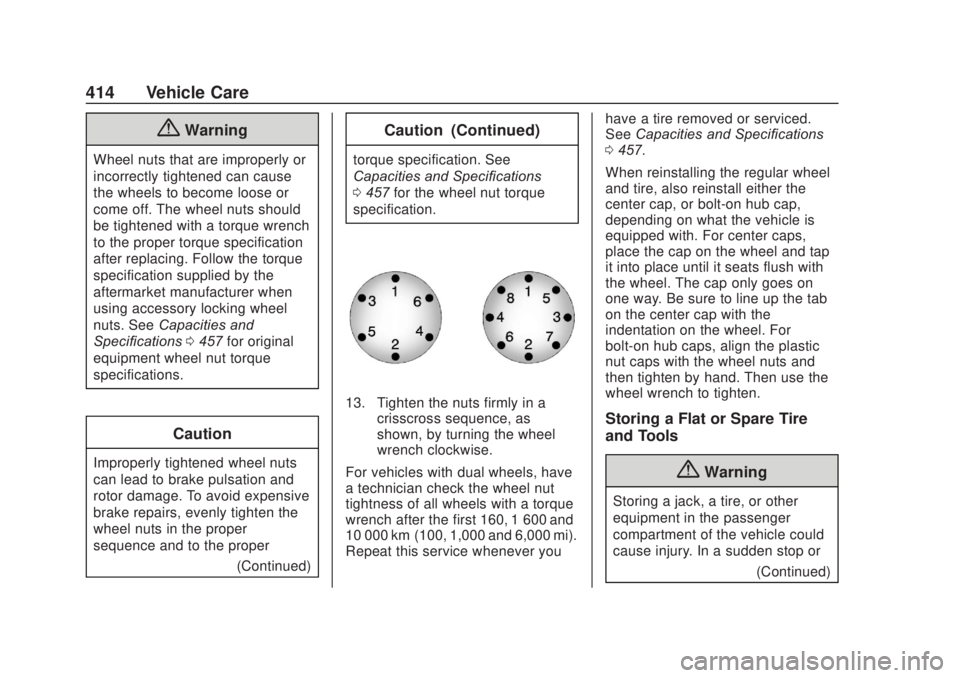
13. Tighten the nuts firmly in a crisscross sequence, as
shown, by turning the wheel
wrench clockwise.
For vehicles with dual wheels, have
a technician check the wheel nut
tightness of all wheels with a torque
wrench after the first 160, 1 600 and
10 000 km (100, 1,000 and 6,000 mi).
Repeat this service whenever you have a tire removed or serviced.
See
Capacities and Specifications
0 457.
When reinstalling the regular wheel
and tire, also reinstall either the
center cap, or bolt-on hub cap,
depending on what the vehicle is
equipped with. For center caps,
place the cap on the wheel and tap
it into place until it seats flush with
the wheel. The cap only goes on
one way. Be sure to line up the tab
on the center cap with the
indentation on the wheel. For
bolt-on hub caps, align the plastic
nut caps with the wheel nuts and
then tighten by hand. Then use the
wheel wrench to tighten.
Storing a Flat or Spare Tire
and Tools
{Warning
Storing a jack, a tire, or other
equipment in the passenger
compartment of the vehicle could
cause injury. In a sudden stop or (Continued)
Page 418 of 500
Chevrolet Silverado Owner Manual (GMNA-Localizing-U.S./Canada/Mexico-
13337620) - 2020 - CRC - 4/10/19
Vehicle Care 417
5. Insert the hoist end (10)through the hole (9) in the rear
bumper and onto the hoist
shaft.
Do not use the chiseled end of
the wheel wrench.
6. Raise the tire part way upward. Make sure the retainer is
seated in the wheel opening.
7. If equipped with a spare tirecable, orient the cable by
rotating the spare tire so that
the cable is by the frame
attachment location.
8. Raise the tire fully against the underside of the vehicle by
turning the wheel wrench
clockwise until you hear two
clicks or feel it skip twice. You
cannot overtighten the cable.9. Make sure the tire is storedsecurely. Push, pull, and then
try to turn the tire. If the tire
moves, use the wheel wrench
to tighten the cable.
Page 489 of 500

Chevrolet Silverado Owner Manual (GMNA-Localizing-U.S./Canada/Mexico-
13337620) - 2020 - CRC - 4/2/19
488 Index
CargoTie-Downs . . . . . . . . . . . . . . . . . . . . .116
Caution, Danger, and Warning . . . . 2
Center Console Storage . . . . . . . . 114
Center High-Mounted Stoplamp (CHMSL) and
Cargo Lamp . . . . . . . . . . . . . . . . . . . 369
Center Seat . . . . . . . . . . . . . . . . . . . . . 56
Chains, Tire . . . . . . . . . . . . . . . . . . . . 404
Charging Wireless . . . . . . . . . . . . . . . . . . . . . . 124
Charging System Light . . . . . . . . . 137
Check Engine Light (MalfunctionIndicator) . . . . . . . . . . . . . . . . . . . . 138
Ignition Transmission Lock . . . 363
Child Restraints Infants and Young Children . . . . . 87
Lower Anchors and Tethersfor Children . . . . . . . . . . . . . . . . . . . 92
Older Children . . . . . . . . . . . . . . . . . . 85
Securing . . . . . . . . . . . . 105, 108, 109
Systems . . . . . . . . . . . . . . . . . . . . . . . . 89
Circuit Breakers . . . . . . . . . . . . . . . . 370
Cleaning Exterior Care . . . . . . . . . . . . . . . . . 429
Interior Care . . . . . . . . . . . . . . . . . . 434
Climate Control Systems . . . . . . . 177 Climate Control Systems (cont'd)
Air Conditioning . . . . . . . . . . . . . . 177
Dual Automatic . . . . . . . . . . . . . . . 179
Heating . . . . . . . . . . . . . . . . . . . . . . . 177
Clock . . . . . . . . . . . . . . . . . . . . . . . . . . . 121
Cluster, Instrument . . . . . . . . . . . . . 127
Collision Damage Repair . . . . . . . 468
Compartments Storage . . . . . . . . . . . . . . . . . . . . . . . .113
Compass . . . . . . . . . . . . . . . . . . . . . . . 121
Connected Services Connections . . . . . . . . . . . . . . . . . . 484
Diagnostics . . . . . . . . . . . . . . . . . . . 485
Navigation . . . . . . . . . . . . . . . . . . . . 483
Connections Connected Services . . . . . . . . . . 484
Control Hill Descent . . . . . . . . . . . . . . . . . . 237
Traction and Electronic
Stability . . . . . . . . . . . . . . . . . . . . . 235
Control Light Hill Descent . . . . . . . . . . . . . . . . . . 142
Control of a Vehicle . . . . . . . . . . . . . 188
Convex Mirrors . . . . . . . . . . . . . . . . . . 40
Coolant
Engine Temperature Gauge . . 134
Engine TemperatureWarning Light . . . . . . . . . . . . . . . 144 Cooling . . . . . . . . . . . . . . . . . . . . 177, 179
Cooling System . . . . . . . . . . . . . . . . . 346
Courtesy Transportation
Program . . . . . . . . . . . . . . . . . . . . . . . 467
Cruise Control . . . . . . . . . . . . . . . . . . 243 Light . . . . . . . . . . . . . . . . . . . . . . . . . . 147
Cruise Control, Adaptive . . . . . . . . 246
Cupholders . . . . . . . . . . . . . . . . . . . . . 113
Customer Assistance . . . . . . . . . . . 464
Offices . . . . . . . . . . . . . . . . . . . . . . . . 463
Text Telephone (TTY)Users . . . . . . . . . . . . . . . . . . . . . . . 464
Customer Information Publications OrderingInformation . . . . . . . . . . . . . . . . . . 470
Customer Satisfaction
Procedure . . . . . . . . . . . . . . . . . . . . . 461
Cybersecurity . . . . . . . . . . . . . . . . . . . 473
D
Damage Repair, Collision . . . . . . . 468
Danger, Warning, and Caution . . . . 2
Data Collection Infotainment System . . . . . . . . . . 474
OnStar . . . . . . . . . . . . . . . . . . . . . . . 474
Data Recorders, Event . . . . . . . . . 473
Daytime Running
Lamps (DRL) . . . . . . . . . . . . . . . . . . 168
Page:
< prev 1-8 9-16 17-24