Page 287 of 500
Chevrolet Silverado Owner Manual (GMNA-Localizing-U.S./Canada/Mexico-
13337620) - 2020 - CRC - 4/11/19
286 Driving and Operating
Turn the fuel cap counterclockwise
to remove. Fully insert and latch the
fill nozzle, begin fueling. If the
vehicle is a dual fuel tank chassis
cab model, and it runs out of fuel,
refuel the front fuel tank first to
ensure a quick restart.
{Warning
Overfilling the fuel tank by more
than three clicks of a standard fill
nozzle may cause:. Vehicle performance issues,
including engine stalling and
damage to the fuel system.
. Fuel spills.
. Under certain conditions,
fuel fires.
Be careful not to spill fuel. Wait
five seconds after you have finished
pumping before removing the fill
nozzle. Clean fuel from painted
surfaces as soon as possible. See
Exterior Care 0429. Reinstall the
cap by turning it clockwise until it
clicks.
{Warning
If a fire starts while you are
refueling, do not remove the fill
nozzle. Shut off the flow of fuel by
shutting off the pump or by
notifying the station attendant.
Leave the area immediately.
Caution
If a new fuel cap is needed, get
the right type of cap from your
dealer. The wrong type of fuel cap
may not fit properly, may turn on
the malfunction indicator lamp,
and could damage the fuel
system and emissions system.
See Malfunction Indicator Lamp
(Check Engine Light) 0138.
Filling a Portable Fuel
Container
{Warning
Never fill a portable fuel container
while it is in the vehicle. Static
electricity discharge from the
container can ignite the fuel
vapor. You or others could be
badly burned and the vehicle
could be damaged. To help avoid
injury to you and others:
. Dispense fuel only into
approved containers.
. Do not fill a container while
it is inside a vehicle, in a
vehicle's trunk, in a pickup
bed, or on any surface other
than the ground.
. Bring the fill nozzle in
contact with the inside of
the fill opening before
operating the nozzle.
Maintain contact until filling
is complete.
(Continued)
Page 351 of 500
Chevrolet Silverado Owner Manual (GMNA-Localizing-U.S./Canada/Mexico-
13337620) - 2020 - CRC - 4/10/19
350 Vehicle Care
Warning (Continued)
warning. The engine could catch
fire and you or others could be
burned.
{Warning
Steam and scalding liquids from a
hot cooling system are under
pressure. Turning the pressure
cap, even a little, can cause them
to come out at high speed and
you could be burned. Never turn
the cap when the cooling system,
including the pressure cap, is hot.
Wait for the cooling system and
pressure cap to cool.
Caution
Failure to follow the specific
coolant fill procedure could cause
the engine to overheat and could(Continued)
Caution (Continued)
cause system damage. If coolant
is not visible in the surge tank,
contact your dealer.
If no coolant is visible in the surge
tank, add coolant.
1. Remove the coolant surge tank pressure cap when the cooling
system, including the coolant
surge tank pressure cap and
upper radiator hose, is no
longer hot.
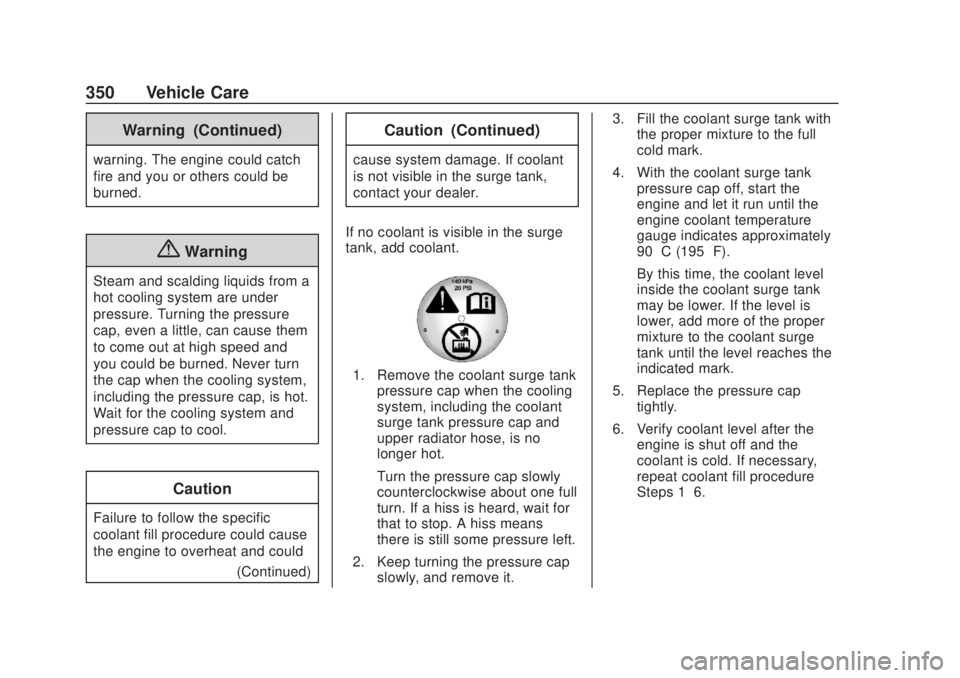
Turn the pressure cap slowly
counterclockwise about one full
turn. If a hiss is heard, wait for
that to stop. A hiss means
there is still some pressure left.
2. Keep turning the pressure cap slowly, and remove it. 3. Fill the coolant surge tank with
the proper mixture to the full
cold mark.
4. With the coolant surge tank pressure cap off, start the
engine and let it run until the
engine coolant temperature
gauge indicates approximately
90 °C (195 °F).
By this time, the coolant level
inside the coolant surge tank
may be lower. If the level is
lower, add more of the proper
mixture to the coolant surge
tank until the level reaches the
indicated mark.
5. Replace the pressure cap tightly.
6. Verify coolant level after the engine is shut off and the
coolant is cold. If necessary,
repeat coolant fill procedure
Steps 1–6.
Page 368 of 500

Chevrolet Silverado Owner Manual (GMNA-Localizing-U.S./Canada/Mexico-
13337620) - 2020 - CRC - 4/10/19
Vehicle Care 367
LED Lighting
This vehicle has several LED lamps.
For replacement of any LED lighting
assembly, contact your dealer.
Headlamps, Front Turn
Signal, Sidemarker, and
Parking Lamps
Base Level Headlamp
Assembly
1. Sidemarker lamp
2. Low-Beam Headlamp
3. High-Beam Headlamp
4. Turn Signal/Park Lamps
Midlevel Headlamp Assembly
1. Turn Signal Lamps
Headlamp Replacement
Base Level1. Open the hood.
2. Remove the headlamp bulb cover.
3. Turn the bulb socket counterclockwise to remove it
from the headlamp assembly.
4. Unplug the electrical connector from the bulb by releasing the
clip on the connector. 5. Replace the bulb and reverse
Steps 1–4 to reinstall.
Midlevel and Uplevel
See your dealer for headlamp
replacement.
Uplevel
See your dealer for turn signal
replacement.
Turn Signal Lamp
Replacement
1. Open the hood.
2. Turn the bulb socket counterclockwise to remove it
from the headlamp assembly
and pull it straight out.
3. Remove the bulb by pulling it straight out of the bulb socket.
4. Replace the bulb and reverse Steps 1–3 to reinstall.
Page 370 of 500
Chevrolet Silverado Owner Manual (GMNA-Localizing-U.S./Canada/Mexico-
13337620) - 2020 - CRC - 4/10/19
Vehicle Care 369
4. Turn the bulb socketcounterclockwise.
5. Pull the bulb straight out from the socket.
6. Replace the bulb and reverse Steps 1–5 to reinstall.
Center High-Mounted
Stoplamp (CHMSL) and
Cargo Lamp
This procedure is for the regular cab
only. For crew cab and double cab
see your dealer.
1. Cargo Lamp Bulbs
2. Center High-Mounted
Stoplamp (CHMSL) Bulb
To replace one of these bulbs:
1. Remove the two screws and lift off the lamp assembly.
2. Turn the bulb socket counterclockwise and pull it
straight out.
3. Pull the bulb straight out from the socket.
License Plate Lamp
To replace the bulb:
1. Reach behind the rear bumper and locate the bulb.
2. Turn the bulb socket counterclockwise and pull the
bulb straight out of the socket.
Page 408 of 500
Chevrolet Silverado Owner Manual (GMNA-Localizing-U.S./Canada/Mexico-
13337620) - 2020 - CRC - 4/10/19
Vehicle Care 407
Tire Changing
Removing the Spare Tire and
Tools
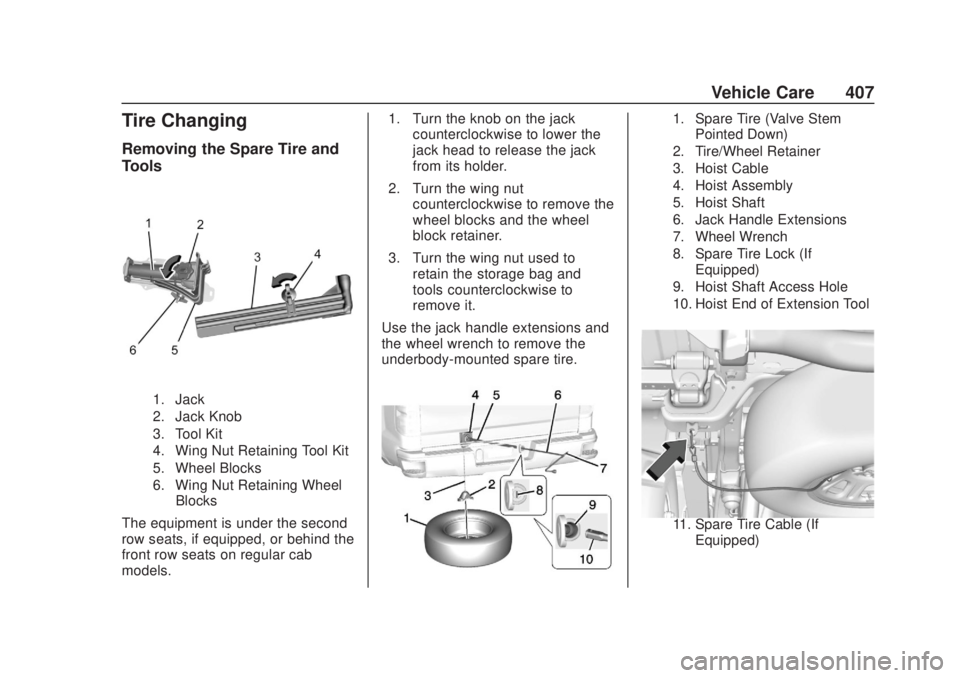
1. Jack
2. Jack Knob
3. Tool Kit
4. Wing Nut Retaining Tool Kit
5. Wheel Blocks
6. Wing Nut Retaining WheelBlocks
The equipment is under the second
row seats, if equipped, or behind the
front row seats on regular cab
models. 1. Turn the knob on the jack
counterclockwise to lower the
jack head to release the jack
from its holder.
2. Turn the wing nut counterclockwise to remove the
wheel blocks and the wheel
block retainer.
3. Turn the wing nut used to retain the storage bag and
tools counterclockwise to
remove it.
Use the jack handle extensions and
the wheel wrench to remove the
underbody-mounted spare tire.
1. Spare Tire (Valve Stem Pointed Down)
2. Tire/Wheel Retainer
3. Hoist Cable
4. Hoist Assembly
5. Hoist Shaft
6. Jack Handle Extensions
7. Wheel Wrench
8. Spare Tire Lock (If Equipped)
9. Hoist Shaft Access Hole
10. Hoist End of Extension Tool
11. Spare Tire Cable (If Equipped)
Page 409 of 500
Chevrolet Silverado Owner Manual (GMNA-Localizing-U.S./Canada/Mexico-
13337620) - 2020 - CRC - 4/10/19
408 Vehicle Care
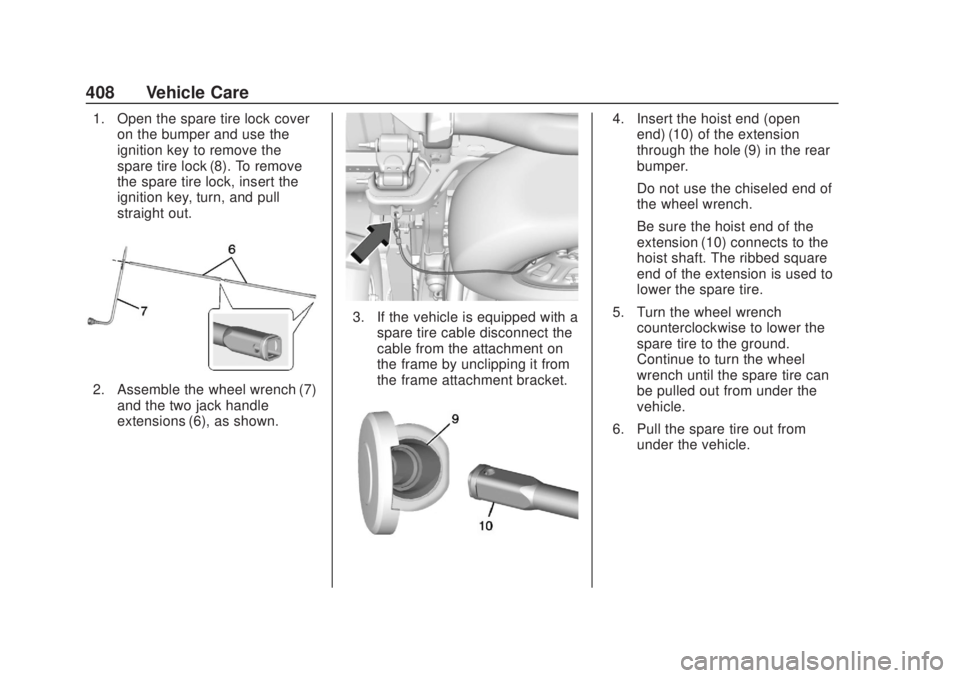
1. Open the spare tire lock coveron the bumper and use the
ignition key to remove the
spare tire lock (8). To remove
the spare tire lock, insert the
ignition key, turn, and pull
straight out.
2. Assemble the wheel wrench (7)
and the two jack handle
extensions (6), as shown.
3. If the vehicle is equipped with aspare tire cable disconnect the
cable from the attachment on
the frame by unclipping it from
the frame attachment bracket.
4. Insert the hoist end (openend) (10) of the extension
through the hole (9) in the rear
bumper.
Do not use the chiseled end of
the wheel wrench.
Be sure the hoist end of the
extension (10) connects to the
hoist shaft. The ribbed square
end of the extension is used to
lower the spare tire.
5. Turn the wheel wrench counterclockwise to lower the
spare tire to the ground.
Continue to turn the wheel
wrench until the spare tire can
be pulled out from under the
vehicle.
6. Pull the spare tire out from under the vehicle.
Page 411 of 500
Chevrolet Silverado Owner Manual (GMNA-Localizing-U.S./Canada/Mexico-
13337620) - 2020 - CRC - 4/10/19
410 Vehicle Care
The tools you will be using include
the jack (1), the wheel blocks (2),
the jack handle (3), the jack handle
extensions (4), and the wheel
wrench (5).1. Do a safety check before proceeding. See If a Tire Goes
Flat 0405.
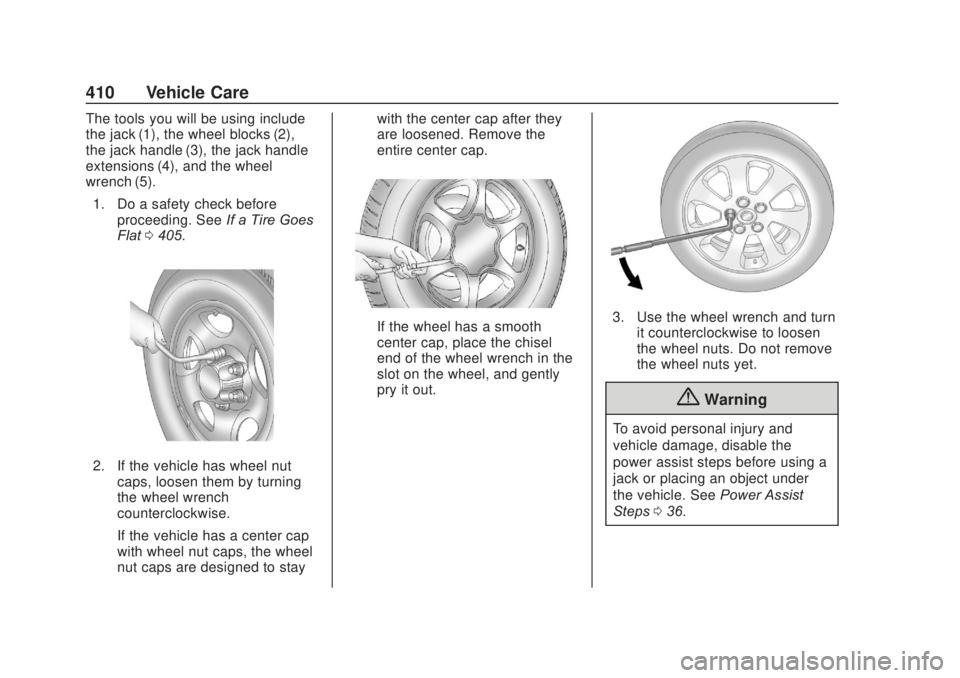
2. If the vehicle has wheel nut
caps, loosen them by turning
the wheel wrench
counterclockwise.
If the vehicle has a center cap
with wheel nut caps, the wheel
nut caps are designed to stay with the center cap after they
are loosened. Remove the
entire center cap.
If the wheel has a smooth
center cap, place the chisel
end of the wheel wrench in the
slot on the wheel, and gently
pry it out.3. Use the wheel wrench and turn
it counterclockwise to loosen
the wheel nuts. Do not remove
the wheel nuts yet.
{Warning
To avoid personal injury and
vehicle damage, disable the
power assist steps before using a
jack or placing an object under
the vehicle. See Power Assist
Steps 036.
Page 413 of 500
Chevrolet Silverado Owner Manual (GMNA-Localizing-U.S./Canada/Mexico-
13337620) - 2020 - CRC - 4/10/19
412 Vehicle Care
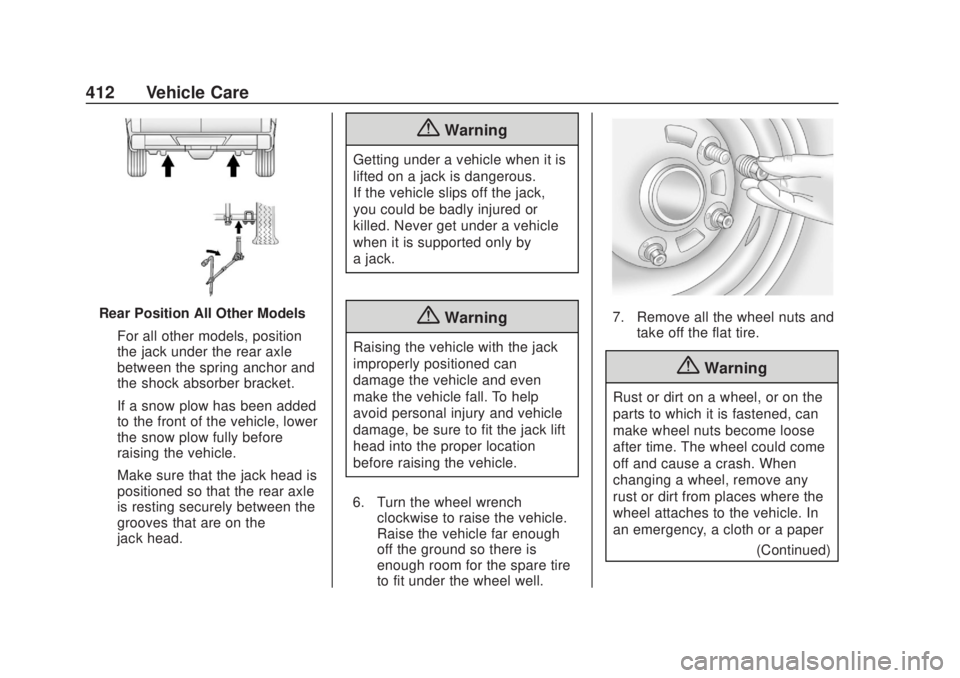
Rear Position All Other ModelsFor all other models, position
the jack under the rear axle
between the spring anchor and
the shock absorber bracket.
If a snow plow has been added
to the front of the vehicle, lower
the snow plow fully before
raising the vehicle.
Make sure that the jack head is
positioned so that the rear axle
is resting securely between the
grooves that are on the
jack head.
{Warning
Getting under a vehicle when it is
lifted on a jack is dangerous.
If the vehicle slips off the jack,
you could be badly injured or
killed. Never get under a vehicle
when it is supported only by
a jack.
{Warning
Raising the vehicle with the jack
improperly positioned can
damage the vehicle and even
make the vehicle fall. To help
avoid personal injury and vehicle
damage, be sure to fit the jack lift
head into the proper location
before raising the vehicle.
6. Turn the wheel wrench clockwise to raise the vehicle.
Raise the vehicle far enough
off the ground so there is
enough room for the spare tire
to fit under the wheel well.
7. Remove all the wheel nuts andtake off the flat tire.
{Warning
Rust or dirt on a wheel, or on the
parts to which it is fastened, can
make wheel nuts become loose
after time. The wheel could come
off and cause a crash. When
changing a wheel, remove any
rust or dirt from places where the
wheel attaches to the vehicle. In
an emergency, a cloth or a paper
(Continued)