2020 CHEVROLET MALIBU run flat
[x] Cancel search: run flatPage 150 of 358
Chevrolet Malibu Owner Manual (GMNA-Localizing-U.S./Canada/Mexico-
13555849) - 2020 - CRC - 8/16/19
Driving and Operating 149
Warning (Continued)
occupants could drown. Do not
ignore police warnings and be
very cautious about trying to drive
through flowing water.
Hydroplaning
Hydroplaning is dangerous. Water
can build up under the vehicle's
tires so they actually ride on the
water. This can happen if the road is
wet enough and you are going fast
enough. When the vehicle is
hydroplaning, it has little or no
contact with the road.
There is no hard and fast rule about
hydroplaning. The best advice is to
slow down when the road is wet.
Other Rainy Weather Tips
Besides slowing down, other wet
weather driving tips include:
.Allow extra following distance.
. Pass with caution. .
Keep windshield wiping
equipment in good shape.
. Keep the windshield washer fluid
reservoir filled.
. Have good tires with proper
tread depth. See Tires0250.
. Turn off cruise control.
Hill and Mountain Roads
Driving on steep hills or through
mountains is different than driving
on flat or rolling terrain. Tips include:
.Keep the vehicle serviced and in
good shape.
. Check all fluid levels and brakes,
tires, cooling system, and
transmission.
. Shift to a lower gear when going
down steep or long hills.
{Warning
Using the brakes to slow the
vehicle on a long downhill slope
can cause brake overheating, can
(Continued)
Warning (Continued)
reduce brake performance, and
could result in a loss of braking.
Shift the transmission to a lower
gear to let the engine assist the
brakes on a steep downhill slope.
{Warning
Coasting downhill in N (Neutral)
or with the ignition off is
dangerous. This can cause
overheating of the brakes and
loss of steering assist. Always
have the engine running and the
vehicle in gear.
. Drive at speeds that keep the
vehicle in its own lane. Do not
swing wide or cross the
center line.
. Be alert on top of hills;
something could be in your lane
(e.g., stalled car, crash).
Page 274 of 358
Chevrolet Malibu Owner Manual (GMNA-Localizing-U.S./Canada/Mexico-
13555849) - 2020 - CRC - 8/21/19
Vehicle Care 273
Warning (Continued)
5. Place wheel blocks,if equipped, on both sides of
the tire at the opposite
corner of the tire being
changed.
This vehicle may come with a jack
and spare tire or a tire sealant and
compressor kit. To use the jacking
equipment to change a spare tire
safely, follow the instructions below.
Then see Tire Changing 0280. To
use the tire sealant and compressor
kit, see Tire Sealant and
Compressor Kit 0273.
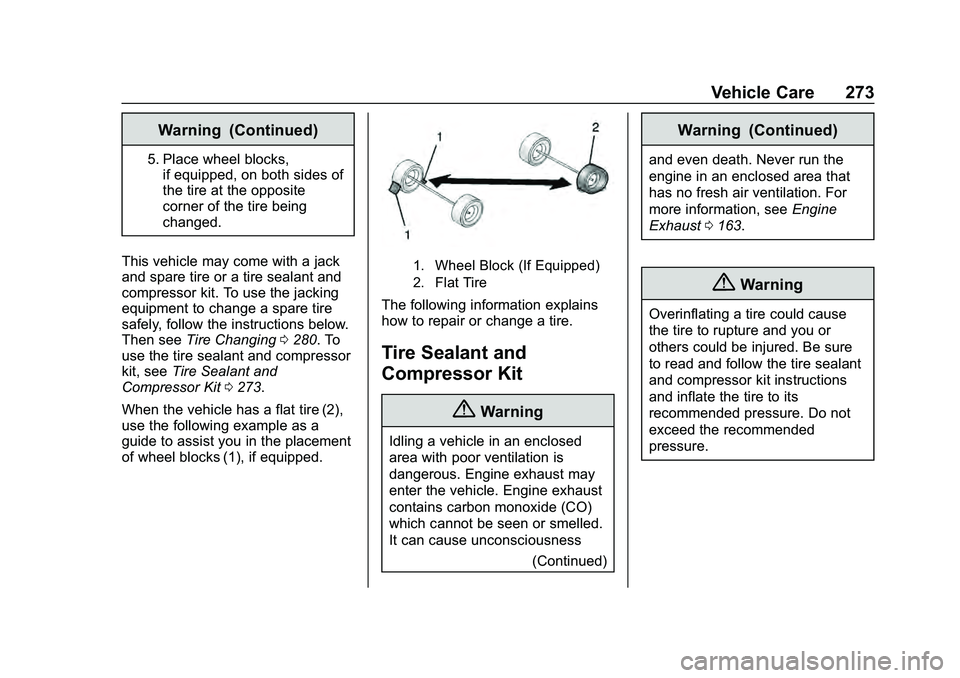
When the vehicle has a flat tire (2),
use the following example as a
guide to assist you in the placement
of wheel blocks (1), if equipped.
1. Wheel Block (If Equipped)
2. Flat Tire
The following information explains
how to repair or change a tire.
Tire Sealant and
Compressor Kit
{Warning
Idling a vehicle in an enclosed
area with poor ventilation is
dangerous. Engine exhaust may
enter the vehicle. Engine exhaust
contains carbon monoxide (CO)
which cannot be seen or smelled.
It can cause unconsciousness (Continued)
Warning (Continued)
and even death. Never run the
engine in an enclosed area that
has no fresh air ventilation. For
more information, seeEngine
Exhaust 0163.
{Warning
Overinflating a tire could cause
the tire to rupture and you or
others could be injured. Be sure
to read and follow the tire sealant
and compressor kit instructions
and inflate the tire to its
recommended pressure. Do not
exceed the recommended
pressure.
Page 277 of 358
Chevrolet Malibu Owner Manual (GMNA-Localizing-U.S./Canada/Mexico-
13555849) - 2020 - CRC - 8/21/19
276 Vehicle Care
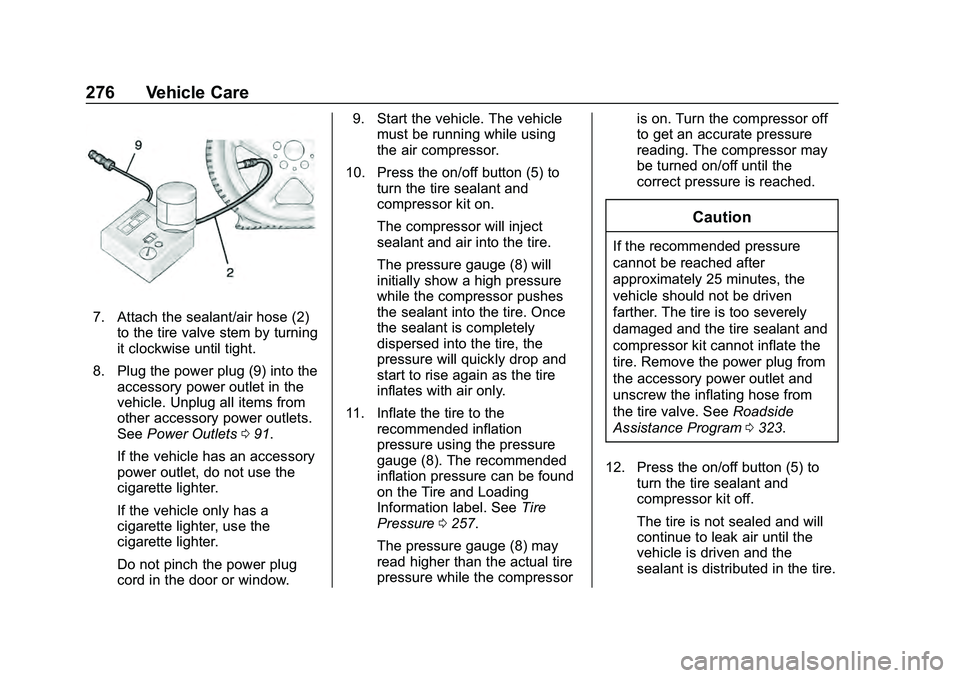
7. Attach the sealant/air hose (2)to the tire valve stem by turning
it clockwise until tight.
8. Plug the power plug (9) into the accessory power outlet in the
vehicle. Unplug all items from
other accessory power outlets.
See Power Outlets 091.
If the vehicle has an accessory
power outlet, do not use the
cigarette lighter.
If the vehicle only has a
cigarette lighter, use the
cigarette lighter.
Do not pinch the power plug
cord in the door or window. 9. Start the vehicle. The vehicle
must be running while using
the air compressor.
10. Press the on/off button (5) to turn the tire sealant and
compressor kit on.
The compressor will inject
sealant and air into the tire.
The pressure gauge (8) will
initially show a high pressure
while the compressor pushes
the sealant into the tire. Once
the sealant is completely
dispersed into the tire, the
pressure will quickly drop and
start to rise again as the tire
inflates with air only.
11. Inflate the tire to the recommended inflation
pressure using the pressure
gauge (8). The recommended
inflation pressure can be found
on the Tire and Loading
Information label. See Tire
Pressure 0257.
The pressure gauge (8) may
read higher than the actual tire
pressure while the compressor is on. Turn the compressor off
to get an accurate pressure
reading. The compressor may
be turned on/off until the
correct pressure is reached.
Caution
If the recommended pressure
cannot be reached after
approximately 25 minutes, the
vehicle should not be driven
farther. The tire is too severely
damaged and the tire sealant and
compressor kit cannot inflate the
tire. Remove the power plug from
the accessory power outlet and
unscrew the inflating hose from
the tire valve. See
Roadside
Assistance Program 0323.
12. Press the on/off button (5) to turn the tire sealant and
compressor kit off.
The tire is not sealed and will
continue to leak air until the
vehicle is driven and the
sealant is distributed in the tire.
Page 280 of 358
Chevrolet Malibu Owner Manual (GMNA-Localizing-U.S./Canada/Mexico-
13555849) - 2020 - CRC - 8/21/19
Vehicle Care 279
If the vehicle only has a
cigarette lighter, use the
cigarette lighter.
Do not pinch the power plug
cord in the door or window.
7. Start the vehicle. The vehicle must be running while using
the air compressor.
8. Press the on/off button (5) to turn the tire sealant and
compressor kit on.
The compressor will inflate the
tire with air only.
9. Inflate the tire to the recommended inflation
pressure using the pressure
gauge (8). The recommended
inflation pressure can be found
on the Tire and Loading
Information label. See Tire
Pressure 0257.
The pressure gauge (8) may
read higher than the actual tire
pressure while the compressor
is on. Turn the compressor off
to get an accurate pressure reading. The compressor may
be turned on/off until the
correct pressure is reached.
Caution
If the recommended pressure
cannot be reached after
approximately 25 minutes, the
vehicle should not be driven
farther. The tire is too severely
damaged and the tire sealant and
compressor kit cannot inflate the
tire. Remove the power plug from
the accessory power outlet and
unscrew the inflating hose from
the tire valve. See
Roadside
Assistance Program 0323.
10. Press the on/off button (5) to turn the tire sealant and
compressor kit off.
Be careful while handling the
compressor as it could be
warm after usage.
11. Unplug the power plug (9) from the accessory power outlet in
the vehicle. 12. Turn the air only hose (10)
counterclockwise to remove it
from the tire valve stem.
13. Replace the tire valve stem cap.
14. Return the air only hose (10) and power plug (9) back to
their original storage location.
15. Return the equipment to its original storage location in the
vehicle.
The tire sealant and compressor kit
has accessory adapters located in a
compartment on the bottom of its
housing that can be used to inflate
air mattresses, balls, etc.
Storing the Tire Sealant
and Compressor Kit
To access the tire sealant and
compressor kit: 1. Open the trunk. See Trunk
0 22.
2. Lift the cover.
Page 281 of 358
Chevrolet Malibu Owner Manual (GMNA-Localizing-U.S./Canada/Mexico-
13555849) - 2020 - CRC - 8/21/19
280 Vehicle Care
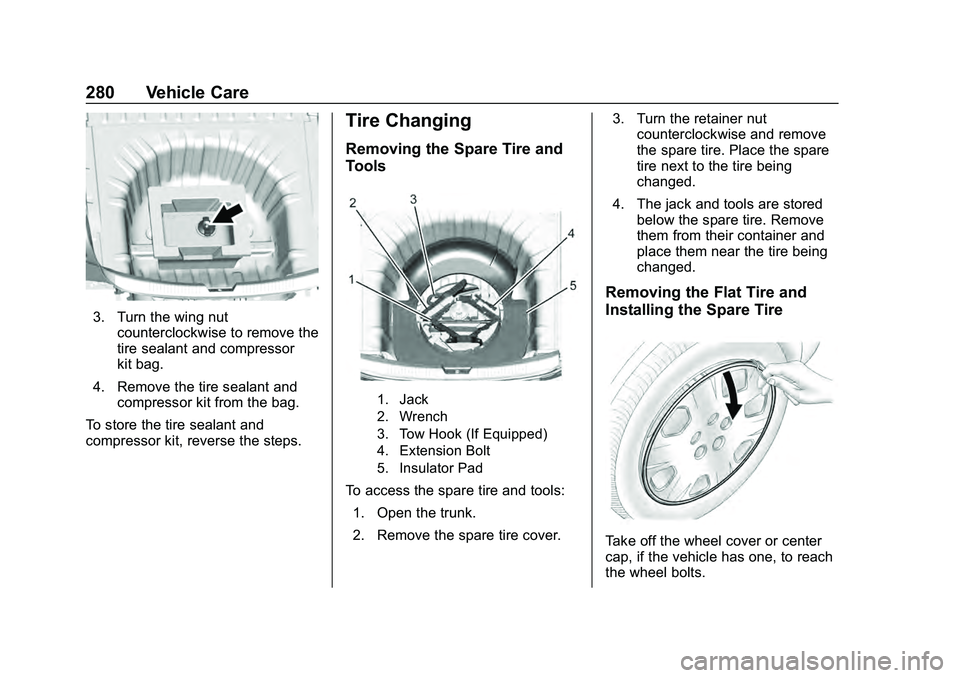
3. Turn the wing nutcounterclockwise to remove the
tire sealant and compressor
kit bag.
4. Remove the tire sealant and compressor kit from the bag.
To store the tire sealant and
compressor kit, reverse the steps.
Tire Changing
Removing the Spare Tire and
Tools
1. Jack
2. Wrench
3. Tow Hook (If Equipped)
4. Extension Bolt
5. Insulator Pad
To access the spare tire and tools: 1. Open the trunk.
2. Remove the spare tire cover. 3. Turn the retainer nut
counterclockwise and remove
the spare tire. Place the spare
tire next to the tire being
changed.
4. The jack and tools are stored below the spare tire. Remove
them from their container and
place them near the tire being
changed.
Removing the Flat Tire and
Installing the Spare Tire
Take off the wheel cover or center
cap, if the vehicle has one, to reach
the wheel bolts.
Page 350 of 358
Chevrolet Malibu Owner Manual (GMNA-Localizing-U.S./Canada/Mexico-
13555849) - 2020 - CRC - 8/16/19
Index 349
DrivingAssistance Systems . . . . . . . . . . 188
Better Fuel Economy . . . . . . . . . 144
Characteristics and
Towing Tips . . . . . . . . . . . . . . . . . 203
Defensive . . . . . . . . . . . . . . . . . . . . . 145
Drunk . . . . . . . . . . . . . . . . . . . . . . . . . 145
Hill and Mountain Roads . . . . . . 149
If the Vehicle is Stuck . . . . . . . . . 151
Loss of Control . . . . . . . . . . . . . . . 148
Off-Road Recovery . . . . . . . . . . . 147
Vehicle Load Limits . . . . . . . . . . . 151
Wet Roads . . . . . . . . . . . . . . . . . . . 148
Winter . . . . . . . . . . . . . . . . . . . . . . . . 150
Dual Automatic Climate Control System . . . . . . . . . . . . . . . . 137
E
Electric Parking Brake . . . . . . . . . . 168
Electric Parking Brake Light . . . . 106
Electrical Equipment,
Add-On . . . . . . . . . . . . . . . . . . . . . . . 210
Electrical System Engine Compartment FuseBlock . . . . . . . . . . . . . . . . . . . . . . . . 243
Fuses and Circuit Breakers . . . 242
Instrument Panel Fuse
Block . . . . . . . . . . . . . . . . . . . . . . . . 247 Electrical System (cont'd)
Overload . . . . . . . . . . . . . . . . . . . . . 242
Emergency OnStar . . . . . . . . . . . . . . . . . . . . . . . 336
Engine Air Cleaner/Filter . . . . . . . . . . . . . 223
Check Light (MalfunctionIndicator) . . . . . . . . . . . . . . . . . . . . 104
Compartment Overview . . . . . . . 216
Coolant Temperature
Gauge . . . . . . . . . . . . . . . . . . . . . . 101
Coolant Temperature Warning Light . . . . . . . . . . . . . . . .110
Cooling System . . . . . . . . . . . . . . . 225
Drive Belt Routing . . . . . . . . . . . . 318
Exhaust . . . . . . . . . . . . . . . . . . . . . . 163
Heater . . . . . . . . . . . . . . . . . . . . . . . . 159
Oil Life System . . . . . . . . . . . . . . . 221
Oil Pressure Light . . . . . . . . . . . . .110
Overheating . . . . . . . . . . . . . . . . . . 228
Power Messages . . . . . . . . . . . . . 120
Running While Parked . . . . . . . . 163
Starting . . . . . . . . . . . . . . . . . . . . . . . 157
Engine Air Filter Life System . . . . 223
Entry Lighting . . . . . . . . . . . . . . . . . . . 131
Equipment, Towing . . . . . . . . . . . . . 208
Event Data Recorders . . . . . . . . . . 332
Exit Lighting . . . . . . . . . . . . . . . . . . . . 131 Extended Parking . . . . . . . . . . . . . . . 162
Extender, Seat Belt . . . . . . . . . . . . . . 52
Exterior Lamp Controls . . . . . . . . . 125
Exterior Lamps Off Reminder . . . 127
Exterior Lighting Battery
Saver . . . . . . . . . . . . . . . . . . . . . . . . . 132
F
Filter,Engine Air Cleaner . . . . . . . . . . . 223
Flash-to-Pass . . . . . . . . . . . . . . . . . . . 127
Flashers, Hazard Warning . . . . . . 128
Flat Tire . . . . . . . . . . . . . . . . . . . . . . . . 271 Changing . . . . . . . . . . . . . . . . . . . . . 280
Floor Mats . . . . . . . . . . . . . . . . . . . . . . 300
Fluid Automatic Transmission . . . . . . 222
Brakes . . . . . . . . . . . . . . . . . . . . . . . . 231
Washer . . . . . . . . . . . . . . . . . . . . . . . 229
Folding Mirrors . . . . . . . . . . . . . . . . . . 27
Forward Collision Alert (FCA) System . . . . . . . . . . . . . . . . . 188
Frequency Statement Radio . . . . . . . . . . . . . . . . . . . . . . . . . 329
Front Pedestrian Braking (FPB) System . . . . . . . . . . . . . . . . . 191
Front Seats Adjustment . . . . . . . . . . . . . . . . . . . . . 35