2020 CHEVROLET MALIBU flat tire
[x] Cancel search: flat tirePage 282 of 358
Chevrolet Malibu Owner Manual (GMNA-Localizing-U.S./Canada/Mexico-
13555849) - 2020 - CRC - 8/21/19
Vehicle Care 281
1. Do a safety check beforeproceeding. See If a Tire Goes
Flat 0271.
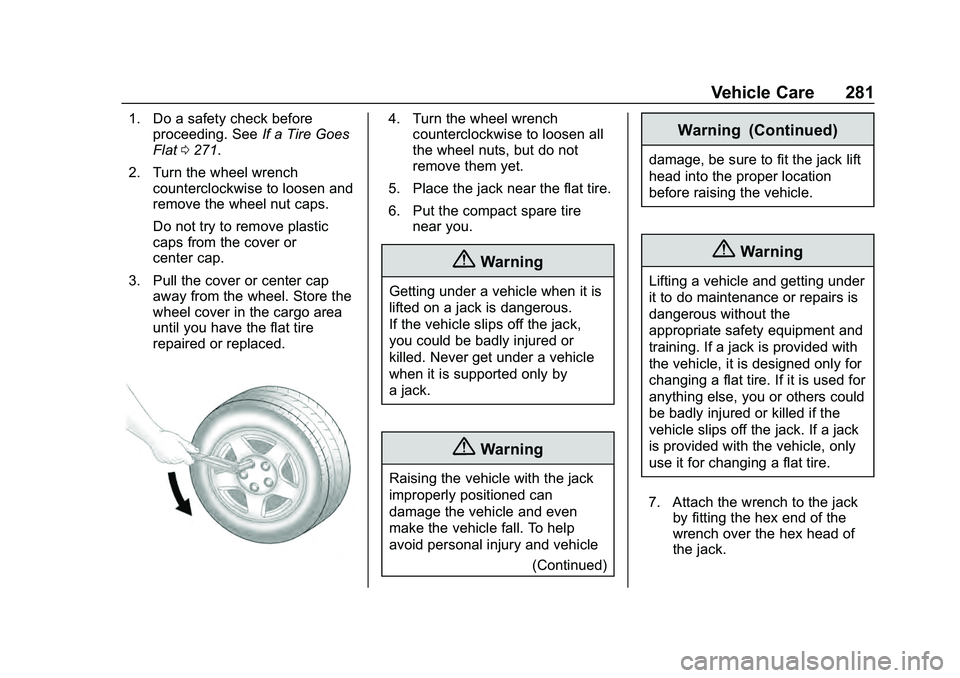
2. Turn the wheel wrench counterclockwise to loosen and
remove the wheel nut caps.
Do not try to remove plastic
caps from the cover or
center cap.
3. Pull the cover or center cap away from the wheel. Store the
wheel cover in the cargo area
until you have the flat tire
repaired or replaced.4. Turn the wheel wrenchcounterclockwise to loosen all
the wheel nuts, but do not
remove them yet.
5. Place the jack near the flat tire.
6. Put the compact spare tire near you.
{Warning
Getting under a vehicle when it is
lifted on a jack is dangerous.
If the vehicle slips off the jack,
you could be badly injured or
killed. Never get under a vehicle
when it is supported only by
a jack.
{Warning
Raising the vehicle with the jack
improperly positioned can
damage the vehicle and even
make the vehicle fall. To help
avoid personal injury and vehicle
(Continued)
Warning (Continued)
damage, be sure to fit the jack lift
head into the proper location
before raising the vehicle.
{Warning
Lifting a vehicle and getting under
it to do maintenance or repairs is
dangerous without the
appropriate safety equipment and
training. If a jack is provided with
the vehicle, it is designed only for
changing a flat tire. If it is used for
anything else, you or others could
be badly injured or killed if the
vehicle slips off the jack. If a jack
is provided with the vehicle, only
use it for changing a flat tire.
7. Attach the wrench to the jack by fitting the hex end of the
wrench over the hex head of
the jack.
Page 283 of 358
Chevrolet Malibu Owner Manual (GMNA-Localizing-U.S./Canada/Mexico-
13555849) - 2020 - CRC - 8/21/19
282 Vehicle Care
8. Place the jack under thevehicle.
Caution
Make sure that the jack lift head
is in the correct position or you
may damage your vehicle. The
repairs would not be covered by
your warranty.
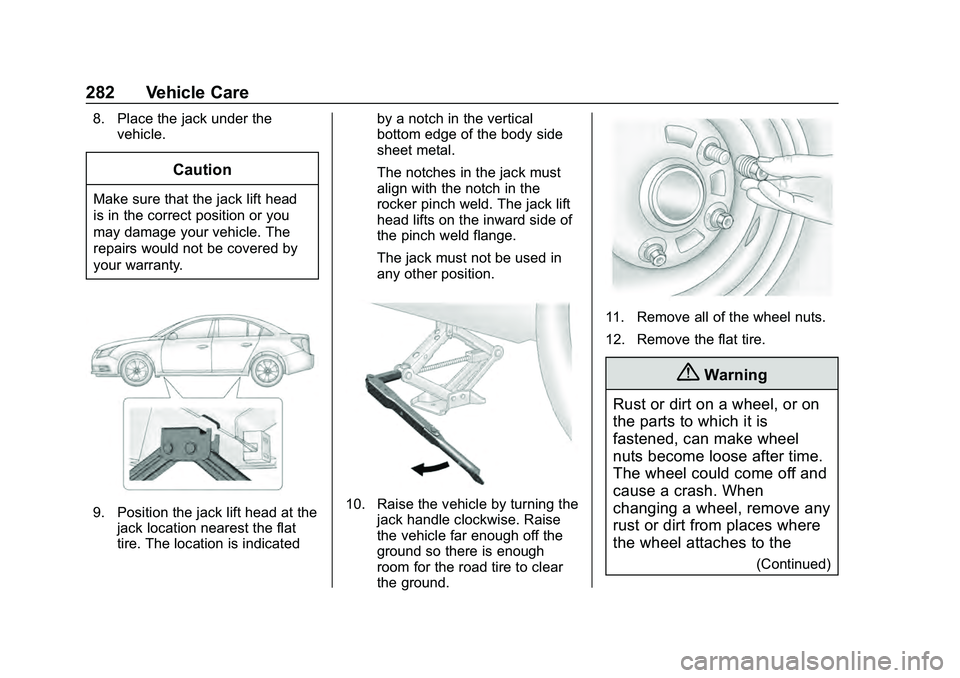
9. Position the jack lift head at thejack location nearest the flat
tire. The location is indicated by a notch in the vertical
bottom edge of the body side
sheet metal.
The notches in the jack must
align with the notch in the
rocker pinch weld. The jack lift
head lifts on the inward side of
the pinch weld flange.
The jack must not be used in
any other position.10. Raise the vehicle by turning the
jack handle clockwise. Raise
the vehicle far enough off the
ground so there is enough
room for the road tire to clear
the ground.
11. Remove all of the wheel nuts.
12. Remove the flat tire.
{Warning
Rust or dirt on a wheel, or on
the parts to which it is
fastened, can make wheel
nuts become loose after time.
The wheel could come off and
cause a crash. When
changing a wheel, remove any
rust or dirt from places where
the wheel attaches to the
(Continued)
Page 285 of 358
Chevrolet Malibu Owner Manual (GMNA-Localizing-U.S./Canada/Mexico-
13555849) - 2020 - CRC - 8/21/19
284 Vehicle Care
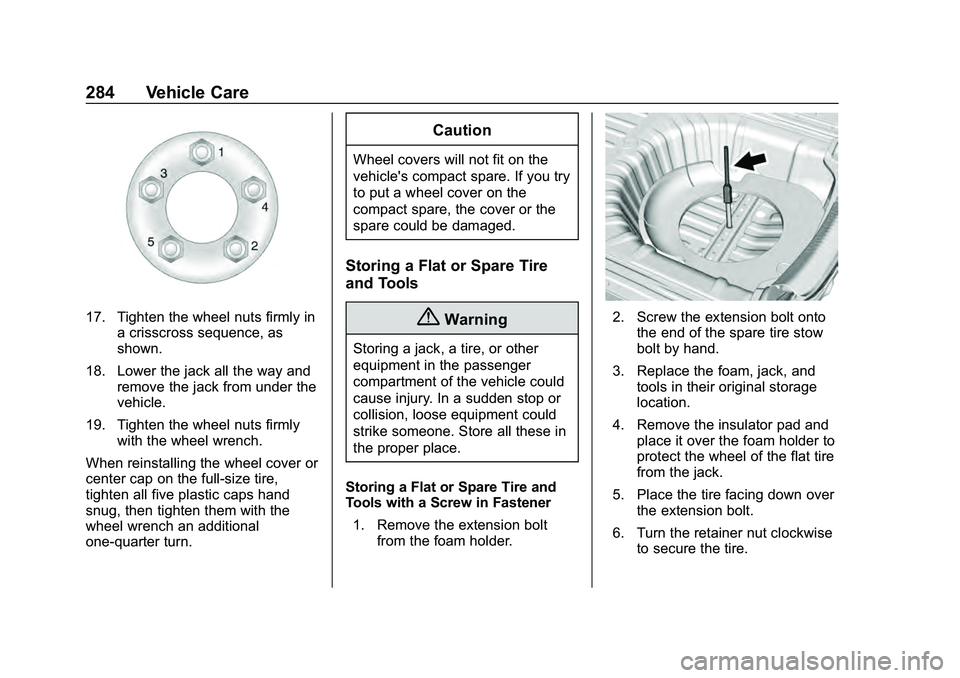
17. Tighten the wheel nuts firmly ina crisscross sequence, as
shown.
18. Lower the jack all the way and remove the jack from under the
vehicle.
19. Tighten the wheel nuts firmly with the wheel wrench.
When reinstalling the wheel cover or
center cap on the full-size tire,
tighten all five plastic caps hand
snug, then tighten them with the
wheel wrench an additional
one-quarter turn.
Caution
Wheel covers will not fit on the
vehicle's compact spare. If you try
to put a wheel cover on the
compact spare, the cover or the
spare could be damaged.
Storing a Flat or Spare Tire
and Tools
{Warning
Storing a jack, a tire, or other
equipment in the passenger
compartment of the vehicle could
cause injury. In a sudden stop or
collision, loose equipment could
strike someone. Store all these in
the proper place.
Storing a Flat or Spare Tire and
Tools with a Screw in Fastener 1. Remove the extension bolt from the foam holder.
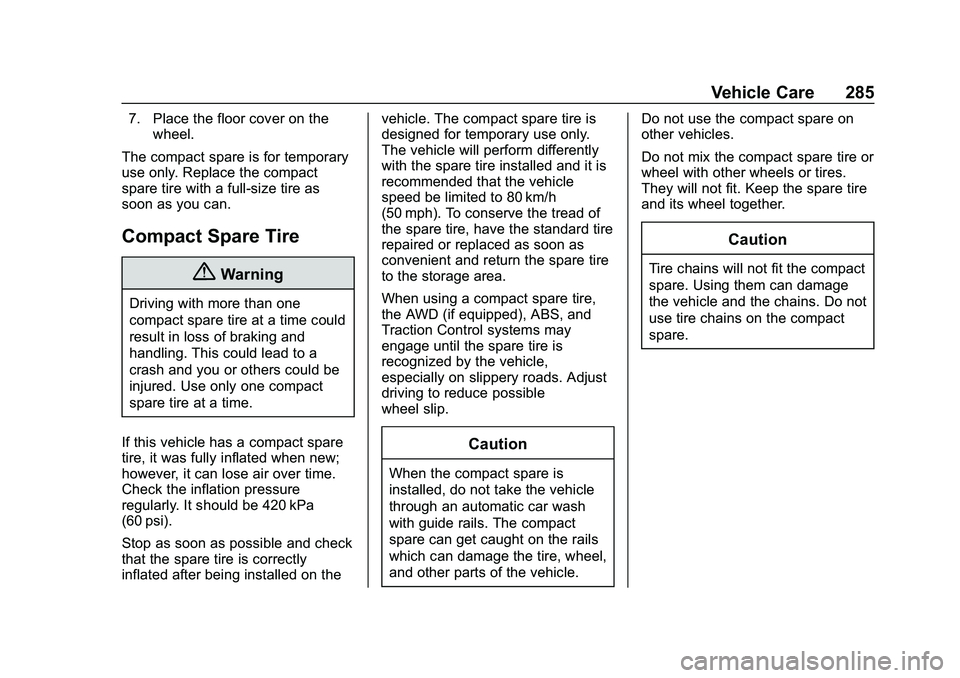
2. Screw the extension bolt ontothe end of the spare tire stow
bolt by hand.
3. Replace the foam, jack, and tools in their original storage
location.
4. Remove the insulator pad and place it over the foam holder to
protect the wheel of the flat tire
from the jack.
5. Place the tire facing down over the extension bolt.
6. Turn the retainer nut clockwise to secure the tire.
Page 286 of 358
Chevrolet Malibu Owner Manual (GMNA-Localizing-U.S./Canada/Mexico-
13555849) - 2020 - CRC - 8/21/19
Vehicle Care 285
7. Place the floor cover on thewheel.
The compact spare is for temporary
use only. Replace the compact
spare tire with a full-size tire as
soon as you can.
Compact Spare Tire
{Warning
Driving with more than one
compact spare tire at a time could
result in loss of braking and
handling. This could lead to a
crash and you or others could be
injured. Use only one compact
spare tire at a time.
If this vehicle has a compact spare
tire, it was fully inflated when new;
however, it can lose air over time.
Check the inflation pressure
regularly. It should be 420 kPa
(60 psi).
Stop as soon as possible and check
that the spare tire is correctly
inflated after being installed on the vehicle. The compact spare tire is
designed for temporary use only.
The vehicle will perform differently
with the spare tire installed and it is
recommended that the vehicle
speed be limited to 80 km/h
(50 mph). To conserve the tread of
the spare tire, have the standard tire
repaired or replaced as soon as
convenient and return the spare tire
to the storage area.
When using a compact spare tire,
the AWD (if equipped), ABS, and
Traction Control systems may
engage until the spare tire is
recognized by the vehicle,
especially on slippery roads. Adjust
driving to reduce possible
wheel slip.
Caution
When the compact spare is
installed, do not take the vehicle
through an automatic car wash
with guide rails. The compact
spare can get caught on the rails
which can damage the tire, wheel,
and other parts of the vehicle.
Do not use the compact spare on
other vehicles.
Do not mix the compact spare tire or
wheel with other wheels or tires.
They will not fit. Keep the spare tire
and its wheel together.
Caution
Tire chains will not fit the compact
spare. Using them can damage
the vehicle and the chains. Do not
use tire chains on the compact
spare.
Page 290 of 358
Chevrolet Malibu Owner Manual (GMNA-Localizing-U.S./Canada/Mexico-
13555849) - 2020 - CRC - 8/21/19
Vehicle Care 289
Towing the Vehicle
Caution
Incorrectly towing a disabled
vehicle may cause damage. The
damage would not be covered by
the vehicle warranty. Do not lash
or hook to suspension
components. Use the proper
straps around the tires to secure
the vehicle. Do not drag a locked
wheel/tire. Use tire skates or
dollies under any locked wheel/
tire while loading the vehicle. Do
not use a sling type lift to tow the
vehicle. This could damage the
vehicle.
Caution
If the vehicle cannot be shifted
into Neutral (N), do not use the
tow eye to tow the vehicle.
Vehicle damage may occur.GM recommends a flatbed tow truck
to transport a disabled vehicle. Use
ramps to help reduce approach
angles, if necessary. A towed
vehicle should have its drive wheels
off the ground. Contact Roadside
Assistance or a professional towing
service if the disabled vehicle must
be towed.
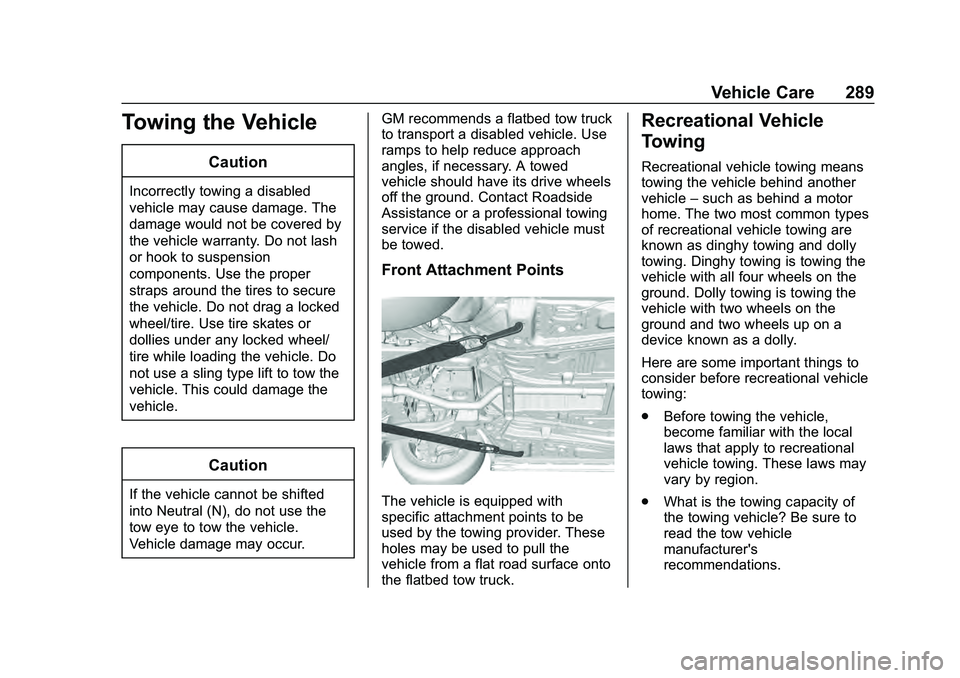
Front Attachment Points
The vehicle is equipped with
specific attachment points to be
used by the towing provider. These
holes may be used to pull the
vehicle from a flat road surface onto
the flatbed tow truck.
Recreational Vehicle
Towing
Recreational vehicle towing means
towing the vehicle behind another
vehicle
–such as behind a motor
home. The two most common types
of recreational vehicle towing are
known as dinghy towing and dolly
towing. Dinghy towing is towing the
vehicle with all four wheels on the
ground. Dolly towing is towing the
vehicle with two wheels on the
ground and two wheels up on a
device known as a dolly.
Here are some important things to
consider before recreational vehicle
towing:
. Before towing the vehicle,
become familiar with the local
laws that apply to recreational
vehicle towing. These laws may
vary by region.
. What is the towing capacity of
the towing vehicle? Be sure to
read the tow vehicle
manufacturer's
recommendations.
Page 305 of 358
Chevrolet Malibu Owner Manual (GMNA-Localizing-U.S./Canada/Mexico-
13555849) - 2020 - CRC - 8/16/19
304 Service and Maintenance
Maintenance
Schedule
Owner Checks and Services
Check the engine oil level. See
Engine Oil0219.
Once a Month
. Check the tire inflation
pressures. See Tire Pressure
0 257.
. Inspect the tires for wear. See
Tire Inspection 0264.
. Check the windshield washer
fluid level. See Washer Fluid
0 229.
Engine Oil Change
When the CHANGE ENGINE OIL
SOON message displays, have the
engine oil and filter changed within
the next 1 000 km (600 mi). If driven
under the best conditions, the
engine oil life system may not
indicate the need for vehicle service
for up to a year. The engine oil and
filter must be changed at least once
a year and the oil life system must be reset. Your trained dealer
technician can perform this work.
If the engine oil life system is reset
accidentally, service the vehicle
within 5 000 km (3,000 mi) since the
last service. Reset the oil life
system when the oil is changed.
See
Engine Oil Life System 0221.
Engine Air Filter Change
When the REPLACE AT NEXT OIL
CHANGE message displays, the
engine air filter should be replaced
at the next engine oil change. When
the REPLACE ENGINE AIR FILTER
SOON message displays, the
engine air filter should be replaced
at the earliest convenience. Reset
the engine air filter life system after
the engine air filter is replaced. See
Engine Air Filter Life System 0223.
Air Conditioning Desiccant
(Replace Every Seven Years)
The air conditioning system requires
maintenance every seven years.
This service requires replacement of
the desiccant to help the longevity and efficient operation of the air
conditioning system. This service
can be complex. See your dealer.
Tire Rotation and Required
Services Every 12 000 km
(7,500 mi)
Rotate the tires, if recommended for
the vehicle, and perform the
following services. See
Tire
Rotation 0265.
. Check engine oil level and oil
life percentage. If needed,
change engine oil and filter, and
reset oil life system. See Engine
Oil 0219 and
Engine Oil Life System 0221.
. If equipped with the engine air
filter life system, check the air
filter life percentage.
If necessary, replace the engine
air filter and reset the engine air
filter life system. See Engine Air
Filter Life System 0223. If the
vehicle is not equipped with the
engine air filter life system,
inspect the engine air cleaner
filter. See Engine Air Cleaner/
Filter 0223.
Page 306 of 358

Chevrolet Malibu Owner Manual (GMNA-Localizing-U.S./Canada/Mexico-
13555849) - 2020 - CRC - 8/16/19
Service and Maintenance 305
.Check engine coolant level. See
Cooling System 0225.
. Check windshield washer fluid
level. See Washer Fluid 0229.
. Check tire inflation pressures.
See Tire Pressure 0257.
. Inspect tire wear. See Tire
Inspection 0264.
. Visually check for fluid leaks.
. Inspect brake system. See
Exterior Care 0292.
. Visually inspect steering,
suspension, and chassis
components for damage,
including cracks or tears in the
rubber boots, loose or missing
parts, or signs of wear at least
once a year. See Exterior Care
0 292.
. Inspect power steering for
proper attachment, connections,
binding, leaks, cracks,
chafing, etc.
. Visually inspect halfshafts and
drive shafts for excessive wear,
lubricant leaks, and/or damage
including: tube dents or cracks, constant velocity joint or
universal joint looseness,
cracked or missing boots, loose
or missing boot clamps, center
bearing excessive looseness,
loose or missing fasteners, and
axle seal leaks.
. Check restraint system
components. See Safety System
Check 052.
. Visually inspect fuel system for
damage or leaks.
. Visually inspect exhaust system
and nearby heat shields for
loose or damaged parts.
. Lubricate body components. See
Exterior Care 0292.
. Check starter switch. See Starter
Switch Check 0234.
. Check automatic transmission
shift lock control function. See
Automatic Transmission Shift
Lock Control Function Check
0234. .
Check parking brake and
automatic transmission park
mechanism. See Park Brake and
P (Park) Mechanism Check
0 235.
. Check accelerator pedal for
damage, high effort, or binding.
Replace if needed.
. Visually inspect gas strut for
signs of wear, cracks, or other
damage. Check the hold open
ability of the strut. If the hold
open ability is low, service the
gas strut. See Gas Strut(s)
0 236.
. Check tire sealant expiration
date, if equipped. See Tire
Sealant and Compressor Kit
0 273.
. Inspect sunroof track and seal,
if equipped. See Sunroof030.
Page 312 of 358
Chevrolet Malibu Owner Manual (GMNA-Localizing-U.S./Canada/Mexico-
13555849) - 2020 - CRC - 8/16/19
Service and Maintenance 311
Lamps
Properly working headlamps,
taillamps, and brake lamps are
important to see and be seen on
the road.
.Signs that the headlamps need
attention include dimming, failure
to light, cracking, or damage.
The brake lamps need to be
checked periodically to ensure
that they light when braking.
. With a multi-point inspection,
your dealer can check the lamps
and note any concerns.
Shocks and Struts
Shocks and struts help aid in control
for a smoother ride.
. Signs of wear may include
steering wheel vibration, bounce/
sway while braking, longer
stopping distance, or uneven
tire wear.
. As part of the multi-point
inspection, trained dealer
technicians can visually inspect
the shocks and struts for signs of leaking, blown seals,
or damage, and can advise
when service is needed.
Tires
Tires need to be properly inflated,
rotated, and balanced. Maintaining
the tires can save money and fuel,
and can reduce the risk of tire
failure.
. Signs that the tires need to be
replaced include three or more
visible treadwear indicators; cord
or fabric showing through the
rubber; cracks or cuts in the
tread or sidewall; or a bulge or
split in the tire.
. Trained dealer technicians can
inspect and recommend the right
tires. Your dealer can also
provide tire/wheel balancing
services to ensure smooth
vehicle operation at all speeds.
Your dealer sells and services
name brand tires. Vehicle Care
To help keep the vehicle looking like
new, vehicle care products are
available from your dealer. For
information on how to clean and
protect the vehicle’s interior and
exterior, see
Interior Care 0297 and
Exterior Care 0292.
Wheel Alignment
Wheel alignment is critical for
ensuring that the tires deliver
optimal wear and performance.
. Signs that the alignment may
need to be adjusted include
pulling, improper vehicle
handling, or unusual tire wear.
. Your dealer has the required
equipment to ensure proper
wheel alignment.
Windshield
For safety, appearance, and the
best viewing, keep the windshield
clean and clear.
. Signs of damage include
scratches, cracks, and chips.