2020 CHEVROLET MALIBU check engine
[x] Cancel search: check enginePage 169 of 358
Chevrolet Malibu Owner Manual (GMNA-Localizing-U.S./Canada/Mexico-
13555849) - 2020 - CRC - 8/16/19
168 Driving and Operating
Electric Parking Brake
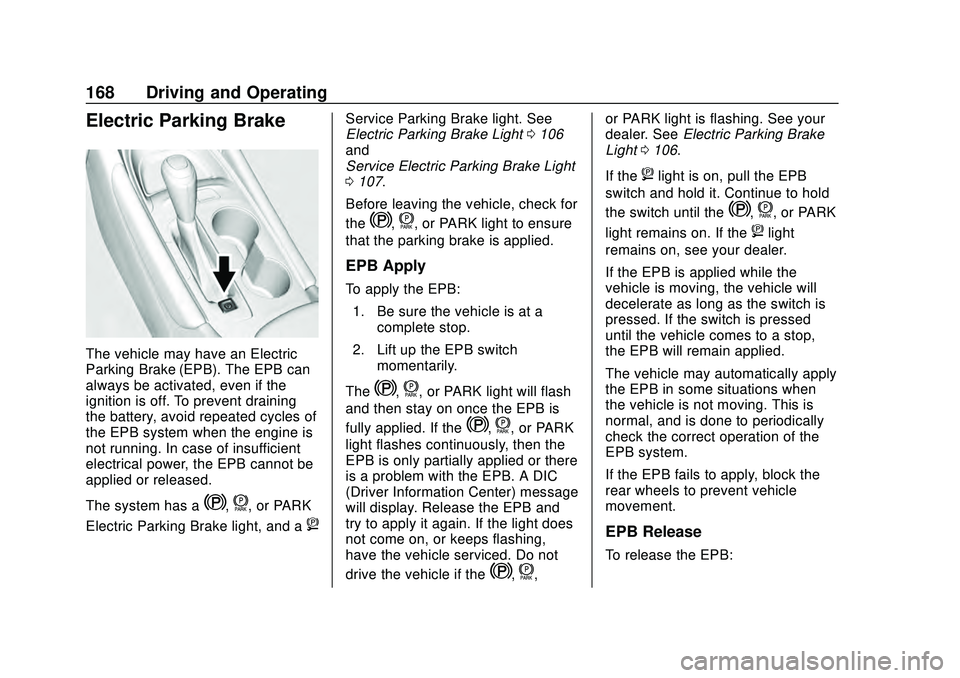
The vehicle may have an Electric
Parking Brake (EPB). The EPB can
always be activated, even if the
ignition is off. To prevent draining
the battery, avoid repeated cycles of
the EPB system when the engine is
not running. In case of insufficient
electrical power, the EPB cannot be
applied or released.
The system has a
Y,f, or PARK
Electric Parking Brake light, and a
8
Service Parking Brake light. See
Electric Parking Brake Light 0106
and
Service Electric Parking Brake Light
0 107.
Before leaving the vehicle, check for
the
Y,f, or PARK light to ensure
that the parking brake is applied.
EPB Apply
To apply the EPB:
1. Be sure the vehicle is at a complete stop.
2. Lift up the EPB switch momentarily.
The
Y,f, or PARK light will flash
and then stay on once the EPB is
fully applied. If the
Y,f, or PARK
light flashes continuously, then the
EPB is only partially applied or there
is a problem with the EPB. A DIC
(Driver Information Center) message
will display. Release the EPB and
try to apply it again. If the light does
not come on, or keeps flashing,
have the vehicle serviced. Do not
drive the vehicle if the
Y,f, or PARK light is flashing. See your
dealer. See
Electric Parking Brake
Light 0106.
If the
8light is on, pull the EPB
switch and hold it. Continue to hold
the switch until the
Y,f, or PARK
light remains on. If the
8light
remains on, see your dealer.
If the EPB is applied while the
vehicle is moving, the vehicle will
decelerate as long as the switch is
pressed. If the switch is pressed
until the vehicle comes to a stop,
the EPB will remain applied.
The vehicle may automatically apply
the EPB in some situations when
the vehicle is not moving. This is
normal, and is done to periodically
check the correct operation of the
EPB system.
If the EPB fails to apply, block the
rear wheels to prevent vehicle
movement.
EPB Release
To release the EPB:
Page 171 of 358
Chevrolet Malibu Owner Manual (GMNA-Localizing-U.S./Canada/Mexico-
13555849) - 2020 - CRC - 8/16/19
170 Driving and Operating
HSA is available when the vehicle is
facing uphill in a forward gear,
or when facing downhill in
R (Reverse). The vehicle must
come to a complete stop on a grade
for HSA to activate.Ride Control Systems
Traction Control/
Electronic Stability
Control
System Operation
The vehicle has a Traction Control
System (TCS) and StabiliTrak/
Electronic Stability Control (ESC).
These systems help limit wheel slip
and assist the driver in maintaining
control, especially on slippery road
conditions.
TCS activates if it senses that any
of the drive wheels are spinning or
beginning to lose traction. When this
happens, TCS applies the brakes to
the spinning wheels and reduces
engine power to limit wheel spin.
StabiliTrak/ESC activates when the
vehicle senses a difference between
the intended path and the direction
the vehicle is actually traveling.
StabiliTrak/ESC selectively applies
braking pressure to any one of thevehicle wheel brakes to assist the
driver in keeping the vehicle on the
intended path.
If cruise control is being used and
traction control or StabiliTrak/ESC
begins to limit wheel spin, cruise
control will disengage. Cruise
control may be turned back on when
road conditions allow.
Both systems come on
automatically when the vehicle is
started and begins to move. The
systems may be heard or felt while
they are operating or while
performing diagnostic checks. This
is normal and does not mean there
is a problem with the vehicle.
It is recommended to leave both
systems on for normal driving
conditions, but it may be necessary
to turn TCS off if the vehicle gets
stuck in sand, mud, ice, or snow.
See
If the Vehicle Is Stuck 0151
and “Turning the Systems Off and
On” later in this section.
Page 205 of 358
Chevrolet Malibu Owner Manual (GMNA-Localizing-U.S./Canada/Mexico-
13555849) - 2020 - CRC - 8/16/19
204 Driving and Operating
.Automatic Emergency
Braking (AEB)
. Intelligent Brake Assist (IBA)
. Front Pedestrian Braking (FPB)
If equipped with Lane Change Alert
(LCA), the LCA detection zones that
extend back from the side of the
vehicle do not move further back
when a trailer is towed. Use caution
while changing lanes when towing a
trailer.
If equipped with Rear Cross Traffic
Alert (RCTA), use caution while
backing up when towing a trailer, as
the RCTA detection zones that
extend out from the back of the
vehicle do not move further back
when a trailer is towed.
{Warning
To prevent serious injury or death
from carbon monoxide (CO),
when towing a trailer: (Continued)
Warning (Continued)
.Do not drive with the
liftgate, trunk/hatch,
or rear-most window open.
. Fully open the air outlets on
or under the instrument
panel.
. Adjust the climate control
system to a setting that
brings in only outside air.
See “Climate Control
Systems” in the Index.
For more information about
carbon monoxide, see Engine
Exhaust 0163.
Towing a trailer requires experience.
The combination of the vehicle and
trailer is longer and not as
responsive as the vehicle itself. Get
used to the handling and braking of
the combination by driving on a
level road surface before driving on
public roads. The trailer structure, the tires, and
the brakes must be all be rated to
carry the intended cargo.
Inadequate trailer equipment can
cause the combination to operate in
an unexpected or unsafe manner.
Before driving, inspect all trailer
hitch parts and attachments, safety
chains, electrical connectors, lamps,
tires, and mirrors. See
Towing
Equipment 0208. If the trailer has
electric brakes, start the
combination moving and then
manually apply the trailer brake
controller to check that the trailer
brakes work. During the trip,
occasionally check that the cargo
and trailer are secure and that the
lamps and any trailer brakes are
working.
Towing with a Stability Control
System
When towing, the stability control
system might be heard. The system
reacts to vehicle movement caused
by the trailer, which mainly occurs
during cornering. This is normal
when towing heavier trailers.
Page 207 of 358

Chevrolet Malibu Owner Manual (GMNA-Localizing-U.S./Canada/Mexico-
13555849) - 2020 - CRC - 8/16/19
206 Driving and Operating
When parking your vehicle and your
trailer on a hill:1. Press the brake pedal, but do not shift into P (Park) yet. Turn
the wheels into the curb if
facing downhill or into traffic if
facing uphill.
2. Have someone place chocks under the trailer wheels.
3. When the wheel chocks are in place, gradually release the
brake pedal to allow the chocks
to absorb the load of the trailer.
4. Reapply the brake pedal. Then apply the parking brake and
shift into P (Park).
5. Release the brake pedal.
Leaving After Parking on a Hill
1. Apply and hold the brake pedal.
.Start the engine.
. Shift into a gear.
. Release the parking brake.
2. Let up on the brake pedal. 3. Drive slowly until the trailer is
clear of the chocks.
4. Stop and have someone pick up and store the chocks.
Maintenance When Trailer
Towing
The vehicle needs service more
often when used to tow trailers. See
Maintenance Schedule 0304. It is
especially important to check the
automatic transmission fluid, engine
oil, axle lubricant, belts, cooling
system, and brake system before
and during each trip.
Check periodically that all nuts and
bolts on the trailer hitch are tight.
Engine Cooling When Trailer
Towing
The cooling system may temporarily
overheat during severe operating
conditions. See Engine Overheating
0 228.
Trailer Towing
Caution
Towing a trailer improperly can
damage the vehicle and result in
costly repairs not covered by the
vehicle warranty. To tow a trailer
correctly, follow the directions in
this section and see your dealer
for important information about
towing a trailer with the vehicle.
Trailer Weight
{Warning
Never exceed the towing capacity
for your vehicle.
Safe trailering requires monitoring
the weight, speed, altitude, road
grades, outside temperature,
dimensions of the front of the trailer,
and how frequently the vehicle is
used to tow a trailer.
Before towing a trailer, always
separately weigh:
Page 211 of 358
Chevrolet Malibu Owner Manual (GMNA-Localizing-U.S./Canada/Mexico-
13555849) - 2020 - CRC - 8/16/19
210 Driving and Operating
Conversions and
Add-Ons
Add-On Electrical
Equipment
{Warning
The Data Link Connector (DLC) is
used for vehicle service and
Emission Inspection/Maintenance
testing. SeeMalfunction Indicator
Lamp (Check Engine Light) 0104
. A device connected to the DLC
— such as an aftermarket fleet or
driver-behavior tracking device —
may interfere with vehicle
systems. This could affect vehicle
operation and cause a crash.
Such devices may also access
information stored in the vehicle’s
systems.
Caution
Some electrical equipment can
damage the vehicle or cause
components to not work and
would not be covered by the
vehicle warranty. Always check
with your dealer before adding
electrical equipment.
Add-on equipment can drain the
vehicle's 12-volt battery, even if the
vehicle is not operating.
The vehicle has an airbag system.
Before attempting to add anything
electrical to the vehicle, see
Servicing the Airbag-Equipped
Vehicle 064 and
Adding Equipment to the
Airbag-Equipped Vehicle 064.
Page 212 of 358

Chevrolet Malibu Owner Manual (GMNA-Localizing-U.S./Canada/Mexico-
13555849) - 2020 - CRC - 8/21/19
Vehicle Care 211
Vehicle Care
General Information
General Information . . . . . . . . . . 212
California Proposition65 Warning . . . . . . . . . . . . . . . . . 213
California Perchlorate Materials Requirements . . . . . 213
Accessories and Modifications . . . . . . . . . . . . . . . . 213
Vehicle Checks
Doing Your OwnService Work . . . . . . . . . . . . . . . 214
Hood . . . . . . . . . . . . . . . . . . . . . . . . . 214
Engine Compartment Overview . . . . . . . . . . . . . . . . . . . . 216
Engine Oil . . . . . . . . . . . . . . . . . . . . 219
Engine Oil Life System . . . . . . . 221
Automatic Transmission Fluid . . . . . . . . . . . . . . . . . . . . . . . . 222
Engine Air Filter Life System . . . . . . . . . . . . . . . . . . . . . . 223
Engine Air Cleaner/Filter . . . . . . 223
Cooling System . . . . . . . . . . . . . . 225
Engine Overheating . . . . . . . . . . 228
Washer Fluid . . . . . . . . . . . . . . . . . 229
Brakes . . . . . . . . . . . . . . . . . . . . . . . 230
Brake Fluid . . . . . . . . . . . . . . . . . . . 231 Battery - North America . . . . . . 232
Starter Switch Check . . . . . . . . . 234
Automatic Transmission Shift
Lock Control Function
Check . . . . . . . . . . . . . . . . . . . . . . . 234
Park Brake and P (Park) Mechanism Check . . . . . . . . . . 235
Wiper Blade Replacement . . . . 235
Windshield Replacement . . . . . 236
Gas Strut(s) . . . . . . . . . . . . . . . . . . 236
Headlamp Aiming
Front Headlamp Aiming . . . . . . 237
Bulb Replacement
Bulb Replacement . . . . . . . . . . . . 238
Halogen Bulbs . . . . . . . . . . . . . . . . 238
LED Lighting . . . . . . . . . . . . . . . . . 238
Headlamps, Front Turn Signal, Sidemarker, and Parking
Lamps . . . . . . . . . . . . . . . . . . . . . . 238
Taillamps, Turn Signal, Stoplamps, and Back-Up
Lamps (LS and LT) . . . . . . . . . . 239
Taillamps, Turn Signal, Stoplamps, and Back-Up
Lamps (LT and Premier) . . . . . 240
License Plate Lamp . . . . . . . . . . 240
Electrical System
High Voltage Devices and Wiring . . . . . . . . . . . . . . . . . . . . . . . 241
Electrical System Overload . . . 242
Fuses and Circuit Breakers . . . 242
Engine Compartment Fuse Block . . . . . . . . . . . . . . . . . . . . . . . . 243
Instrument Panel Fuse Block . . . . . . . . . . . . . . . . . . . . . . . . 247
Wheels and Tires
Tires . . . . . . . . . . . . . . . . . . . . . . . . . . 250
All-Season Tires . . . . . . . . . . . . . . 251
Winter Tires . . . . . . . . . . . . . . . . . . 251
Low-Profile Tires . . . . . . . . . . . . . 251
Summer Tires . . . . . . . . . . . . . . . . 252
Tire Sidewall Labeling . . . . . . . . 252
Tire Designations . . . . . . . . . . . . . 254
Tire Terminology andDefinitions . . . . . . . . . . . . . . . . . . 255
Tire Pressure . . . . . . . . . . . . . . . . . 257
Tire Pressure for High-Speed Operation . . . . . . . . . . . . . . . . . . . 259
Tire Pressure Monitor System . . . . . . . . . . . . . . . . . . . . . . 259
Tire Pressure Monitor Operation . . . . . . . . . . . . . . . . . . . 260
Tire Inspection . . . . . . . . . . . . . . . . 264
Tire Rotation . . . . . . . . . . . . . . . . . 265
Page 215 of 358
Chevrolet Malibu Owner Manual (GMNA-Localizing-U.S./Canada/Mexico-
13555849) - 2020 - CRC - 8/21/19
214 Vehicle Care
Vehicle Checks
Doing Your Own
Service Work
{Warning
It can be dangerous to work on
your vehicle if you do not have
the proper knowledge, service
manual, tools, or parts. Always
follow owner’s manual procedures
and consult the service manual
for your vehicle before doing any
service work.
If doing some of your own service
work, use the proper service
manual. It tells you much more
about how to service the vehicle
than this manual can. To order the
proper service manual, see
Publication Ordering Information
0 329.
This vehicle has an airbag system.
Before attempting to do your own
service work, see Servicing the
Airbag-Equipped Vehicle 064. If equipped with remote vehicle
start, open the hood before
performing any service work to
prevent remote starting the vehicle
accidentally. See
Remote Vehicle
Start 016.
Keep a record with all parts receipts
and list the mileage and the date of
any service work performed. See
Maintenance Records 0315.
Caution
Even small amounts of
contamination can cause damage
to vehicle systems. Do not allow
contaminants to contact the fluids,
reservoir caps, or dipsticks.
Hood
{Warning
For vehicles with auto engine
stop/start, turn the vehicle off
before opening the hood. If the
(Continued)
Warning (Continued)
vehicle is on, the engine will start
when the hood is opened. You or
others could be injured.
{Warning
Components under the hood can
get hot from running the engine.
To help avoid the risk of burning
unprotected skin, never touch
these components until they have
cooled, and always use a glove or
towel to avoid direct skin contact.
Clear any snow from the hood
before opening.
To open the hood: 1. Pull the hood release lever with the
isymbol. It is on the
lower left side of the instrument
panel.
Page 216 of 358
Chevrolet Malibu Owner Manual (GMNA-Localizing-U.S./Canada/Mexico-
13555849) - 2020 - CRC - 8/21/19
Vehicle Care 215
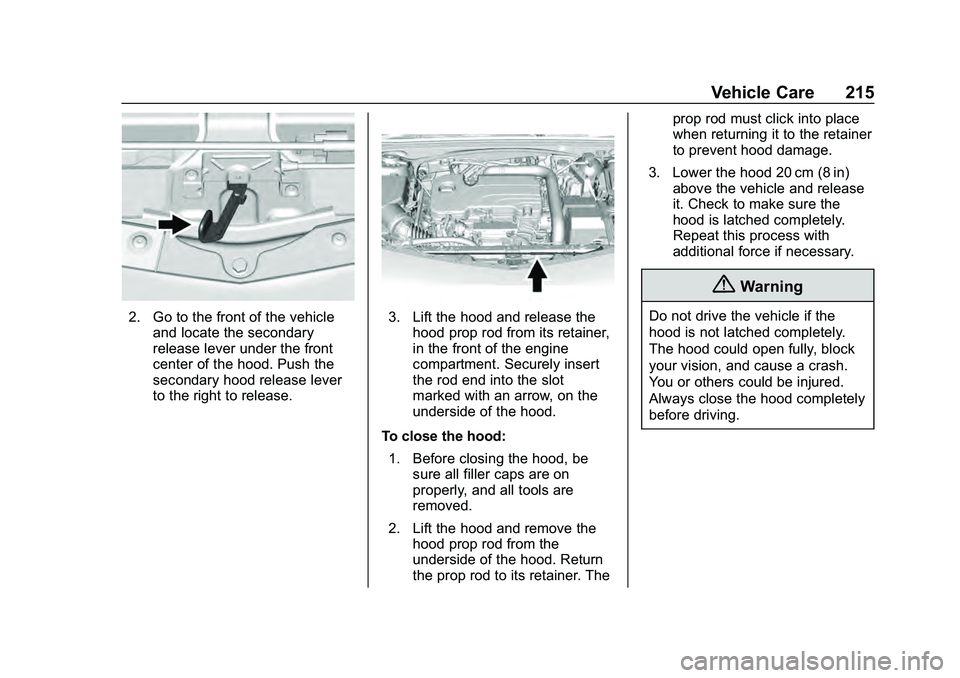
2. Go to the front of the vehicleand locate the secondary
release lever under the front
center of the hood. Push the
secondary hood release lever
to the right to release.3. Lift the hood and release thehood prop rod from its retainer,
in the front of the engine
compartment. Securely insert
the rod end into the slot
marked with an arrow, on the
underside of the hood.
To close the hood: 1. Before closing the hood, be sure all filler caps are on
properly, and all tools are
removed.
2. Lift the hood and remove the hood prop rod from the
underside of the hood. Return
the prop rod to its retainer. The prop rod must click into place
when returning it to the retainer
to prevent hood damage.
3. Lower the hood 20 cm (8 in) above the vehicle and release
it. Check to make sure the
hood is latched completely.
Repeat this process with
additional force if necessary.
{Warning
Do not drive the vehicle if the
hood is not latched completely.
The hood could open fully, block
your vision, and cause a crash.
You or others could be injured.
Always close the hood completely
before driving.