2020 CHEVROLET IMPALA light
[x] Cancel search: lightPage 3 of 16

3
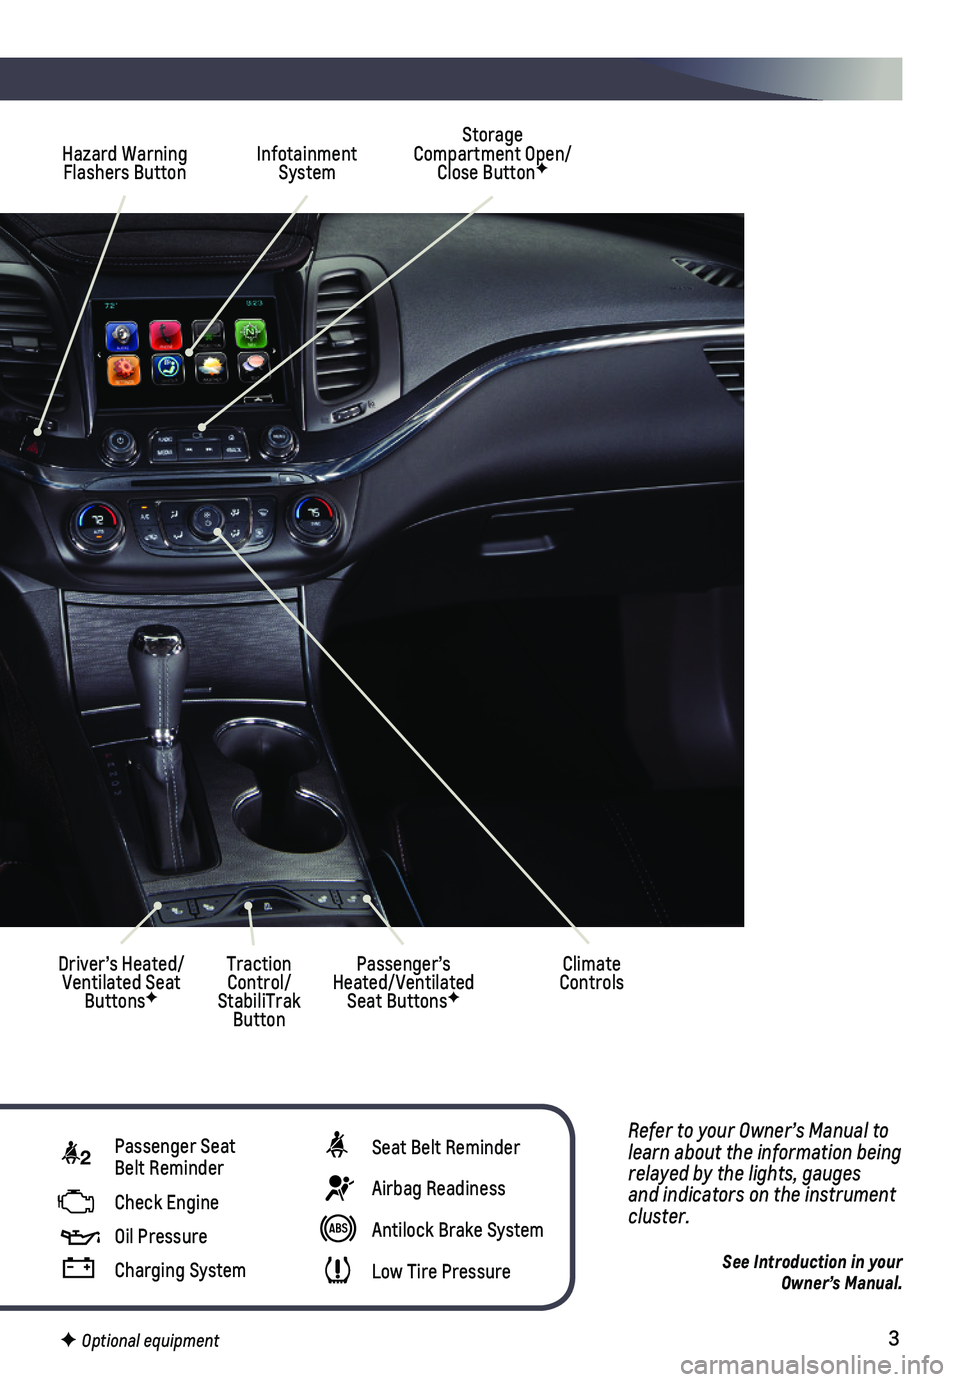
Refer to your Owner’s Manual to learn about the information being relayed by the lights, gauges and indicators on the instrument cluster.
See Introduction in your Owner’s Manual.
Hazard Warning Flashers Button
Storage Compartment Open/Close ButtonF
Driver’s Heated/ Ventilated Seat ButtonsF
Traction Control/ StabiliTrak Button
Passenger’s Heated/Ventilated Seat ButtonsF
Infotainment System
Climate Controls
2 Passenger Seat Belt Reminder
Check Engine
Oil Pressure
Charging System
Seat Belt Reminder
Airbag Readiness
Antilock Brake System
Low Tire Pressure
F Optional equipment
Page 6 of 16

6
POWER SEATSF
SET MEMORY POSITIONS
1. With the vehicle in Park, adjust the driver’s seat, power outside mir\
rors and the power steering columnF to the desired positions.
2. Press and release the SET button on the driver’s door. A beep will sound. Immediately press and hold button 1 until two beeps sound.
3. Repeat the steps using button 2 for a second driver.
SET EXIT POSITION
1. With the vehicle in Park, adjust the driver’s seat, power outside mir\
rors and the power steering columnF to the desired positions.
2. Press and release the SET button on the driver’s door. A beep will sound. Immediately press and hold the EXIT button until two beeps sound.
RECALL POSITIONS Press and hold button 1 or 2 or the EXIT button until the stored position is reached. Releasing the button before the stored position is reached canc\
els the recall.
The memory/exit positions can be programmed to be recalled automatically\
.
To set the Auto Memory Recall or Easy Exit options, go to Settings > Veh\
icle > Comfort and Convenience.
See Seats and Restraints in your Owner’s Manual.
SEAT CONTROLS
A. Seat Adjustment
Move the front horizontal control to move the seat forward or rearward, or to tilt, raise or lower the seat.
B. Seatback Recline Adjustment
Move the vertical control to recline or raise the seatback.
C. Lumbar Adjustment
Move the rear control to adjust the lumbar support.
F Optional equipment
UNIVERSAL REMOTE SYSTEM
The Universal Remote System on the overhead console enables your vehicle\
to control 3 different devices, ranging from garage doors and gates to home lightin\
g. Go to homelink.com for detailed videos and instructions on how to program the Universal Remote System. For additional assistance, call 1-800-355-3515.
See Instruments and Controls in your Owner’s Manual.
CAB
Page 7 of 16

7
LIGHTING
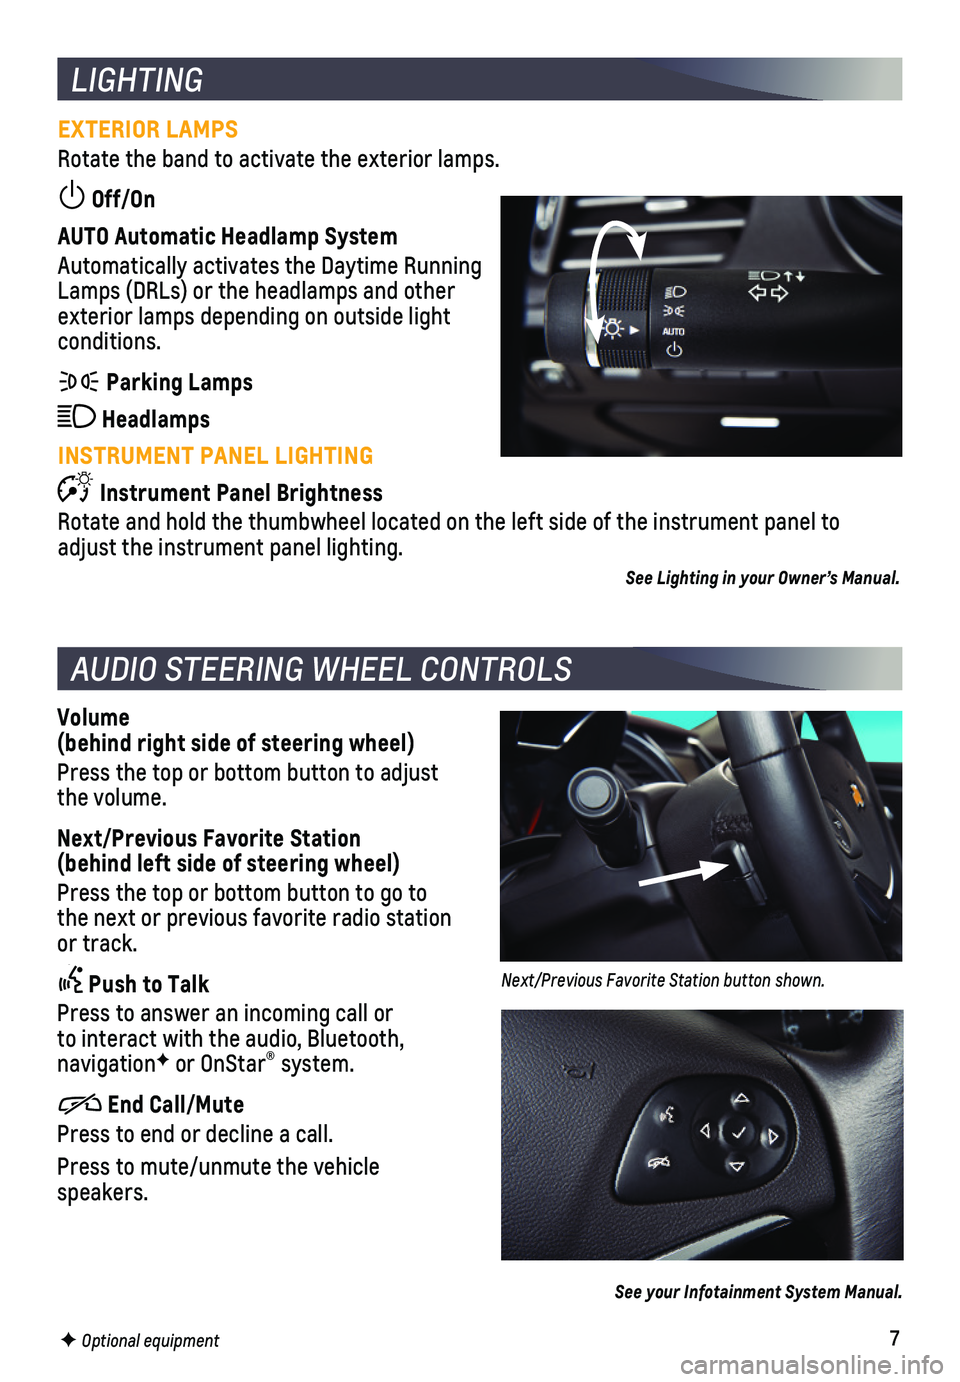
EXTERIOR LAMPS
Rotate the band to activate the exterior lamps.
Off/On
AUTO Automatic Headlamp System
Automatically activates the Daytime Running Lamps (DRLs) or the headlamps and other exterior lamps depending on outside light conditions.
Parking Lamps
Headlamps
INSTRUMENT PANEL LIGHTING
Instrument Panel Brightness
Rotate and hold the thumbwheel located on the left side of the instrumen\
t panel to adjust the instrument panel lighting.
See Lighting in your Owner’s Manual.
AUDIO STEERING WHEEL CONTROLS
Volume (behind right side of steering wheel)
Press the top or bottom button to adjust the volume.
Next/Previous Favorite Station (behind left side of steering wheel)
Press the top or bottom button to go to the next or previous favorite radio station or track.
Push to Talk
Press to answer an incoming call or to interact with the audio, Bluetooth, navigationF or OnStar® system.
End Call/Mute
Press to end or decline a call.
Press to mute/unmute the vehicle speakers.
See your Infotainment System Manual.
F Optional equipment
Next/Previous Favorite Station button shown.
Page 10 of 16

10
BLUETOOTH® SYSTEM
INFOTAINMENT SYSTEM
APPSF
In-vehicle apps — connecting to music, news, weather, travel informat\
ion, sports, enter-tainment and more — are available for download to the radio through t\
he Apps icon on the Home page. Downloading and using the apps requires internet connecti\
vity, and may require a data plan, accessed through the vehicle’s 4G LTE Wi-Fi hots\
pot, if active, or a mobile device hotspot.
APPLE CARPLAY
Apple CarPlay capability is available through a compatible smartphone us\
ing the Projection icon on the Home page of the infotainment system. No app is r\
equired.
1. Connect your compatible phone by plugging the Lightning cable into a USB\
data port. Use your device’s factory-provided Lightning cable. Aftermarket cable\
s may not work.
2. The Projection icon will change to Apple CarPlay. Touch the Apple CarPla\
y icon to have your apps displayed.
ANDROID AUTO
Android Auto capability is available through a compatible smartphone usi\
ng the Projection icon on the Home page of the infotainment system.
1. Download the Android Auto app to your phone from the Google Play Store.
2. Connect your compatible phone by plugging the phone USB cable into a USB\
data port. Use your device’s factory-provided USB cable. Aftermarket cables may \
not work.
3. The Projection icon will change to Android Auto. Touch the Android Auto \
icon to have your apps displayed.
See your Infotainment System Manual.
Before using a Bluetooth-enabled device in the vehicle, it must be paire\
d with the in-vehicle Bluetooth system. Not all devices will support all functions.\
The pairing
process is disabled when the vehicle is moving. For more information, vi\
sit my.chevrolet.com/learn.
PAIR A PHONE
1. To use voice recognition, press the Push to Talk button; after the beep, say “Pair phone.” To use the screen buttons, select Phone or Bluetooth > Pair Device.
2. Start the pairing process on the phone. From your phone’s Bluetooth s\
ettings, select the name shown on the infotainment screen.
3. Follow the pairing instructions.
4. When pairing is complete, the phone screen is displayed on the infotainm\
ent system.
See your Infotainment System Manual.
F Optional equipment
Page 15 of 16

15
DRIVER ASSISTANCE SYSTEMS
TIRE PRESSURE MONITOR
The Low Tire Pressure warning light on the instrument cluster illuminates when one or more of the vehicle’s tires is significantly underinflated. Th\
e proper tire pressures for the vehicle are listed on the Tire and Loading Information label, locate\
d below the driv-er’s door latch. Current tire pressures can be viewed on the Driver I\
nformation Center.
See Vehicle Care in your Owner’s Manual. F Optional equipment
CRUISE CONTROL
SETTING CRUISE CONTROL
1. Press the On/Off button. The Cruise Control symbol will illuminate in white on the instrument cluster.
2. When traveling at the desired speed, press the SET– button to set the speed. The symbol will illuminate in green on the instrument cluster.
ADJUSTING CRUISE CONTROL
RES+ Resume/Accelerate
Press to resume a set speed. When the sys-tem is active, press once to increase speed 1 mph; press and hold to continue increas-ing speed.
SET– Set/Coast
When the system is active, press once to decrease speed 1 mph; press and hold to continue decreasing speed.
Cancel
Press to cancel the Cruise Control without erasing the set speed from me\
mory. Pressing the brake pedal also will cancel the Cruise Control.
The set speed is erased when Cruise Control or the vehicle ignition is t\
urned off.
ADAPTIVE CRUISE CONTROL-ADVANCEDF
The system enhances regular Cruise Control to maintain a following gap —\
the time between your vehicle and a vehicle detected ahead — by accelerating or braking aut\
o-matically while you continue to steer.
GAP Follow Distance Gap/ Collision AlertF (if equipped with Forward Collision Alert)
Press to select a setting of Far, Medium, or Near. This is also the Forw\
ard Collision AlertF
setting.
See Driving and Operating in your Owner’s Manual.
REAR VISION CAMERA – When the vehicle is in Reverse, a view of the area behind the vehicle displays on the infotainment screen. Vehicle speed must be below\
8 mph.
To turn the guidelines on or off, go to Settings > Rear Camera.
See Driving and Operating in your Owner’s Manual.
Page 16 of 16

16
ROADSIDE ASSISTANCE
1-800-CHEV-USA (1-800-243-8872) TTY Users: 1-888-889-243
As the owner of a new Chevrolet, you are automatically enrolled in the C\
hevrolet Roadside Assistance program for 5 years/60,000 miles, whichever occurs fi\
rst, at no expense to you. Chevrolet’s Roadside Assistance toll-free number is s\
taffed by a team of trained advisors who are available 24 hours a day, 365 days a year, to c\
ontact a service provider for light services (fuel delivery, jump-starts, flat tire an\
d lock-outs) or make arrangements to tow your vehicle to the nearest Chevrolet dealer for any\
repairs.
Roadside Assistance and OnStar®
If you have a current OnStar Safety & Security plan, push the blue OnStar button or red Emergency button to get the help you need. An OnStar advisor will use GPS technolo\
gy to pinpoint your vehicle location and contact the nearest service provid\
er.
To learn more about OnStar services, press the blue OnStar button, visit onstar.com, call 1-888-4-ONSTAR (1-888-466-7827), or refer to your Owner’s Manual.
CHEVROLET OWNER CENTER
Get to know your vehicle inside and out with the Chevrolet Owner Center.\
Check out personalized information, including an online Owner’s Manual and help\
ful how-to videos, track your service history and warranty status, review your current OnSt\
ar Vehicle Diagnostics report (active OnStar account required) and more. Create a\
n account today at my.chevrolet.com.
!84660602=A!
Certain restrictions, precautions and safety procedures apply to your ve\
hicle. Please read your Owner’s Manual for complete instructions. All information contained in this guide is ba\
sed on the latest information available at the time of printing and is subject to change without notice. Copyright \
2019 General Motors. All rights reserved.
We recommend always using ACDelco or genuine GM service parts.
Download the myChevrolet app to your compatible smartphone (or device)\
and, if your vehicle is properly equipped, you can start or turn off your engine, loc\
k or unlock your doors, view key diagnostic information, set parking information and more\
.
The app is available on select Apple and Android devices. Service availa\
bility, features and functionality vary by vehicle, device and data plan. Device data con\
nection required. Visit onstar.com for more details. Download the mobile app from your compatible mobile device’s app store.
MYCHEVROLET MOBILE APP
84660602 A