2020 CHEVROLET EQUINOX bulb
[x] Cancel search: bulbPage 135 of 415
Chevrolet Equinox Owner Manual (GMNA-Localizing-U.S./Canada/Mexico-
13555863) - 2020 - CRC - 8/2/19
134 Instruments and Controls
.Brakes
. Steering
. Ride Control Systems
. Driver Assistance Systems
. Cruise Control
. Lighting and Bulb Replacement
. Wiper/Washer Systems
. Doors and Windows
. Seat Belts
. Airbag Systems
. Engine and Transmission
. Tire Pressure
. Battery
Engine Power Messages
ENGINE POWER IS REDUCED
This message displays when the
vehicle's propulsion power is
reduced. A reduction in propulsion
power can affect the vehicle's ability
to accelerate. If this message is on,
but there is no observed reduction
in performance, proceed to your
destination. The performance may be reduced the next time the vehicle
is driven. The vehicle may be driven
while this message is on, but
maximum acceleration and speed
may be reduced. Anytime this
message stays on, or displays
repeatedly, the vehicle should be
taken to your dealer for service as
soon as possible.
Under certain operating conditions,
propulsion will be disabled. Try
restarting after the vehicle has been
off for 30 seconds.
Vehicle Speed Messages
SPEED LIMITED TO XXX KM/
H (MPH)
This message shows that the
vehicle speed has been limited to
the speed displayed. The limited
speed is a protection for various
propulsion and vehicle systems,
such as lubrication, thermal, brakes,
suspension, Teen Driver if
equipped, or tires.
If equipped with a diesel engine,
see
Diesel Exhaust Fluid 0195.
Vehicle
Personalization
The following are all possible
vehicle personalization features.
Depending on the vehicle, some
may not be available.
For System, Apps, and Personal
features and functions, see
“Settings” in the infotainment
manual.
To access the vehicle
personalization menu:
1. Touch the Settings icon on the Home Page of the infotainment
display.
2. Touch Vehicle to display a list of available options.
3. Touch to select the desired feature setting.
4. Touch
9orRto turn a feature
off or on.
5. Touch
zto go to the top level
of the Settings menu.
Page 149 of 415
Chevrolet Equinox Owner Manual (GMNA-Localizing-U.S./Canada/Mexico-
13555863) - 2020 - CRC - 8/2/19
148 Lighting
Hazard Warning Flashers
|:Press to make the front and
rear turn signal lamps flash on and
off. This warns others that you are
having trouble.
Press
|again to turn the
flashers off.
Turn and Lane-Change
Signals
Move the lever all the way up or
down to signal a turn.
An arrow on the instrument cluster
will flash in the direction of the turn
or lane change.
Raise or lower the lever until the
arrow starts to flash to signal a lane
change. Hold it there until the lane
change is complete. If the lever is
moved momentarily to the lane
change position, the arrow will flash
three times.
The lever returns to its starting
position when it is released. If after signaling a turn or lane
change, the arrow flashes rapidly or
does not come on, a signal bulb
may be burned out.
Have any burned out bulbs
replaced. If a bulb is not burned out,
check the fuse. See
Instrument
Panel Fuse Block 0302.
Fog Lamps
The fog lamps button is on the
instrument panel beside the steering
wheel.
To turn on the fog lamps, the ignition
and the headlamps or parking lamps
must be on.
Page 264 of 415
Chevrolet Equinox Owner Manual (GMNA-Localizing-U.S./Canada/Mexico-
13555863) - 2020 - CRC - 8/2/19
Driving and Operating 263
Trailer Lamps
Always check all trailer lamps are
working at the beginning of each
trip, and periodically on longer trips.
Turn Signals When Towing a
Trailer
When properly connected, the trailer
turn signals should will illuminate to
indicate the vehicle is turning,
changing lanes, or stopping. When
towing a trailer, the arrows on the
instrument cluster will illuminate
even if the trailer is not properly
connected or the bulbs are
burned out.
Trailer Tires
Special Trailer (ST) tires differ from
vehicle tires. Trailer tires are
designed with stiff sidewalls to help
prevent sway and to support heavy
loads. These features can make it
difficult to determine if the trailer tire
pressures are low only based on a
visual inspection.Always check all trailer tire
pressures before each trip when the
tires are cool. Low trailer tire
pressure is a leading cause of trailer
tire blow-outs.
Trailer tires deteriorate over time.
The trailer tire sidewall will show the
week and year the tire was
manufactured. Many trailer tire
manufacturers recommend
replacing tires more than six
years old.
Overloading is another leading
cause of trailer tire blow-outs. Never
load your trailer with more weight
than the tires are designed to
support. The load rating is located
on the trailer tire sidewall.
Always know the maximum speed
rating for the trailer tires before
driving. This may be significantly
lower than the vehicle tire speed
rating. The speed rating may be on
the trailer tire sidewall. If the speed
rating is not shown, the default
trailer tire speed rating is 105 km/h
(65 mph).
Conversions and
Add-Ons
Add-On Electrical
Equipment
{Warning
The Data Link Connector (DLC) is
used for vehicle service and
Emission Inspection/Maintenance
testing. See
Malfunction Indicator
Lamp (Check Engine Light) 0114.
A device connected to the DLC —
such as an aftermarket fleet or
driver-behavior tracking device —
may interfere with vehicle
systems. This could affect vehicle
operation and cause a crash.
Such devices may also access
information stored in the vehicle’s
systems.
Page 266 of 415
Chevrolet Equinox Owner Manual (GMNA-Localizing-U.S./Canada/Mexico-
13555863) - 2020 - CRC - 8/2/19
Vehicle Care 265
Vehicle Care
General Information
General Information . . . . . . . . . . 266
California Proposition65 Warning . . . . . . . . . . . . . . . . . 266
California Perchlorate Materials Requirements . . . . . 267
Accessories and Modifications . . . . . . . . . . . . . . . . 267
Vehicle Checks
Doing Your OwnService Work . . . . . . . . . . . . . . . 267
Hood . . . . . . . . . . . . . . . . . . . . . . . . . 268
Engine Compartment Overview . . . . . . . . . . . . . . . . . . . . 270
Engine Oil . . . . . . . . . . . . . . . . . . . . 275
Engine Oil Life System . . . . . . . 279
Automatic Transmission Fluid . . . . . . . . . . . . . . . . . . . . . . . . 280
Engine Air Cleaner/Filter . . . . . . 280
Cooling System . . . . . . . . . . . . . . 282
Engine Overheating . . . . . . . . . . 286
Washer Fluid . . . . . . . . . . . . . . . . . 287
Brakes . . . . . . . . . . . . . . . . . . . . . . . 288
Brake Fluid . . . . . . . . . . . . . . . . . . . 289
Battery - North America . . . . . . 290
All-Wheel Drive . . . . . . . . . . . . . . . 291 Starter Switch Check . . . . . . . . . 291
Automatic Transmission Shift
Lock Control Function
Check . . . . . . . . . . . . . . . . . . . . . . . 291
Park Brake and P (Park)
Mechanism Check . . . . . . . . . . 292
Wiper Blade Replacement . . . . 292
Windshield Replacement . . . . . 293
Gas Strut(s) . . . . . . . . . . . . . . . . . . 294
Headlamp Aiming
Headlamp Aiming . . . . . . . . . . . . 295
Bulb Replacement
Bulb Replacement . . . . . . . . . . . . 295
Halogen Bulbs . . . . . . . . . . . . . . . . 295
High Intensity Discharge (HID) Lighting . . . . . . . . . . . . . . . . . . . . . 296
LED Lighting . . . . . . . . . . . . . . . . . 296
Headlamps . . . . . . . . . . . . . . . . . . . 296
Front Turn Signal and Fog Lamps . . . . . . . . . . . . . . . . . . . . . . 297
Taillamps . . . . . . . . . . . . . . . . . . . . . 297
License Plate Lamp . . . . . . . . . . 298
Electrical System
Electrical System Overload . . . 298
Fuses and Circuit Breakers . . . 299
Engine Compartment Fuse Block . . . . . . . . . . . . . . . . . . . . . . . . 299 Instrument Panel Fuse
Block . . . . . . . . . . . . . . . . . . . . . . . . 302
Rear Compartment Fuse Block . . . . . . . . . . . . . . . . . . . . . . . . 305
Wheels and Tires
Tires . . . . . . . . . . . . . . . . . . . . . . . . . . 307
All-Season Tires . . . . . . . . . . . . . . 307
Winter Tires . . . . . . . . . . . . . . . . . . 308
Tire Sidewall Labeling . . . . . . . . 308
Tire Designations . . . . . . . . . . . . . 310
Tire Terminology andDefinitions . . . . . . . . . . . . . . . . . . . 311
Tire Pressure . . . . . . . . . . . . . . . . . 313
Tire Pressure Monitor System . . . . . . . . . . . . . . . . . . . . . . 315
Tire Pressure Monitor
Operation . . . . . . . . . . . . . . . . . . . 316
Tire Inspection . . . . . . . . . . . . . . . . 320
Tire Rotation . . . . . . . . . . . . . . . . . 320
When It Is Time for New Tires . . . . . . . . . . . . . . . . . . . . . . . . 321
Buying New Tires . . . . . . . . . . . . . 322
Different Size Tires and Wheels . . . . . . . . . . . . . . . . . . . . . . 323
Uniform Tire Quality Grading . . . . . . . . . . . . . . . . . . . . . 324
Wheel Alignment and Tire Balance . . . . . . . . . . . . . . . . . . . . . 325
Wheel Replacement . . . . . . . . . . 326
Tire Chains . . . . . . . . . . . . . . . . . . . 326
Page 296 of 415
Chevrolet Equinox Owner Manual (GMNA-Localizing-U.S./Canada/Mexico-
13555863) - 2020 - CRC - 8/2/19
Vehicle Care 295
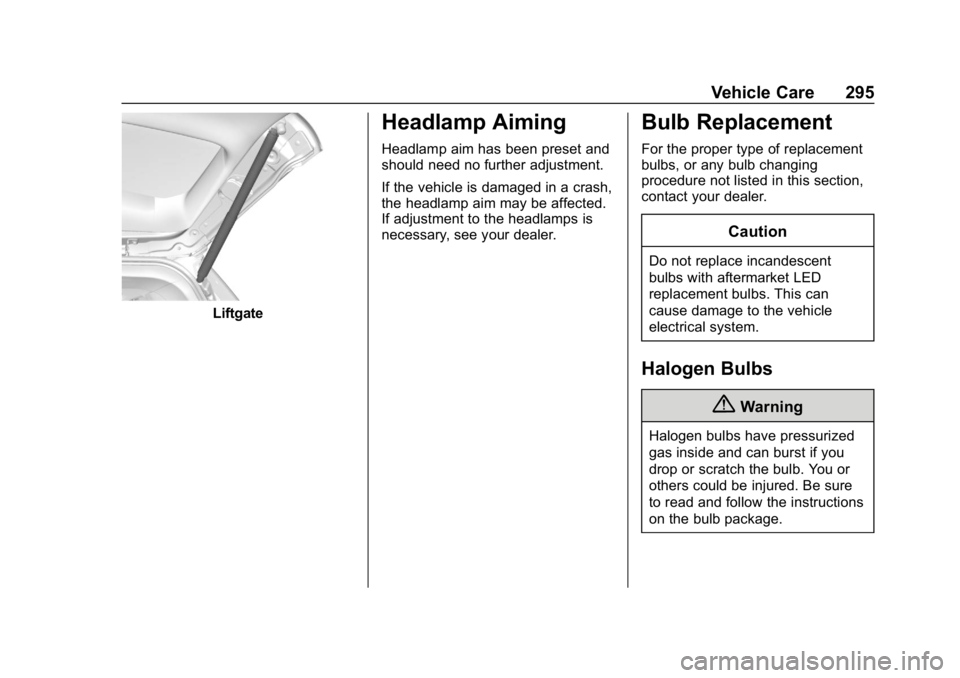
Liftgate
Headlamp Aiming
Headlamp aim has been preset and
should need no further adjustment.
If the vehicle is damaged in a crash,
the headlamp aim may be affected.
If adjustment to the headlamps is
necessary, see your dealer.
Bulb Replacement
For the proper type of replacement
bulbs, or any bulb changing
procedure not listed in this section,
contact your dealer.
Caution
Do not replace incandescent
bulbs with aftermarket LED
replacement bulbs. This can
cause damage to the vehicle
electrical system.
Halogen Bulbs
{Warning
Halogen bulbs have pressurized
gas inside and can burst if you
drop or scratch the bulb. You or
others could be injured. Be sure
to read and follow the instructions
on the bulb package.
Page 297 of 415
Chevrolet Equinox Owner Manual (GMNA-Localizing-U.S./Canada/Mexico-
13555863) - 2020 - CRC - 8/2/19
296 Vehicle Care
High Intensity Discharge
(HID) Lighting
{Warning
The High Intensity Discharge
(HID) lighting system operates at
a very high voltage. If you try to
service any of the system
components, you could be
seriously injured. Have your
dealer or a qualified technician
service them.
After an HID headlamp bulb has
been replaced, the beam might be a
slightly different shade than it was
originally. This is normal.
LED Lighting
This vehicle has several LED lamps.
For replacement of any LED lighting
assembly, contact your dealer.
Headlamps
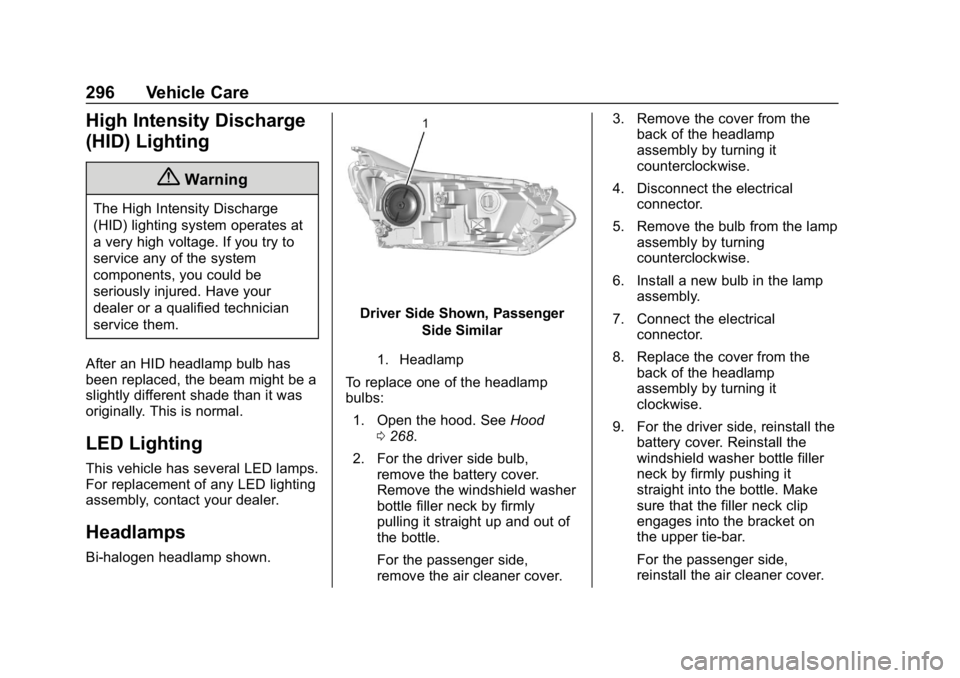
Bi-halogen headlamp shown.
Driver Side Shown, Passenger Side Similar
1. Headlamp
To replace one of the headlamp
bulbs:
1. Open the hood. See Hood
0 268.
2. For the driver side bulb, remove the battery cover.
Remove the windshield washer
bottle filler neck by firmly
pulling it straight up and out of
the bottle.
For the passenger side,
remove the air cleaner cover. 3. Remove the cover from the
back of the headlamp
assembly by turning it
counterclockwise.
4. Disconnect the electrical connector.
5. Remove the bulb from the lamp assembly by turning
counterclockwise.
6. Install a new bulb in the lamp assembly.
7. Connect the electrical connector.
8. Replace the cover from the back of the headlamp
assembly by turning it
clockwise.
9. For the driver side, reinstall the battery cover. Reinstall the
windshield washer bottle filler
neck by firmly pushing it
straight into the bottle. Make
sure that the filler neck clip
engages into the bracket on
the upper tie-bar.
For the passenger side,
reinstall the air cleaner cover.
Page 298 of 415
Chevrolet Equinox Owner Manual (GMNA-Localizing-U.S./Canada/Mexico-
13555863) - 2020 - CRC - 8/2/19
Vehicle Care 297
Front Turn Signal and
Fog Lamps
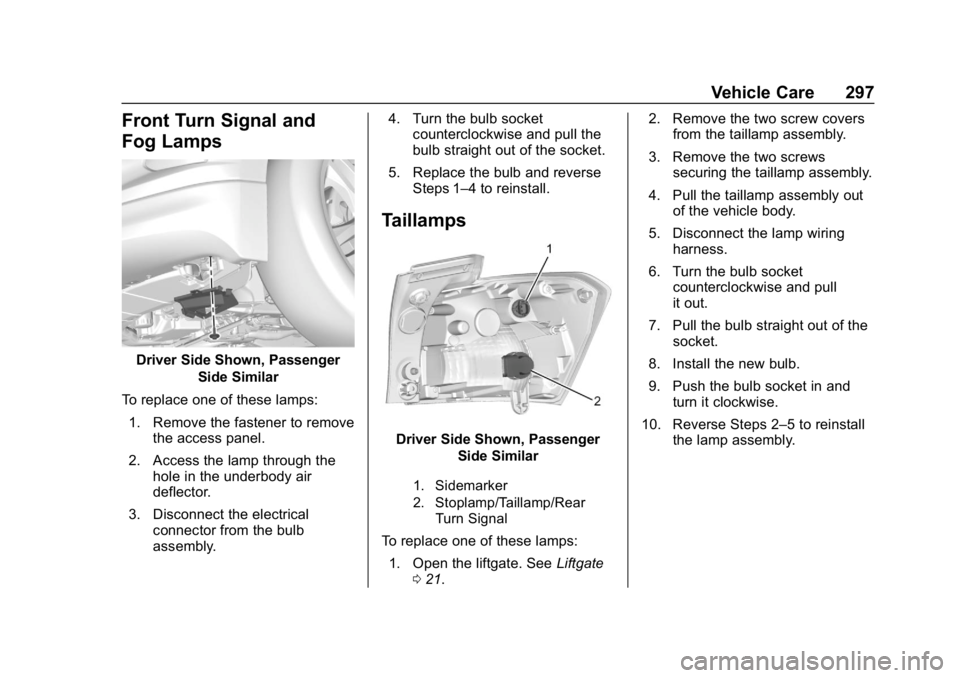
Driver Side Shown, PassengerSide Similar
To replace one of these lamps: 1. Remove the fastener to remove the access panel.
2. Access the lamp through the hole in the underbody air
deflector.
3. Disconnect the electrical connector from the bulb
assembly. 4. Turn the bulb socket
counterclockwise and pull the
bulb straight out of the socket.
5. Replace the bulb and reverse Steps 1–4 to reinstall.
Taillamps
Driver Side Shown, Passenger
Side Similar
1. Sidemarker
2. Stoplamp/Taillamp/RearTurn Signal
To replace one of these lamps:
1. Open the liftgate. See Liftgate
0 21. 2. Remove the two screw covers
from the taillamp assembly.
3. Remove the two screws securing the taillamp assembly.
4. Pull the taillamp assembly out of the vehicle body.
5. Disconnect the lamp wiring harness.
6. Turn the bulb socket counterclockwise and pull
it out.
7. Pull the bulb straight out of the socket.
8. Install the new bulb.
9. Push the bulb socket in and turn it clockwise.
10. Reverse Steps 2–5 to reinstall the lamp assembly.
Page 299 of 415
Chevrolet Equinox Owner Manual (GMNA-Localizing-U.S./Canada/Mexico-
13555863) - 2020 - CRC - 8/2/19
298 Vehicle Care
License Plate Lamp
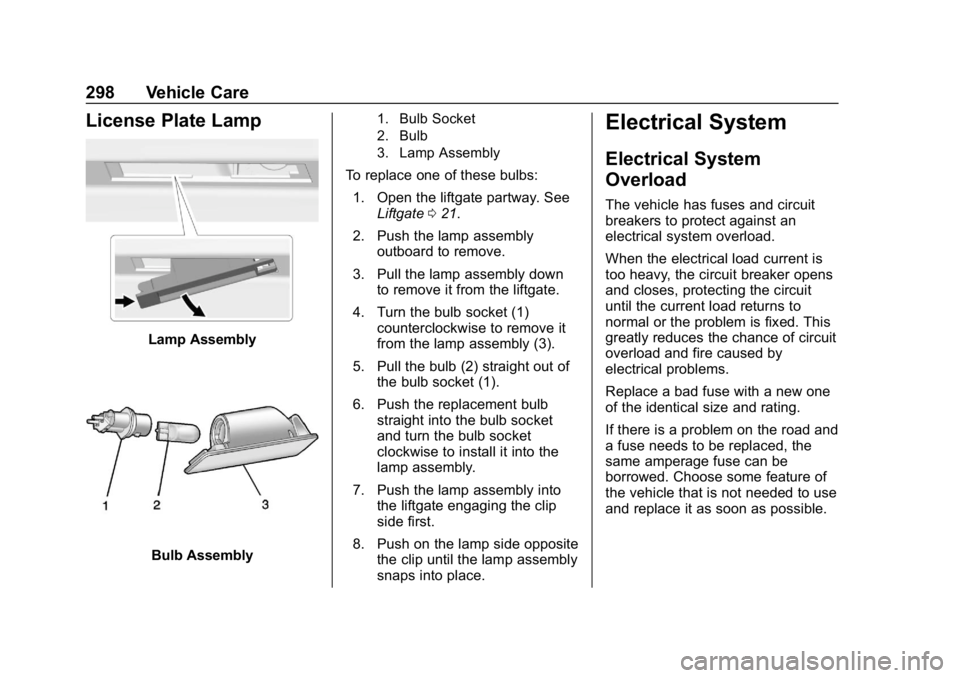
Lamp Assembly
Bulb Assembly
1. Bulb Socket
2. Bulb
3. Lamp Assembly
To replace one of these bulbs:1. Open the liftgate partway. See Liftgate 021.
2. Push the lamp assembly outboard to remove.
3. Pull the lamp assembly down to remove it from the liftgate.
4. Turn the bulb socket (1) counterclockwise to remove it
from the lamp assembly (3).
5. Pull the bulb (2) straight out of the bulb socket (1).
6. Push the replacement bulb straight into the bulb socket
and turn the bulb socket
clockwise to install it into the
lamp assembly.
7. Push the lamp assembly into the liftgate engaging the clip
side first.
8. Push on the lamp side opposite the clip until the lamp assembly
snaps into place.
Electrical System
Electrical System
Overload
The vehicle has fuses and circuit
breakers to protect against an
electrical system overload.
When the electrical load current is
too heavy, the circuit breaker opens
and closes, protecting the circuit
until the current load returns to
normal or the problem is fixed. This
greatly reduces the chance of circuit
overload and fire caused by
electrical problems.
Replace a bad fuse with a new one
of the identical size and rating.
If there is a problem on the road and
a fuse needs to be replaced, the
same amperage fuse can be
borrowed. Choose some feature of
the vehicle that is not needed to use
and replace it as soon as possible.