2020 CHEVROLET BOLT EV under
[x] Cancel search: underPage 222 of 347
Chevrolet BOLT EV Owner Manual (GMNA-Localizing-U.S./Canada/Mexico-
13556250) - 2020 - CRC - 2/11/20
Driving and Operating 221
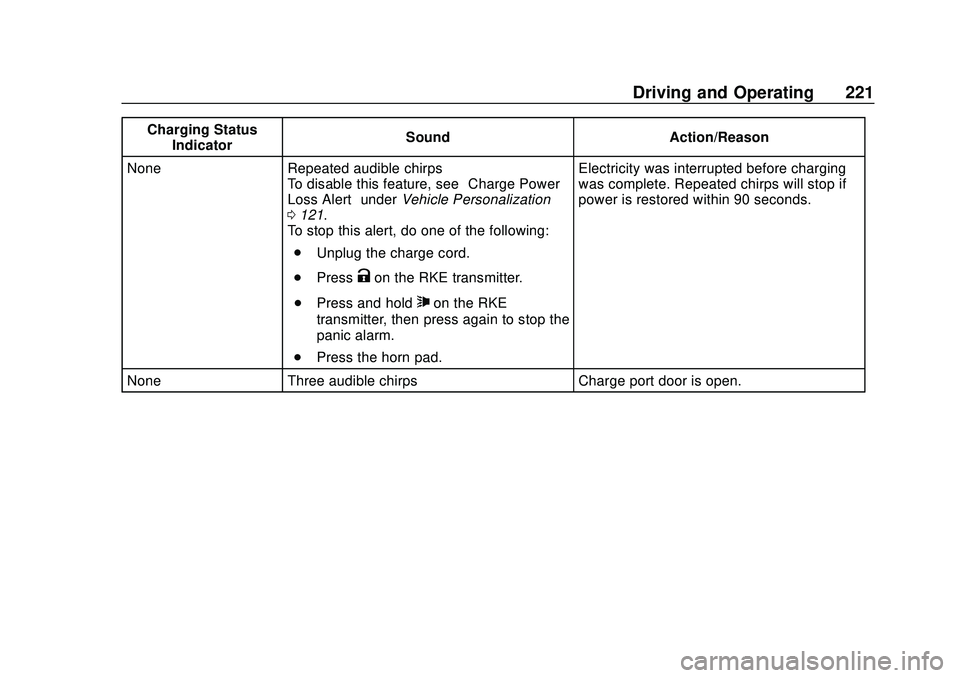
Charging StatusIndicator Sound Action/Reason
None Repeated audible chirps To disable this feature, see “Charge Power
Loss Alert” underVehicle Personalization
0 121.
To stop this alert, do one of the following:
. Unplug the charge cord.
. Press
Kon the RKE transmitter.
. Press and hold
7on the RKE
transmitter, then press again to stop the
panic alarm.
. Press the horn pad. Electricity was interrupted before charging
was complete. Repeated chirps will stop if
power is restored within 90 seconds.
None Three audible chirps Charge port door is open.
Page 223 of 347
Chevrolet BOLT EV Owner Manual (GMNA-Localizing-U.S./Canada/Mexico-
13556250) - 2020 - CRC - 2/11/20
222 Driving and Operating
Charge Cord
IMPORTANT SAFETY
INSTRUCTIONS
This symbol indicates risk of
electrical shock if misused.
SeeRadio Frequency Statement
0 322.
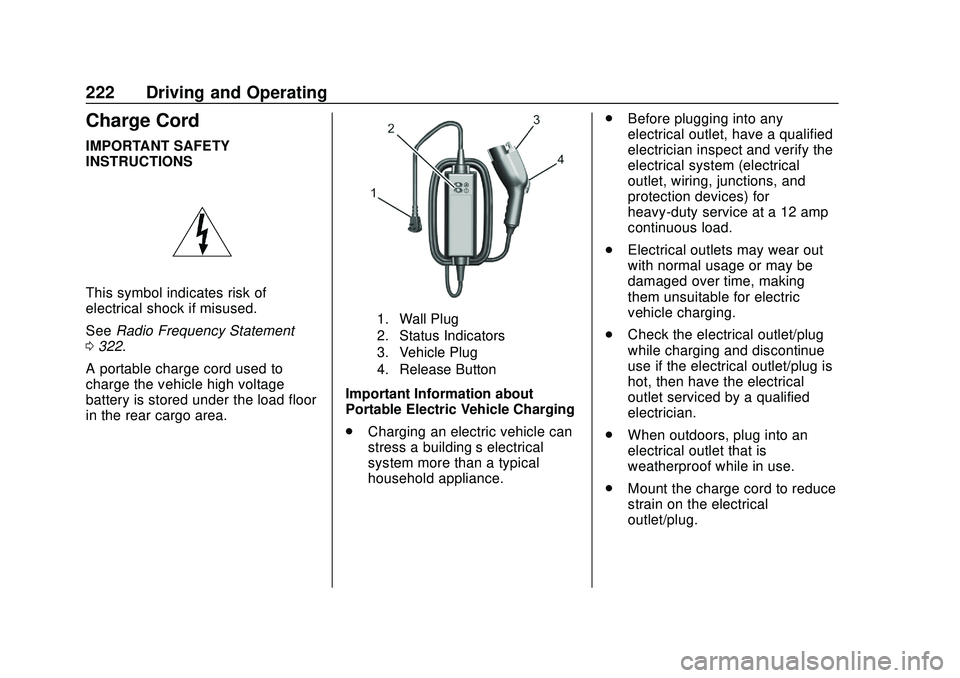
A portable charge cord used to
charge the vehicle high voltage
battery is stored under the load floor
in the rear cargo area.
1. Wall Plug
2. Status Indicators
3. Vehicle Plug
4. Release Button
Important Information about
Portable Electric Vehicle Charging
. Charging an electric vehicle can
stress a building’ s electrical
system more than a typical
household appliance. .
Before plugging into any
electrical outlet, have a qualified
electrician inspect and verify the
electrical system (electrical
outlet, wiring, junctions, and
protection devices) for
heavy-duty service at a 12 amp
continuous load.
. Electrical outlets may wear out
with normal usage or may be
damaged over time, making
them unsuitable for electric
vehicle charging.
. Check the electrical outlet/plug
while charging and discontinue
use if the electrical outlet/plug is
hot, then have the electrical
outlet serviced by a qualified
electrician.
. When outdoors, plug into an
electrical outlet that is
weatherproof while in use.
. Mount the charge cord to reduce
strain on the electrical
outlet/plug.
Page 227 of 347
Chevrolet BOLT EV Owner Manual (GMNA-Localizing-U.S./Canada/Mexico-
13556250) - 2020 - CRC - 2/11/20
226 Driving and Operating
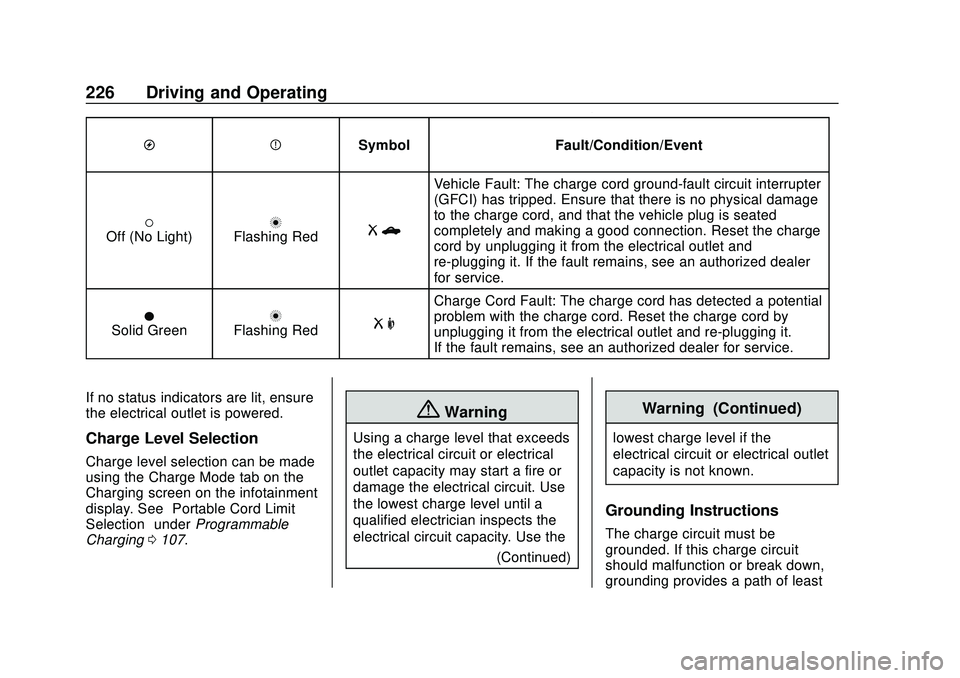
OPSymbol Fault/Condition/Event
(Off (No Light)nFlashing RedRb
Vehicle Fault: The charge cord ground-fault circuit interrupter
(GFCI) has tripped. Ensure that there is no physical damage
to the charge cord, and that the vehicle plug is seated
completely and making a good connection. Reset the charge
cord by unplugging it from the electrical outlet and
re-plugging it. If the fault remains, see an authorized dealer
for service.
OSolid GreennFlashing RedR m
Charge Cord Fault: The charge cord has detected a potential
problem with the charge cord. Reset the charge cord by
unplugging it from the electrical outlet and re-plugging it.
If the fault remains, see an authorized dealer for service.
If no status indicators are lit, ensure
the electrical outlet is powered.
Charge Level Selection
Charge level selection can be made
using the Charge Mode tab on the
Charging screen on the infotainment
display. See “Portable Cord Limit
Selection” underProgrammable
Charging 0107.
{Warning
Using a charge level that exceeds
the electrical circuit or electrical
outlet capacity may start a fire or
damage the electrical circuit. Use
the lowest charge level until a
qualified electrician inspects the
electrical circuit capacity. Use the
(Continued)
Warning (Continued)
lowest charge level if the
electrical circuit or electrical outlet
capacity is not known.
Grounding Instructions
The charge circuit must be
grounded. If this charge circuit
should malfunction or break down,
grounding provides a path of least
Page 229 of 347
Chevrolet BOLT EV Owner Manual (GMNA-Localizing-U.S./Canada/Mexico-
13556250) - 2020 - CRC - 2/11/20
228 Driving and Operating
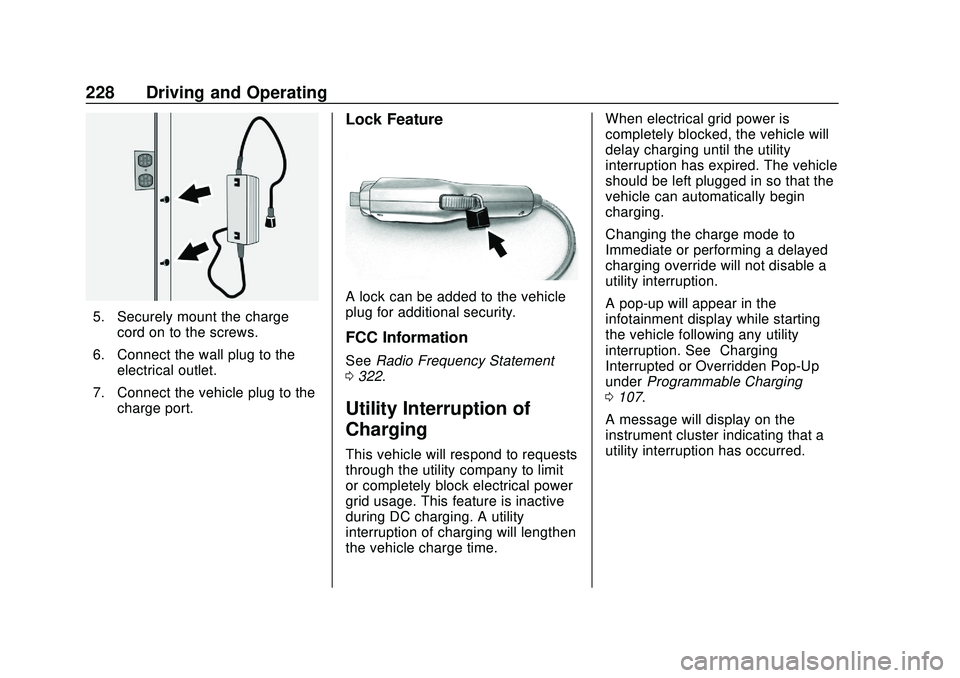
5. Securely mount the chargecord on to the screws.
6. Connect the wall plug to the electrical outlet.
7. Connect the vehicle plug to the charge port.
Lock Feature
A lock can be added to the vehicle
plug for additional security.
FCC Information
See Radio Frequency Statement
0 322.
Utility Interruption of
Charging
This vehicle will respond to requests
through the utility company to limit
or completely block electrical power
grid usage. This feature is inactive
during DC charging. A utility
interruption of charging will lengthen
the vehicle charge time. When electrical grid power is
completely blocked, the vehicle will
delay charging until the utility
interruption has expired. The vehicle
should be left plugged in so that the
vehicle can automatically begin
charging.
Changing the charge mode to
Immediate or performing a delayed
charging override will not disable a
utility interruption.
A pop-up will appear in the
infotainment display while starting
the vehicle following any utility
interruption. See
“Charging
Interrupted or Overridden Pop-Up”
under Programmable Charging
0 107.
A message will display on the
instrument cluster indicating that a
utility interruption has occurred.
Page 233 of 347

Chevrolet BOLT EV Owner Manual (GMNA-Localizing-U.S./Canada/Mexico-
13556250) - 2020 - CRC - 2/11/20
232 Vehicle Care
Vehicle Care
General Information
General Information . . . . . . . . . . 233
California Proposition65 Warning . . . . . . . . . . . . . . . . . 233
California Perchlorate Materials Requirements . . . . . 234
Accessories and Modifications . . . . . . . . . . . . . . . . 234
Vehicle Checks
Doing Your OwnService Work . . . . . . . . . . . . . . . 234
Hood . . . . . . . . . . . . . . . . . . . . . . . . . 235
Underhood Compartment Overview . . . . . . . . . . . . . . . . . . . . 237
Cooling System . . . . . . . . . . . . . . 238
Washer Fluid . . . . . . . . . . . . . . . . . 239
Brakes . . . . . . . . . . . . . . . . . . . . . . . 240
Brake Fluid . . . . . . . . . . . . . . . . . . . 241
Battery - North America . . . . . . 242
Park Brake and P (Park) Mechanism Check . . . . . . . . . . 244
Wiper Blade Replacement . . . . 244
Windshield Replacement . . . . . 246
Gas Strut(s) . . . . . . . . . . . . . . . . . . 246
Headlamp Aiming
Front Headlamp Aiming . . . . . . 247
Bulb Replacement
Bulb Replacement . . . . . . . . . . . . 247
Halogen Bulbs . . . . . . . . . . . . . . . . 247
High Intensity Discharge (HID) Lighting . . . . . . . . . . . . . . . . . . . . . 248
LED Lighting . . . . . . . . . . . . . . . . . 248
Taillamps, Turn Signal, Stoplamps, and Back-Up
Lamps . . . . . . . . . . . . . . . . . . . . . . 248
License Plate Lamp . . . . . . . . . . 249
Electrical System
High Voltage Devices and Wiring . . . . . . . . . . . . . . . . . . . . . . . 249
Electrical System Overload . . . 250
Fuses and Circuit Breakers . . . 250
Underhood Compartment Fuse Block . . . . . . . . . . . . . . . . . . . . . . . . 251
Instrument Panel Fuse Block . . . . . . . . . . . . . . . . . . . . . . . . 255
Wheels and Tires
Tires . . . . . . . . . . . . . . . . . . . . . . . . . . 257
All-Season Tires . . . . . . . . . . . . . . 257
Winter Tires . . . . . . . . . . . . . . . . . . 258
Self-Sealing Tires . . . . . . . . . . . . 258
Tire Sidewall Labeling . . . . . . . . 259
Tire Designations . . . . . . . . . . . . . 260 Tire Terminology and
Definitions . . . . . . . . . . . . . . . . . . 260
Tire Pressure . . . . . . . . . . . . . . . . . 263
Tire Pressure Monitor System . . . . . . . . . . . . . . . . . . . . . . 264
Tire Pressure Monitor Operation . . . . . . . . . . . . . . . . . . . 265
Tire Inspection . . . . . . . . . . . . . . . . 269
Tire Rotation . . . . . . . . . . . . . . . . . 269
When It Is Time for New Tires . . . . . . . . . . . . . . . . . . . . . . . . 270
Buying New Tires . . . . . . . . . . . . . 271
Different Size Tires and Wheels . . . . . . . . . . . . . . . . . . . . . . 273
Uniform Tire Quality Grading . . . . . . . . . . . . . . . . . . . . . 273
Wheel Alignment and Tire Balance . . . . . . . . . . . . . . . . . . . . . 275
Wheel Replacement . . . . . . . . . . 275
Tire Chains . . . . . . . . . . . . . . . . . . . 276
If a Tire Goes Flat . . . . . . . . . . . . 276
Tire Sealant and Compressor Kit . . . . . . . . . . . . . 277
Storing the Tire Sealant and Compressor Kit . . . . . . . . . . . . . 283
Jump Starting
Jump Starting - NorthAmerica . . . . . . . . . . . . . . . . . . . . . 284
Page 235 of 347
Chevrolet BOLT EV Owner Manual (GMNA-Localizing-U.S./Canada/Mexico-
13556250) - 2020 - CRC - 2/11/20
234 Vehicle Care
California Perchlorate
Materials Requirements
Certain types of automotive
applications, such as airbag
initiators, seat belt pretensioners,
and lithium batteries contained in
electronic keys, may contain
perchlorate materials. Perchlorate
Material–special handling may
apply. See www.dtsc.ca.gov/
hazardouswaste/perchlorate.
Accessories and
Modifications
Adding non-dealer accessories or
making modifications to the vehicle
can affect vehicle performance and
safety, including such things as
airbags, braking, stability, ride and
handling, emissions systems,
aerodynamics, durability, and
electronic systems like antilock
brakes, traction control, and stability
control. These accessories or
modifications could even cause
malfunction or damage not covered
by the vehicle warranty. Damage to suspension components
caused by modifying vehicle height
outside of factory settings will not be
covered by the vehicle warranty.
Damage to vehicle components
resulting from modifications or the
installation or use of non-GM
certified parts, including control
module or software modifications, is
not covered under the terms of the
vehicle warranty and may affect
remaining warranty coverage for
affected parts.
GM Accessories are designed to
complement and function with other
systems on the vehicle. See your
dealer to accessorize the vehicle
using genuine GM Accessories
installed by a dealer technician.
Also, see
Adding Equipment to the
Airbag-Equipped Vehicle 057.
Vehicle Checks
Doing Your Own
Service Work
{Warning
Never try to do your own service
on high voltage battery
components. You can be injured
and the vehicle can be damaged
if you try to do your own service
work. Service and repair of these
high voltage battery components
should only be performed by a
trained dealer technician with the
proper knowledge and tools.
Exposure to high voltage can
cause shock, burns, and even
death. The high voltage
components in the vehicle can
only be serviced by technicians
with special training.
(Continued)
Page 236 of 347
Chevrolet BOLT EV Owner Manual (GMNA-Localizing-U.S./Canada/Mexico-
13556250) - 2020 - CRC - 2/11/20
Vehicle Care 235
Warning (Continued)
High voltage components are
identified by labels. Do not
remove, open, take apart,
or modify these components.
High voltage cable or wiring has
orange covering. Do not probe,
tamper with, cut, or modify high
voltage cable or wiring.
{Warning
It can be dangerous to work on
your vehicle if you do not have
the proper knowledge, service
manual, tools, or parts. Always
follow owner’s manual procedures
and consult the service manual
for your vehicle before doing any
service work.
If doing some of your own service
work, use the proper service
manual. It tells you much more
about how to service the vehicle
than this manual can. To order the proper service manual, see
Publication Ordering Information
0
321.
This vehicle has an airbag system.
Before attempting to do your own
service work, see Servicing the
Airbag-Equipped Vehicle 057.
Keep a record with all parts receipts
and list the mileage and the date of
any service work performed. See
Maintenance Records 0309.
Hood
{Warning
For vehicles with auto engine
stop/start, turn the vehicle off
before opening the hood. If the
vehicle is on, the engine will start
when the hood is opened. You or
others could be injured.
{Warning
Components under the hood can
get hot from running the engine.
To help avoid the risk of burning
unprotected skin, never touch
these components until they have
cooled, and always use a glove or
towel to avoid direct skin contact.
Clear any snow from the hood
before opening.
To open the hood: 1. Pull the hood release lever with the
isymbol. It is on the
lower left side of the instrument
panel.
Page 237 of 347
Chevrolet BOLT EV Owner Manual (GMNA-Localizing-U.S./Canada/Mexico-
13556250) - 2020 - CRC - 2/11/20
236 Vehicle Care
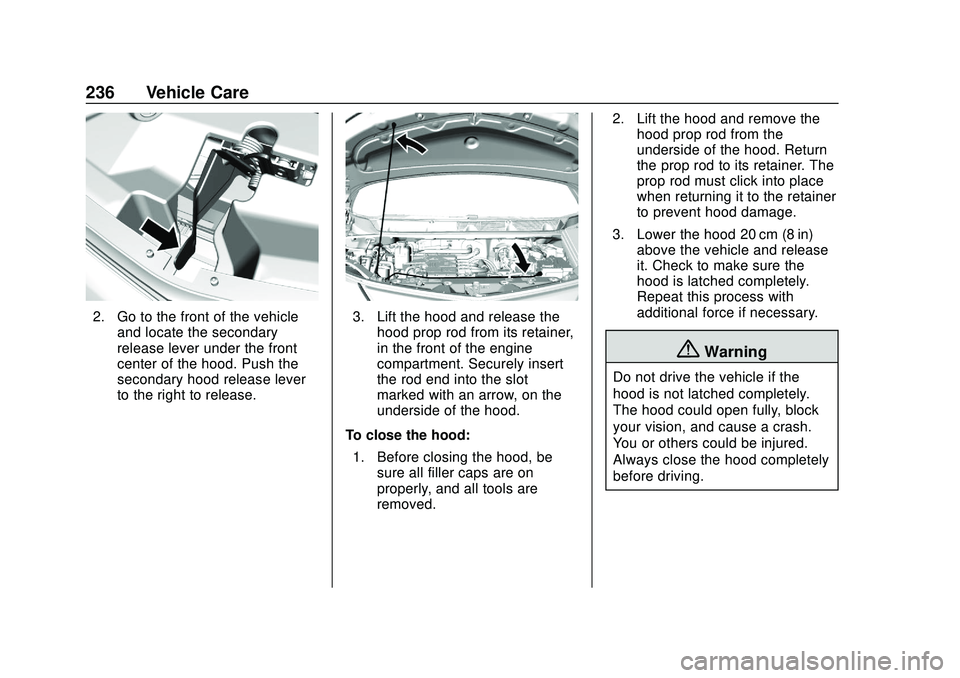
2. Go to the front of the vehicleand locate the secondary
release lever under the front
center of the hood. Push the
secondary hood release lever
to the right to release.3. Lift the hood and release thehood prop rod from its retainer,
in the front of the engine
compartment. Securely insert
the rod end into the slot
marked with an arrow, on the
underside of the hood.
To close the hood: 1. Before closing the hood, be sure all filler caps are on
properly, and all tools are
removed. 2. Lift the hood and remove the
hood prop rod from the
underside of the hood. Return
the prop rod to its retainer. The
prop rod must click into place
when returning it to the retainer
to prevent hood damage.
3. Lower the hood 20 cm (8 in) above the vehicle and release
it. Check to make sure the
hood is latched completely.
Repeat this process with
additional force if necessary.
{Warning
Do not drive the vehicle if the
hood is not latched completely.
The hood could open fully, block
your vision, and cause a crash.
You or others could be injured.
Always close the hood completely
before driving.