2020 CHEVROLET BOLT EV instrument panel
[x] Cancel search: instrument panelPage 218 of 347
Chevrolet BOLT EV Owner Manual (GMNA-Localizing-U.S./Canada/Mexico-
13556250) - 2020 - CRC - 2/11/20
Driving and Operating 217
5. Follow the steps listed on thecharging station to start
charging.
6. Once charging, the DC vehicle plug will be locked to the DC
charge port and cannot be
disconnected while charging is
active.
7. Verify that the Charging Status Indicator illuminates on top of
the instrument panel and an
audible chirp occurs. See
Charging Status Feedback
0218.
Caution
Do not attempt to disconnect the
DC vehicle plug while charging is
active. This action may damage
the vehicle or charging station
hardware.
Stop Charge
Controls on the charging station can
be used to stop the charge process
at any time. To stop the charge when inside the
vehicle, use the Stop button on the
Charging screen, or press the
button on top of the AC vehicle cord
handle.
Stop Charge
—Automatic
When the vehicle no longer needs
to use power from the charging
station, it will stop charging and the
DC vehicle plug will be unlocked
from the DC charge port.
Energy can still be consumed from
the charging station when the
vehicle’s displays and indicators
show that the battery is fully
charged. This is to ensure the
battery is in optimal temperature
operating range to maximize vehicle
range. See Programmable Charging
0 107.
End Charge 1. Wait until the charging process has been fully stopped, the
vehicle plug is unlocked, and
the Charging Status Indicator is
solid green or off. If the vehicle plug does not
unlock from the vehicle charge
port after a charge, contact
Roadside Assistance for
assistance. See
Roadside
Assistance Program 0316.
2. Unplug the DC vehicle plug from the DC charge port on the
vehicle and close the dust
cover.
3. Close the charge port door by pressing firmly in the center
until it latches.
4. The Electric Parking Brake should be manually
disengaged before driving the
vehicle.
5. To start another DC charge, remove the DC vehicle plug
and reconnect.
Delayed Charging
Override
To temporarily override a delayed
charge event, unplug the charge
cord from the charge port and then
Page 219 of 347
Chevrolet BOLT EV Owner Manual (GMNA-Localizing-U.S./Canada/Mexico-
13556250) - 2020 - CRC - 2/11/20
218 Driving and Operating
plug it back in within five seconds.
A single audible chirp will sound
and charging will begin immediately.
To cancel a temporary override,
unplug the charge cord, wait for
10 seconds, and then plug the
charge cord back in. A double
audible chirp will sound and
charging will be delayed.
SeeProgrammable Charging 0107
for advanced charge scheduling
options.
Charging Status
Feedback
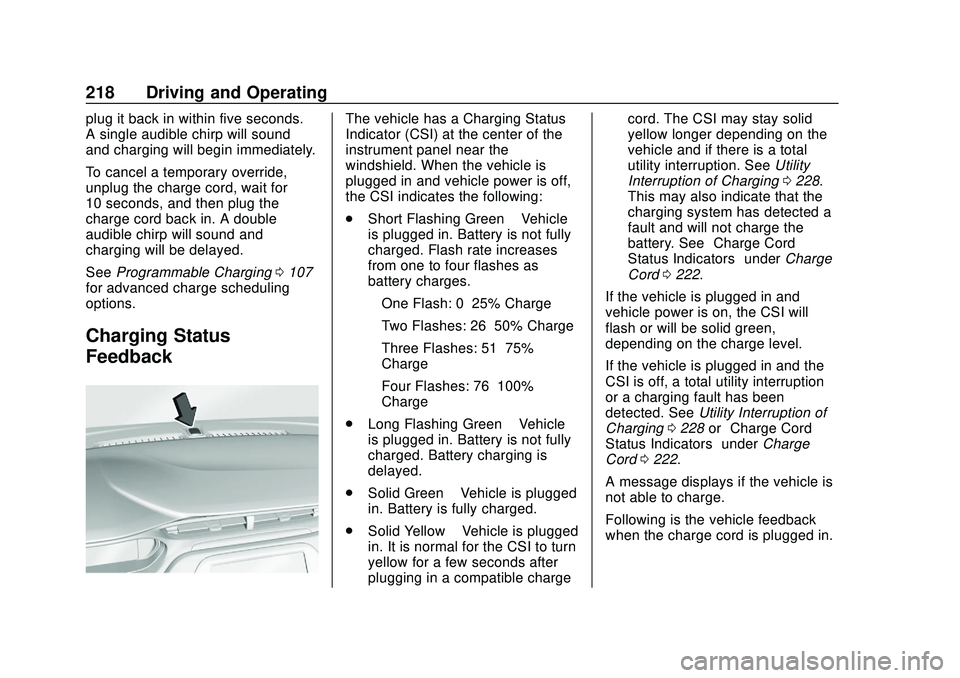
The vehicle has a Charging Status
Indicator (CSI) at the center of the
instrument panel near the
windshield. When the vehicle is
plugged in and vehicle power is off,
the CSI indicates the following:
. Short Flashing Green –Vehicle
is plugged in. Battery is not fully
charged. Flash rate increases
from one to four flashes as
battery charges.
‐ One Flash: 0–25% Charge
‐ Two Flashes: 26–50% Charge
‐ Three Flashes: 51–75%
Charge
‐ Four Flashes: 76–100%
Charge
. Long Flashing Green –Vehicle
is plugged in. Battery is not fully
charged. Battery charging is
delayed.
. Solid Green –Vehicle is plugged
in. Battery is fully charged.
. Solid Yellow –Vehicle is plugged
in. It is normal for the CSI to turn
yellow for a few seconds after
plugging in a compatible charge cord. The CSI may stay solid
yellow longer depending on the
vehicle and if there is a total
utility interruption. See
Utility
Interruption of Charging 0228.
This may also indicate that the
charging system has detected a
fault and will not charge the
battery. See “Charge Cord
Status Indicators” underCharge
Cord 0222.
If the vehicle is plugged in and
vehicle power is on, the CSI will
flash or will be solid green,
depending on the charge level.
If the vehicle is plugged in and the
CSI is off, a total utility interruption
or a charging fault has been
detected. See Utility Interruption of
Charging 0228 or“Charge Cord
Status Indicators” underCharge
Cord 0222.
A message displays if the vehicle is
not able to charge.
Following is the vehicle feedback
when the charge cord is plugged in.
Page 233 of 347

Chevrolet BOLT EV Owner Manual (GMNA-Localizing-U.S./Canada/Mexico-
13556250) - 2020 - CRC - 2/11/20
232 Vehicle Care
Vehicle Care
General Information
General Information . . . . . . . . . . 233
California Proposition65 Warning . . . . . . . . . . . . . . . . . 233
California Perchlorate Materials Requirements . . . . . 234
Accessories and Modifications . . . . . . . . . . . . . . . . 234
Vehicle Checks
Doing Your OwnService Work . . . . . . . . . . . . . . . 234
Hood . . . . . . . . . . . . . . . . . . . . . . . . . 235
Underhood Compartment Overview . . . . . . . . . . . . . . . . . . . . 237
Cooling System . . . . . . . . . . . . . . 238
Washer Fluid . . . . . . . . . . . . . . . . . 239
Brakes . . . . . . . . . . . . . . . . . . . . . . . 240
Brake Fluid . . . . . . . . . . . . . . . . . . . 241
Battery - North America . . . . . . 242
Park Brake and P (Park) Mechanism Check . . . . . . . . . . 244
Wiper Blade Replacement . . . . 244
Windshield Replacement . . . . . 246
Gas Strut(s) . . . . . . . . . . . . . . . . . . 246
Headlamp Aiming
Front Headlamp Aiming . . . . . . 247
Bulb Replacement
Bulb Replacement . . . . . . . . . . . . 247
Halogen Bulbs . . . . . . . . . . . . . . . . 247
High Intensity Discharge (HID) Lighting . . . . . . . . . . . . . . . . . . . . . 248
LED Lighting . . . . . . . . . . . . . . . . . 248
Taillamps, Turn Signal, Stoplamps, and Back-Up
Lamps . . . . . . . . . . . . . . . . . . . . . . 248
License Plate Lamp . . . . . . . . . . 249
Electrical System
High Voltage Devices and Wiring . . . . . . . . . . . . . . . . . . . . . . . 249
Electrical System Overload . . . 250
Fuses and Circuit Breakers . . . 250
Underhood Compartment Fuse Block . . . . . . . . . . . . . . . . . . . . . . . . 251
Instrument Panel Fuse Block . . . . . . . . . . . . . . . . . . . . . . . . 255
Wheels and Tires
Tires . . . . . . . . . . . . . . . . . . . . . . . . . . 257
All-Season Tires . . . . . . . . . . . . . . 257
Winter Tires . . . . . . . . . . . . . . . . . . 258
Self-Sealing Tires . . . . . . . . . . . . 258
Tire Sidewall Labeling . . . . . . . . 259
Tire Designations . . . . . . . . . . . . . 260 Tire Terminology and
Definitions . . . . . . . . . . . . . . . . . . 260
Tire Pressure . . . . . . . . . . . . . . . . . 263
Tire Pressure Monitor System . . . . . . . . . . . . . . . . . . . . . . 264
Tire Pressure Monitor Operation . . . . . . . . . . . . . . . . . . . 265
Tire Inspection . . . . . . . . . . . . . . . . 269
Tire Rotation . . . . . . . . . . . . . . . . . 269
When It Is Time for New Tires . . . . . . . . . . . . . . . . . . . . . . . . 270
Buying New Tires . . . . . . . . . . . . . 271
Different Size Tires and Wheels . . . . . . . . . . . . . . . . . . . . . . 273
Uniform Tire Quality Grading . . . . . . . . . . . . . . . . . . . . . 273
Wheel Alignment and Tire Balance . . . . . . . . . . . . . . . . . . . . . 275
Wheel Replacement . . . . . . . . . . 275
Tire Chains . . . . . . . . . . . . . . . . . . . 276
If a Tire Goes Flat . . . . . . . . . . . . 276
Tire Sealant and Compressor Kit . . . . . . . . . . . . . 277
Storing the Tire Sealant and Compressor Kit . . . . . . . . . . . . . 283
Jump Starting
Jump Starting - NorthAmerica . . . . . . . . . . . . . . . . . . . . . 284
Page 236 of 347
Chevrolet BOLT EV Owner Manual (GMNA-Localizing-U.S./Canada/Mexico-
13556250) - 2020 - CRC - 2/11/20
Vehicle Care 235
Warning (Continued)
High voltage components are
identified by labels. Do not
remove, open, take apart,
or modify these components.
High voltage cable or wiring has
orange covering. Do not probe,
tamper with, cut, or modify high
voltage cable or wiring.
{Warning
It can be dangerous to work on
your vehicle if you do not have
the proper knowledge, service
manual, tools, or parts. Always
follow owner’s manual procedures
and consult the service manual
for your vehicle before doing any
service work.
If doing some of your own service
work, use the proper service
manual. It tells you much more
about how to service the vehicle
than this manual can. To order the proper service manual, see
Publication Ordering Information
0
321.
This vehicle has an airbag system.
Before attempting to do your own
service work, see Servicing the
Airbag-Equipped Vehicle 057.
Keep a record with all parts receipts
and list the mileage and the date of
any service work performed. See
Maintenance Records 0309.
Hood
{Warning
For vehicles with auto engine
stop/start, turn the vehicle off
before opening the hood. If the
vehicle is on, the engine will start
when the hood is opened. You or
others could be injured.
{Warning
Components under the hood can
get hot from running the engine.
To help avoid the risk of burning
unprotected skin, never touch
these components until they have
cooled, and always use a glove or
towel to avoid direct skin contact.
Clear any snow from the hood
before opening.
To open the hood: 1. Pull the hood release lever with the
isymbol. It is on the
lower left side of the instrument
panel.
Page 256 of 347

Chevrolet BOLT EV Owner Manual (GMNA-Localizing-U.S./Canada/Mexico-
13556250) - 2020 - CRC - 2/11/20
Vehicle Care 255
Instrument Panel Fuse
BlockThe instrument panel fuse block is
on the left side of the instrument
panel. To access the fuses, open
the fuse panel door by pulling out.
To reinstall the door, insert the top
tab first, then push the door back
into its original location.Fuses Usage
F01 Video processing
module
F02 Indicator light solar
sensor
F03 Side blind zone alert
F04 Passive entry, passive
start
F05 CGM
F06 Body control module 4
F07 Body control module 3
F08 Body control module 2
F09 Body control module 1
F10 Trailer interface
module 1
F11 Amplifier
F12 Body control module 8 Fuses Usage
F13 Data link connector 1
F14 Automatic parking
assist
F15 -
F16 Single power inverter
module 1
F17 Body control module 6
F18 Body control module 5
F19 –
F20 –
F21 –
F22 –
F23 USB
F24 Wireless charging
module
F25 Reflected LED alert
display
F26 Heated steering wheel
F27 CGM 2
F28 Instrument cluster 2
Page 298 of 347
Chevrolet BOLT EV Owner Manual (GMNA-Localizing-U.S./Canada/Mexico-
13556250) - 2020 - CRC - 2/11/20
Vehicle Care 297
To clean:1. Saturate a clean, lint-free colorfast cloth with water.
Microfiber cloth is
recommended to prevent lint
transfer to the fabric or carpet.
2. Remove excess moisture by gently wringing until water does
not drip from the cleaning cloth.
3. Start on the outside edge of the soil and gently rub toward the
center. Fold the cleaning cloth
to a clean area frequently to
prevent forcing the soil in to the
fabric.
4. Continue gently rubbing the soiled area until there is no
longer any color transfer from
the soil to the cleaning cloth.
5. If the soil is not completely removed, use a mild soap
solution followed only by plain
water.
If the soil is not completely
removed, it may be necessary to
use a commercial upholstery
cleaner or spot lifter. Test a small
hidden area for colorfastness before using a commercial upholstery
cleaner or spot lifter. If ring
formation occurs, clean the entire
fabric or carpet.
After cleaning, use a paper towel to
blot excess moisture.
Cleaning High Gloss Surfaces
and Vehicle Information and
Radio Displays
Use a microfiber cloth on high gloss
surfaces or vehicle displays. First,
use a soft bristle brush to remove
dirt that can scratch the surface.
Then gently clean by rubbing with a
microfiber cloth. Never use window
cleaners or solvents. Periodically
hand wash the microfiber cloth
separately, using mild soap. Do not
use bleach or fabric softener. Rinse
thoroughly and air dry before
next use.
Caution
Do not attach a device with a
suction cup to the display. This
may cause damage and would
not be covered by the vehicle
warranty.
Instrument Panel, Leather,
Vinyl, Other Plastic Surfaces,
Low Gloss Paint Surfaces, and
Natural Open Pore Wood
Surfaces
Use a soft microfiber cloth
dampened with water to remove
dust and loose dirt. For a more
thorough cleaning, use a soft
microfiber cloth dampened with a
mild soap solution.
Caution
Soaking or saturating leather,
especially perforated leather, as
well as other interior surfaces,
may cause permanent damage.
(Continued)
Page 299 of 347
Chevrolet BOLT EV Owner Manual (GMNA-Localizing-U.S./Canada/Mexico-
13556250) - 2020 - CRC - 2/11/20
298 Vehicle Care
Caution (Continued)
Wipe excess moisture from these
surfaces after cleaning and allow
them to dry naturally. Never use
heat, steam, or spot removers. Do
not use cleaners that contain
silicone or wax-based products.
Cleaners containing these
solvents can permanently change
the appearance and feel of
leather or soft trim, and are not
recommended.
Do not use cleaners that increase
gloss, especially on the instrument
panel. Reflected glare can decrease
visibility through the windshield
under certain conditions.
Caution
Use of air fresheners may cause
permanent damage to plastics
and painted surfaces. If an air
freshener comes in contact with (Continued)
Caution (Continued)
any plastic or painted surface in
the vehicle, blot immediately and
clean with a soft cloth dampened
with a mild soap solution.
Damage caused by air fresheners
would not be covered by the
vehicle warranty.
Cargo Cover and
Convenience Net
If equipped, wash with warm water
and mild detergent. Do not use
chlorine bleach. Rinse with cold
water, and then dry completely.
Care of Seat Belts
Keep belts clean and dry.
{Warning
Do not bleach or dye seat belt
webbing. It may severely weaken
the webbing. In a crash, they
might not be able to provide(Continued)
Warning (Continued)
adequate protection. Clean and
rinse seat belt webbing only with
mild soap and lukewarm water.
Allow the webbing to dry.
Floor Mats
{Warning
If a floor mat is the wrong size or
is not properly installed, it can
interfere with the pedals.
Interference with the pedals can
cause unintended acceleration
and/or increased stopping
distance which can cause a crash
and injury. Make sure the floor
mat does not interfere with the
pedals.
Use the following guidelines for
proper floor mat usage:
. The original equipment floor
mats were designed for your
vehicle. If the floor mats need
Page 311 of 347

Chevrolet BOLT EV Owner Manual (GMNA-Localizing-U.S./Canada/Mexico-
13556250) - 2020 - CRC - 2/11/20
310 Technical Data
Technical Data
Vehicle Identification
Vehicle IdentificationNumber (VIN) . . . . . . . . . . . . . . . 310
Service Parts Identification . . . 310
Vehicle Data
Capacities and Specifications . . . . . . . . . . . . . . . 311
Vehicle Identification
Vehicle Identification
Number (VIN)
This legal identifier is in the front
corner of the instrument panel, on
the driver side of the vehicle. It can
be seen through the windshield from
outside. The Vehicle Identification
Number (VIN) also appears on the
Vehicle Certification and Service
Parts labels and certificates of title
and registration.
Engine Identification
The eighth character in the VIN is
the engine code. This code
identifies the vehicle's engine,
specifications, and replacement parts. See
“Engine Specifications”
under Capacities and Specifications
0 311 for the vehicle's engine code.
Service Parts
Identification
There may be a large barcode on
the certification label on the center
pillar that you can scan for the
following information:
.
Vehicle Identification
Number (VIN)
. Model designation
. Paint information
. Production options
If there is not a large barcode on
this label, then you will find this
same information on a label inside
of the trunk.