2020 CHEVROLET BOLT EV tow
[x] Cancel search: towPage 61 of 347

Chevrolet BOLT EV Owner Manual (GMNA-Localizing-U.S./Canada/Mexico-
13556250) - 2020 - CRC - 2/11/20
60 Seats and Restraints
Q: What is the proper way towear seat belts?
A: An older child should wear a
lap-shoulder belt and get the
additional restraint a shoulder
belt can provide. The shoulder
belt should not cross the face or
neck. The lap belt should fit
snugly below the hips, just
touching the top of the thighs.
This applies belt force to the
child's pelvic bones in a crash.
It should never be worn over the
abdomen, which could cause
severe or even fatal internal
injuries in a crash.
Also see “Rear Seat Belt Comfort
Guides” underLap-Shoulder Belt
0 42.
According to accident statistics,
children are safer when properly
restrained in a rear seating position.
In a crash, children who are not
buckled up can strike other people
who are buckled up, or can be
thrown out of the vehicle. Older
children need to use seat belts
properly.
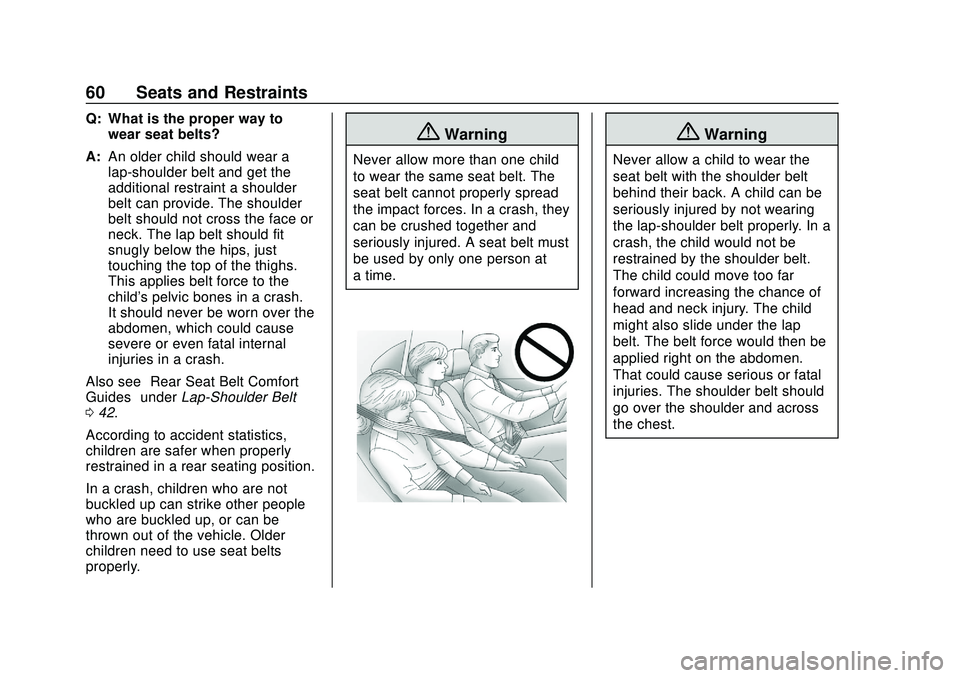
{Warning
Never allow more than one child
to wear the same seat belt. The
seat belt cannot properly spread
the impact forces. In a crash, they
can be crushed together and
seriously injured. A seat belt must
be used by only one person at
a time.
{Warning
Never allow a child to wear the
seat belt with the shoulder belt
behind their back. A child can be
seriously injured by not wearing
the lap-shoulder belt properly. In a
crash, the child would not be
restrained by the shoulder belt.
The child could move too far
forward increasing the chance of
head and neck injury. The child
might also slide under the lap
belt. The belt force would then be
applied right on the abdomen.
That could cause serious or fatal
injuries. The shoulder belt should
go over the shoulder and across
the chest.
Page 72 of 347

Chevrolet BOLT EV Owner Manual (GMNA-Localizing-U.S./Canada/Mexico-
13556250) - 2020 - CRC - 2/11/20
Seats and Restraints 71
{Warning
To reduce the risk of serious or
fatal injuries during a crash, do
not attach more than one child
restraint to a single anchor.
Attaching more than one child
restraint to a single anchor could
cause the anchor or attachment
to come loose or even break
during a crash. A child or others
could be injured.
{Warning
Children can be seriously injured
or strangled if a shoulder belt is
wrapped around their neck. The
shoulder belt can tighten but
cannot be loosened if it is locked.
The shoulder belt locks when it is
pulled all the way out of the
retractor. It unlocks when the
shoulder belt is allowed to go all
the way back into the retractor,(Continued)
Warning (Continued)
but it cannot do this if it is
wrapped around a child’s neck.
If the shoulder belt is locked and
tightened around a child’s neck,
the only way to loosen the belt is
to cut it.
Buckle any unused seat belts
behind the child restraint so
children cannot reach them. Pull
the shoulder belt all the way out
of the retractor to set the lock,
and tighten the belt behind the
child restraint after the child
restraint has been installed.
Caution
Do not let the LATCH
attachments rub against the
vehicle’s seat belts. This may
damage these parts. If necessary,
move buckled seat belts to avoid
rubbing the LATCH attachments.(Continued)
Caution (Continued)
Do not fold the rear seatback
when the seat is occupied. Do not
fold the empty rear seat with a
seat belt buckled. This could
damage the seat belt or the seat.
Unbuckle and return the seat belt
to its stowed position, before
folding the seat.
If you need to secure more than one
child restraint in the rear seat, see
Where to Put the Restraint 065 for
additional information.
Rear Seat Delete Model
1. For models without a rear seat, forward-facing child restraints
should only be installed in the
right front seating position with
the seat belt and a top tether.
See Securing Child Restraints
(With the Seat Belt in the Rear
Seat) 076 or
Securing Child Restraints (With
the Seat Belt in the Front Seat)
0 78.
Page 78 of 347

Chevrolet BOLT EV Owner Manual (GMNA-Localizing-U.S./Canada/Mexico-
13556250) - 2020 - CRC - 2/11/20
Seats and Restraints 77
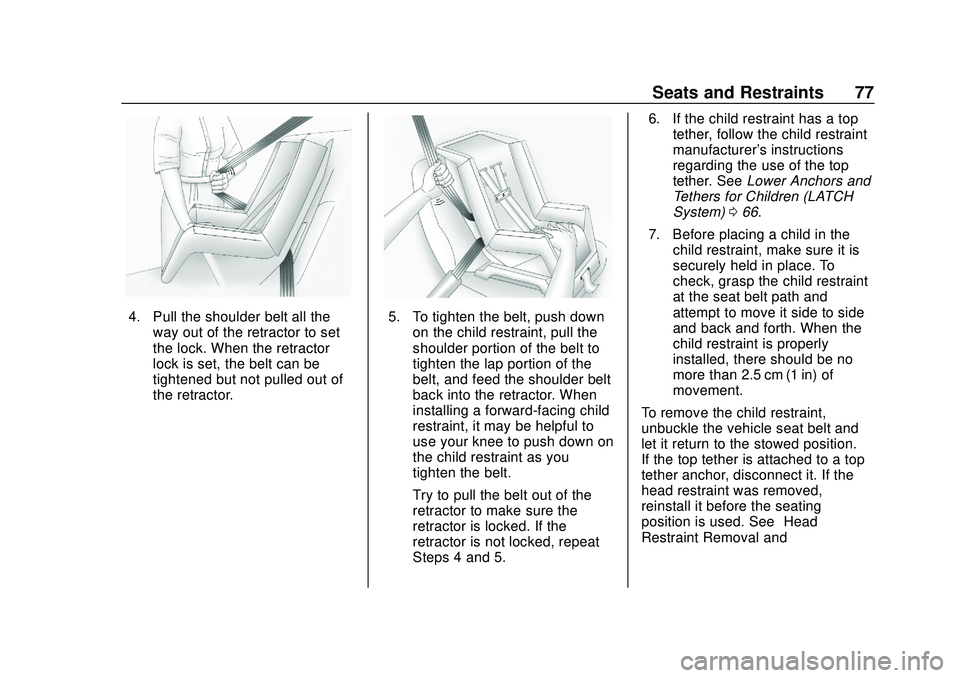
4. Pull the shoulder belt all theway out of the retractor to set
the lock. When the retractor
lock is set, the belt can be
tightened but not pulled out of
the retractor.5. To tighten the belt, push downon the child restraint, pull the
shoulder portion of the belt to
tighten the lap portion of the
belt, and feed the shoulder belt
back into the retractor. When
installing a forward-facing child
restraint, it may be helpful to
use your knee to push down on
the child restraint as you
tighten the belt.
Try to pull the belt out of the
retractor to make sure the
retractor is locked. If the
retractor is not locked, repeat
Steps 4 and 5. 6. If the child restraint has a top
tether, follow the child restraint
manufacturer's instructions
regarding the use of the top
tether. See Lower Anchors and
Tethers for Children (LATCH
System) 066.
7. Before placing a child in the child restraint, make sure it is
securely held in place. To
check, grasp the child restraint
at the seat belt path and
attempt to move it side to side
and back and forth. When the
child restraint is properly
installed, there should be no
more than 2.5 cm (1 in) of
movement.
To remove the child restraint,
unbuckle the vehicle seat belt and
let it return to the stowed position.
If the top tether is attached to a top
tether anchor, disconnect it. If the
head restraint was removed,
reinstall it before the seating
position is used. See “Head
Restraint Removal and
Page 81 of 347

Chevrolet BOLT EV Owner Manual (GMNA-Localizing-U.S./Canada/Mexico-
13556250) - 2020 - CRC - 2/11/20
80 Seats and Restraints
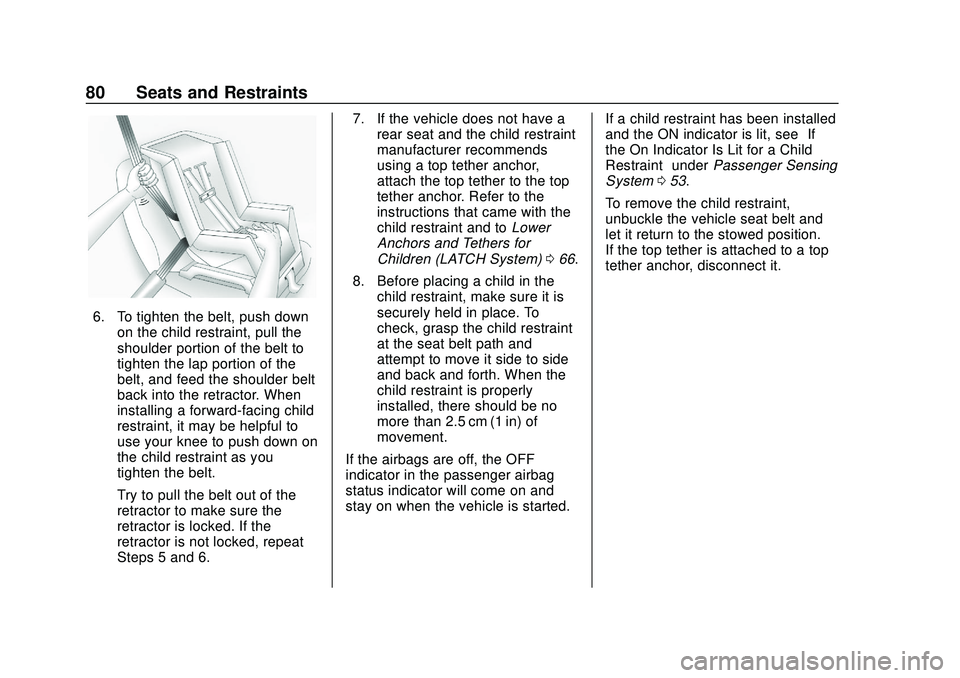
6. To tighten the belt, push downon the child restraint, pull the
shoulder portion of the belt to
tighten the lap portion of the
belt, and feed the shoulder belt
back into the retractor. When
installing a forward-facing child
restraint, it may be helpful to
use your knee to push down on
the child restraint as you
tighten the belt.
Try to pull the belt out of the
retractor to make sure the
retractor is locked. If the
retractor is not locked, repeat
Steps 5 and 6. 7. If the vehicle does not have a
rear seat and the child restraint
manufacturer recommends
using a top tether anchor,
attach the top tether to the top
tether anchor. Refer to the
instructions that came with the
child restraint and to Lower
Anchors and Tethers for
Children (LATCH System) 066.
8. Before placing a child in the child restraint, make sure it is
securely held in place. To
check, grasp the child restraint
at the seat belt path and
attempt to move it side to side
and back and forth. When the
child restraint is properly
installed, there should be no
more than 2.5 cm (1 in) of
movement.
If the airbags are off, the OFF
indicator in the passenger airbag
status indicator will come on and
stay on when the vehicle is started. If a child restraint has been installed
and the ON indicator is lit, see
“If
the On Indicator Is Lit for a Child
Restraint” underPassenger Sensing
System 053.
To remove the child restraint,
unbuckle the vehicle seat belt and
let it return to the stowed position.
If the top tether is attached to a top
tether anchor, disconnect it.
Page 89 of 347

Chevrolet BOLT EV Owner Manual (GMNA-Localizing-U.S./Canada/Mexico-
13556250) - 2020 - CRC - 2/11/20
88 Instruments and Controls
Wiper Parking
If the vehicle Is turned off while the
wipers are on LO, HI, or INT, they
will immediately stop. If the
windshield wiper lever is then
moved to OFF before the driver
door is opened or within 10 minutes,
the wipers will restart and move to
the base of the windshield. If the
vehicle is turned off while the wipers
are performing wipes due to
windshield washing, the wipers
continue to run until they reach the
base of the windshield.
f:Pull the windshield wiper
lever toward you to spray windshield
washer fluid and activate the wipers.
The wipers will continue until the
lever is released or the maximum
wash time is reached. When the
lever is released, additional wipes
may occur depending on how long
the windshield washer had been
activated. See Washer Fluid0239
for information on filling the
windshield washer fluid reservoir.
Rear Window Wiper/
Washer
The controls are on the end of the
windshield wiper lever.
Move the control to:
ON : To turn on.
OFF : To turn off. INT :
To turn on intermittent rear
wipes.1: Push the windshield wiper
lever forward to spray washer fluid
on the rear window. If equipped with
the rear camera mirror, the washer
fluid is sprayed on the rear camera
at the same time. The lever returns
to its starting position when
released.
Page 103 of 347

Chevrolet BOLT EV Owner Manual (GMNA-Localizing-U.S./Canada/Mexico-
13556250) - 2020 - CRC - 2/11/20
102 Instruments and Controls
If a short distance must be driven
with the light on, be sure to turn off
all accessories, such as the radio.
Service Vehicle Soon
Light
This light comes on if a condition
exists that may require the vehicle
to be taken in for service.
If the light comes on, take the
vehicle to your dealer for service as
soon as possible.
Brake System Warning
Light
MetricEnglish
This light should come on briefly
when the vehicle is turned on. If it
does not come on then, have it fixed
so it will be ready to warn you if
there is a problem.
If the light comes on and stays on at
start up, there is a brake problem.
Have the brake system inspected
right away.
If the light comes on while driving,
pull off the road and stop carefully.
The brake pedal might be harder to
push, or the brake pedal may go
closer to the floor. It could take
longer to stop. If the light is still on,
have the vehicle towed for service.
See Towing the Vehicle 0287.
{Warning
The brake system might not be
working properly if the brake
system warning light is on.
Driving with the brake system
warning light on can lead to a
crash. If the light is still on after
the vehicle has been pulled off
the road and carefully stopped,
have the vehicle towed for
service.
Electric Parking Brake
Light
MetricEnglish
This light comes on when the
parking brake is applied. If the light
flashes and stays on after the
Page 131 of 347

Chevrolet BOLT EV Owner Manual (GMNA-Localizing-U.S./Canada/Mexico-
13556250) - 2020 - CRC - 2/11/20
130 Lighting
The instrument cluster light will
come on to indicate the
IntelliBeam system is
reactivated.
The high beams may not turn off
automatically if the system cannot
detect another vehicle's lamps
because of any of the following:
. The other vehicle’s lamps are
missing, damaged, obstructed
from view, or otherwise
undetected.
. The other vehicle‘s lamps are
covered with dirt, snow, and/or
road spray.
. The other vehicle’s lamps cannot
be detected due to dense
exhaust, smoke, fog, snow, road
spray, mist, or other airborne
obstructions.
. The vehicle's windshield is dirty,
cracked, or obstructed by
something that blocks the view
of the light sensor. .
The vehicle is loaded such that
the front end points upward,
causing the light sensor to aim
high and not detect headlamps
and taillamps.
. Driving on winding or hilly roads.
The IntelliBeam system may need to
be disabled if any of the above
conditions exist.
Exterior Lamps Off
Reminder
A warning chime sounds if the driver
door is opened while the vehicle is
off and the exterior lamps are on.
Headlamp High/
Low-Beam Changer
Push the turn signal lever away
from you and release, to turn the
high beams on. To return to low
beams, push the lever again or pull
it toward you and release.
This indicator light turns on in the
instrument cluster when the
high-beam headlamps are on.
Flash-to-Pass
To flash the high beams, pull the
turn signal lever toward you, and
release.
Daytime Running
Lamps (DRL)
DRL can make it easier for others to
see the front of your vehicle during
the day. Fully functional DRL are
required on all vehicles first sold in
Canada.
The DRL system comes on in
daylight when the following
conditions are met:
. The power button is on.
Page 171 of 347

Chevrolet BOLT EV Owner Manual (GMNA-Localizing-U.S./Canada/Mexico-
13556250) - 2020 - CRC - 2/11/20
170 Driving and Operating
Driving and
Operating
Driving Information
Driving for Better EnergyEfficiency . . . . . . . . . . . . . . . . . . . 171
Distracted Driving . . . . . . . . . . . . 172
Defensive Driving . . . . . . . . . . . . . 173
Drunk Driving . . . . . . . . . . . . . . . . . 173
Control of a Vehicle . . . . . . . . . . . 173
Braking . . . . . . . . . . . . . . . . . . . . . . . 173
Steering . . . . . . . . . . . . . . . . . . . . . . 174
Off-Road Recovery . . . . . . . . . . . 175
Loss of Control . . . . . . . . . . . . . . . 175
Driving on Wet Roads . . . . . . . . 176
Hill and Mountain Roads . . . . . 176
Winter Driving . . . . . . . . . . . . . . . . 177
If the Vehicle Is Stuck . . . . . . . . 178
Vehicle Load Limits . . . . . . . . . . . 178
Starting and Operating
New Vehicle Break-In . . . . . . . . . 182
Power Button . . . . . . . . . . . . . . . . . 182
Starting and Stopping the Vehicle . . . . . . . . . . . . . . . . . . . . . . 184
Retained Accessory Power (RAP) . . . . . . . . . . . . . . . . 184
Shifting Into Park . . . . . . . . . . . . . 185 Shifting out of Park . . . . . . . . . . . 185
Extended Parking . . . . . . . . . . . . 186
Electric Vehicle Operating
Modes
Driver Selected Operating
Modes . . . . . . . . . . . . . . . . . . . . . . 186
Electric Drive Unit
Electric Drive Unit . . . . . . . . . . . . 187
One-Pedal Driving . . . . . . . . . . . . 190
Brakes
Antilock BrakeSystem (ABS) . . . . . . . . . . . . . . . 191
Electric Parking Brake . . . . . . . . 192
Brake Assist . . . . . . . . . . . . . . . . . . 193
Hill Start Assist (HSA) . . . . . . . . 193
Regenerative Braking . . . . . . . . 194
Ride Control Systems
Traction Control/Electronic Stability Control . . . . . . . . . . . . . 194
Cruise Control
Cruise Control . . . . . . . . . . . . . . . . 196
Driver Assistance Systems
Driver Assistance Systems . . . 199
Assistance Systems forParking or Backing . . . . . . . . . . 200 Assistance Systems for
Driving . . . . . . . . . . . . . . . . . . . . . . 203
Forward Collision Alert (FCA) System . . . . . . . . . . . . . . . . . . . . . . 204
Automatic Emergency
Braking (AEB) . . . . . . . . . . . . . . . 205
Front Pedestrian Braking (FPB) System . . . . . . . . . . . . . . . 207
Side Blind Zone Alert (SBZA) . . . . . . . . . . . . . . . . 209
Lane Change Alert (LCA) . . . . . 209
Lane Keep Assist (LKA) . . . . . . 211
Charging
When to Charge . . . . . . . . . . . . . . 213
Plug-In Charging . . . . . . . . . . . . . 214
Delayed Charging Override . . . 217
Charging Status Feedback . . . 218
Charge Cord . . . . . . . . . . . . . . . . . 222
Utility Interruption of Charging . . . . . . . . . . . . . . . . . . . . 228
Electrical Requirements for Battery Charging . . . . . . . . . . . . 229
Trailer Towing
General TowingInformation . . . . . . . . . . . . . . . . . . 230
Conversions and Add-Ons
Add-On ElectricalEquipment . . . . . . . . . . . . . . . . . . 230