2020 CHEVROLET BLAZER fuse
[x] Cancel search: fusePage 5 of 390

Chevrolet Blazer Owner Manual (GMNA-Localizing-U.S./Canada/Mexico-
13557845) - 2020 - CRC - 3/24/20
4 Introduction
R:Fuse Block Cover Lock
Location
+: Fuses
j:ISOFIX/LATCH System Child
Restraints
Q: Keep Fuse Block Covers
Properly Installed
|: Lane Change Alert
@:Lane Departure Warning
A:Lane Keep Assist
*: Malfunction Indicator Lamp
::Oil Pressure
X:Park Assist
~:Pedestrian Ahead Indicator
O:Power
7:Rear Cross Traffic Alert
I:Registered Technician
/:Remote Vehicle Start
>:Seat Belt Reminders
I: Side Blind Zone Alert
h:Stop/Start
7:Tire Pressure Monitor
d:Traction Control/StabiliTrak/
Electronic Stability Control (ESC)
a: Under Pressure
V:Vehicle Ahead Indicator
Page 104 of 390

Chevrolet Blazer Owner Manual (GMNA-Localizing-U.S./Canada/Mexico-
13557845) - 2020 - CRC - 3/24/20
Instruments and Controls 103
Caution
Leaving electrical equipment
plugged in for an extended period
of time while the ignition is off will
drain the battery. Always unplug
electrical equipment when not in
use and do not plug in equipment
that exceeds the maximum
15 amp rating.
Certain accessory plugs may not be
compatible with the accessory
power outlet and could overload
vehicle and adapter fuses. If a
problem is experienced, see your
dealer.
When adding electrical equipment,
be sure to follow the proper
installation instructions included with
the equipment. See Add-On
Electrical Equipment 0242.
Caution
Hanging heavy equipment from
the power outlet can cause
damage not covered by the
vehicle warranty. The power
outlets are designed for
accessory power plugs only, such
as cell phone charge cords.
Power Outlet 110-V/120-V
Alternating Current
If equipped, this power outlet it can
be used to plug in electrical
equipment that uses a maximum
limit of 150 watts.
The power outlet is on the rear of
the center console.
An indicator light on the outlet turns
on to show it is in use. The light
comes on when the ignition is on,
equipment requiring less than 150
watts is plugged into the outlet, and
no system fault is detected.
The indicator light does not come on
when the ignition is off or if the
equipment is not fully seated into
the outlet.
If equipment is connected using
more than 150 watts or a system
fault is detected, a protection circuit
shuts off the power supply and the
Page 150 of 390

Chevrolet Blazer Owner Manual (GMNA-Localizing-U.S./Canada/Mexico-
13557845) - 2020 - CRC - 3/24/20
Lighting 149
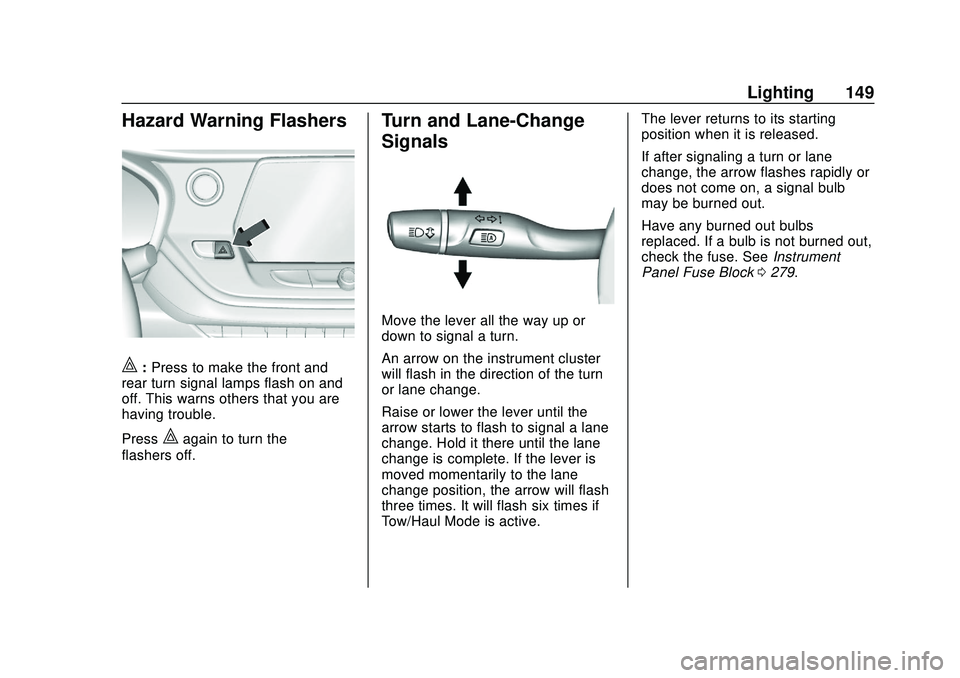
Hazard Warning Flashers
|:Press to make the front and
rear turn signal lamps flash on and
off. This warns others that you are
having trouble.
Press
|again to turn the
flashers off.
Turn and Lane-Change
Signals
Move the lever all the way up or
down to signal a turn.
An arrow on the instrument cluster
will flash in the direction of the turn
or lane change.
Raise or lower the lever until the
arrow starts to flash to signal a lane
change. Hold it there until the lane
change is complete. If the lever is
moved momentarily to the lane
change position, the arrow will flash
three times. It will flash six times if
Tow/Haul Mode is active. The lever returns to its starting
position when it is released.
If after signaling a turn or lane
change, the arrow flashes rapidly or
does not come on, a signal bulb
may be burned out.
Have any burned out bulbs
replaced. If a bulb is not burned out,
check the fuse. See
Instrument
Panel Fuse Block 0279.
Page 240 of 390

Chevrolet Blazer Owner Manual (GMNA-Localizing-U.S./Canada/Mexico-
13557845) - 2020 - CRC - 3/24/20
Driving and Operating 239
.Tires must be properly inflated to
support loads while towing a
trailer. See Tires0284 for
instructions on proper tire
inflation.
Safety Chains
Always attach chains between the
vehicle and the trailer, and attach
the chains to the holes on the trailer
hitch platform. Instructions for safety
chains may be provided by the hitch
manufacturer or by the trailer
manufacturer.
Cross the safety chains under the
tongue of the trailer to help prevent
the tongue from contacting the road
if it becomes separated from the
hitch. Always leave just enough
slack so the combination can turn.
Never allow safety chains to drag on
the ground.
Trailer Brakes
Loaded trailers over 450 kg
(1,000 lb) must be equipped with
brake systems and with brakes for
each axle. Trailer braking equipment
conforming to Canadian Standards Association (CSA) requirement
CAN3-D313, or its equivalent, is
recommended.
State or local regulations may
require trailers to have their own
braking system if the loaded weight
of the trailer exceeds certain
minimums that can vary from state
to state. Read and follow the
instructions for the trailer brakes so
they are installed, adjusted, and
maintained properly. Never attempt
to tap into your vehicle's hydraulic
brake system. If you do, both the
vehicle antilock brakes and the
trailer brakes may not function,
which could result in a crash.
Trailer Wiring Harness
Basic Trailer Wiring
The trailer wiring harness, with a
seven-pin connector, is at the rear
of the vehicle and is tied to the
vehicle's frame. The harness
requires the installation of a trailer
connector, which is available
through your dealer.
Use only a round, seven-wire
connector with flat blade terminals
meeting SAE J2863 specifications
for proper electrical connectivity.
The seven-wire harness contains
the following trailer circuits:
.
Yellow: Left Stop/Turn Signal
. Green: Right Stop/Turn Signal
. Brown: Tail/Parking Lamps
. White: Trailer Ground
. Red: Stop Lamp Supply Voltage
. Black: Back Up Lamp Supply
Voltage
. Blue: Service Brakes
The fuse for the electric trailer brake
circuit is in the engine compartment
fuse block, but the wires may not be
connected. They should be
connected by your dealer or a
qualified service center. To control
electric trailer brakes, a trailer brake
controller needs to be installed on
the vehicle by your dealer or a
qualified service center. See electric
brake control wiring provisions.
Page 244 of 390

Chevrolet Blazer Owner Manual (GMNA-Localizing-U.S./Canada/Mexico-
13557845) - 2020 - CRC - 3/24/20
Vehicle Care 243
Vehicle Care
General Information
General Information . . . . . . . . . . 244
California Proposition65 Warning . . . . . . . . . . . . . . . . . 244
California Perchlorate Materials Requirements . . . . . 245
Accessories and Modifications . . . . . . . . . . . . . . . . 245
Vehicle Checks
Doing Your OwnService Work . . . . . . . . . . . . . . . 245
Hood . . . . . . . . . . . . . . . . . . . . . . . . . 246
Engine Compartment Overview . . . . . . . . . . . . . . . . . . . . 248
Engine Oil . . . . . . . . . . . . . . . . . . . . 253
Engine Oil Life System . . . . . . . 255
Automatic Transmission Fluid . . . . . . . . . . . . . . . . . . . . . . . . 256
Engine Air Filter Life System . . . . . . . . . . . . . . . . . . . . . . 257
Engine Air Cleaner/Filter . . . . . . 257
Cooling System . . . . . . . . . . . . . . 259
Engine Overheating . . . . . . . . . . 264
Washer Fluid . . . . . . . . . . . . . . . . . 265
Brakes . . . . . . . . . . . . . . . . . . . . . . . 266
Brake Fluid . . . . . . . . . . . . . . . . . . . 267 Battery - North America . . . . . . 268
All-Wheel Drive . . . . . . . . . . . . . . . 269
Starter Switch Check . . . . . . . . . 269
Automatic Transmission Shift
Lock Control Function
Check . . . . . . . . . . . . . . . . . . . . . . . 269
Park Brake and P (Park) Mechanism Check . . . . . . . . . . 269
Wiper Blade Replacement . . . . 270
Windshield Replacement . . . . . 271
Gas Strut(s) . . . . . . . . . . . . . . . . . . 271
Headlamp Aiming
Front Headlamp Aiming . . . . . . 273
Bulb Replacement
Bulb Replacement . . . . . . . . . . . . 273
High Intensity Discharge (HID) Lighting . . . . . . . . . . . . . . . . . . . . . 273
LED Lighting . . . . . . . . . . . . . . . . . 273
Back-Up Lamps . . . . . . . . . . . . . . 273
Electrical System
High Voltage Devices and Wiring . . . . . . . . . . . . . . . . . . . . . . . 274
Electrical System Overload . . . 275
Fuses and Circuit Breakers . . . 275
Engine Compartment Fuse Block . . . . . . . . . . . . . . . . . . . . . . . . 276
Instrument Panel Fuse Block . . . . . . . . . . . . . . . . . . . . . . . . 279 Rear Compartment Fuse
Block . . . . . . . . . . . . . . . . . . . . . . . . 282
Wheels and Tires
Tires . . . . . . . . . . . . . . . . . . . . . . . . . . 284
All-Season Tires . . . . . . . . . . . . . . 285
Winter Tires . . . . . . . . . . . . . . . . . . 285
Summer Tires . . . . . . . . . . . . . . . . 286
Tire Sidewall Labeling . . . . . . . . 286
Tire Designations . . . . . . . . . . . . . 288
Tire Terminology andDefinitions . . . . . . . . . . . . . . . . . . 289
Tire Pressure . . . . . . . . . . . . . . . . . 291
Tire Pressure for High-Speed Operation . . . . . . . . . . . . . . . . . . . 293
Tire Pressure Monitor System . . . . . . . . . . . . . . . . . . . . . . 293
Tire Pressure Monitor Operation . . . . . . . . . . . . . . . . . . . 294
Tire Inspection . . . . . . . . . . . . . . . . 298
Tire Rotation . . . . . . . . . . . . . . . . . 299
When It Is Time for New Tires . . . . . . . . . . . . . . . . . . . . . . . . 300
Buying New Tires . . . . . . . . . . . . . 301
Different Size Tires and Wheels . . . . . . . . . . . . . . . . . . . . . . 302
Uniform Tire Quality Grading . . . . . . . . . . . . . . . . . . . . . 302
Wheel Alignment and Tire Balance . . . . . . . . . . . . . . . . . . . . . 304
Wheel Replacement . . . . . . . . . . 304
Page 250 of 390

Chevrolet Blazer Owner Manual (GMNA-Localizing-U.S./Canada/Mexico-
13557845) - 2020 - CRC - 3/24/20
Vehicle Care 249
1.Engine Air Cleaner/Filter 0257.
2. Engine Oil Fill Cap. See Engine Oil 0253.
3. Engine Oil Dipstick. See Engine Oil 0253.
4. Engine Cooling Fan (Out of View). See Cooling System
0 259.
5. Brake Fluid Reservoir. See Brake Fluid 0267. 6.
Battery - North America 0268.
7. Engine Coolant Surge Tank and Pressure Cap. See
Cooling System 0259.
8. Positive (+) Battery Terminal (Under Cover). See Jump
Starting - North America 0321. 9. Windshield Washer Fluid
Reservoir. See Washer Fluid
0 265.
10. Engine Compartment Fuse
Block 0276.
11. Remote Negative (-) Battery Terminal. See Jump Starting -
North America 0321.
Page 252 of 390

Chevrolet Blazer Owner Manual (GMNA-Localizing-U.S./Canada/Mexico-
13557845) - 2020 - CRC - 3/24/20
Vehicle Care 251
1.Engine Air Cleaner/Filter 0257.
2. Engine Oil Fill Cap. See Engine Oil 0253.
3. Engine Oil Dipstick. See Engine Oil 0253.
4. Engine Cooling Fan (Out of View). See Cooling System
0 259. 5. Brake Fluid Reservoir. See
Brake Fluid 0267.
6. Battery - North America 0268.
7. Engine Coolant Surge Tank and Pressure Cap. See
Cooling System 0259.
8. Positive (+) Battery Terminal (Under Cover). See Jump
Starting - North America 0321. 9. Windshield Washer Fluid
Reservoir. See Washer Fluid
0 265.
10. Engine Compartment Fuse
Block 0276.
11. Remote Negative (-) Battery Terminal. See Jump Starting -
North America 0321.
Page 254 of 390

Chevrolet Blazer Owner Manual (GMNA-Localizing-U.S./Canada/Mexico-
13557845) - 2020 - CRC - 3/24/20
Vehicle Care 253
1.Engine Air Cleaner/Filter 0257.
2. Engine Oil Fill Cap. See Engine Oil 0253.
3. Engine Oil Dipstick. See Engine Oil 0253.
4. Engine Cooling Fan (Out of View). See Cooling System
0 259.
5. Brake Fluid Reservoir. See Brake Fluid 0267.
6. Battery - North America 0268.
7. Engine Coolant Surge Tank and Pressure Cap. See
Cooling System 0259.
8. Positive (+) Battery Terminal. See Jump Starting - North
America 0321.
9. Windshield Washer Fluid Reservoir. See Washer Fluid
0 265.
10. Engine Compartment Fuse
Block 0276.
11. Remote Negative (-) Battery Terminal. See Jump Starting -
North America 0321.Engine Oil
To ensure proper engine
performance and long life, careful
attention must be paid to engine oil.
Following these simple, but
important steps will help protect
your investment:
.
Use engine oil approved to the
proper specification and of the
proper viscosity grade. See
“Selecting the Right Engine Oil”
in this section.
. Check the engine oil level
regularly and maintain the
proper oil level. See “Checking
Engine Oil” and“When to Add
Engine Oil” in this section.
. Change the engine oil at the
appropriate time. See Engine Oil
Life System 0255.
. Always dispose of engine oil
properly. See “What to Do with
Used Oil” in this section.
Checking Engine Oil
Check the engine oil level regularly,
every 650 km (400 mi), especially
prior to a long trip. The engine oil dipstick handle is a loop. See
Engine Compartment Overview
0
248 for the location.
{Warning
The engine oil dipstick handle
may be hot; it could burn you.
Use a towel or glove to touch the
dipstick handle.
If a low oil Driver Information Center
(DIC) message displays, check the
oil level.
Follow these guidelines:
. To get an accurate reading, park
the vehicle on level ground.
Check the engine oil level after
the engine has been off for at
least two hours. Checking the
engine oil level on steep grades
or too soon after engine shutoff
can result in incorrect readings.
Accuracy improves when
checking a cold engine prior to
starting. Remove the dipstick
and check the level.