Page 284 of 390
Chevrolet Blazer Owner Manual (GMNA-Localizing-U.S./Canada/Mexico-
13557845) - 2020 - CRC - 3/24/20
Vehicle Care 283
FusesUsage
F5 Rear drive control 1
F6 –
F7 Right window
F8 Rear window defogger
F9 Left window
F10 –
F11 Trailer reverse
F12 –
F13 –
F14 –
F15 –
F16 –
F17 –
F18 –
F19 –
F20 Glove box door/ Trailer stoplamp
F21 –
F22 – Fuses
Usage
F23 –
F24 –
F25 –
F26 Trailer brake
F27 Driver ventilated seat/Lumbar
F28 Passive entry/ Passive start
F29 –
F30 Canister vent
F31 –
F32 Heated mirrors
F33 –
F34 Liftgate module
F35 Fuel system control module/Fuel tank
zone module
F36 Passenger ventilated seat/
Lumbar
F37 –
F38 Window module Fuses
Usage
F39 Rear closure
F40 Memory seat module
F41 Automatic occupancy sensor
F42 –
F43 –
F44 –
F45 Liftgate motor
F46 Rear heated seats
F47 –
F48 –
F49 –
F50 –
F51 –
F52 Rear drive control 2/
Semi-active
dampening system
module
F53 Video
Page 310 of 390

Chevrolet Blazer Owner Manual (GMNA-Localizing-U.S./Canada/Mexico-
13557845) - 2020 - CRC - 3/24/20
Vehicle Care 309
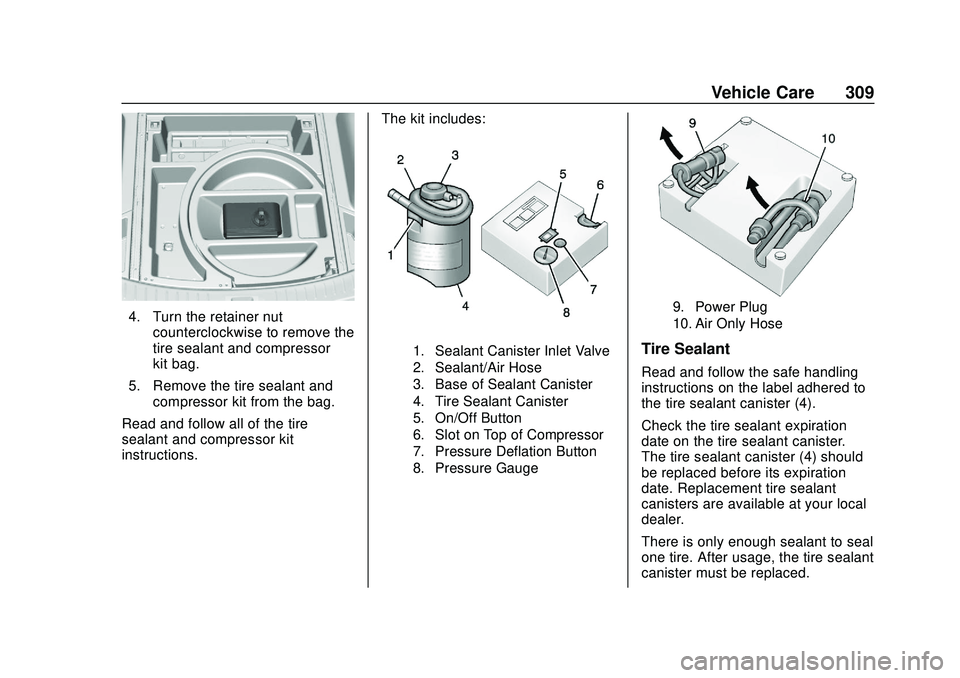
4. Turn the retainer nutcounterclockwise to remove the
tire sealant and compressor
kit bag.
5. Remove the tire sealant and compressor kit from the bag.
Read and follow all of the tire
sealant and compressor kit
instructions. The kit includes:
1. Sealant Canister Inlet Valve
2. Sealant/Air Hose
3. Base of Sealant Canister
4. Tire Sealant Canister
5. On/Off Button
6. Slot on Top of Compressor
7. Pressure Deflation Button
8. Pressure Gauge
9. Power Plug
10. Air Only Hose
Tire Sealant
Read and follow the safe handling
instructions on the label adhered to
the tire sealant canister (4).
Check the tire sealant expiration
date on the tire sealant canister.
The tire sealant canister (4) should
be replaced before its expiration
date. Replacement tire sealant
canisters are available at your local
dealer.
There is only enough sealant to seal
one tire. After usage, the tire sealant
canister must be replaced.
Page 311 of 390

Chevrolet Blazer Owner Manual (GMNA-Localizing-U.S./Canada/Mexico-
13557845) - 2020 - CRC - 3/24/20
310 Vehicle Care
Using the Tire Sealant and
Compressor Kit to Temporarily
Seal and Inflate a
Punctured Tire
If a tire goes flat, avoid further tire
and wheel damage by driving slowly
to a level place. Turn on the hazard
warning flashers. SeeHazard
Warning Flashers 0149.
See If a Tire Goes Flat 0306 for
other important safety warnings.
Do not remove any objects that
have penetrated the tire.
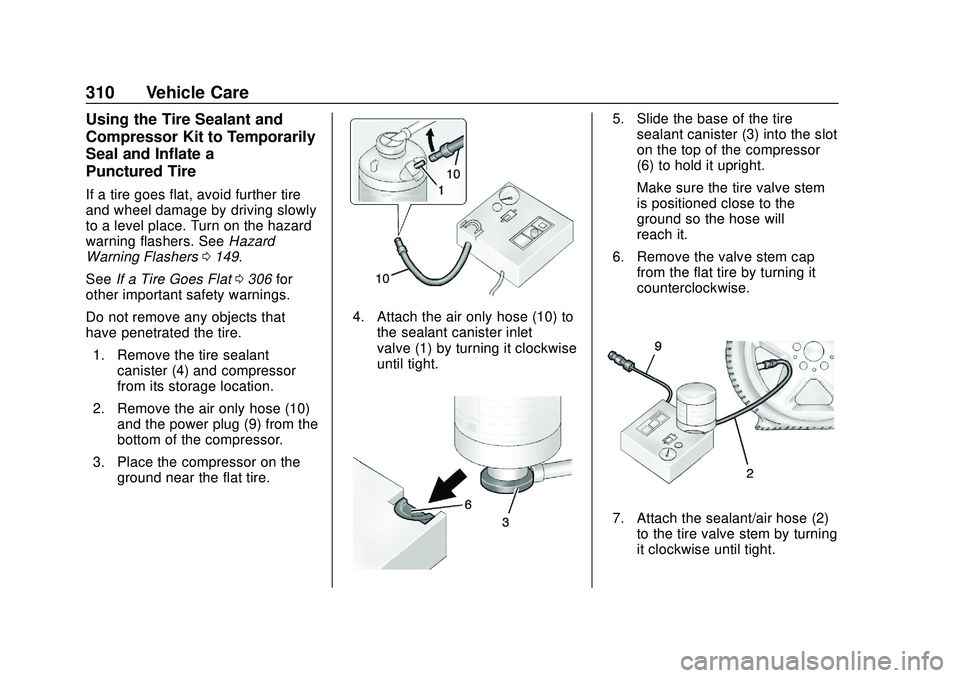
1. Remove the tire sealant canister (4) and compressor
from its storage location.
2. Remove the air only hose (10) and the power plug (9) from the
bottom of the compressor.
3. Place the compressor on the ground near the flat tire.
4. Attach the air only hose (10) tothe sealant canister inlet
valve (1) by turning it clockwise
until tight.
5. Slide the base of the tiresealant canister (3) into the slot
on the top of the compressor
(6) to hold it upright.
Make sure the tire valve stem
is positioned close to the
ground so the hose will
reach it.
6. Remove the valve stem cap from the flat tire by turning it
counterclockwise.
7. Attach the sealant/air hose (2)to the tire valve stem by turning
it clockwise until tight.
Page 313 of 390

Chevrolet Blazer Owner Manual (GMNA-Localizing-U.S./Canada/Mexico-
13557845) - 2020 - CRC - 3/24/20
312 Vehicle Care
14. Turn the sealant/air hose (2)counterclockwise to remove it
from the tire valve stem.
15. Replace the tire valve stem cap.
16. Remove the tire sealant canister (4) from the slot on top
of the compressor (6).
17. Turn the air only hose (10) counterclockwise to remove it
from the tire sealant canister
inlet valve (1).
18. Turn the sealant/air hose (2) clockwise onto the sealant
canister inlet valve (1) to
prevent sealant leakage.
19. Return the air only hose (10) and power plug (9) back to
their original storage location.20. If the flat tire was able to inflateto the recommended inflation
pressure, remove the
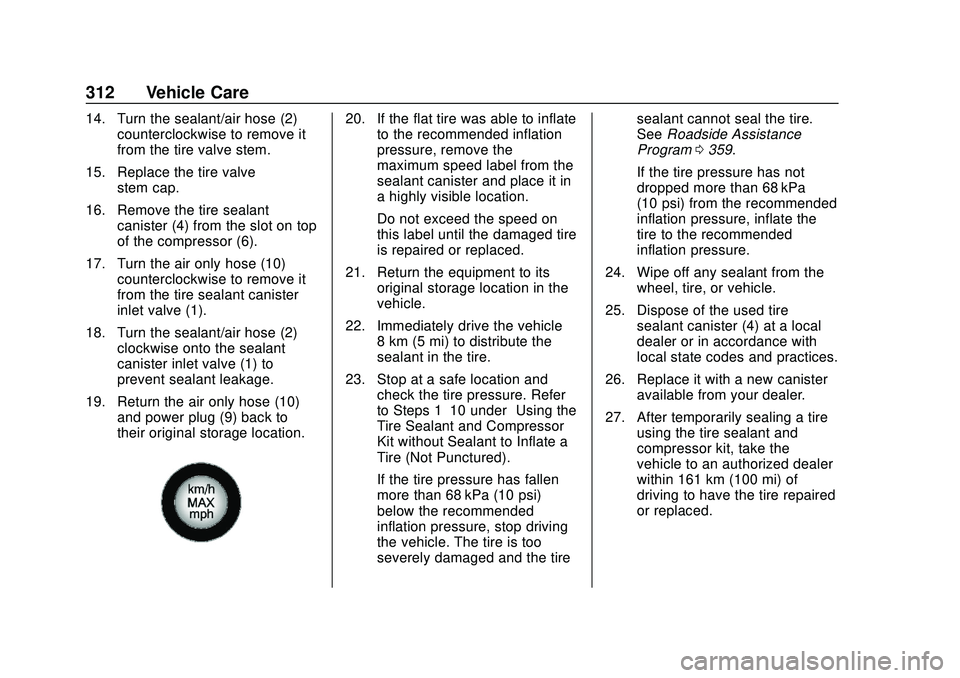
maximum speed label from the
sealant canister and place it in
a highly visible location.
Do not exceed the speed on
this label until the damaged tire
is repaired or replaced.
21. Return the equipment to its original storage location in the
vehicle.
22. Immediately drive the vehicle 8 km (5 mi) to distribute the
sealant in the tire.
23. Stop at a safe location and check the tire pressure. Refer
to Steps 1–10 under “Using the
Tire Sealant and Compressor
Kit without Sealant to Inflate a
Tire (Not Punctured).”
If the tire pressure has fallen
more than 68 kPa (10 psi)
below the recommended
inflation pressure, stop driving
the vehicle. The tire is too
severely damaged and the tire sealant cannot seal the tire.
See
Roadside Assistance
Program 0359.
If the tire pressure has not
dropped more than 68 kPa
(10 psi) from the recommended
inflation pressure, inflate the
tire to the recommended
inflation pressure.
24. Wipe off any sealant from the wheel, tire, or vehicle.
25. Dispose of the used tire sealant canister (4) at a local
dealer or in accordance with
local state codes and practices.
26. Replace it with a new canister available from your dealer.
27. After temporarily sealing a tire using the tire sealant and
compressor kit, take the
vehicle to an authorized dealer
within 161 km (100 mi) of
driving to have the tire repaired
or replaced.
Page 314 of 390

Chevrolet Blazer Owner Manual (GMNA-Localizing-U.S./Canada/Mexico-
13557845) - 2020 - CRC - 3/24/20
Vehicle Care 313
Using the Tire Sealant and
Compressor Kit without
Sealant to Inflate a Tire (Not
Punctured)
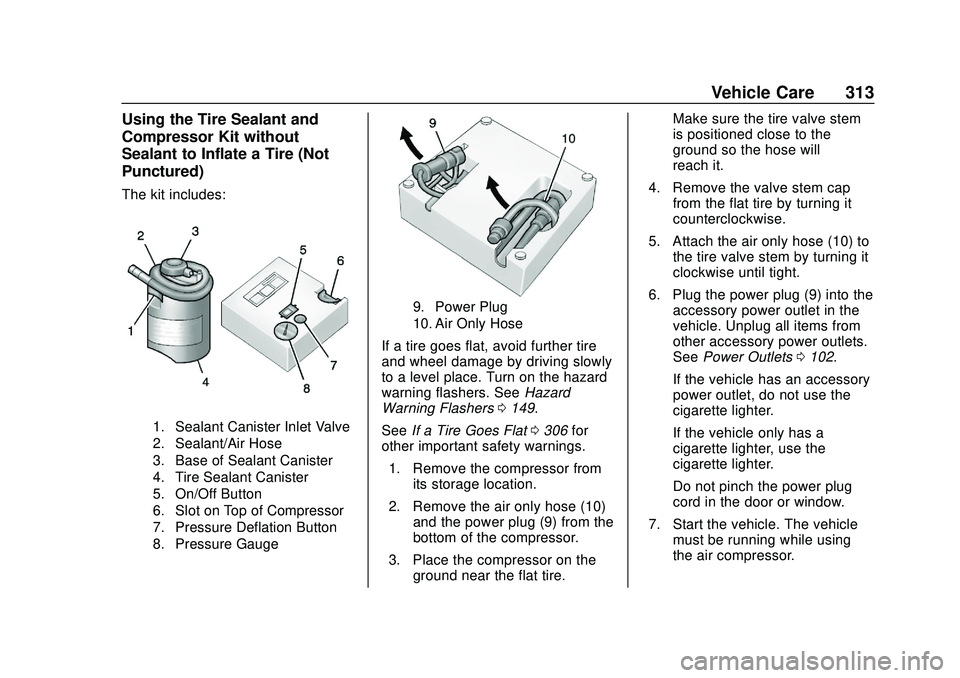
The kit includes:
1. Sealant Canister Inlet Valve
2. Sealant/Air Hose
3. Base of Sealant Canister
4. Tire Sealant Canister
5. On/Off Button
6. Slot on Top of Compressor
7. Pressure Deflation Button
8. Pressure Gauge
9. Power Plug
10. Air Only Hose
If a tire goes flat, avoid further tire
and wheel damage by driving slowly
to a level place. Turn on the hazard
warning flashers. SeeHazard
Warning Flashers 0149.
See If a Tire Goes Flat 0306 for
other important safety warnings.
1. Remove the compressor from its storage location.
2. Remove the air only hose (10) and the power plug (9) from the
bottom of the compressor.
3. Place the compressor on the ground near the flat tire. Make sure the tire valve stem
is positioned close to the
ground so the hose will
reach it.
4. Remove the valve stem cap from the flat tire by turning it
counterclockwise.
5. Attach the air only hose (10) to the tire valve stem by turning it
clockwise until tight.
6. Plug the power plug (9) into the accessory power outlet in the
vehicle. Unplug all items from
other accessory power outlets.
See Power Outlets 0102.
If the vehicle has an accessory
power outlet, do not use the
cigarette lighter.
If the vehicle only has a
cigarette lighter, use the
cigarette lighter.
Do not pinch the power plug
cord in the door or window.
7. Start the vehicle. The vehicle must be running while using
the air compressor.