Page 17 of 20
 transmitter twice.
Press the Power Liftgate knob on the ove")
17
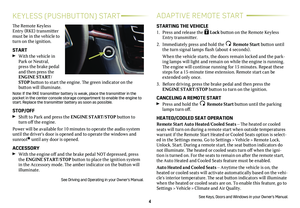
POWER LIFTGATE POWER ASSIST STEPS♦
OPEN/CLOSE THE POWER LIFTGATE
Press the Power Liftgate button on the Remote Keyless Entry (RKE) transmitter twice.
Press the Power Liftgate knob on the overhead console.
Press the touchpad (A) on the liftgate handle to open the liftgate.
Press the button (B) next to the liftgate latch to close the liftgate.
PROGRAMMING THE LIFTGATE HEIGHT
1. Turn the Power Liftgate knob to the 3/4 mode position.
2. Open the liftgate.
3. Adjust the liftgate manually to the desired height.
4. To save the setting, press and hold the button next to the liftgate latch (B) for 3 seconds. The turn signals flash and a beep sounds when the setting is saved.
HANDS-FREE OPERATION
To open or close the liftgate hands-free, kick your foot straight in and out under the center of the rear bumper, or above the vehicle logo projected on the ground♦. Do not swing your foot side-to-side.
The RKE transmitter must be within 3 feet of the liftgate.
See Keys, Doors and Windows in your Owner's Manual.
The power assist steps lower automatically when a door is opened and retract after the doors are closed.
To deploy the steps for cleaning and car washes, with the
ignition on and the vehicle in Park or with the vehicle running and in Neutral, select the Run Board screen button on the infotainment screen and then select the Extended option.
To disable or enable the steps, with the ignition on and the
vehicle in Park or Neutral, select the Run Board screen
button and then select On or Off.
See Keys, Doors and Windows in your Owner's Manual.
SUNROOF♦
OPEN/CLOSE THE SUNROOF
Press the rear of the
SLIDE TILT Sunroof Tilt switch to vent the sunroof.
Fully press the rear of the SLIDE TILT Sunroof Slide switch to express-open the sunroof.
Fully press the front of either
SLIDE TILT
Sunroof switch to express-close the sunroof.
See Keys, Doors and Windows in your Owner's Manual.
A
B
♦ Optional equipment
Page 18 of 20

SET MEMORY POSITIONS
With the vehicle in Park and the
ignition On or in Accessory mode:
1. Adjust the power driver’s seat, power adjustable pedals, power outside mirrors, and power tilt/telescopic steering column to the desired positions.
2. Press and release the SET button. A beep will sound. Immediately press and hold
button 1 until two beeps sound.
3. Repeat the steps using button 2 for a second driver.
To store driver's seat, adjustable pedals and steering column
positions for more clearance when exiting the vehicle, repeat steps 1 and 2 using the EXIT button.
RECALL POSITIONS
Press and hold button 1 or 2 or the EXIT button until the seat, pedals, mirrors and steering column reach the set position.
The memory/exit positions can be programmed to be recalled automatically when the ignition is turned On/Off (for exit recall, the driver's door must be opened).
To set the Auto Memory Recall or Easy Exit Options, go to Settings > Vehicle > Comfort and Convenience > Auto Memory Recall or Easy Exit Options.
See Seats and Restraints in your Owner's Manual.
18
POWER FRONT SEATS
SEAT ADJUSTMENTS
A. Seat Cushion Adjustment
Move the front horizontal
control to move the seat for-ward or rearward, or to tilt, raise or lower the seat.
B. Seatback Adjustment
Move the vertical control to recline or raise the seatback.
C. Lumbar Adjustment
Move the rear control fore/aft to increase/decrease lumbar
support or up/down to raise/lower the lumbar location.
ADDITIONAL SEAT ADJUSTMENTS (PLATINUM MODEL)
D. Feature Select Control
Press and release the control to display the seat adjustment features on the infotainment screen. Press and hold to scroll through the adjustments.
E. 4-Way Control Pad
Use the 4-way control pad to make adjustments up, down, forward, or rearward to the selected feature.
F. Massage On/Off
With the ignition on, press to recall the last massage type and intensity.
A
FD
CB
E
Page 19 of 20
 on the panel behind the rear doors or the x2 button (B) in the rear cargo area to fold the seat forward. Press either button again to tumble the seat forward.
UN")
2. Press the Seat Release button (A) on the panel behind the rear doors or the x2 button (B) in the rear cargo area to fold the seat forward. Press either button again to tumble the seat forward.
UNFOLDING 2ND-ROW SEATS
1. Pull down the seat until it latches to the floor.
2. Lift up the seatback until it locks in place.
POWER FOLDING/UNFOLDING 3RD-ROW SEATS
1. With the vehicle in Park, lower the head restraint, unbuckle the seat belt, and make sure nothing is on the seat.
2. Press and hold the bottom of the Seat Release button (C) in the rear cargo area to fold the seat flat.
3. Press and hold the top of the button to raise the seatback.
See Seats and Restraints in your Owner's Manual.
19
REAR SEATS
FOLDING 2ND-ROW SEATS
The 2nd-row seats fold and tumble to provide more cargo space and access to the 3rd-row seats.
1. Lower the head restraint, unbuckle the seat belt, make sure nothing is under or in front of the seat, and move the front seat forward enough to allow room for the folded seat.
2. Lift the lever on the lower outboard side of the 2nd-row seat. The seatback will fold
forward.
3. Lift the lever again to tumble the seat forward.
POWER FOLDING 2ND-ROW SEATS♦
1. Lower the head restraint, unbuckle the seat belt, make sure nothing is under or in front of the seat, and move the front seat forward enough to allow room for the folded seat.
A
BC
♦ Optional equipment
Page 20 of 20

!84367257=A!
Certain restrictions, precautions and safety procedures apply to your ve\
hicle. Please read your Owner’s Manual for complete instructions. All information c\
ontained in this guide is based on the latest information available at the time of printing and is subject to change without notice. Copyright 2019 by General Motors. All rights reserved.
We recommend always using ACDelco or genuine GM service parts.
OWNER PRIVILEGES™
myCADILLAC MOBILE APP
Download the myCadillac app to your compatible smartphone (or device) and, if your vehicle is properly equipped, you can start or turn off your engine, lock or unlock your doors, view key diagnostic information, set parking information and more.
The app is available on select Apple and Android devices. Service availability, features and functionality vary by vehicle, device and data plan. Device data connection required. Visit onstar.com for more details. Download the mobile app from your compatible mobile device’s app store.
CADILLAC ONLINE OWNER CENTER
Create an account at my.cadillac.com to access personalized
information, including an online Owner’s Manual and helpful
how-to videos, track your service history and warranty status,
manage your OnStar and Connected Services vehicle plans, review your current Vehicle Diagnostics report (active service account required) and more.
ROADSIDE ASSISTANCE 1-800-224-1400 TTY Users: 1-888-889-2438
Roadside Assistance provides every Cadillac owner with the
advantage of contacting a Cadillac advisor and, when appropriate, a Cadillac-trained dealer technician who can provide on-site services, including towing service, battery jump-starting, lock-out service, fuel delivery and flat tire assistance. Services are provided for up to 6 years/70,000 miles, whichever occurs first.
Roadside Assistance and OnStar®: If you have a current OnStar Safety & Security plan, push the blue OnStar button or red Emergency button to get the help you need. An OnStar advisor will use GPS technology to pinpoint your vehicle location and contact the nearest service provider.
To learn more about OnStar services, press the blue OnStar
button, call 1-888-466-7827, visit onstar.com or refer to your Owner’s Manual.
CUSTOMER ASSISTANCE 1-800-458-8006
Cadillac Customer Assistance is available anytime to answer
questions or provide additional information.
Page:
< prev 1-8 9-16 17-24