2020 AUDI TT COUPE instrument cluster
[x] Cancel search: instrument clusterPage 55 of 280

8S1012721BB
Sitting correctly and safely
Safety systems monitoring
The Ea indicator light in the instrument cluster
monitors the safety systems such as the airbags
(including the control modules, sensors, and wir-
ing) and the belt tensioners. It turns on when you
switch the ignition on and turns off after several
seconds.
If the Ea indicator light does not turn on when
the ignition is switched on, does not turn off af-
ter several seconds, or turns on or flashes while
driving, there may be a malfunction in one of the
safety systems. Drive to an authorized Audi deal-
er or authorized Audi Service Facility immediately
to have the malfunction corrected.
A WARNING
Have the malfunction in the safety systems in-
spected immediately. Otherwise, there is a
risk that the systems may not activate during
an accident, which increases the risk of seri-
ous or fatal injury.
53
Page 58 of 280

Sitting correctly and safely
has been certified for “suppression” for infants
approximately 12 months old and younger, and
for “low risk deployment” for children aged 3 to
6 years old (as defined in the standard).
The advanced airbag system will activate or deac-
tivate the front passenger's airbag based on the
occupancy of the seat. If a front airbag deploys
during an accident, the deployment force will
adapt to the passenger.
Components
The advanced airbag system consists of the fol-
lowing components:
— Front airbags in the steering wheel and in the
instrument panel on the front passenger's side:
these can protect the front passengers during
an accident
— Passenger occupant detection sensor in the
front passenger's seat: this detects if the front
passenger's seat is occupied (for example, by a
person or a small child in a child safety seat)
— Seat position sensors on the front seats: these
determine the distance between the seat and
the steering wheel or instrument panel
— Sensors in the front seat belt latch: these de-
tect if the safety belts are fastened
—The PASSENGER AIR BAG OFF #, ON @
indicator light in the headliner:this indicates if
the front passenger's airbag is activated or de-
activated
- indicator light in the instrument cluster:
this monitors the function of the Advanced Air-
bag System components to ensure they are
functioning correctly
How the components function together
The passenger occupant detection sensor in the
front passenger's seat detects if the front pas-
senger's seat is occupied. The passenger occu-
pant detection sensor measures the electrical ca-
pacity on the front passenger’s seat. The pas-
senger's airbag is activated or deactivated de-
pending on the electrical capacity that is meas-
ured.
The passenger's airbag is activated if:
56
— The electrical capacity is higher than the
threshold stored in the control module
— The electrical capacity is the same as or greater
than the electrical capacity of a typical adult
The passenger's airbag is deactivated if:
— The electrical capacity is lower than the thresh-
old stored in the control module
— The electrical capacity is the same as or less
than the electrical capacity of a typical one-
year-old child in a child safety seat that has
been used for certification in accordance with
FMVSS 208
If the front passenger's airbag is activated, the
PASSENGER AIR BAG ON @ indicator light
will turn on. If the front passenger's airbag is de-
activated, the PASSENGER AIR BAG OFF #;
indicator light will turn on.
The deployment force of the front airbags adapts
based on whether or not the safety belt is used
and the distance between the seat and the steer-
ing wheel/instrument panel. For example, if a
person is too close to the front airbag, the front
airbag will deploy with less force to help reduce
the risk of injury.
Meaning of PASSENGER AIR BAG OFF #4, ON
® indicator light
When the ignition is switched on, the system de-
tects whether the front passenger's seat is occu-
pied. PASSENGER AIR BAG OFF #7, ON @
will turn on for several seconds during this proc-
ess. Then it will indicate whether the front pas-
senger's airbag is activated or deactivated.
— PASSENGER AIR BAG OFF 8%: the front
passenger's airbag is deactivated and will not
deploy in the event of an accident.
— PASSENGER AIR BAG ON ®: the front pas-
senger's airbag is activated and could deploy in
the event of an accident.
If a change to the occupancy status of the front
passenger's seat is detected
PASSENGER AIR BAG OFF #, ON @ will
flash for several seconds and will then display the
status of the front passenger's airbag.
Page 79 of 280

8S1012721BB
Driving
This message appears when starting or stopping
the engine if the selector lever is not in the "N" or
"P" position. The engine will not start/stop.
Starting the engine when there is a
Telia (ela)
It may not be possible to start the engine under
certain circumstances, for example, if the bat-
tery in the vehicle key is drained, if interference is
affecting the key or if there is a system malfunc-
tion.
Fig. 84 Steering column/remote control key: starting the
engine if there is a malfunction
As long as the message ?) Remote control key:
hold back of key against the designated area.
See owner's manual is displayed, you can emer-
gency
start your vehicle.
» Press the brake pedal.
> Press the [START ENGINE STOP] button.
> Hold the master key in the location indicated in
the illustration ?) = fig. 84. The engine will
start.
> If the engine does not automatically start,
press the [START ENGINE STOP] button again.
@ Tips
You can view the message again by pressing
the [START ENGINE STOP] button.
Electromechanical
parking brake
The ©) switch is located under the selector lever
in the center console.
Your vehicle is equipped with an electromechani-
cal parking brake. The parking brake is designed
to prevent the vehicle from rolling unintentional-
ly and replaces the hand brake.
Setting/manually releasing the parking
brake
> Pull the ©) switch to set the parking brake. The
LED in the switch turns on. The iw (USA mod-
els)/[@) (Canada models) indicator light also
turns on in the instrument cluster display.
> To release the parking brake manually, press
the brake or accelerator pedal while the igni-
tion is switched on and press the ©) switch at
the same time. The LED in the button and the
indicator light in the display turn off.
Releasing the parking brake automatically
Requirement: the driver's door must be closed.
> To start driving and release the parking brake
automatically, press the accelerator pedal as
usual.
In addition to releasing the parking brake auto-
matically, other convenience and safety functions
are available when you start driving > page 78,
Starting to drive.
Emergency braking function
You can use the emergency braking function in an
emergency situation, or if the standard brakes
are malfunctioning or the pedal is obstructed.
> Pull and hold the ©) switch.
>» As soon as you release the (©) switch or acceler-
ate, the braking stops.
Pulling and holding the ©) switch while driving
the vehicle activates the emergency braking func-
tion. The hydraulic brake system will brake all
four wheels. The braking effect is similar to heavy
braking > A\.
To reduce the risk of activating the emergency
braking by mistake, a warning tone (buzzer)
sounds when the ©) switch is pulled. Emergency
braking stops as soon as the ©) switch is released
or the accelerator pedal is pressed.
Parking
> Press the brake pedal to stop the vehicle.
> Pull the ©) switch to set the parking brake.
77
>
Page 81 of 280

8S1012721BB
Driving
pressed. To reduce the risk of an accident,
do not inadvertently press the accelerator
pedal and always shift into “P” when the ve-
hicle is stopped.
— If the power supply fails, you cannot set the
parking brake once it is released, or release
it if it is set. In this case, park the vehicle on
level ground and secure it by engaging the
"P” gear. Contact an authorized Audi dealer
or authorized Audi Service Facility for assis-
tance.
ZA WARNING
— If you do not begin driving immediately af-
ter releasing the brake pedal, your vehicle
may begin to roll backward. Press the brake
pedal
or set the parking brake immediately.
— The hill hold assist cannot hold the vehicle
on inclines in every scenario (for example,
on slippery or icy ground).
Sporty driving
Applies to: RS model
When driving in a sporty style, for example ona
driving track, the wear on all vehicle components
is greatly increased, especially on the engine,
transmission, tires, brakes, and suspension. This
can result in increased wear. Also note the fol-
lowing points:
— Make sure the vehicle is in good condition.
Make sure to check the brake pads, tire tread,
and tire pressure (when tires are warm).
— Beforehand, warm up the engine by driving no
higher than two-thirds of the maximum permit-
ted engine RPM. The engine oil temperature
must be brought to a minimum of 140 °F
(60 °C).
— Before stopping the vehicle, allow the engine
and brakes to cool back down to a regular oper-
ating temperature by driving normally.
If necessary, use the following functions:
— Dynamic Audi drive select mode* > page 96
— Launch Control > page 84
— Limit ESC > page 106
@) Tips
Wear caused by load does not constitute a ve-
hicle fault as defined by the terms of the war-
ranty.
Automatic transmission
Introduction
Your vehicle is equipped with an electronically-
controlled DSG transmission called S tronic. Two
independent clutches transfer the power be-
tween the engine and transmission. It allows the
vehicle to accelerate without a noticeable inter-
ruption in traction.
The transmission shifts up or down automatically
depending on which drive program is selected.
When a moderate driving style is used, the
transmission selects the most economical driving
mode. The transmission upshifts at a lower RPM
and downshifts at a higher RPM to improve fuel
efficiency.
The transmission switches to a sporty mode after
a kick-down or when the driver uses a sporty driv-
ing style characterized by quick accelerator pedal
movements, heavy acceleration, frequent
changes in speed, and traveling at the maximum
speed.
If desired, the driver can also select the gears
manually (tiptronic mode) > page 83.
a BS a $
z 5
Pog
a
Le oe
Fig. 85 Instrument cluster: selector lever positions
The Infotainment system display shows the cur-
rent selector lever position and the engaged
gear.
79
Page 90 of 280

Assist systems
Switching the system on
Applies to: vehicles with cruise control system
@ #
©
f°
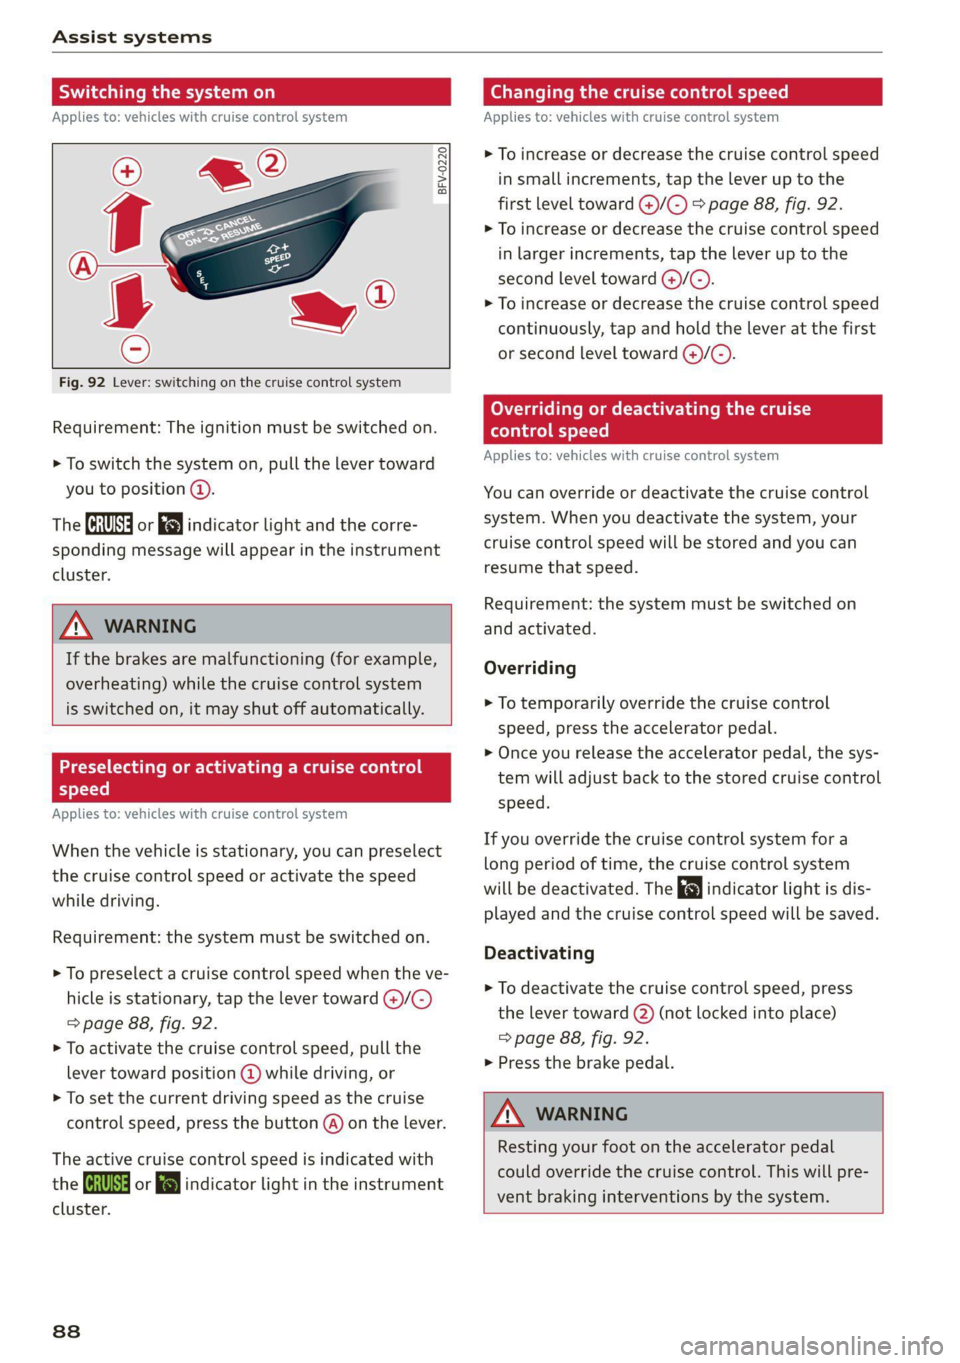
Fig. 92 Lever: switching on the cruise control system
Requirement: The ignition must be switched on.
> To switch the system on, pull the lever toward
you to position @).
The (a or 8] indicator light and the corre-
sponding message will appear in the instrument
cluster.
ZA WARNING
If the brakes are malfunctioning (for example,
overheating) while the cruise control system
is switched on, it may shut off automatically.
Preselecting or activating a cruise control
Cy ey-t-te)
Applies to: vehicles with cruise control system
When the vehicle is stationary, you can preselect
the cruise control speed or activate the speed
while driving.
Requirement: the system must be switched on.
> To preselect a cruise control speed when the ve-
hicle is stationary, tap the lever toward @)/G)
=> page 88, fig. 92.
> To activate the cruise control speed, pull the
lever toward position @ while driving, or
> To set the current driving speed as the cruise
control speed, press the button @) on the lever.
The active cruise control speed is indicated with
the ICRUISE| or i=} indicator light in the instrument
cluster.
838
Changing the cruise control speed
Applies to: vehicles with cruise control system
> To increase or decrease the cruise control speed
in small increments, tap the lever up to the
first level toward @)/G) > page 88, fig. 92.
> To increase or decrease the cruise control speed
in larger increments, tap the lever up to the
second level toward ()/C).
> To increase or decrease the cruise control speed
continuously, tap and hold the lever at the first
or second level toward @/G).
Overriding or deactivating the cruise
control speed
Applies to: vehicles with cruise control system
You can override or deactivate the cruise control
system. When you deactivate the system, your
cruise control speed will be stored and you can
resume that speed.
Requirement: the system must be switched on
and activated.
Overriding
> To temporarily override the cruise control
speed, press the accelerator pedal.
> Once you release the accelerator pedal, the sys-
tem will adjust back to the stored cruise control
speed.
If you override the cruise control system for a
long period of time, the cruise control system
will be deactivated. The indicator light is dis-
played and the cruise control speed will be saved.
Deactivating
> To deactivate the cruise control speed, press
the lever toward (2) (not locked into place)
=> page 88, fig. 92.
> Press the brake pedal.
A WARNING
Resting your foot on the accelerator pedal
could override the cruise control. This will pre-
vent braking interventions by the system.
Page 92 of 280

Assist systems
— For safety reasons, active lane assist must
not be used when there are poor road and/or
weather conditions such as slippery roads,
fog, gravel, heavy rain, snow and the poten-
tial for hydroplaning. Using active lane as-
sist under these conditions may increase the
risk of a crash.
Switching on/off
Applies to: vehicles with Audi active lane assist
B8V-0692
Fig. 93 Turn signal lever: button for active lane assist (ex-
ample)
ig
84M-0090
Fig. 94 Windshield: camera window for active lane assist
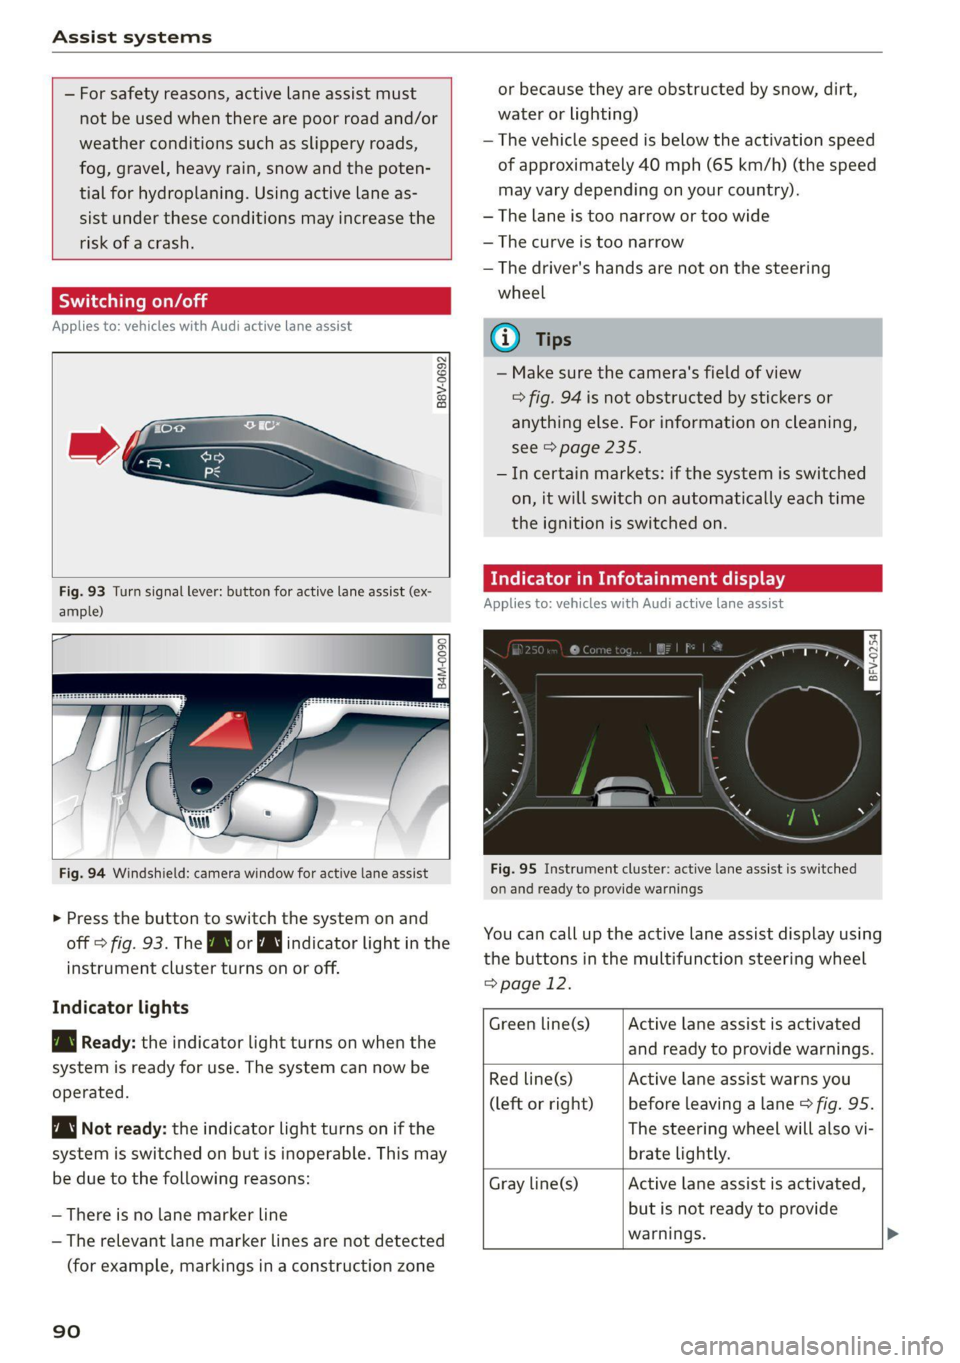
> Press the button to switch the system on and
off > fig. 93. The Bg or WJ indicator light in the
instrument cluster turns on or off.
Indicator lights
B Ready: the indicator light turns on when the
system is ready for use. The system can now be
operated.
Not ready: the indicator light turns on if the
system is switched on but is inoperable. This may
be due to the following reasons:
— There is no lane marker line
— The relevant lane marker lines are not detected
(for example, markings in a construction zone
90
or because they are obstructed by snow, dirt,
water or lighting)
— The vehicle speed is below the activation speed
of approximately 40 mph (65 km/h) (the speed
may vary depending on your country).
— The lane is too narrow or too wide
— The curve is too narrow
— The driver's hands are not on the steering
wheel
@) Tips
— Make sure the camera's field of view
=> fig. 94 is not obstructed by stickers or
anything else. For information on cleaning,
see > page 235.
—Incertain markets: if the system is switched
on, it will switch on automatically each time
the ignition is switched on.
dicator in Infotainment display
Applies to: vehicles with Audi active lane assist
Fig. 95 Instrument cluster: active lane assist is switched
on and ready to provide warnings
You can call up the active lane assist display using
the buttons in the multifunction steering wheel
=> page 12.
Active lane assist is activated
and ready to provide warnings.
Green line(s)
Red line(s)
(left or right)
Active lane assist warns you
before leaving a lane > fig. 95.
The steering wheel will also vi-
brate lightly.
Active lane assist is activated,
but is not ready to provide
warnings. >
Gray line(s)
Page 94 of 280

Assist systems
The time measurement on an individual lap ends
after 99 hours 59 minutes and 59 seconds. A new
lap starts automatically after that.
The measurement ends after a maximum of 30
laps. You can then evaluate the lap times or start
a new time measurement.
You can control the lap timer using the controls
on the multifunction steering wheel > page 92.
ZA WARNING
Your focus should always be on driving your
vehicle safely. As the driver, you have com-
plete responsibility for safety in traffic. Only
use the functions such as the lap timer in such
a way that you always maintain complete con-
trol over your vehicle in all traffic situations.
G) Tips
You can retrieve information from the trip
computer while the lap timer stopwatch is
running.
Opening the lap timer and measuring time
Applies to: vehicles with lap timer
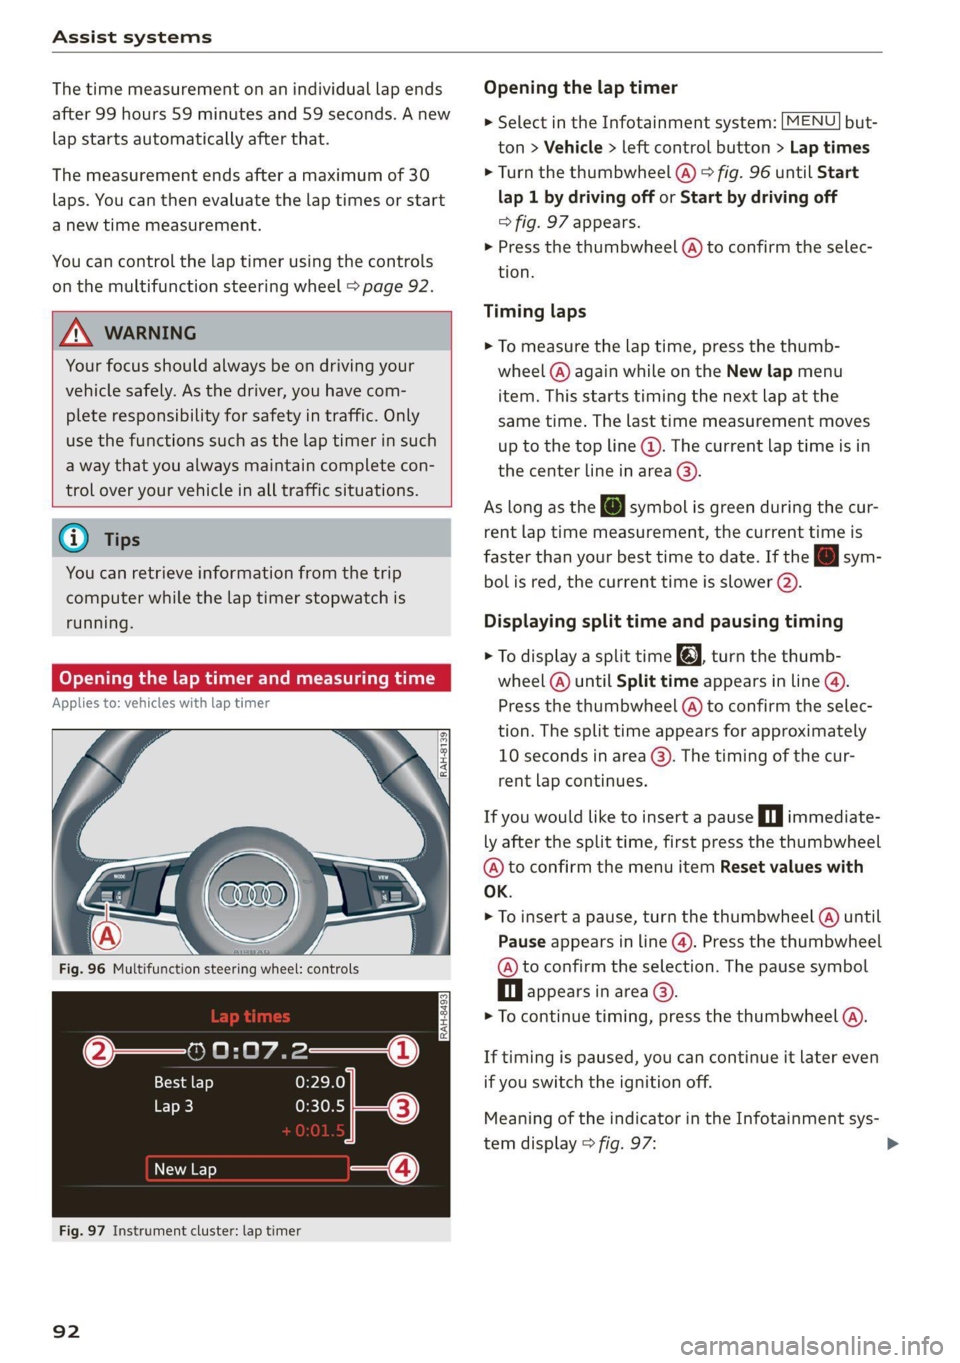
Fig. 96 Multifunction steering wheel: controls
RAH-8493
@— 0:07.2——_@
Best lap 0:29.0
To} 0:30.5
New Lap
Fig. 97 Instrument cluster: lap timer
92
Opening the lap timer
> Select in the Infotainment system: [MENU] but-
ton > Vehicle > left control button > Lap times
> Turn the thumbwheel (@) > fig. 96 until Start
lap 1 by driving off or Start by driving off
> fig. 97 appears.
> Press the thumbwheel (@) to confirm the selec-
tion.
Timing laps
> To measure the lap time, press the thumb-
wheel (@) again while on the New lap menu
item. This starts timing the next lap at the
same time. The last time measurement moves
up to the top line @). The current lap time is in
the center line in area @).
As
long as the J symbol is green during the cur-
rent lap time measurement, the current time is
faster than your best time to date. If the [J sym-
bol is red, the current time is slower ©.
Displaying split time and pausing timing
> To display a split time @, turn the thumb-
wheel (@) until Split time appears in line @.
Press the thumbwheel (@) to confirm the selec-
tion. The split time appears for approximately
10 seconds in area @). The timing of the cur-
rent lap continues.
If you would like to insert a pause Oi immediate-
ly after the split time, first press the thumbwheel
@ to confirm the menu item Reset values with
OK.
> To insert a pause, turn the thumbwheel (@) until
Pause appears in line (@). Press the thumbwheel
@ to confirm the selection. The pause symbol
DH appears in area.
> To continue timing, press the thumbwheel ().
If timing is paused, you can continue it later even
if you switch the ignition off.
Meaning of the indicator in the Infotainment sys-
tem display > fig. 97:
Page 95 of 280

8S1012721BB
Assist systems
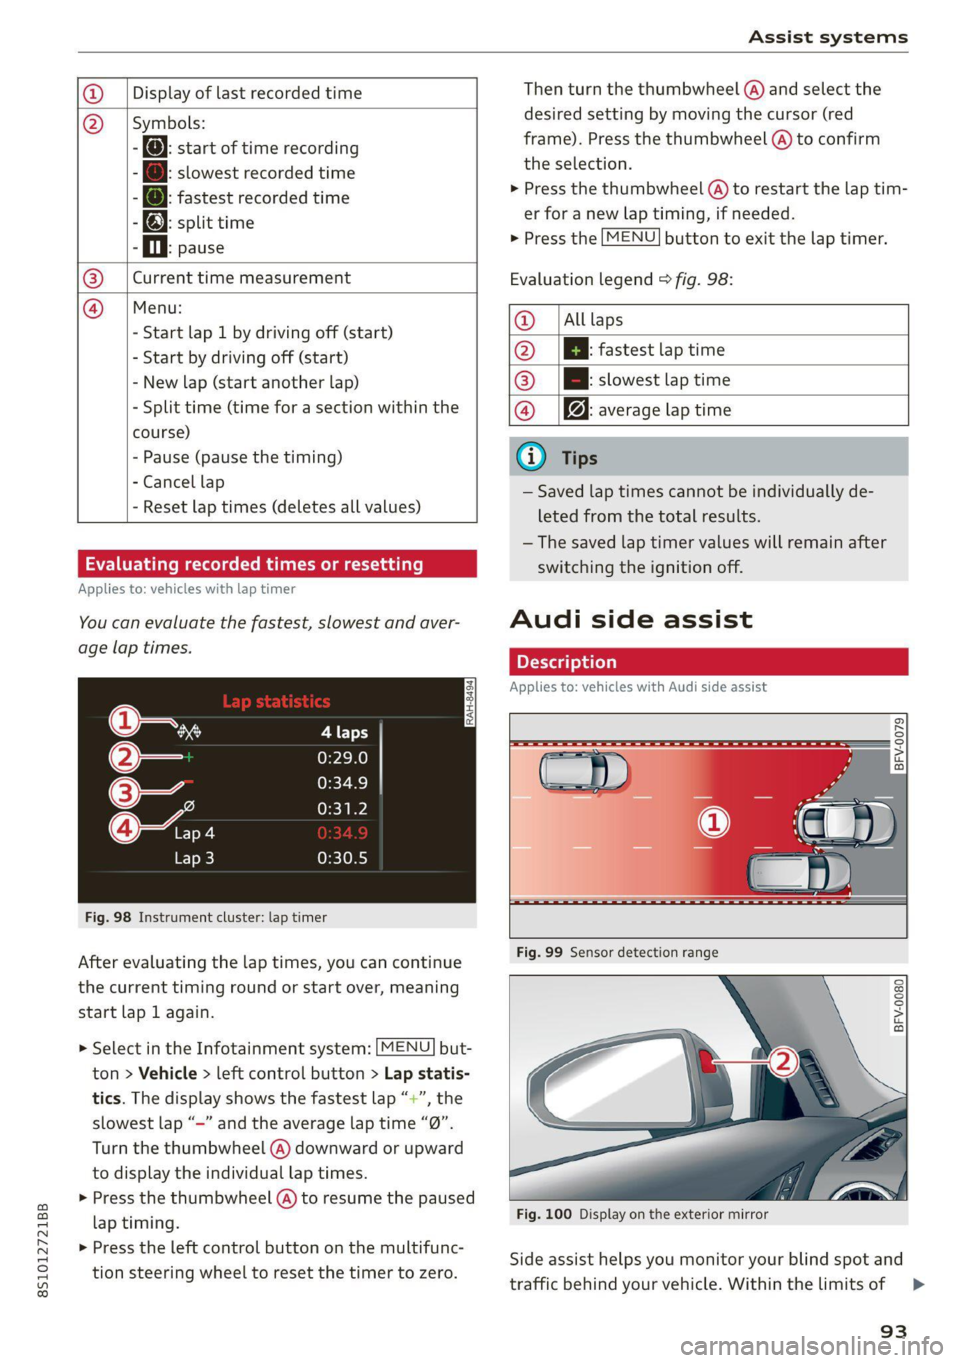
Display of last recorded time
O}{G) Symbols:
5 fe): start of time recording
- @: slowest recorded time
ei @: fastest recorded time
: fe): split time
- fl. pause
Current time measurement
Menu:
- Start lap 1 by driving off (start)
- Start by driving off (start)
- New lap (start another lap)
- Split time (time for a section within the
course)
- Pause (pause the timing)
- Cancel lap
- Reset lap times (deletes all values)
®|©
Evaluating recorded times or resetting
Applies to: vehicles with lap timer
You can evaluate the fastest, slowest and aver-
age lap times.
Fig. 98 Instrument cluster: lap timer
After evaluating the lap times, you can continue
the current timing round or start over, meaning
start lap 1 again.
> Select in the Infotainment system: [MENU] but-
ton > Vehicle > left control button > Lap statis-
tics. The display shows the fastest lap “+”, the
slowest lap “-” and the average lap time “0”.
Turn the thumbwheel (@) downward or upward
to display the individual lap times.
> Press the thumbwheel (@) to resume the paused
lap timing.
> Press the left control button on the multifunc-
tion steering wheel to reset the timer to zero.
Then turn the thumbwheel @) and select the
desired setting by moving the cursor (red
frame). Press the thumbwheel @ to confirm
the selection.
> Press the thumbwheel (@) to restart the lap tim-
er for a new lap timing, if needed.
> Press the [MENU] button to exit the lap timer.
Evaluation legend © fig. 98:
@ |Alllaps
@ |[EB fastest lap time
@® |[Bh slowest lap time
@ Bq: average lap time
@) Tips
— Saved lap times cannot be individually de-
leted from the total results.
— The saved lap timer values will remain after
switching the ignition off.
Audi side assist
Applies to: vehicles with Audi side assist
BFV-0079
BFV-0080
Fig. 100 Display on the exterior mirror
Side assist helps you monitor your blind spot and
traffic behind your vehicle. Within the limits of =>
93