2020 AUDI TT COUPE turn signal
[x] Cancel search: turn signalPage 78 of 280
![AUDI TT COUPE 2020 Owners Manual Driving
Stopping the engine
> Bring the vehicle to a full stop.
> Press the [START ENGINE STOP] button.
Emergency off function*
If it is absolutely necessary, the engine can also
be AUDI TT COUPE 2020 Owners Manual Driving
Stopping the engine
> Bring the vehicle to a full stop.
> Press the [START ENGINE STOP] button.
Emergency off function*
If it is absolutely necessary, the engine can also
be](/manual-img/6/57658/w960_57658-77.png)
Driving
Stopping the engine
> Bring the vehicle to a full stop.
> Press the [START ENGINE STOP] button.
Emergency off function*
If it is absolutely necessary, the engine can also
be turned off while driving at speeds starting at
4 mph (7 km/h). To stop the engine, press the
START ENGINE STOP] button twice in a row or
press and hold it one time.
Z\ WARNING
— Never turn off the engine before the vehicle
has come to a complete stop. Switching it
off before the vehicle has stopped may im-
pair the function of the brake booster and
power steering. You may need to use more
force when braking or steering. Because you
cannot brake and steer as you usually would,
this could lead to accidents and serious inju-
ries.
— If you leave the vehicle, switch the ignition
off and take the vehicle key with you. If you
do not do this, the engine could be started
and electrical equipment such as the power
windows could be activated. This can lead to
serious injuries.
— For safety reasons, always park the vehicle
with the selector lever in the P position.
Otherwise, there is the risk that the vehicle
could roll unintentionally.
@) Note
If the engine has been under heavy load for
an extended period of time, heat builds up in
the engine compartment after the engine is
switched off and there is a risk of damaging
the engine. For this reason, let the engine run
at idle for approximately two minutes before
shutting it off.
@) Tips
For up to 10 minutes after stopping the en-
gine, the radiator fan may turn on again auto-
matically or it may continue to run, even if the
ignition is switched off.
76
Messages
Pressing the start/stop button again will switch
off the engine
This message appears when you press the
START ENGINE STOP] button while driving.
Engine start system: malfunction! Please con-
tact Service
The engine automatic start system has a mal-
function. Drive immediately to an authorized
Audi dealer or authorized Audi Service Facility to
have the malfunction repaired. To start the en-
gine, press and hold the |START ENGINE STOP
button.
Remote control key: hold back of key
against the designated area. See owner's man-
ual
This message appears if there is no convenience
key inside the vehicle or if the system does not
recognize the key. The convenience key may not
be recognized, for example, if it is covered by an
object that disrupts the signal (such as a brief-
case), or if the key battery is weak. Electronic de-
vices such as cell phones can also interfere with
the signal.
To still be able to start or stop the engine, see
= page 77, Starting the engine when there is a
malfunction.
B Remote control key: key not detected. Is the
key
still in the vehicle?
The B indicator light turns on and this message
appears if the convenience key was removed from
the vehicle when the engine was running. If the
convenience key is no longer in the vehicle, you
cannot switch the ignition on or start the engine
once you stop it. You also cannot lock the vehicle
from the outside.
Please press the brake pedal
This message appears if you do not press the
brake pedal when starting the engine.
Please select N or P
Page 91 of 280
8S1012721BB
Assist systems
Switching the system off
Applies to: vehicles with cruise control system
When you switch the system off completely, the
cruise control speed will be deleted.
Requirement: the system must be switched on.
> To switch the system off, press the lever toward
@ (locked into place) > page 88, fig. 92, or
> Switch the ignition off.
Applies to: vehicles with cruise control system
ICRUISE| / 3) Speed control system: currently un-
available. See owner's manual
If the indicator light turns on and this message
appears, the cruise control system has been deac-
tivated. There is a temporary malfunction, for ex-
ample the brakes are overheating. Switch the
cruise control system on again later.
Audi active lane assist
Applies to: vehicles with Audi active lane assist
Active lane assist detects lane marker lines with-
in the limits of the system using a camera in the
windshield. If you are approaching a detected
lane marker line and it appears likely that you
will leave the lane, the system will warn you with
corrective steering. You can override this steering
at any time. If you pass over a line, the steering
wheel will vibrate lightly. In order for this warn-
ing vibration to occur, it must first be switched
on in the Infotainment system. Active lane assist
is ready for operation when the lane marker line
is detected on at least one side of the vehicle.
The system is designed for driving on express-
ways and highways and so it only activates at
speeds above approximately 40 mph (65 km/h)
(depending on the market).
Applies to vehicles with side assist*: If you acti-
vate a turn signal when active lane assist is ready
and it classifies a lane change as critical because
D_ The corrective steering function is not available in all mar-
kets.
of vehicles traveling alongside you or approach-
ing you, there will be noticeable corrective steer-
ing shortly before you leave the lane. This will at-
tempt to keep your vehicle in the lane.
Applies to vehicles without side assist*: When
the system is ready, it will not warn you if you ac-
tivate the turn signal before crossing the lane
marker line. In this case, it assumes that you are
changing lanes intentionally.
Z\ WARNING
— The system warns the driver that the vehicle
is leaving the lane using corrective steering.
The
driver is always responsible for keeping
the vehicle within the lane.
— The system can assist the driver in keeping
the vehicle in the lane, but it does not drive
by itself. Always keep your hands on the
steering wheel.
— Corrective steering may not occur in certain
situations, such as during heavy braking.
— There may be cases where the camera does
not recognize all lane marker lines. Correc-
tive steering can only take place on the side
of the vehicle where lane marker lines are
detected.
— Other road structures or objects could possi-
bly be identified unintentionally as lane
marker lines. As a result, corrective steering
may be unexpected or may not occur.
— The camera view can be restricted, for exam-
ple by vehicles driving ahead or by rain,
snow, heavy spray light shining into the
camera or by dirt on the window. This can
result in active lane assist not detecting the
lane marker lines or detecting them incor-
rectly.
— In certain situations where visibility is low,
the vehicle may switch internally from “ear-
ly” to “late” steering correction )).
— Under certain conditions such as ruts in the
road, an inclined roadway or crosswinds, the
corrective steering alone may not be enough
to keep the vehicle in the middle of the lane.
89
Page 92 of 280
Assist systems
— For safety reasons, active lane assist must
not be used when there are poor road and/or
weather conditions such as slippery roads,
fog, gravel, heavy rain, snow and the poten-
tial for hydroplaning. Using active lane as-
sist under these conditions may increase the
risk of a crash.
Switching on/off
Applies to: vehicles with Audi active lane assist
B8V-0692
Fig. 93 Turn signal lever: button for active lane assist (ex-
ample)
ig
84M-0090
Fig. 94 Windshield: camera window for active lane assist
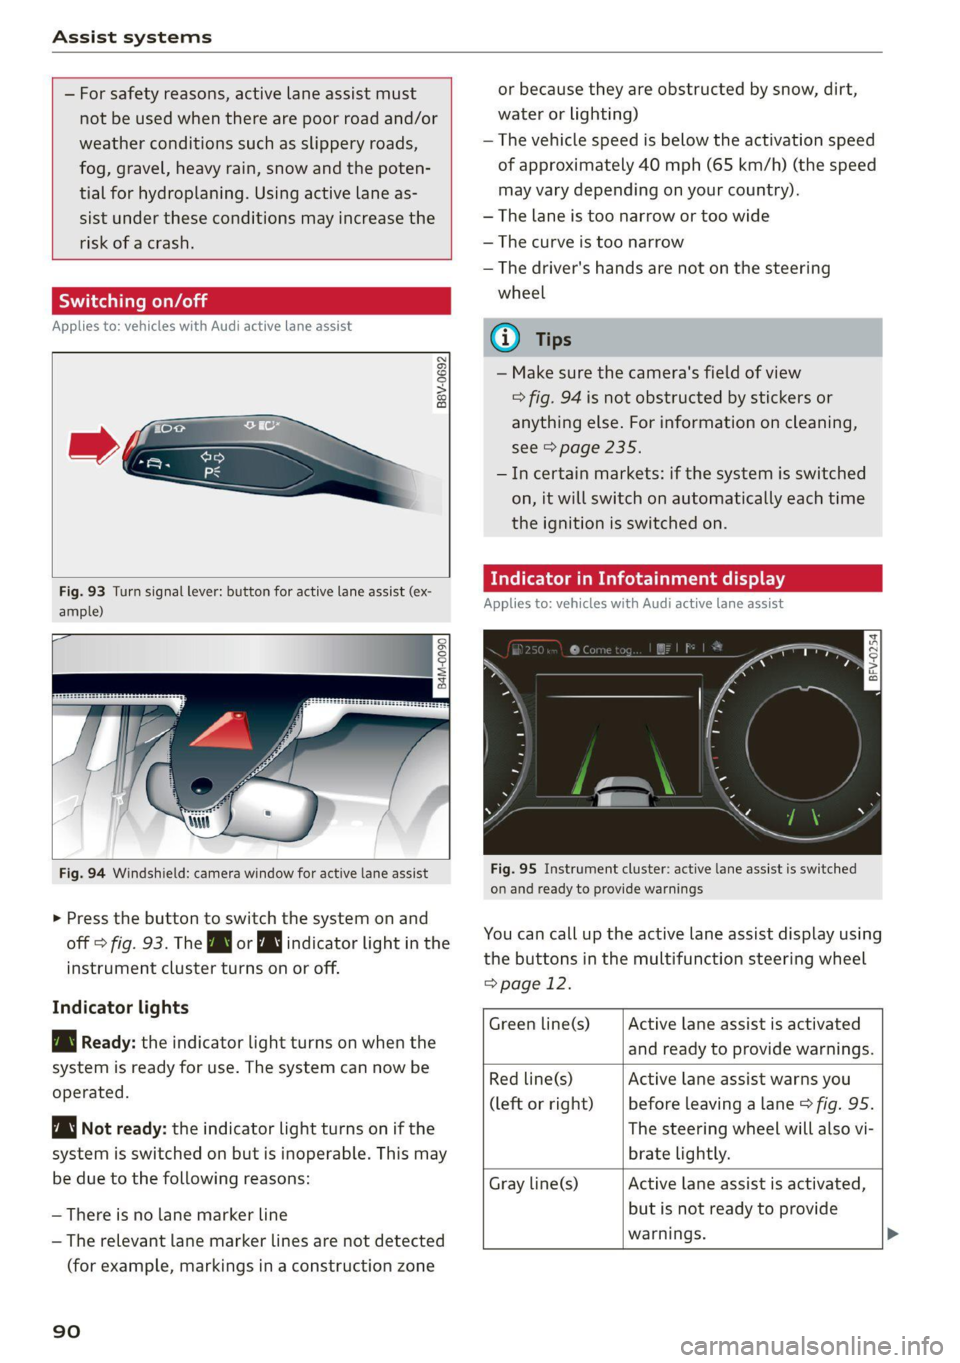
> Press the button to switch the system on and
off > fig. 93. The Bg or WJ indicator light in the
instrument cluster turns on or off.
Indicator lights
B Ready: the indicator light turns on when the
system is ready for use. The system can now be
operated.
Not ready: the indicator light turns on if the
system is switched on but is inoperable. This may
be due to the following reasons:
— There is no lane marker line
— The relevant lane marker lines are not detected
(for example, markings in a construction zone
90
or because they are obstructed by snow, dirt,
water or lighting)
— The vehicle speed is below the activation speed
of approximately 40 mph (65 km/h) (the speed
may vary depending on your country).
— The lane is too narrow or too wide
— The curve is too narrow
— The driver's hands are not on the steering
wheel
@) Tips
— Make sure the camera's field of view
=> fig. 94 is not obstructed by stickers or
anything else. For information on cleaning,
see > page 235.
—Incertain markets: if the system is switched
on, it will switch on automatically each time
the ignition is switched on.
dicator in Infotainment display
Applies to: vehicles with Audi active lane assist
Fig. 95 Instrument cluster: active lane assist is switched
on and ready to provide warnings
You can call up the active lane assist display using
the buttons in the multifunction steering wheel
=> page 12.
Active lane assist is activated
and ready to provide warnings.
Green line(s)
Red line(s)
(left or right)
Active lane assist warns you
before leaving a lane > fig. 95.
The steering wheel will also vi-
brate lightly.
Active lane assist is activated,
but is not ready to provide
warnings. >
Gray line(s)
Page 96 of 280
Assist systems
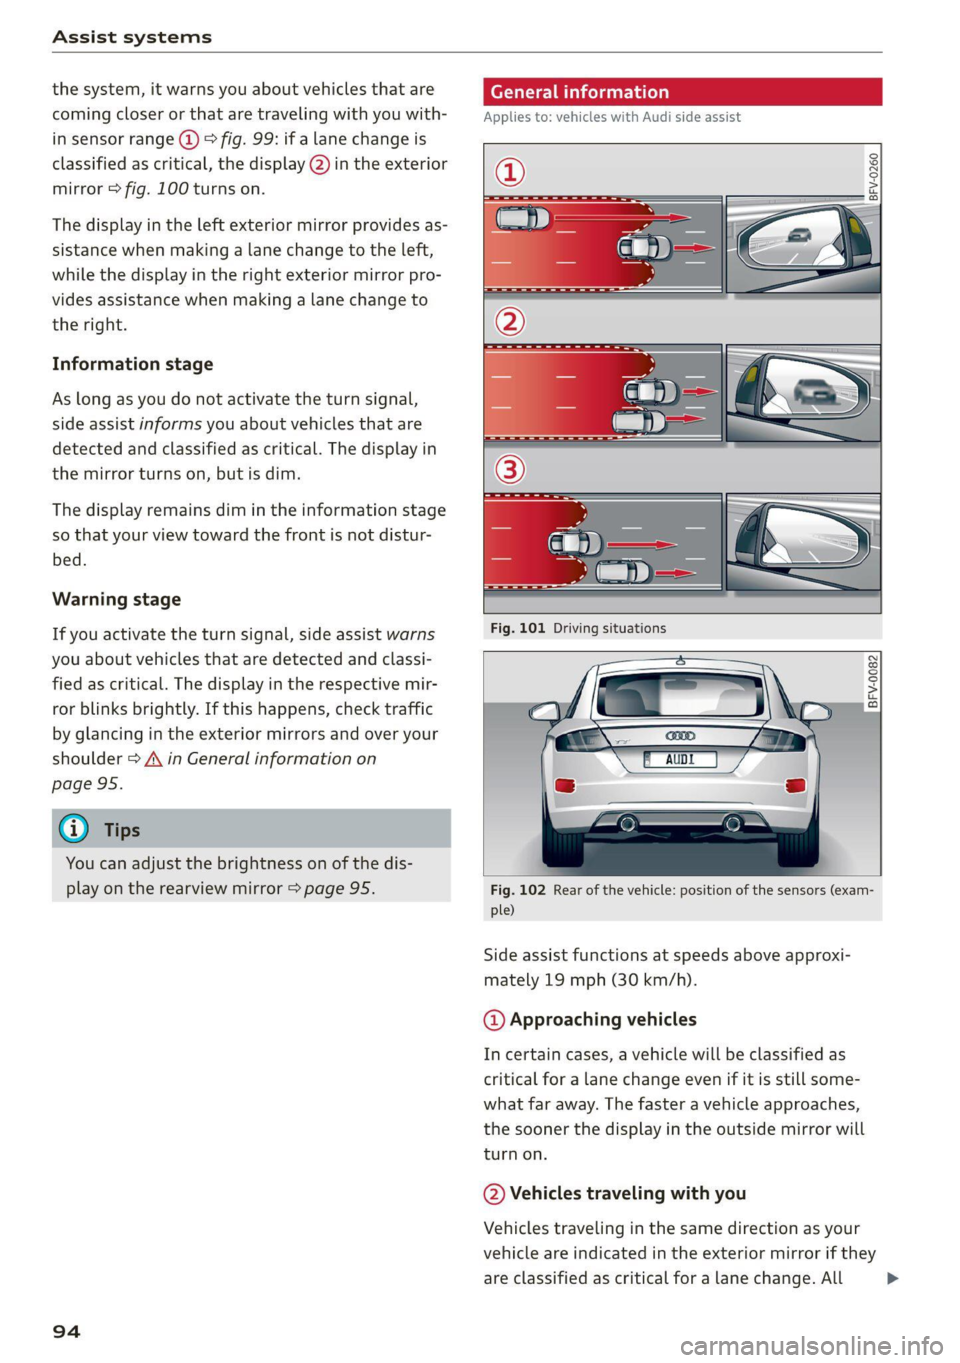
the system, it warns you about vehicles that are
coming closer or that are traveling with you with-
in sensor range @) > fig. 99: if a lane change is
classified as critical, the display @) in the exterior
mirror > fig. 100 turns on.
The display in the left exterior mirror provides as-
sistance when making a lane change to the left,
while the display in the right exterior mirror pro-
vides assistance when making a lane change to
the right.
Information stage
As long as you do not activate the turn signal,
side assist informs you about vehicles that are
detected and classified as critical. The display in
the mirror turns on, but is dim.
The display remains dim in the information stage
so that your view toward the front is not distur-
bed.
Warning stage
If you activate the turn signal, side assist warns
you about vehicles that are detected and classi-
fied as critical. The display in the respective mir-
ror blinks brightly. If this happens, check traffic
by glancing in the exterior mirrors and over your
shoulder > A\ in General information on
page 95.
@ Tips
You can adjust the brightness on of the dis-
play on the rearview mirror > page 95.
94
General information
Applies to: vehicles with Audi side assist
BFV-0260
BFV-0082
Fig. 102 Rear of the vehicle: position of the sensors (exam-
ple)
Side assist functions at speeds above approxi-
mately 19 mph (30 km/h).
@ Approaching vehicles
In certain cases, a vehicle will be classified as
critical for a lane change even if it is still some-
what far away. The faster a vehicle approaches,
the sooner the display in the outside mirror will
turn on.
@ Vehicles traveling with you
Vehicles traveling in the same direction as your
vehicle are indicated in the exterior mirror if they
are classified as critical for a lane change. All >
Page 103 of 280

8S1012721BB
Parking aid
Switching on and off
Applies to: vehicles with parking system plus
BFV-0209
Fig. 106 Center console: parking aid button
Fig. 107 Optical distance display
Switching on
> Shift into reverse, or
> Press the P1 button in the center console
=> fig. 106. A short confirmation tone sounds
and the LED in the button turns on.
Switching off
> Drive faster than 6 mph (10 km/h), or
> Press the P button, or
> Switch the ignition off.
Activating automatically
The parking aid is activated automatically at
speeds less than 6 mph (10 km/h) and when ap-
proaching an obstacle from approximately
3.1 feet (95 cm) away. There are audible signals
when approximately 1.6 ft (SO cm) away from the
obstacle. If you press the Pa button to switch the
parking aid off, it can only be reactivated auto-
matically when one of the following conditions is
met:
— The vehicle speed exceeds 6 mph (10 km/h)
— The ignition is switched off and back on again
— The parking brake is set and then released
— The selector lever must be in the "P" position.
Segments in the visual display
The segments in front of and behind the vehicle
(vehicles with parking system plus”) > fig. 107
help you to determine the distance between your
vehicle and an obstacle. The red lines mark the
expected direction of travel according to the
steering angle. A white segment indicates an
identified obstacle that is outside of the vehicle's
path. Red segments show identified obstacles
that are in your vehicle's path. As your vehicle
comes closer to the obstacle, the segments move
closer to the vehicle. The collision area has been
reached when the next to last segment is dis-
played. Obstacles in the collision area, including
those outside of the vehicle's path, are shown in
red. Do not continue driving forward or in reverse
= A in Introduction on page 99, >@ in Intro-
duction on page 99!
Rearview camera
roduction
Applies to: vehicles with rearview camera
B8V-0629
Fig. 108 Diagram: lines to aid in parking
The rearview camera helps you to park or maneu-
ver using the orientation lines.
101
Page 105 of 280

8S1012721BB
Parking aid
> Switch the ignition off.
@ Tips
— The visual display in the left part of the dis-
play should help you detect the critical vehi-
cle areas.
— You can change the volume of the signals
and the display > page 103.
leet hms L are)
Applies to: vehicles with rearview camera
This view may be used when parking in a garage
or ina parking space.
cS ale
ds. Look! Safe to move?
Fig. 112 Infotainment system: aligning the vehicle
> Turn the Infotainment system on and shift into
reverse gear.
> The orange orientation lines @ show the vehi-
cle's direction of travel. Turn the steering wheel
until the orange orientation lines align with the
parking space fig. 111. Use the markings @
to help you estimate the distance to an obsta-
cle. Each marking represents approximately 3
feet (1 meter). The blue area represents an ex-
tension of the vehicle's outline by approximate-
ly 16 feet (S meters) to the rear.
> While driving in reverse gear, adjust the steer-
ing wheel angle to fit the parking space using
the orange orientation lines for assistance > /\.
in General information on page 102, >@) in
General information on page 102. Area @) rep-
resents the rear bumper. At the very latest,
stop the vehicle when the red orientation line
@ borders an object.
Adjusting the display
and the warning tones
Applies to: vehicles with parking system plus
The display and warning tones can be adjusted in
the Infotainment.
> Select in the Infotainment system: [MENU] but-
ton > Vehicle > left control button > Driver as-
sistance > Parking aid.
Signal tones
Front volume - Volume for the front area
Rear volume - Volume for the rear area
Entertainment fader - The volume of the audio/
video source is lowered when the parking system
is turned on
1@) Tips
—The settings are automatically stored and
assigned to the remote control key that is in
use.
— The new level is demonstrated briefly* when
the volume is adjusted.
Error messages
Applies to: vehicles with rear parking system/parking system
plus
Rear parking aid: malfunction! Obstacles cannot
be detected
Parking aid: malfunction! Obstacles cannot be
detected
There is a system malfunction if the LED in the
Pya button blinks when switching on the system.
If the error is not corrected before you switch off
the ignition, the LED in the P button will blink
the
next time you switch on the parking system
by shifting into reverse. As long as the error is
103
Page 113 of 280
8S1012721BB
Multi Media Interface
Multi Media Interface
Traffic safety
information
Audi recommends performing certain Infotain-
ment system functions, such as entering a desti-
nation, only when the vehicle is stationary. Al-
ways be prepared to stop operating the Infotain-
ment system in the interest of your safety and
the safety of other road users.
Z\ WARNING
Only use the Infotainment system when road,
traffic, weather, and visibility conditions per-
mit and always in a way that allows you to
maintain complete control over your vehicle.
@) Tips
Certain functions are not available while driv-
ing.
Introduction
[RAH-8837,
Fig. 115 MMI control panel: Overview
The Multi Media Interface, or MMI for short,
combines various systems for communication,
navigation* and entertainment in your Audi. You
can operate the MMI using the MMI control pan-
el, the multifunction steering wheel or the voice
recognition system*.
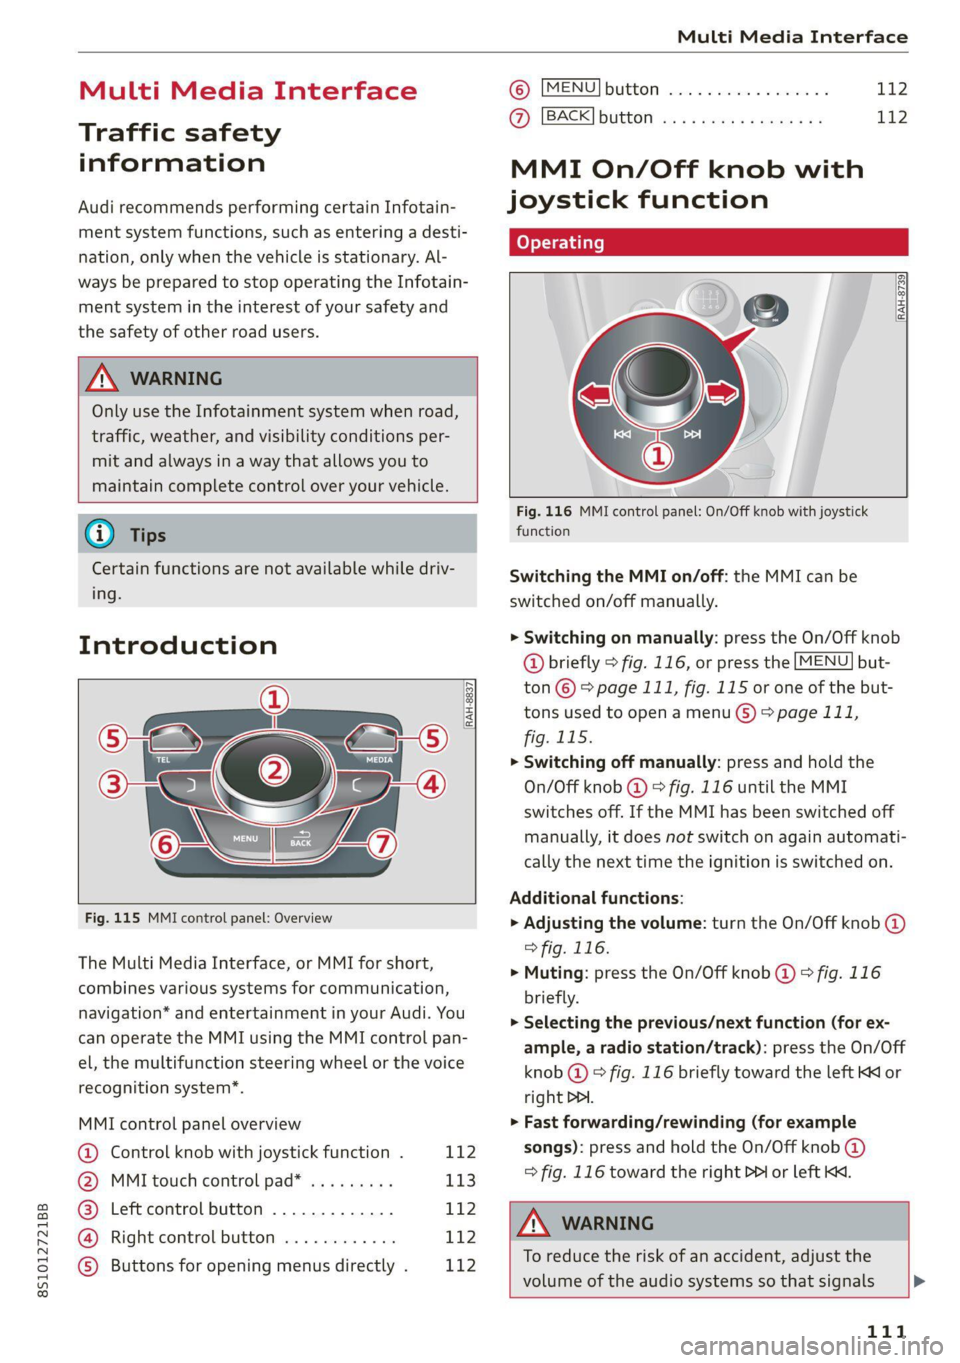
MMI control panel overview
@ Control knob with joystick function . 112
@ MMI touch control pad* ......... 113
@® Left control button ............. 112
@ Right control button ............ 112
© Buttons for opening menus directly . L142
(B) [MENU] button socscc co escvon ov comers «5
@ [BACK] button ............0.0..
MMI On/Off knob with
joystick function
fo} oy-e- 1 |
[RAH-8739]
Fig. 116 MMI control panel: On/Off knob with joystick
function
Switching the MMI on/off: the MMI can be
switched on/off manually.
> Switching on manually: press the On/Off knob
@ briefly > fig. 116, or press the [MENU] but-
ton © > page 111, fig. 115 or one of the but-
tons used to open a menu G) > page 111,
fig. 115.
> Switching off manually: press and hold the
On/Off knob @ © fig. 116 until the MMI
switches off. If the MMI has been switched off
manually, it does not switch on again automati-
cally the next time the ignition is switched on.
Additional functions:
> Adjusting the volume: turn the On/Off knob @
> fig. 116.
>» Muting: press the On/Off knob @ © fig. 116
briefly.
> Selecting the previous/next function (for ex-
ample, a radio station/track): press the On/Off
knob @ ® fig. 116 briefly toward the left KK or
right DDI.
> Fast forwarding/rewinding (for example
songs): press and hold the On/Off knob @)
=> fig. 116 toward the right D> or left KM.
ZX WARNING
To reduce the risk of an accident, adjust the
volume of the audio systems so that signals >
111
Page 116 of 280
Multi Media Interface
Requirement: it must be possible to enter text or
numbers and the symbol @) must appear in the
Infotainment system display.
> Initial entry: write an individual upper case or
lower case letter or number/symbol on the
MMI touch control pad using your finger. A
symbol that is recognized clearly by the system
is displayed in the Infotainment system display
@ © page 113, fig. 120, confirmed with an au-
dible signal if necessary, and transferred to the
input field.
> Entering spaces: move your finger across the
MMI touch control pad from left to right.
> Deleting characters: move your finger across
the MMI touch control pad from right to left.
> Deleting characters quickly: move your finger
quickly across the MMI touch control pad from
right to left.
> Selecting the input suggestion: press the con-
trol knob.
> Switching directly to the results list: turn the
control knob to the right.
> Opening the speller: select the right control
button > Open speller. Text or numbers are en-
tered using the speller > page 117.
114
Mite eerie
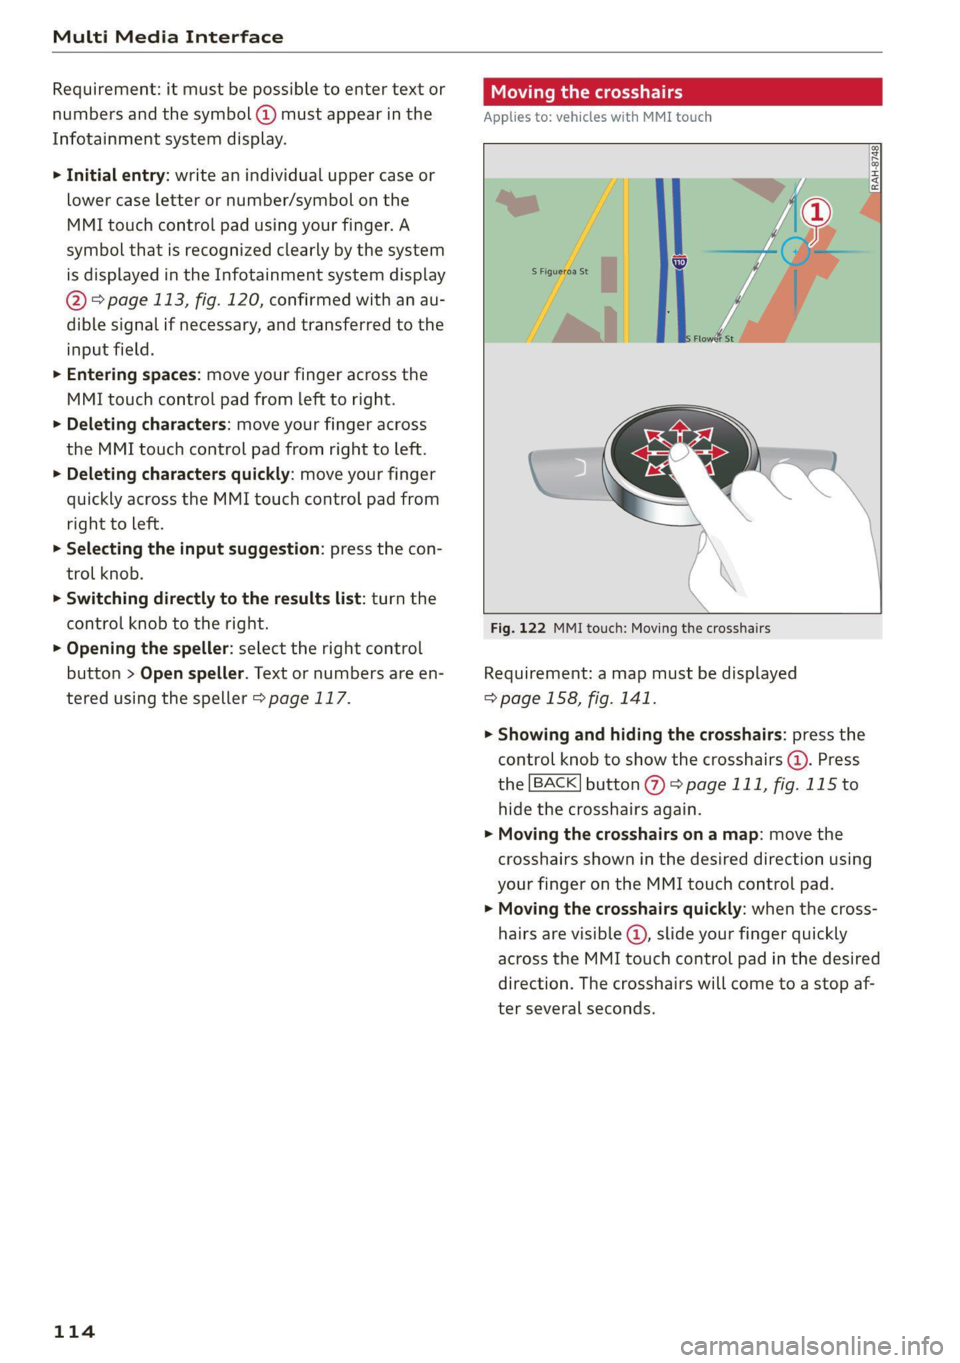
Applies to: vehicles with MMI touch
Fig. 122 MMI touch: Moving the crosshairs
Requirement: a map must be displayed
=> page 158, fig. 141.
> Showing and hiding the crosshairs: press the
control knob to show the crosshairs (@). Press
the [BACK] button %) > page 111, fig. 115 to
hide the crosshairs again.
> Moving the crosshairs on a map: move the
crosshairs shown in the desired direction using
your finger on the MMI touch control pad.
> Moving the crosshairs quickly: when the cross-
hairs are visible @, slide your finger quickly
across the MMI touch control pad in the desired
direction. The crosshairs will come to a stop af-
ter several seconds.