2020 AUDI Q7 sensor
[x] Cancel search: sensorPage 164 of 316

Parking and maneuvering
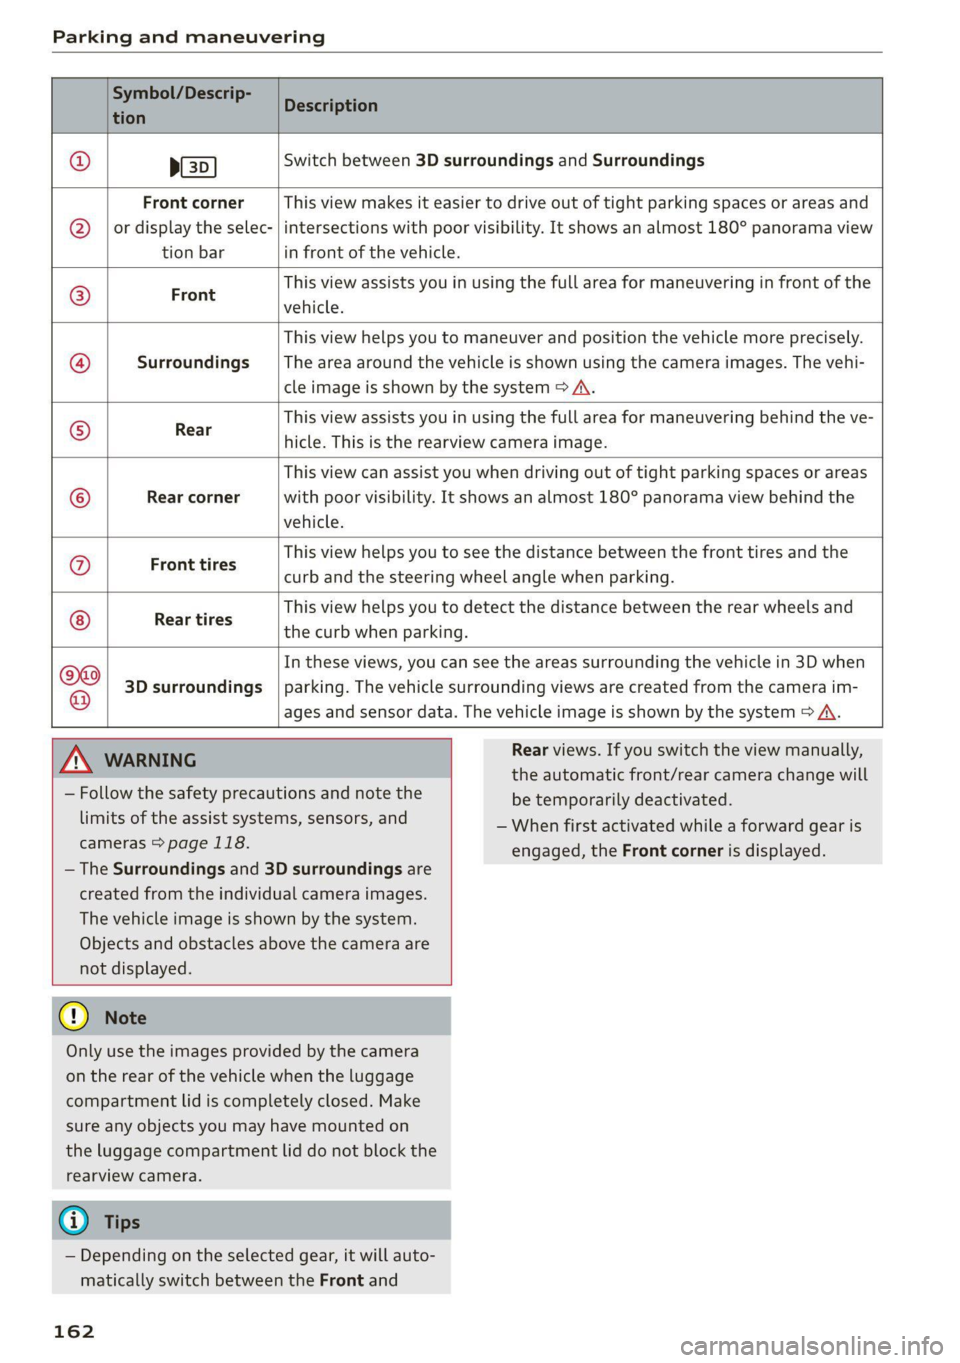
Symbol/Descrip-
tion
Description
psp
Switch between 3D surroundings and Surroundings
Front corner
or display the selec-
tion bar
This view makes it easier to drive out of tight parking spaces or areas and
intersections with poor visibility. It shows an almost 180° panorama view
in front of the vehicle.
Front
This view assists you in using the full area for maneuvering in front of the
vehicle.
Surroundings
This view helps you to maneuver and position the vehicle more precisely.
The area around the vehicle is shown using the camera images. The vehi-
cle image is shown by the system > A\.
Rear
This view assists you in using the full area for maneuvering behind the ve-
hicle. This is the rearview camera image.
Rear corner
This view can assist you when driving out of tight parking spaces or areas
with poor visibility. It shows an almost 180° panorama view behind the
vehicle.
Front tires
This view helps you to see the distance between the front tires and the
curb and the steering wheel angle when parking.
Rear tires
This view helps you to detect the distance between the rear wheels and
the curb when parking.
3D surroundings
In these views, you can see the areas surrounding the vehicle in 3D when
parking. The vehicle surrounding views are created from the camera im-
©f$;/@/e|
@
|o|/e
|e]
oe
|e
ages and sensor data. The vehicle image is shown by the system > A\.
Z\ WARNING
— Follow the safety precautions and note the
limits of the assist systems, sensors, and
cameras > page 118.
— The Surroundings and 3D surroundings are
created from the individual camera images.
The vehicle image is shown by the system.
Objects and obstacles above the camera are
not displayed.
@) Note
Only use the images provided by the camera
on the rear of the vehicle when the luggage
compartment lid is completely closed. Make
sure any objects you may have mounted on
the luggage compartment lid do not block the
rearview camera.
@) Tips
— Depending on the selected gear, it will auto-
matically switch between the Front and
162
Rear views. If you switch the view manually,
the automatic front/rear camera change will
be temporarily deactivated.
— When first activated while a forward gear is
engaged, the Front corner is displayed.
Page 165 of 316

4M1012721BA
Parking and maneuvering
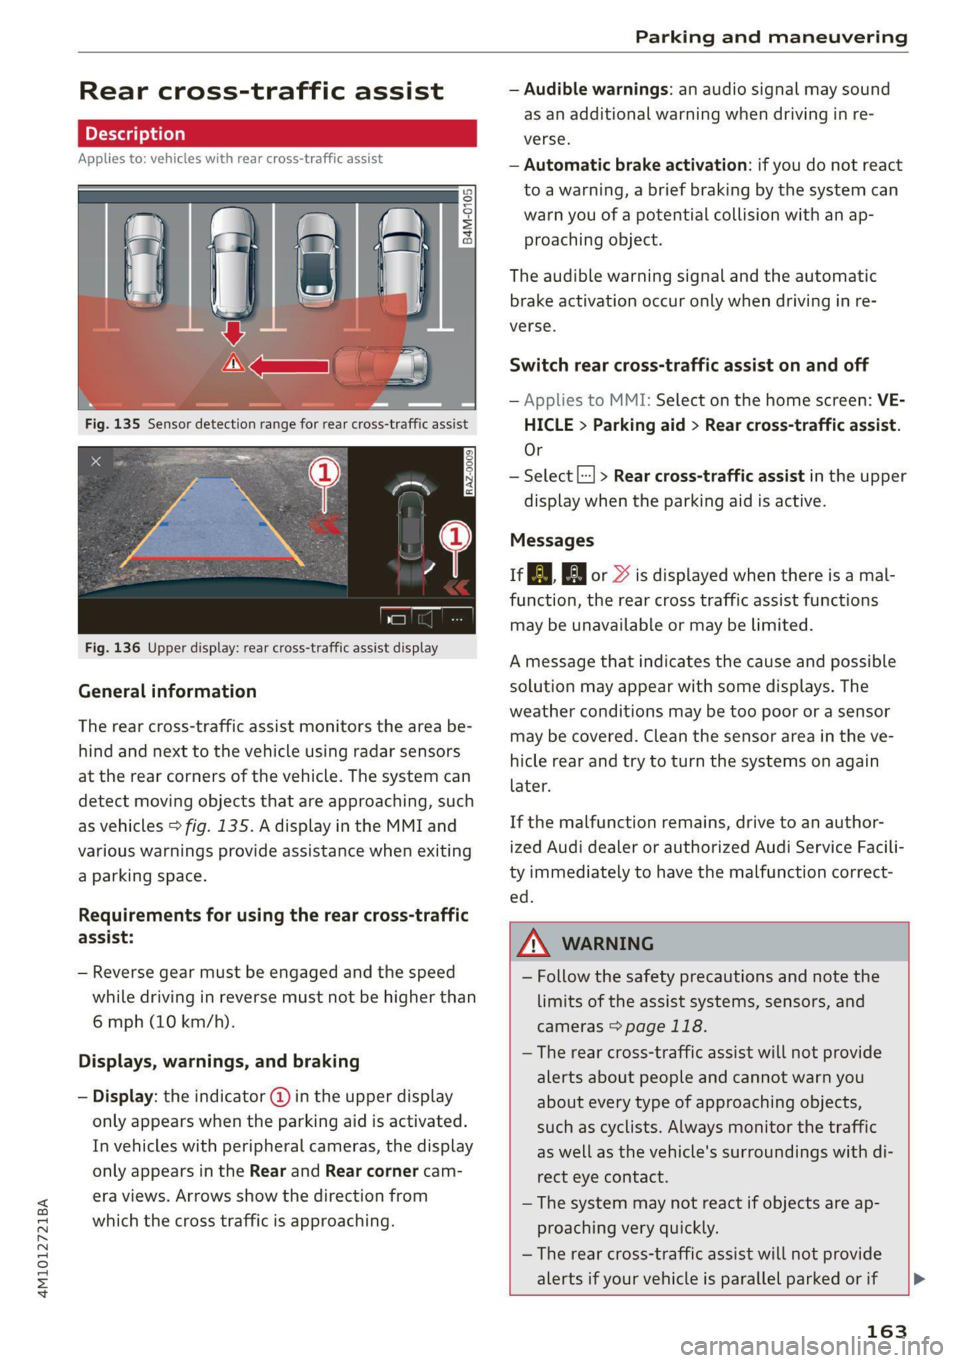
Rear cross-traffic assist
Applies to: vehicles with rear cross-traffic assist
3 s
&
= st a
Fig. 136 Upper display: rear cross-traffic assist display
General information
The rear cross-traffic assist monitors the area be-
hind and next to the vehicle using radar sensors
at the rear corners of the vehicle. The system can
detect moving objects that are approaching, such
as vehicles > fig. 135. A display in the MMI and
various warnings provide assistance when exiting
a parking space.
Requirements for using the rear cross-traffic
assist:
— Reverse gear must be engaged and the speed
while driving in reverse must not be higher than
6 mph (10 km/h).
Displays, warnings, and braking
— Display: the indicator @ in the upper display
only appears when the parking aid is activated.
In vehicles with peripheral cameras, the display
only appears in the Rear and Rear corner cam-
era views. Arrows show the direction from
which the cross traffic is approaching.
— Audible warnings: an audio signal may sound
as an additional warning when driving in re-
verse.
— Automatic brake activation: if you do not react
to a warning, a brief braking by the system can
warn you of a potential collision with an ap-
proaching object.
The audible warning signal and the automatic
brake activation occur only when driving in re-
verse.
Switch rear cross-traffic assist on and off
— Applies to MMI: Select on the home screen: VE-
HICLE > Parking aid > Rear cross-traffic assist.
Or
— Select |--| > Rear cross-traffic assist in the upper
display when the parking aid is active.
Messages
re or >% is displayed when there is a mal-
function, the rear cross traffic assist functions
may be unavailable or may be limited.
A message that indicates the cause and possible
solution may appear with some displays. The
weather conditions may be too poor or a sensor
may be covered. Clean the sensor area in the ve-
hicle rear and try to turn the systems on again
later.
If the malfunction remains, drive to an author-
ized Audi dealer or authorized Audi Service Facili-
ty immediately to have the malfunction correct-
— Follow the safety precautions and note the
limits of the assist systems, sensors, and
cameras > page 118.
— The rear cross-traffic assist will not provide
alerts about people and cannot warn you
about every type of approaching objects,
such as cyclists. Always monitor the traffic
as well as the vehicle's surroundings with di-
rect eye contact.
— The system may not react if objects are ap-
proaching very quickly.
— The rear cross-traffic assist will not provide
alerts if your vehicle is parallel parked or if
163
Page 166 of 316

Parking and maneuvering
your vehicle is pulled too far into the park-
ing space so that it is hidden by adjacent
vehicles.
Gi) Tips
— Certain settings are stored automatically in
the active personal profile.
— Once an automatic brake activation occurs,
the system cannot initiate another activa-
tion for several seconds.
— System functions may not be available if the
ESC is limited or switched off, or if there is a
malfunction.
— If there is an acoustic warning signal from
the rear cross-traffic assist, then the park-
ing aid may not warn you of detected obsta-
cles under certain circumstances.
— The system is not available when the vehicle
detects that you are towing a trailer. There
is no guarantee the functions will be deacti-
vated when using a retrofitted trailer hitch.
Do not use these functions when towing a
trailer.
— For an explanation on conformity with the
FCC regulations in the United States and the
Industry Canada regulations, see
=> page 295.
— The coverage areas of the sensors > fig. 135
are diagrams and do not represent a true-
to-scale image of the sensor ranges.
164
Page 170 of 316

Telephone
braking maneuvers, which increases the risk
of
an accident. Store objects securely while
driving.
— The mobile device may become hot during
wireless charging. Pay attention to the tem-
perature of your mobile device and be care-
ful when removing it from the Audi phone
box.
— An alternating magnetic field is used for
wireless charging. Maintain a minimum dis-
tance of approximately 2.4 in (6 cm) to the
Audi phone box charging plate. The thresh-
olds for prolonged exposure at this distance
comply with ICNIRP1998. Therefore, inter-
actions such as irritation of sensory organs,
malfunctions of active implants (such as
pacemakers, infusion pumps, or neurosti-
mulators) or effects on passive implants
(such as prosthetic limbs) is highly unlikely.
If you have an implant, consult a medical
specialist if you have any questions. You can
also switch the function for wireless charg-
ing in the Audi phone box on and off. You
can continue to charge your mobile device
using a cable connection.
@) Note
Applicable to U.S.A.
Operation of the Audi phone box is subject to
the following requirements of the Federal
Communications Commission:
— This is a CONSUMER device.
— BEFORE USE, you MUST REGISTER THIS DE-
VICE with your wireless provider and have
your provider’s consent. Most wireless pro-
viders consent to the use of signal boosters.
Some providers may not consent to the use
of this device on their network. If you are
unsure, contact your service provider.
— You MUST operate this device with approved
antennas and cables as specified by the
manufacturer. Antennas MUST be installed
at least 20 cm (8 inches) from any person.
— You MUST cease operating this device im-
mediately if requested by the FCC or a li-
censed wireless service provider.
168
— WARNING: E911 location information may
not be provided or may be inaccurate for
calls served by using this device.
C) Note
Applicable to Canada
In Canada, operation of a Zone Enhancer,
such as an Audi Phone Box, is subject to the
following requirements of the Innovation,
Science and Economic Development Canada
(ISED):
— This is a CONSUMER device.
— BEFORE USE, you MUST meet all require-
ments set out in CPC-2-1-05.
— You MUST operate this device with approved
antennas
and cables as specified by the
manufacturer. Antennas MUST NOT be in-
stalled within 20 cm of any person.
— You MUST cease operating this device im-
mediately if requested by ISED or a licensed
wireless service provider.
— WARNING: £911 location information may
not be provided or may be inaccurate for
calls served by using this device.
@ Tips
— Only one mobile device at a time can be
charged wirelessly in the Audi phone box.
— Strong transmission quality* cannot be
guaranteed if more than one mobile device
is in the box.
— To reduce the risk of malfunctions, make
sure the mobile device is positioned correct-
ly in the Audi phone box.
— Make sure there are no objects between the
Audi phone box and the mobile device.
— Placing the mobile device in a bag or protec-
tive sleeve inside the Audi phone box can in-
terfere with the connection to the external
antenna”*.
— Metallic objects in the Audi phone box block
the wireless charging of your mobile device
and calls made using the exterior antenna”*.
—The maximum charging output is 5 W.
—The charging time and temperature will vary
depending on the mobile device being used. >
Page 238 of 316

Checking and Filling
Engine oil
If the engine oil level is too low
If you need to add engine oil, use an oil that is
listed on the sticker. The sticker is located at the
front of the engine compartment > page 235,
fig. 166.
If the recommended engine oil is not available, in
an emergency you may add a maximum of 1
quart (1 liter) of ACEA C3 or API SN engine oil
one time until the next oil change.
For more information on the correct engine oil
for your vehicle, contact an authorized Audi deal-
er or authorized Audi Service Facility. Have the oil
changed by an authorized Audi dealer or author-
ized Service Facility.
Audi recommends
Sbastrol/ ZIOGE Prarzssional
Audi recommends using the LongLife high-per-
formance engine oil from Audi Genuine Parts.
Messages
Engine oil pressure
& Turn off engine. Oil pressure too low
Stop driving and switch the engine off. Check the
engine oil level > page 237.
—If the engine oil level is too low, add engine oil
=> page 237. Only continue driving once the in-
dicator light turns off.
— If the engine oil level is correct and the indica-
tor light still turns on, turn the engine off and
do not continue driving. See an authorized Audi
dealer or authorized Audi Service Facility for as-
sistance.
Engine oil level
& Please add oil immediately
Stop driving and switch the engine off. Check the
engine oil level > page 237 and add engine oil
immediately > page 237.
EE Please add max. x qt (x ) oil. You can con-
tinue driving
236
Add the amount of oil shown immediately
=> page 237.
Reducing the oil level
2 Please reduce oil level
There is too much oil in the engine and there is a
risk of damaging the catalytic converter or en-
gine. Drive to an authorized Audi dealer or au-
thorized Audi Service Facility immediately to have
engine oil extracted if necessary. Avoid high en-
gine speeds, full acceleration, and heavy engine
loads.
Engine oil sensor
& Oil level sensor: oil change necessary. Please
contact Service
Fuel has entered the engine oil. This will cause
the engine oil level to rise slowly and the engine
oil quality to decrease. Do not extract engine oil
to reduce the level, because this will increase the
risk of engine damage. Drive to an authorized
Audi dealer or authorized Audi Service Facility im-
mediately to have engine oil extracted.
B Oil level system: malfunction! Please con-
tact Service
The sensor that checks the engine oil level has
malfunctioned. Drive immediately to an author-
ized Audi dealer or authorized Audi Service Facili-
ty to have the malfunction repaired.
& Oil pressure sensor: malfunction! Please
contact Service
The sensor that checks the engine oil pressure
has malfunctioned. Drive immediately to an au-
thorized Audi dealer or authorized Audi Service
Facility to have the malfunction repaired.
Engine warm-up request
i Please drive to warm up engine
Fuel has entered the engine oil, either due to low
outside temperatures or frequent short drives.
Drive until the engine is warm so that the fuel in
the engine oil will evaporate. Avoid high engine
speeds, full accelerating, and heavy engine loads
when doing this.
Page 263 of 316

4M1012721BA
Wheels
ZA\ WARNING
Wheel bolts that are tightened or repaired in-
correctly can become loose and result in loss
of vehicle control, which increases the risk of
an accident. For the correct tightening specifi-
cation, see > page 278, Finishing.
— Always keep the wheel bolts and the threads
in the wheel hub clean and free of grease.
— Only use wheel bolts that fit the rim.
— Always have damaged rims repaired by an
authorized Audi dealer or authorized Audi
Service Facility. Never repair or disassemble
rims yourself, because this increases the risk
of an accident.
Loose wheel warning
Applies to: vehicles with loose wheel warning
Within the limits of the system, the loose wheel
warning in the instrument cluster warns you if
one or more wheels are loose.
Using the ABS sensors, the loose wheel warning
system compares the vibration characteristics of
the individual tires. If one or more wheels are
loose, it will be indicated in the instrument clus-
ter display with the fi indicator light and a mes-
sage. If only one wheel is affected, the location
of that wheel will be indicated.
Messages
fi Wheel bolts loose. Please safely stop the ve-
hicle and check all wheel bolts!
Loose wheel warning for at least one wheel > A\.
Check the wheel bolts on all wheels with the
wheel wrench (vehicle tool kit). Have the tighten-
ing specification checked as soon as possible with
a torque wrench. Drive carefully until then. For
the correct tightening specification, see
=> page 278, Finishing.
fi Wheel assessment active. Please continue
driving carefully
After this message appears and you have checked
the wheel bolts, the assessment phase begins
when the vehicle is in motion. This may take sev-
eral minutes.
fi Loose wheel warning: malfunction! See
owner's manual
There is a system malfunction. Drive immediately
to an authorized Audi dealer or authorized Audi
Service Facility to have the malfunction repaired.
Z\ WARNING
Wheel bolts that are tightened incorrectly can
become loose and result in loss of vehicle con-
trol, which increases the risk of an accident.
— If a message appears, reduce your speed im-
mediately and avoid any hard steering or
braking maneuvers. Stop as soon as possible
and check the wheel bolts.
— Check your wheels for damage. Have the
damaged wheels checked and/or replaced
immediately by an authorized Audi dealer or
authorized Audi Service Facility.
— Under certain conditions (such as a sporty
driving style, winter conditions, or unpaved
roads), the message may be delayed.
— The driver is responsible for ensuring that
the wheels are attached correctly.
(i) Tips
— The loose wheel warning system can also
stop working when there is an ESC malfunc-
tion.
— Using snow chains may result in a system
malfunction.
Winter tires significantly improve the vehicle's
handling when driving in winter conditions. Be-
cause of their construction (width, compound,
tread pattern), summer tires provide less traction
on ice and snow.
> Use winter tires on all four wheels.
> Only use winter tires that are approved for your
vehicle.
>» Please note that the maximum permitted
speed may be lower with winter tires > A\ in
General information on page 246. An author-
ized Audi dealer or authorized Audi Service Fa-
cility can inform you about the maximum per-
mitted speed for your tires.
261
>
Page 266 of 316

Wheels
As an added safety feature, your vehicle has been
equipped with a tire pressure monitoring system
(TPMS) that illuminates a low tire pressure tell-
tale when one or more of your tires is significant-
ly under-inflated. Accordingly, when the low tire
pressure telltale illuminates, you should stop and
check your tires as soon as possible, and inflate
them to the proper pressure. Driving ona signifi-
cantly under-inflated tire causes the tire to over-
heat and can lead to tire failure. Under-inflation
also reduces fuel efficiency and tire tread life,
and may affect the vehicle's handling and stop-
ping
ability.
Please note that the TPMS is not a substitute for
proper tire maintenance, and it is the driver's re-
sponsibility to maintain correct tire pressure,
even if under-inflation has not reached the level
to trigger illumination of the TPMS low tire pres-
sure telltale.
Your vehicle has also been equipped with a TPMS
malfunction indicator to indicate when the sys-
tem is not operating properly. The TPMS mal-
function indicator is combined with the low tire
pressure telltale. When the system detects a
malfunction, the telltale will flash for approxi-
mately one minute and then remain continuously
illuminated. This sequence will continue upon
subsequent vehicle start-ups as long as the mal-
function exists.
When the malfunction indicator is illuminated,
the system may not be able to detect or signal
low tire pressure as intended. TPMS malfunctions
may occur for a variety of reasons, including the
installation of replacement or alternate tires or
wheels on the vehicle that prevent the TPMS
from functioning properly. Always check the
TPMS malfunction telltale after replacing one or
more tires or wheels on your vehicle to ensure
that the replacement or alternate tires and
wheels allow the TPMS to continue to function
properly.
264
If the tire pressure monito
appears
Applies to: vehicles with Tire Pressure Monitoring System in-
dicator
g indicator
The tire pressure indicator in the instrument
cluster informs you if the tire pressure is too low
or if there is a system malfunction.
Using the ABS sensors, the tire pressure monitor-
ing system compares the tire tread circumference
and vibration characteristics of the individual
tires. If the pressure changes in one or more
tires, this is indicated in the instrument cluster
display with an indicator light @ and a message.
If only one tire is affected, the location of that
tire will be indicated.
The tire pressures must be stored again each
time you change the pressures (switching be-
tween partial and full load pressure) or after
changing or replacing a tire on your vehicle
= page 265. The tire pressure monitoring system
only monitors the tire pressure you have stored.
Refer to the tire pressure label for the recom-
mended tire pressure for your vehicle
=> page 256, fig. 175.
Tire tread circumference and vibration character-
istics can change and cause a tire pressure warn-
ing if:
— The tire pressure in one or more tires is too low
— The tires have structural damage
— The tire was replaced or the tire pressure was
changed and it was not stored > page 265
— Tires that are only partially used are replaced
with new tires
Indicator lights
If the @ indicator light turns on, there is a loss
of pressure in at least one tire .> A\ Check the
tires and replace or repair if necessary. Check and
correct the pressures of all four tires and store
the pressure again > page 265.
ITPMS| Tire pressure: malfunction! See owner's
manual
fo appears after switching the ignition on or
while driving and the indicator light in the in-
strument cluster blinks for approximately one >
Page 269 of 316

4M1012721BA
Care and cleaning
Care and cleaning
General information
Regular, proper care helps to maintain your vehi-
cle's value. It can also be a requirement when
submitting warranty claims for corrosion damage
and paint defects on the body.
The required cleaning and care products can be
obtained from an authorized Audi dealer or au-
thorized Service Facility. Read and follow the in-
structions for use on the packaging.
ZA WARNING
— Using cleaning and care products incorrectly
can be dangerous to your health.
— Always store cleaning and care products out
of reach of children to reduce the risk of poi-
soning.
@ For the sake of the environment
— Purchase environmentally-friendly cleaning
products if possible.
— Do not dispose of cleaning and care prod-
ucts with household trash.
Car washes
The longer that deposits such as insects, bird
droppings, tree sap or road salt remain on the ve-
hicle, the more the surface can be damaged. High
temperatures such as those caused by sunlight
increase the damaging effect.
Before washing, rinse off heavy deposits with
plenty of water.
Stubborn deposits such as bird droppings or tree
sap are best removed with plenty of water anda
microfiber cloth.
Also, wash the underside of your vehicle once
road salt stops being used for the season.
Pressure washers
When washing your vehicle with a pressure wash-
er, always follow the operating instructions pro-
vided with the pressure washer. This is especially
important in regard to the pressure and spraying
distance. Do not aim the spray directly at the
seals on the side windows, doors, hood, luggage
compartment lid, or sunroof*, or at tires, rubber
hoses, insulating material, sensors*, camera
lenses*, or the laser scanner*. Keep a distance of
at least 16 in (40 cm).
Do not remove snow and ice with a pressure
washer.
Never use cone nozzles or high pressure nozzles.
The water temperature must not be above 140 °F
(60 °C).
Automatic car wash
Spray off the vehicle before washing.
Make sure that the windows and roof* are closed
and the windshield wipers are off. Follow instruc-
tions from the car wash operator, especially if
there are accessories attached to your vehicle.
If possible, use car washes that do not have
brushes.
Washing by hand
Clean the vehicle starting from the top and work-
ing downward using a soft sponge or cleaning
brush. Use solvent-free cleaning products.
Washing vehicles with matte finish paint by
hand
To reduce the risk of damaging the paint when
washing, first remove dust and large particles
from your vehicle. Insects, grease spots, and fin-
gerprints are best removed with a special cleaner
for matte finish paint.
Apply the product using a microfiber cloth. To re-
duce the risk of damaging the paint surface, do
not use too much pressure.
Rinse the vehicle thoroughly with water. Then
clean using a neutral shampoo and a soft micro-
fiber cloth.
Rinse the vehicle thoroughly again and let it air
dry. Remove any water residue using a chamois.
267
>