2020 AUDI Q7 display
[x] Cancel search: displayPage 169 of 316
4M1012721BA
Telephone
Disconnecting a mobile device
Applies to: vehicles with telephone
The mobile device will be disconnected from the
MMI and removed from the list of paired devices.
> To disconnect a connected device, use the con-
nection manager > page 227.
Using the Audi phone
box
Applies to: vehicles with Audi phone box
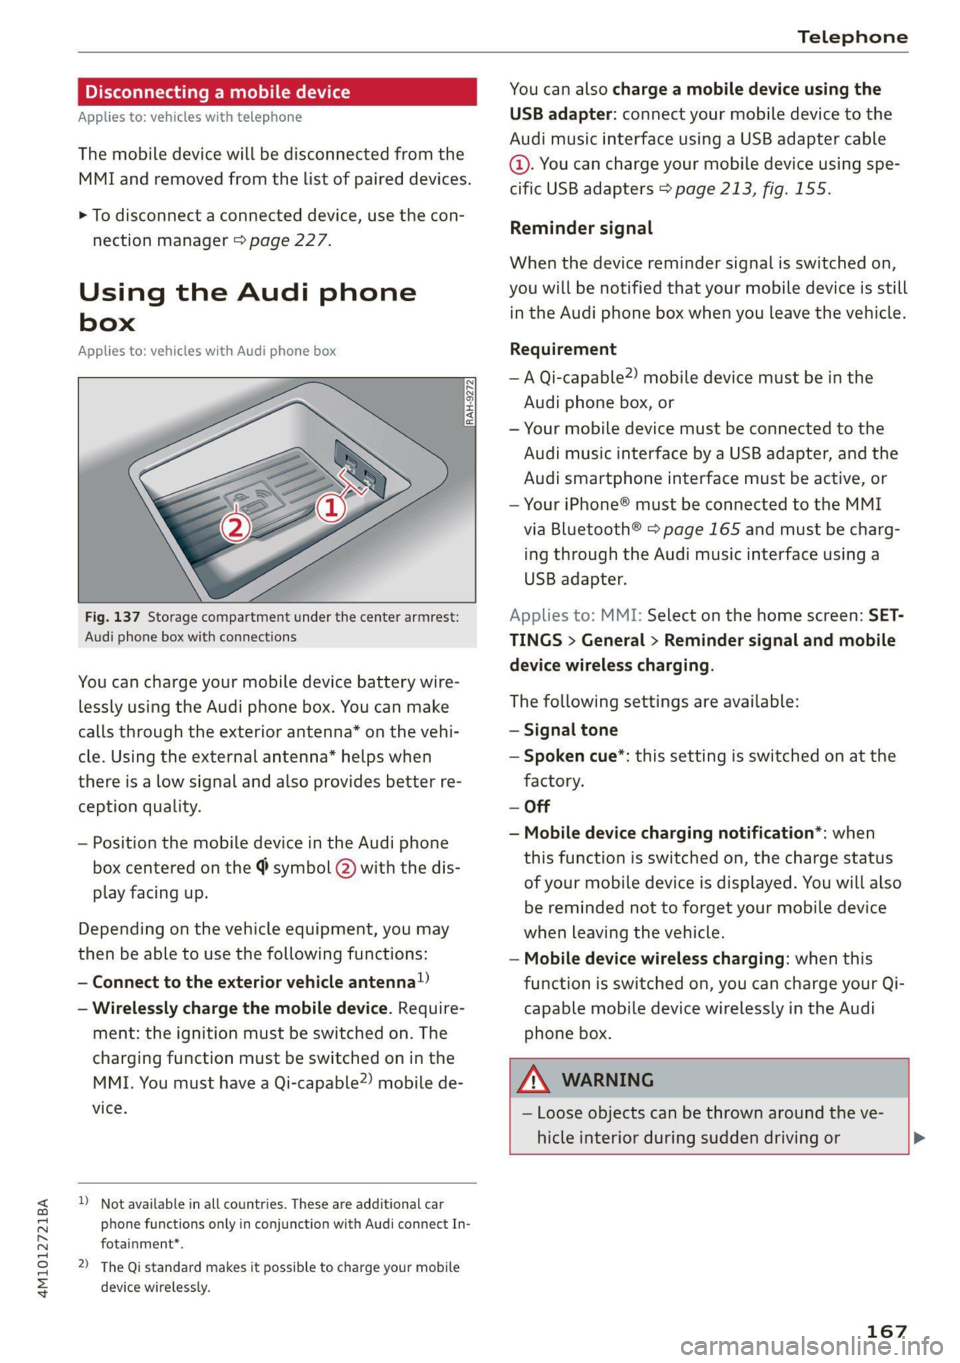
Fig. 137 Storage compartment under the center armrest:
Audi phone box with connections
You can charge your mobile device battery wire-
lessly using the Audi phone box. You can make
calls through the exterior antenna* on the vehi-
cle. Using the external antenna* helps when
there is a low signal and also provides better re-
ception quality.
— Position the mobile device in the Audi phone
box centered on the @ symbol @ with the dis-
play facing up.
Depending on the vehicle equipment, you may
then be able to use the following functions:
— Connect to the exterior vehicle antenna!)
— Wirelessly charge the mobile device. Require-
ment: the ignition must be switched on. The
charging function must be switched on in the
MMI. You must have a Qi-capable2) mobile de-
vice.
D_ Not available in all countries. These are additional car
phone functions only in conjunction with Audi connect In-
fotainment*.
2) The Qi standard makes it possible to charge your mobile
device wirelessly.
You can also charge a mobile device using the
USB adapter: connect your mobile device to the
Audi music interface using a USB adapter cable
@. You can charge your mobile device using spe-
cific USB adapters > page 213, fig. 155.
Reminder signal
When the device reminder signal is switched on,
you will be notified that your mobile device is still
in the Audi phone box when you leave the vehicle.
Requirement
—A Qi-capable”) mobile device must be in the
Audi phone box, or
— Your mobile device must be connected to the
Audi music interface by a USB adapter, and the
Audi smartphone interface must be active, or
— Your iPhone® must be connected to the MMI
via Bluetooth® > page 165 and must be charg-
ing through the Audi music interface using a
USB adapter.
Applies to: MMI: Select on the home screen: SET-
TINGS > General > Reminder signal and mobile
device wireless charging.
The following settings are available:
— Signal tone
— Spoken cue”: this setting is switched on at the
factory.
— Off
— Mobile device charging notification*: when
this function is switched on, the charge status
of your mobile device is displayed. You will also
be reminded not to forget your mobile device
when leaving the vehicle.
— Mobile device wireless charging: when this
function is switched on, you can charge your Qi-
capable mobile device wirelessly in the Audi
phone box.
WARNING
— Loose objects can be thrown around the ve-
hicle interior during sudden driving or >
y
167
Page 171 of 316
4M1012721BA
Telephone
— You can purchase a USB adapter from an au-
thorized Audi dealer or authorized Audi
Service Facility, or at specialty stores.
— Audi recommends using Audi Genuine Ac-
cessories. Audi has verified their reliability,
safety, and suitability.
Using the telephone
Accessing the telephone functions
Applies to: vehicles with telephone
w
fentins frencsy
or
Requirement: a mobile device must be connected
to the MMI > page 165.
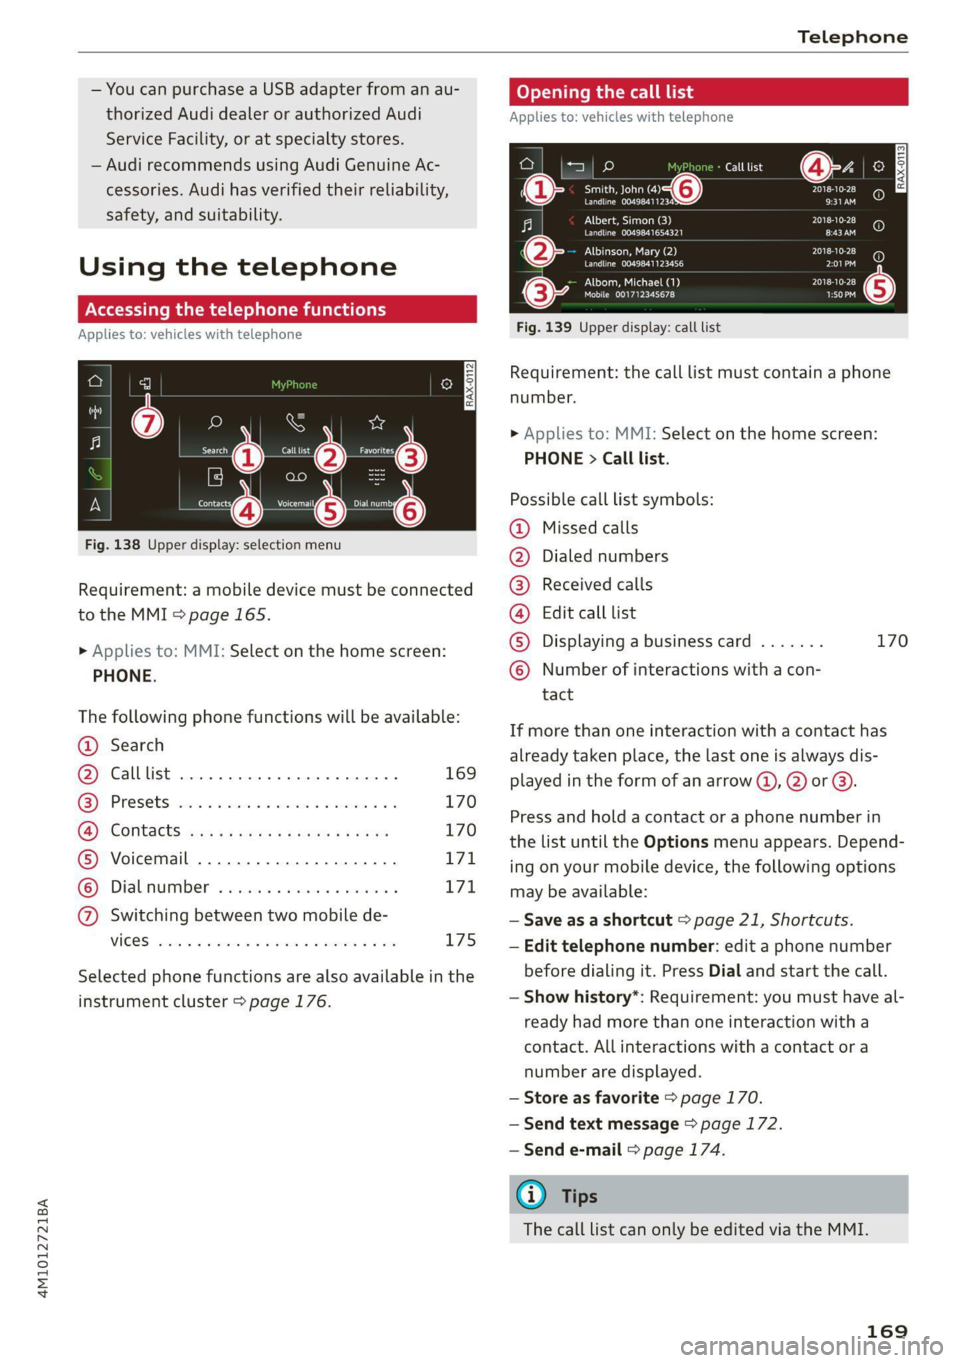
Fig. 138 Upper —O selection menu
> Applies to: MMI: Select on the home screen:
PHONE.
The following phone functions will be available:
@ Search
@ Calllist ........ ee 169
GQ) Presets von c= cian es eemusoe 2 v cmvtee 2 vo 170
CB) COMtACES isws + x naps so ews ge saws 170
® Voicemail ...............0.000. 171
© Dialnumber ..............20005 171
@ Switching between two mobile de-
VICES sevens x aeswnn « % euenoos wo seeomus «aoe L75
Selected phone functions are also available in the
instrument cluster > page 176.
Opening the call list
Applies to: vehicles with telephone
Call list
Smith, John (4) PIES ti
Perm AnPED 9:31AM
Albert, Simon (3) PT Sloe)
Peewee era) EEE
ENT TES Ae) PLSD
Perm EL PE)
PUT ea 2018-10-28
Mobile 001712345678 rT
a) 2 aa
Fig. 139 Upper display: call list
Requirement: the call list must contain a phone
number.
> Applies to: MMI: Select on the home screen:
PHONE > Call list.
Possible call list symbols:
Missed calls
Dialed numbers
Received calls
Edit call list
Displaying a business card ....... 170
Number of interactions with a con-
tact
©OO®COLO
If more than one interaction with a contact has
already taken place, the last one is always dis-
played in the form of an arrow (a), @) or @).
Press and hold a contact or a phone number in
the list until the Options menu appears. Depend-
ing on your mobile device, the following options
may be available:
— Save as a shortcut > page 21, Shortcuts.
— Edit telephone number: edit a phone number
before dialing it. Press Dial and start the call.
— Show history*: Requirement: you must have al-
ready had more than one interaction with a
contact. All interactions with a contact or a
number are displayed.
— Store as favorite > page 170.
— Send text message > page 172.
— Send e-mail > page 174.
@) Tips
The call list can only be edited via the MMI.
169
Page 172 of 316
Telephone
Managing favorites
Applies to: vehicles with telephone
You can store the desired number for a contact as
a shortcut in the favorites list.
Accessing favorites
> Applies to: MMI: Select on the home screen:
PHONE > Favorites.
Storing favorites
> Press YY in the business card @) > page 170,
fig. 140, or
> Press Store as favorite in the options
=> page 169.
Deleting favorites
> Press & in the business card @ > page 170,
fig. 140, or
> Select: Favorites > Z > one or multiple favor-
ites or Select all > Delete > Done.
@) Tips
If there are multiple mobile devices, you can
create separate favorites in the MMI for each
mobile device.
Opening contacts
Applies to: vehicles with telephone
Contact info
RAX-0114] Tae oi}
nO +
Eien
toler TPL el)
Eee acc
85057 Ingolstadt Ch
i
Peart Rei)
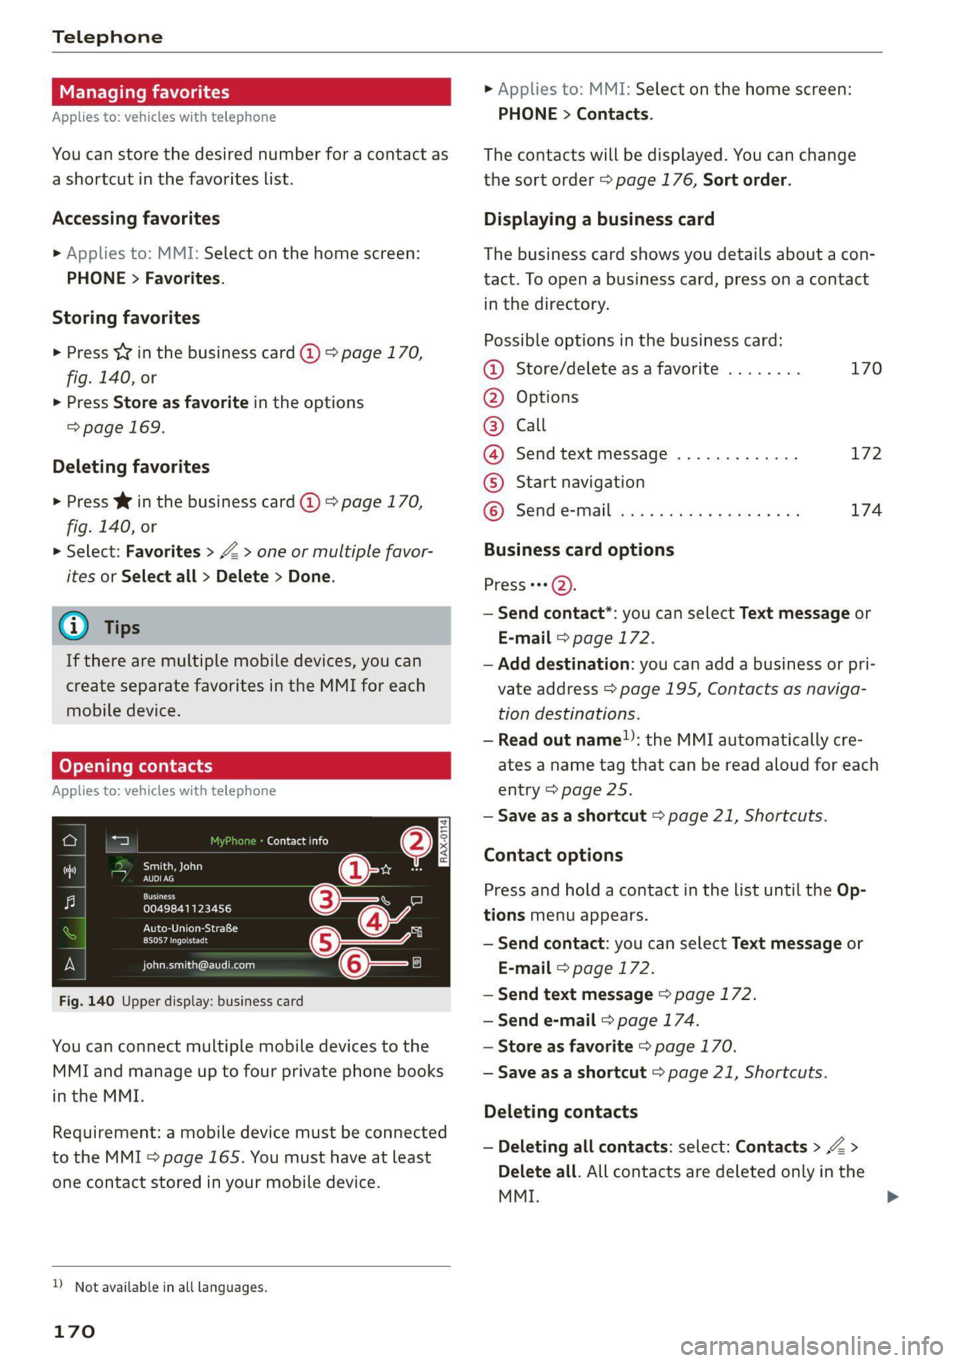
Fig. 140 Upper display: business card
You can connect multiple mobile devices to the
MMI and manage up to four private phone books
in the MMI.
Requirement: a mobile device must be connected
to the MMI > page 165. You must have at least
one contact stored in your mobile device.
) Not available in all languages.
170
> Applies to: MMI: Select on the home screen:
PHONE > Contacts.
The contacts will be displayed. You can change
the sort order > page 176, Sort order.
Displaying a business card
The business card shows you details about a con-
tact. To open a business card, press on a contact
in the directory.
Possible options in the business card:
@ Store/delete as a favorite ........ 170
@ Options
© Call
@ Send text message ............. 172
© Start navigation
© Send email v.03 6s sees es came aves 174
Business card options
Press +++).
— Send contact*: you can select Text message or
E-mail > page 172.
— Add destination: you can add a business or pri-
vate address > page 195, Contacts as naviga-
tion destinations.
— Read out name”): the MMI automatically cre-
ates a name tag that can be read aloud for each
entry > page 25.
— Save as a shortcut > page 21, Shortcuts.
Contact options
Press and hold a contact in the list until the Op-
tions menu appears.
— Send contact: you can select Text message or
E-mail > page 172.
— Send text message > page 172.
— Send e-mail © page 174.
— Store as favorite > page 170.
— Save as a shortcut > page 21, Shortcuts.
Deleting contacts
— Deleting all contacts: select: Contacts > Z >
Delete all. All contacts are deleted only in the
MMI.
Page 173 of 316
4M1012721BA
Telephone
— Deleting imported contacts: requirement: you
must have imported at least one contact. Se-
lect: Contacts > Z > one or more contacts, or
Select all > Delete imported contacts > Done.
The imported contacts are deleted.
G) Tips
— Pay attention to any synchronization
prompts on your mobile device when down-
loading contacts.
— Only the contacts of the mobile device being
actively used are displayed.
— The contacts from the mobile device may
not be transferred in alphabetical order. If
there are too many entries, contacts with
different first letters may be missing in the
MMI.
— If contacts are loaded from the mobile de-
vice into the MMI, the contacts on the SIM
card will no longer be displayed in the MMI.
— The contacts in the local MMI memory are
always visible and can be accessed by other
users.
— After switching off the ignition and exiting
the vehicle, the mobile device directory will
be loaded when the MMI is started again if
the mobile device is within range and the
Bluetooth function is switched on in the mo-
bile device and the MMI.
— Only the contacts in the local MMI memory
can be deleted.
Listening to voicemail
Applies to: vehicles with telephone
> Applies to: MMI: Select on the home screen:
PHONE > Voicemail.
Requirement: there must be no voicemail num-
ber stored.
> Entering the voicemail number: enter the de-
sired number. Press OK.
Requirement: a voicemail number must be stor-
ed.
> Dialing the voicemail number: press Voice-
mail. The call begins immediately.
@) Tips
This service must be set up and activated in
advance by the cell phone service provider.
Dialing a phone number
Applies to: vehicles with telephone
Depending on the vehicle equipment, you may
have the following options for dialing a phone
number:
— Using text input in the MMI > page 22.
— Using voice operation > page 25.
Making an emergency call
Applies to: vehicles with telephone
Requirement: a mobile device must be connected
to the MMI via Bluetooth.
> Applies to: MMI: Select on the home screen:
PHONE > Dial number > the emergency call
number specific to the country (for example,
911) > Dial.
Z\ WARNING
— Because your phone works with radio sig-
nals, a connection cannot be guaranteed un-
der all circumstances. Do not rely on only
your phone when it comes to essential com-
munication (such as during a medical emer-
gency).
— Always follow the instructions given by the
emergency personnel during an emergency
call and only end the call when they instruct
you to do so.
Answering/ending a call
Applies to: vehicles with telephone
> To accept or end a call, press the @ button on
the multifunction steering wheel. Operating
=> page 12.
You can use the following options on the MMI
when there is an incoming call:
> Answering an incoming call: press Answer.
> Declining a call: press Decline.
171
Page 175 of 316
4M1012721BA
Telephone
Requirement: your mobile device must be con-
nected to the MMI via Bluetooth Message Access
Profile (Bluetooth MAP) > page 165.
> Applies to: MMI: Select on the home screen:
MESSAGES > (=) > Text message (SIM card)*/
text message (phone 1)/text message (phone
2)*.
Inboxes
— New text message: press on a template in the
list or dictate a text message. Press Add and
select one or more recipients from your con-
tacts. To remove a recipient, press Delete. Press
Send.
— Inbox: displays all received text messages.
— Sent: displays all sent text messages.
— Outbox”: displays all text messages to be sent.
— Drafts*: text messages that have not been sent
yet by the mobile device are displayed on the
MMI.
— Deleted*: deleted text messages are displayed.
— User-defined*: folders defined by the user are
transferred from your mobile device.
Message options
The following options are available when you se-
lect a text message:
— Read out* the text message).
— Reply: a reply can be sent to the selected mes-
sage in the Inbox.
— To switch to the previous or the next message,
press < or >.
— More: options
When you press More, the following options are
available:
— Call: Requirement: a number must be stored.
You can call the contact.
— Forward: the selected text message can be for-
warded to other recipients. Text can also be
added before sending.
— Navigate: Requirement: the contact must have
a navigation address stored with it in the direc-
tory. You can start route guidance.
D_ Not available in all languages.
2) Function is not supported on all mobile devices.
— Extract numbers: Requirement: the message
must contain a number. You can extract a num-
ber from a text message.
— Send again: Requirement: the text message
must be in the Outbox. The selected text mes-
sage can be resent.
Press and hold an entry in the Inbox until the Op-
tions menu appears.
— Reply: a reply can be sent to the selected mes-
sage in the Inbox.
— Forward: the selected text message can be for-
warded to other recipients. Text can also be
added before sending.
Settings
Press ©}.
— Automatically forward text message to mobile
device*2): when this function is switched on,
text messages will also be automatically stored
on your mobile device.
— New text message notification: when this
function is switched on, you will be notified
when new text messages are received. New text
messages are indicated with an envelope Min
the MMI status bar.
— Text message center*: the number for the text
message center of your cell phone service pro-
vider is displayed. If no number has been stor-
ed yet, you can enter the text message center
number.
— Delete text messages from SIM card”: if the
memory capacity on the SIM card is full, an en-
velope with a line through it is displayed in the
MMI status bar. You can continue to send text
messages, but you cannot receive new text
messages. To delete all sent text messages
from the SIM card, select All sent messages. To
delete all read text messages from the SIM
card, select All read messages.
Delete text message
Select: a mailbox > Z > one or more text mes-
sages > Delete > Done.
173
Page 176 of 316
Telephone
G) Tips
— Please note that you may have to activate
the receiving and sending of text messages
depending on the SIM card being used (for
example, when using a multi-SIM).
— Messages that are deleted in the MMI are
also deleted in the mobile device automati-
cally.
— Only new received messages may be dis-
played depending on your mobile device.
Applies to: vehicles with telephone
Depending on the type of mobile device being
used, you may be able to receive and send e-
mails through the MMI.
Requirement: your mobile device must be con-
nected to the MMI via Bluetooth Message Access
Profile (Bluetooth MAP) > page 165.
» Applies to: MMI: Select on the home screen:
MESSAGES > (:) > e-mail (phone 1)/e-mail
(phone 2)*.
Inboxes
— New e-mail: press on a template in the list.
Press Add and select one or more recipients
from your contacts. To remove one or all recipi-
ents, press Delete. Press Send.
— Inbox: displays all received e-mails. To update
the list, press Q.
— Sent: displays all sent e-mails.
— Outbox: displays all e-mails to be sent.
— Drafts: e-mails that have not been sent yet are
displayed.
— Deleted*: deleted e-mails are displayed.
— User-defined*: folders defined by the user are
transferred from your mobile device.
Message options
The following options are available when you se-
lect an e-mail:
— Read out* the e-mail).
D_ Not available in all languages.
174
— Reply: a reply can be sent to the selected e-mail
in the Inbox.
— To switch to the previous or the next message,
press < or >.
— More: options
When you press More, the following options may
be displayed depending on your mobile device
and the applicable mail folder:
— Call: Requirement: a number must be stored.
You can call the contact.
— Forward: the selected e-mail can be forwarded
to other recipients. Text can also be added be-
fore sending.
— Extract e-mail add.: you can extract the e-mail
address from an e-mail.
— Navigate: Requirement: the contact must have
a navigation address stored with it in the direc-
tory. You can start route guidance.
— Extract numbers: Requirement: the text in the
e-mail must contain a number. You can extract
a number from an e-mail.
— Show all recipients*: you can display the recipi-
ents of an e-mail.
— Show attachmts.*: you can display a list of at-
tachments to an e-mail.
— Send again: the selected e-mail in the Outbox
and Sent mailboxes can be sent again.
Press and hold an entry in the Inbox until the Op-
tions menu appears.
— Reply: a reply can be sent to the selected e-
mail.
— Reply all: a reply can be sent for the selected e-
mail and it will be sent to all of the entered re-
cipients.
— Forward: the selected e-mail can be forwarded
to different recipients.
Settings
Press (h.
— New e-mail notification: when this function is
switched on, you will be notified when new e-
mails are received. New e-mails are indicated
with an envelope Min the MMI status bar. >
Page 177 of 316
4M1012721BA
Telephone
Deleting e-mails
Select: a mailbox > Z > one or more e-mails >
Delete > (Done).
@) Note
Read the information about Audi connect, and
be sure to note the connectivity costs section
=>page 178.
Settings
Phone settings
Applies to: vehicles with telephone
> Applies to: MMI: Select on the home screen:
PHONE > ©}.
Switching between two mobile devices
Requirement: phone 1 and phone 2 must be con-
nected to the MMI.
Switch telephones: the device name of the avail-
able mobile device is displayed. You can switch
the phone by pressing the button.
Declining a call with a text message*
When this function is switched on, you can de-
cline an incoming call with a text message.
Call options*
The following options may be available depend-
ing on the mobile device:
— Call forwarding: you can switch the forwarding
of incoming calls to your voicemail or to anoth-
er phone number on and off. You can check if
the function is activated or deactivated with
Status.
— Call waiting: you will be alerted to an incoming
call during a phone call when the function is
switched on. You can check if the function is ac-
tivated or deactivated with Status.
— Send own number: sending your phone num-
ber with an outgoing call can be switched on
and off. With the Net.-depen. setting, the set-
ting listed in the contract with the cell phone
service provider is used. The settings only apply
to the PHONE menu in the MMI. Please note
that the settings on your mobile device will ap-
ply after disconnecting the Bluetooth connec-
tion. You can determine which setting is active
with Status.
Ringtone and volume settings
— Ringtone and message volume: you can adjust
the volume of the selected ringtone and the no-
tification volume when a message is received by
moving the position of the slider.
— Ringtone”: available ringtones are played using
the Ringtone function. Press on an entry in the
list.
— Microphone input level: you can adjust the mi-
crophone input level using the slider.
Turn on car phone or data module
Applies to: vehicles with car phone/data module
When this function is switched on, you can use
the car phone or data module.
As long as the car phone was not turned off sepa-
rately the last time it was used, it will turn on au-
tomatically when the ignition is switched on.
Edit voicemail number
You can change your voicemail number.
Enable VoLTE
When this function is switched on, Voice over
LTE* will be supported.
Network settings
— Login to mobile phone network: select to log
into your cell phone service provider network
automatically or manually.
— Manual network selection: Requirement: the
data module must be switched on and Login to
mobile phone network must be set to Manual.
Select a network manually from the list of
available networks at the present location.
Car phone serial number (IMEI):
Applies to: vehicles with car phone
The serial number (IMEI) of your car phone is dis-
played.
@ Tips
— Several mobile devices can be paired with
the MMI, but only two* mobile devices can
be actively connected.
175
Page 178 of 316
Telephone
— To delete all paired Bluetooth devices, the
Bluetooth function can be reset to the fac-
tory default settings > page 226.
Directory settings
Applies to: vehicles with telephone
> Applies to: MMI: Select on the home screen:
PHONE > Contacts > ©.
Switching between two mobile devices
Requirement: telephone 1 and telephone 2 must
be connected.
Switch telephones: the device name of the avail-
able mobile device is displayed. You can switch
the phone by pressing the button.
The directory for the selected phone will be dis-
played.
Hide grayed-out contacts
When this function is switched on, contacts that
have no phone numbers stored for them will be
hidden.
Sort order
You can sort the contacts by Last name or First
name.
Download contacts
Requirement: a mobile device must be connected
to the MMI.
To update the contacts in the MMI, you can man-
ually download your mobile device contacts. De-
pending on the mobile device, you may need to
disconnect and reconnect the Bluetooth connec-
tion to update the contacts.
Memory capacity
You can manage up to 23,000 contacts. You can
also download up to 5,000 contacts from maxi-
mum four mobile devices. You can also import up
to 3,000 contacts from a storage medium.
Importing and exporting contacts
Requirement: an SD card must be in the SD card
reader* = page 210 or a USB storage device must
176
be connected to the Audi music interface
=> page 213.
Contacts in vCard format (.vcf) can be imported
or exported from the MMI.
— Applies to: MMI: Importing contacts from a
storage medium: Select: Import contacts >
Search for import data > SD card 1 or USB de-
vice 1/USB device 2 > desired contacts or Se-
lect all contacts > Start import.
— Applies to: MMI: Exporting contacts to a stor-
age device: Requirement: Only previously im-
ported contacts can be exported. Select: Export
contacts > Find source for exporting > SD card
1 or USB device 1/USB device 2 > desired con-
tacts or Select all contacts > Start export.
@ Tips
— For more information about the myAudi ac-
count, visit my.audi.com.
— The imported contacts are stored in the lo-
cal MMI memory.
— Contacts that were downloaded from a mo-
bile device cannot be exported.
— There should be no other files or folders on
the storage medium containing the contacts
to be imported.
— Apple devices and MTP devices (such as
smartphones) are not recognized as USB
storage devices.
Mobile phone network settings
Applies to: vehicles with telephone
> Applies to: MMI: Select on the home screen:
SETTINGS > Connection settings > Mobile
phone network.
Switching the car phone or data module on
Applies to: vehicles with car phone/data module
See > page 175.
Instrument cluster
Bo) afedaT)
Applies to: vehicles with multifunction steering wheel and
telephone
In the instrument cluster display, you can control
the MMI functions with the multifunction