2020 AUDI A8 radio
[x] Cancel search: radioPage 5 of 360

4N0012721BD
Table of contents
SEOOKING assess © & secwens + + anes ww ceawien Hewes 131
All wheel drive (quattro).............. 132
Electronic Stabilization Control......... 133
High-voltage system............. 136
General information...........0..5.5 136
Charging the high-voltage battery...... 137
Charging equipment................. 143
TANS COWINIG ss 5 & cews 4c ous ce ewe LSL
Driving with atrailer................. 151
Assist systems.................0. 154
Assist systems................... 154
Generalinformation................. 154
Surrounding area detection............ 155
Switching the systems on and off....... 157
Driving information.............. 159
Speed warning system................ 159
Camera-based traffic sign recognition... 159
Traffic light information.............. 161
LAP Mer as « 2 eons x = nevos ¢ 6 aus ¢ 8 em 162
Night vision assist..............-.04. 163
Driver assistance................. 166
Cruise control system.............0-5 166
Efficiency assist.............02--004. 167
Adaptive cruise assist............00-. 170
Distance Warning « « wse« 6 3 sone se eee oa LID:
Lane departure warning.............4. 180
Audi presense............-.22+--05- 182
Side@rassist esses: sv vows © v ememe © 2 suman 2 eae 186
Exit warning ...........-.....2.0000. 188
Intersection assistant................ 189
Emergeneyassists. «ican & wacen 3 3 woes ¥ 5 190
Parking and maneuvering....... 192
INEFODUCKION « » sey: x « caus 4 2 wasn 4 & Rees 192
Parking system plus...............00. 192
Rearview camera and peripheral cameras. 194
Rear cross-traffic assist... 2.2.2.0... 198
Infotainment system............ 200
TELEBNOMEs: 5 «ees & Cees 4 e oeew eee 200
IMtrOdUGEION « 2 asaces < a asomee x a wma Sewanee 200
Setup... eee eee ee eee 200
Using the Audi phone box............. 202
Using the telephone.................. 204
MessageS ... 0... cece cece eee eee 208
SOCtinGS eva 3 x espa o Kae 5s BER Bo ee 210
Instrument:cluster css vo evn ee ween eae 212
Using the Rear Seat Remote........... 212
Troubleshooting «<< <= eccn ss yews sp es 215
Audi connect..................0.. 216
Generalinformation................. 216
Audi connect Infotainment............ 216
Using a Wi-Fi hotspot................ 217
Audi connect Infotainment services..... 217
Audi connect vehicle control services.... 218
SCttINGS come
EMe@ngency CALL. « «ccc 6 i cs 6 vee « 223
Overview... ... 0. eee eee eee 223
Emergency Call « cas « wean s + gee os pee 223
Online roadside assistance............ 224
Navigation....................005- 225
Opening navigation.................. 225
myAudi navigation...............000% 226
Entering adestination................ 226
Stopping route guidance.............. 231
MapPinceins i + cxanees i ¥ scree © sammee @ =m ommeae #0 oe 2231.
Personal route assistance............. 233
Alternative routes...............000- 234
Additional functions................. 234
Satellite map......... 0... eee eee eee 236
Eleetric'rangeé acc sv sees 5 ¢ eee se Hews: 236
Mapiupdater, « sss + a cssmee + & nen «5 enaens 236
Traffic information................00- 238
Options aNd 'SEtNGS is « x see s x sews 4 vs 239
Troubleshooting wees «= wer = o wees ov eee 241
Ragios: sce ¢ = nae ¢ ¢ seuss 2 2 eeu 2 2 eee 242
Opening the radio...............000. 242
Radio functions.................0-4. 243
Options and settings...............0. 247
Troubleshooting esc 2 2 wee ts wie oo wee 249
Media............ cc eee eee 250
Generalinformation................. 250
SD card reader... ..... cc eee eee eee 250
DVD drive... 2... eee eee eee 250
Bluetooth audio player............... 252
Page 15 of 360
4N0012721BD
Instrument cluster
You can manage personal profiles in the MMI
=> page 41. Before driving, you can select your
personal profile in the instrument cluster and ap-
ply customized vehicle settings, such as the seat
position.
Requirement: the driver's door must have been
opened and the ignition must not be switched
on.
> Confirm the displayed profile @), or
> To load another profile, select and confirm
Switch profile 2).
> Select and confirm the desired profile. The
user-specific settings will load.
> To cancel the seat, mirror, and steering column
adjustment, select Cancel.
G) Tips
For more information and usage options for
personal profiles, see > page 41.
Operating
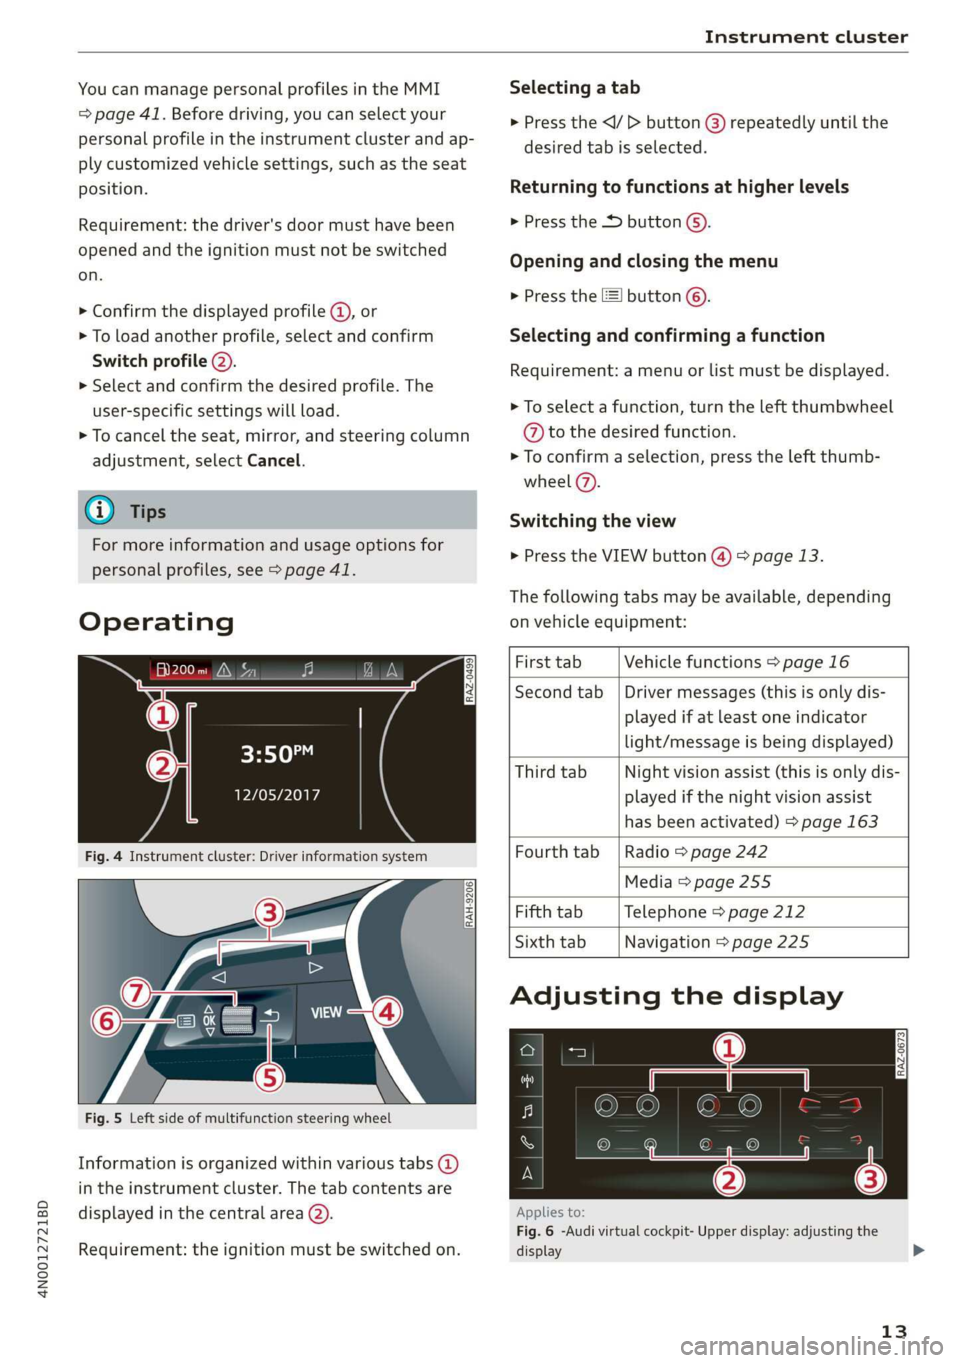
Heyes
12/05/2017
Fig. 4 Instrument cluster: Driver information system
Selecting a tab
> Press the
desired tab is selected.
Returning to functions at higher levels
> Press the D button ©).
Opening and closing the menu
> Press the [=] button ©).
Selecting and confirming a function
Requirement: a menu or list must be displayed.
> To select a function, turn the left thumbwheel
@ to the desired function.
> To confirm a selection, press the left thumb-
wheel (7).
Switching the view
> Press the VIEW button @) > page 13.
The following tabs may be available, depending
on vehicle equipment:
RAH-9206
Fig. 5 Left side of multifunction steering wheel
Information is organized within various tabs @)
in the instrument cluster. The tab contents are
displayed in the central area (2).
Requirement: the ignition must be switched on.
First tab Vehicle functions > page 16
Second tab | Driver messages (this is only dis-
played if at least one indicator
light/message is being displayed)
Third tab Night vision assist (this is only dis-
played if the night vision assist
has been activated) > page 163
Fourth tab | Radio > page 242
Media > page 255
Fifth tab Telephone > page 212
Sixth tab Navigation > page 225
Adjusting the display
RAZ-0673
Applies to:
Fig. 6 -Audi virtual cockpit- Upper display: adjusting the
display
13
>
Page 25 of 360
![AUDI A8 2020 Owners Manual 4N0012721BD
Touch displays
Using the notification center
> To open the notification center, pull the status
bar downward, or
> Press the E=] button on the status bar.
> To apply quick setting AUDI A8 2020 Owners Manual 4N0012721BD
Touch displays
Using the notification center
> To open the notification center, pull the status
bar downward, or
> Press the E=] button on the status bar.
> To apply quick setting](/manual-img/6/57606/w960_57606-24.png)
4N0012721BD
Touch displays
Using the notification center
> To open the notification center, pull the status
bar downward, or
> Press the E=] button on the status bar.
> To apply quick settings, press the respective
symbol (@).
> To obtain additional information about a notifi-
cation, press it.
> To delete a notification, pull it toward the right
edge of the screen.
> If there are more than four notifications in the
notification center, the older notifications will
be hidden. To display the older notifications,
drag
your finger upward on the screen.
Setting displayed content
You can set whether some notifications should be
displayed.
> To set the displayed content, press &@, or
> Applies to MMI: Select on the home screen:
SETTINGS > Notifications.
> Select and confirm which notifications should
be displayed.
Possible quick settings
Symbol Description
Apply sound settings
Open menu settings
Manage connected devices
Manage personal profiles
Set date and time
= Set displayed content in the noti-
fication center
Depending on the vehicle equipment, you can op-
erate various functions in the function bar.
Description
Switch Start/Stop system on or
off
Applies to: Plug-in hybrid drive:
Selecting the driving mode
Symbol Description
Opens the garage door opener
function
Press: adjust sunshade
Press and hold: convenience
opening and closing
Press: shows settings for the
head-up display
Press and hold: switches the
head-up display on or off
Press: switches the upper display
on or off
Press and hold: switches both dis-
plays on or off
Shortcuts
By creating shortcuts, you have quick access to
various items, such as radio stations, frequently
used contacts, or vehicle settings.
Adding shortcuts
The «++ buttons in the upper display indicate, for
example, if a selected radio station can be added
to the shortcuts. Depending on the context, you
may also be able to add items from a list to the
shortcuts.
> Press «+» or press and hold an item ina list.
> Press Save as a shortcut. The selected item will
be added to the shortcuts on the lower display
and
displayed as a tile.
Using shortcuts
> Press the ac! @) > page 21, fig. 15 button in the
function bar on the lower screen. The saved
shortcuts will be displayed or hidden.
> To access the stored function, press the respec-
tive tile.
Moving or deleting shortcuts
> Press and hold a shortcut on the lower display.
> To adjust the order of the shortcuts, drag a
shortcut to the desired location.
> To delete a shortcut, press ®.
23
Page 29 of 360
4N0012721BD
Touch displays
Menus and symbols
Applies to: vehicles with Rear Seat Remote
RADIO c=)
RAX-0092
Smet) (7)
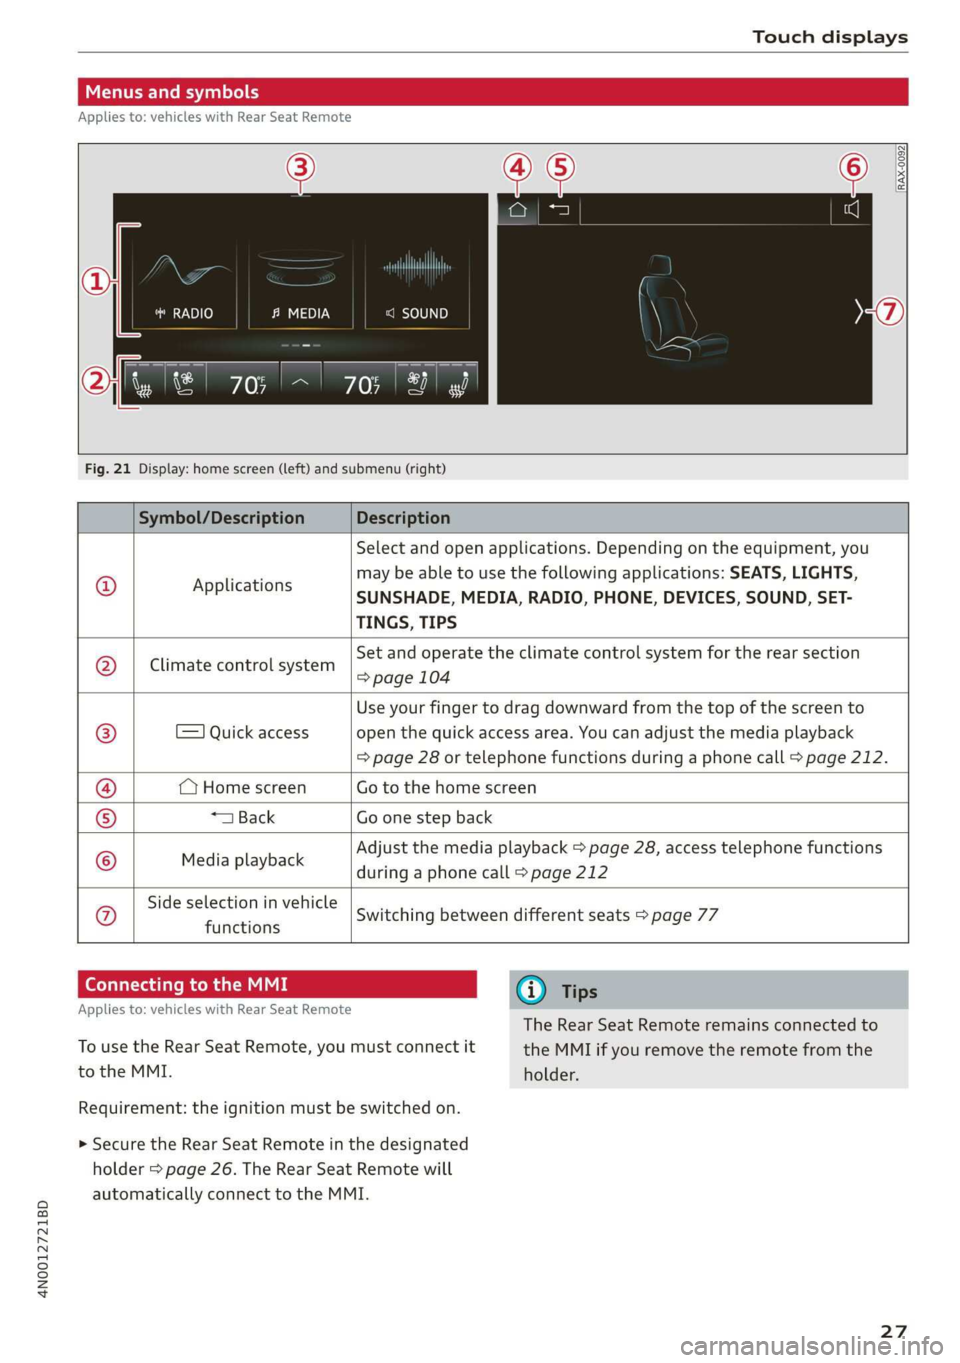
Fig. 21 Display: home screen (left) and submenu (right)
Symbol/Description Description
© Applications
Select and open applications. Depending on the equipment, you
may be able to use the following applications: SEATS, LIGHTS,
SUNSHADE, MEDIA, RADIO, PHONE, DEVICES, SOUND, SET-
TINGS, TIPS
Climate control system
Set and operate the climate control system for the rear section
=> page 104
=) Quick access
Use your finger to drag downward from the top of the screen to
open the quick access area. You can adjust the media playback
=> page 28 or telephone functions during a phone call > page 212.
(Home screen Go to the home screen
*1 Back Go one step back
Media playback
Adjust the media playback > page 28, access telephone functions
during a phone call > page 212
Side selection in vehicle
functions Q}]e
|@Oe|
©
|
0
Switching between different seats > page 77
Connecting to the MMI G@) Tips
Applies to: vehicles with Rear Seat Remote
The Rear Seat Remote remains connected to
To use the Rear Seat Remote, you must connect it the MMI if you remove the remote from the
to the MMI. holder.
Requirement: the ignition must be switched on.
> Secure the Rear Seat Remote in the designated
holder > page 26. The Rear Seat Remote will
automatically connect to the MMI.
27
Page 31 of 360
4N0012721BD
Touch displays
Rear Seat Remote
Dimensions (height x width x depth) 3.39 in x 6.38 in x 0.43 in (86 mm x 162 mmx
11 mm)
Weight
0.58 lbs (261 g)
Rear Seat Entertainment
(Audi tablet)
Introduction
Applies to: vehicles with Audi tablet
You can control available sources in the vehicle
(such as the radio) using the Audi tablet and lis-
ten to them through the vehicle speakers or
headphones. You can also display vehicle infor-
mation (such as the next oil change service). The
Audi tablet also has applications and functions
that are not related to the vehicle.
ZA WARNING
— As the driver, do not allow usage of the Audi
tablet to distract you from driving, as this
could increase the risk of an accident. For
example, do not reach behind you while
driving to operate the Audi tablet.
— Children in rear-facing child safety seats in
the rear: remove the Audi tablet from the
backrest on the front seat to reduce the risk
of
injury. Read the instructions in the chap-
ter > page 91.
— The Audi tablet can only be operated when
the vehicle is stationary or when it is secure-
ly positioned in the designated holder in the
vehicle. Like all loose objects, it could be
thrown through the vehicle and cause seri-
ous injuries in a collision. If the Audi tablet
is not in the designated holder, it must al-
ways be securely stowed while driving.
— Do not use any wireless devices on the front
seats within range of the airbags while driv-
ing. Also read the warnings in the chapter
=> page 86.
— The back of the Audi tablet can become hot
while charging. Pay attention to the housing
temperature, and be careful when removing
the Audi tablet from the holder.
@) Note
— Always follow the information found in >®
in General information on page 216.
— Protect the Audi tablet against prolonged
exposure to direct sunlight.
— Extremely high or low temperatures that
can occur inside vehicles may damage the
Audi tablet or impair its performance. Never
leave your Audi tablet in the vehicle in ex-
tremely high or low temperatures.
— Protect the Audi tablet from coming into
contact with any fluids.
G) Tips
— If the Audi tablet is used when the ignition
is switched off or outside of the range of the
MMI, then only the non-vehicle applications
and functions will be available.
— Vehicle settings are only possible through
the MMI.
— Please note that a Wi-Fi connection does
not automatically make it possible to use
the
Internet. For additional information,
see the chapter > page 216.
— The Audi tablet makes it possible to access
services from external providers. Permanent
availability cannot be guaranteed, because
that depends on the service provider.
— When playing online media sources, there
may be longer loading times or restrictions
on media playback, depending on the Inter-
net connection or the Wi-Fi usage (for ex-
ample, if there is intensive usage by multi-
ple devices on the hotspot, such as tablets
or laptops).
— The Audi tablet has an anti-theft protection
feature: it can only connect to the MMI of
the associated vehicle. Also, the Audi tablet
will be disabled if it has not been connected
to the MMI for longer than 30 days. To ena-
ble it again, connect the Audi tablet to the
29
>
Page 35 of 360
4N0012721BD
Touch displays
Menus and symbols
Applies to: vehicles with Audi tablet
emsa || | cea
Rats ® SETTINGS
Cy
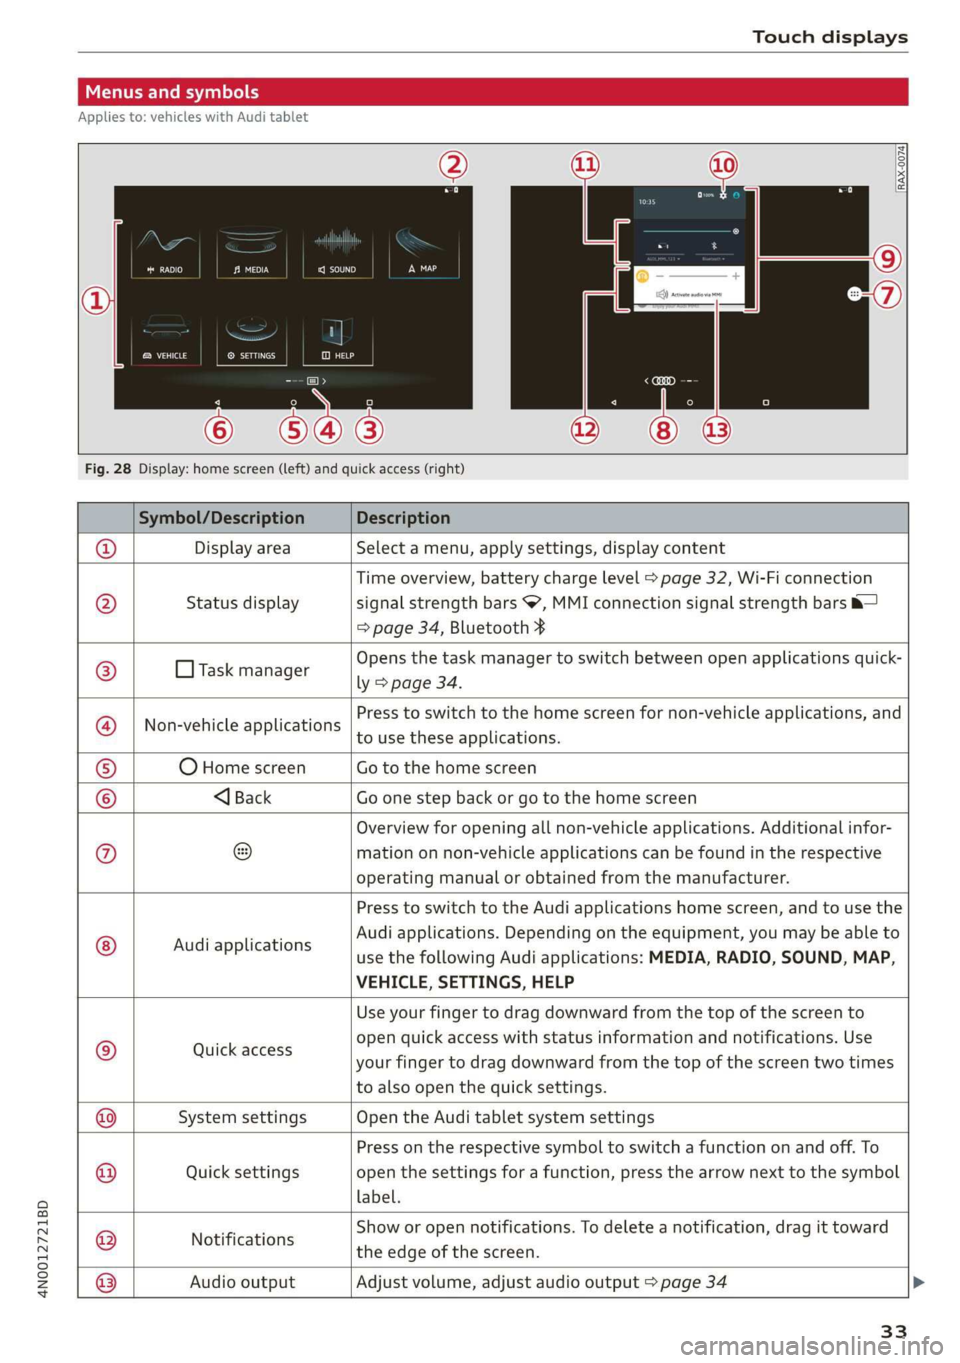
Fig. 28 Display: home screen (left) and quick access (right)
Symbol/Description Description
Display area Select a menu, apply settings, display content
Status display
Time overview, battery charge level > page 32, Wi-Fi connection
signal strength bars , MMI connection signal strength bars &—
=> page 34, Bluetooth ¥
O Task manager
Opens the task manager to switch between open applications quick-
ly > page 34.
Non-vehicle applications
Press to switch to the home screen for non-vehicle applications, and
to use these applications.
O Home screen Go to the home screen
®@
Ef
©|e|
©
|}
<1 Back Go one step back or go to the home screen
Overview for opening all non-vehicle applications. Additional infor-
mation on non-vehicle applications can be found in the respective
operating manual or obtained from the manufacturer.
© Audi applications
Press to switch to the Audi applications home screen, and to use the
Audi applications. Depending on the equipment, you may be able to
use the following Audi applications: MEDIA, RADIO, SOUND, MAP,
VEHICLE, SETTINGS, HELP
Quick access
Use your finger to drag downward from the top of the screen to
open quick access with status information and notifications. Use
your finger to drag downward from the top of the screen two times
to also open the quick settings.
@|
©
System settings Open the Audi tablet system settings
Quick settings
Press on the respective symbol to switch a function on and off. To
open the settings for a function, press the arrow next to the symbol
label.
Notifications
Show or open notifications. To delete a notification, drag it toward
the edge of the screen.
@|O|]
©
Audio output
Adjust volume, adjust audio output > page 34
33
Page 37 of 360
4N0012721BD
Touch displays
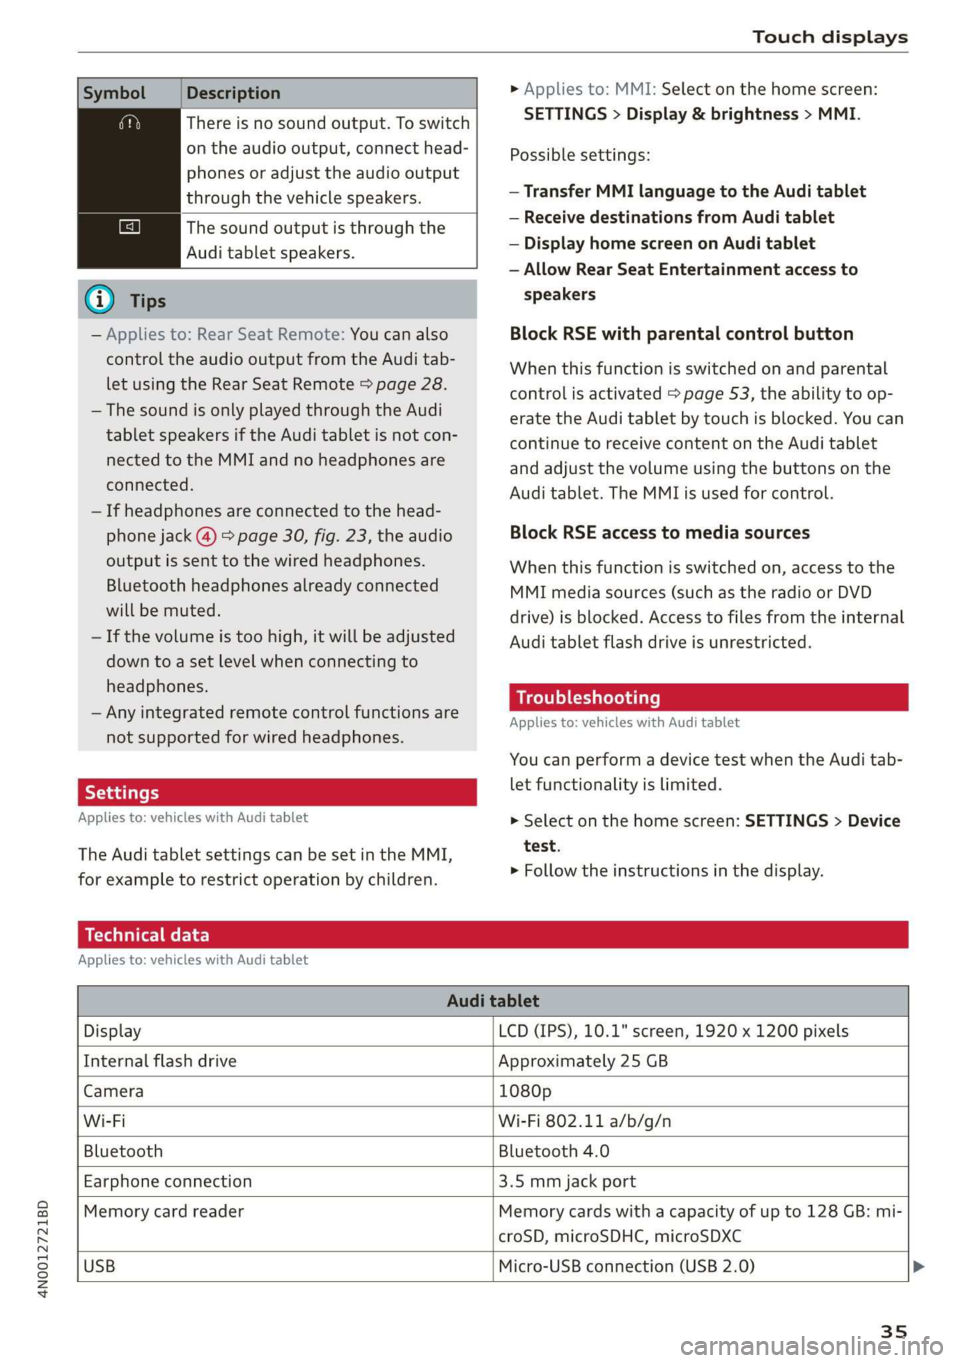
Symbol Description
There is no sound output. To switch
on the audio output, connect head-
phones or adjust the audio output
through the vehicle speakers.
The sound output is through the
Audi tablet speakers.
G) Tips
— Applies to: Rear Seat Remote: You can also
control the audio output from the Audi tab-
let using the Rear Seat Remote > page 28.
— The sound is only played through the Audi
tablet speakers if the Audi tablet is not con-
nected to the MMI and no headphones are
connected.
— If headphones are connected to the head-
phone jack (@) > page 30, fig. 23, the audio
output is sent to the wired headphones.
Bluetooth headphones already connected
will be muted.
— If the volume is too high, it will be adjusted
down to a set level when connecting to
headphones.
— Any integrated remote control functions are
not supported for wired headphones.
Applies to: vehicles with Audi tablet
The Audi tablet settings can be set in the MMI,
for example to restrict operation by children.
> Applies to: MMI: Select on the home screen:
SETTINGS > Display & brightness > MMI.
Possible settings:
— Transfer MMI language to the Audi tablet
— Receive destinations from Audi tablet
— Display home screen on Audi tablet
— Allow Rear Seat Entertainment access to
speakers
Block RSE with parental control button
When this function is switched on and parental
control is activated > page 53, the ability to op-
erate the Audi tablet by touch is blocked. You can
continue to receive content on the Audi tablet
and adjust the volume using the buttons on the
Audi tablet. The MMI is used for control.
Block RSE access to media sources
When this function is switched on, access to the
MMI media sources (such as the radio or DVD
drive) is blocked. Access to files from the internal
Audi tablet flash drive is unrestricted.
Troubleshooting
Applies to: vehicles with Audi tablet
You can perform a device test when the Audi tab-
let functionality is limited.
> Select on the home screen: SETTINGS > Device
test.
> Follow the instructions in the display.
Technical data
Applies to: vehicles with Audi tablet
Audi tablet
Display LCD (IPS), 10.1" screen, 1920 x 1200 pixels
Internal flash drive Approximately 25 GB
Camera 1080p
Wi-Fi Wi-Fi 802.11 a/b/g/n
Bluetooth Bluetooth 4.0
Earphone connection 3.5 mm jack port
Memory card reader Memory cards with a capacity of up to 128 GB: mi-
croSD, microSDHC, microSDXC
USB
Micro-USB connection (USB 2.0) >
35
Page 99 of 360

4N0012721BD
Stowing and using
Stowing and using
Power sources
When the ignition is switched on, you may be
able to use multiple power sources for external
devices, depending on the vehicle equipment.
12 volt sockets
You can connect electrical accessories to the 12
volt sockets. The power usage must not exceed
120 watts.
The 12 volt sockets are labeled with the 12V
symbol. They are located in the front center con-
sole, in the rear* and on the side trim panel in the
luggage compartment*.
USB ports
Applies to: vehicles with USB port
You can charge mobile devices using the USB
ports. The USB ports are labeled with the «<> or
(4 symbol or CHARGE ONLY.
115 volt socket
Applies to: vehicles with 115 volt socket
The socket is located in the center console in the
rear and can be used for electrical devices > A\.
The power usage must not exceed 150 watts.
When you push the device connector all the way
into the socket, the child safety mechanism re-
leases and there is electric current.
—If the LED on the socket is green or flashes
slowly, then the socket is ready for use.
—If the LED is red and flashes quickly, there is a
malfunction in the connected device or the
socket is too hot. The socket will switch off for
safety reasons. To reactivate the socket, remove
the device connector. Connect the device after
correcting the malfunction or reconnect after a
brief cool-down period.
— Incorrect usage can lead to serious injuries
or burns. To reduce the risk of injuries, never
leave children unattended in the vehicle
with the key.
Z\ WARNING
Applies to: vehicles with 115 volt socket
—To reduce the risk of fatal injury, do not in-
sert any conductive objects, such as knitting
needles, into the contacts on the socket.
—To reduce the risk of fatal injury, do not spill
any fluids on the socket. Should any mois-
ture enter the socket, make sure that it has
dried out completely before using the socket
again.
— If devices or connectors that are heavy (such
as a power supply unit) are attached directly
to the socket, the holder can become dam-
aged, which increases the risk of injury.
— Using adapters and extension cables in-
creases the risk of injury because they over-
ride the safety devices for the socket.
—To reduce the risk of injury, remove the con-
nector of the connected device if the socket
has switched off due to a malfunction.
Z\ WARNING
—To reduce the risk of fatal injury, store all
connected devices securely when driving so
that they do not move around inside the ve-
hicle when braking or in the event of an acci-
dent.
@) Note
— Read the operating manuals for the con-
nected devices.
—To reduce the risk of damage to the vehicle
electrical system, never attempt to charge
the vehicle battery by connecting accesso-
ries that provide power to the power sour-
ces.
— Do not connect any device whose network
class (voltage) does not match the network
class designed for the socket.
— Disconnect the connectors from the power
sources carefully to reduce the risk of dam-
aging them.
(i) Tips
Applies to: vehicles with 115 volt socket
— Devices that are not shielded or devices near
the rear window antenna can cause mal-
functions in the radio, TV, or vehicle electri-
cal system.
97