2020 AUDI A8 phone
[x] Cancel search: phonePage 225 of 360
4N0012721BD
Emergency call
Emergency call
Overview
Applies to: vehicles with emergency call function
An emergency call is a combination of data trans-
mission and a phone call. The data transmission
from your vehicle forwards important informa-
tion, such as the vehicle and position data, to the
emergency call center.
Depending on the country and the vehicle equip-
ment, the following functions may be available:
With the emergency call, you can call for help in
dangerous situations as quickly as possible. Use
this function when emergency help is needed
=> page 223.
— Audi connect emergency call (TPS emergency
call). This eCall system uses emergency call
centers operated by third party providers.
With online roadside assistance, you can request
assistance if there is a breakdown or a minor acci-
dent > page 224.
ZA WARNING
In areas with poor GPS reception or outside
the coverage range of the respective cell
phone service provider, some functions and/or
services may not be available, it may not be
possible to send or receive data, or functional-
ity may be limited.
@) Tips
You can find what data will be transferred at
www.audi.com.
Emergency call
Applies to: vehicles with emergency call function
The services are provided through a SIM card in-
stalled in the vehicle. Services are provided as-
suming that the cell phone network required for
the installed SIM card is functioning and availa-
ble for use. The available services set by Audi AG
are only available within the cell phone network
coverage area for the cell phone service provider
selected by Audi AG.
@) Tips
— The emergency call function cannot be deac-
tivated in the Infotainment system settings.
—The availability of the TPS emergency call is
limited to certain times.
—The costs for call and data connections for
TPS emergency calls is included in the price
of the services.
Applies to: vehicles with emergency call function
A TPS emergency call can be made manually or
automatically > page 223.
Making an emergency call
Applies to: vehicles with emergency call function
S S 3
=e x a a
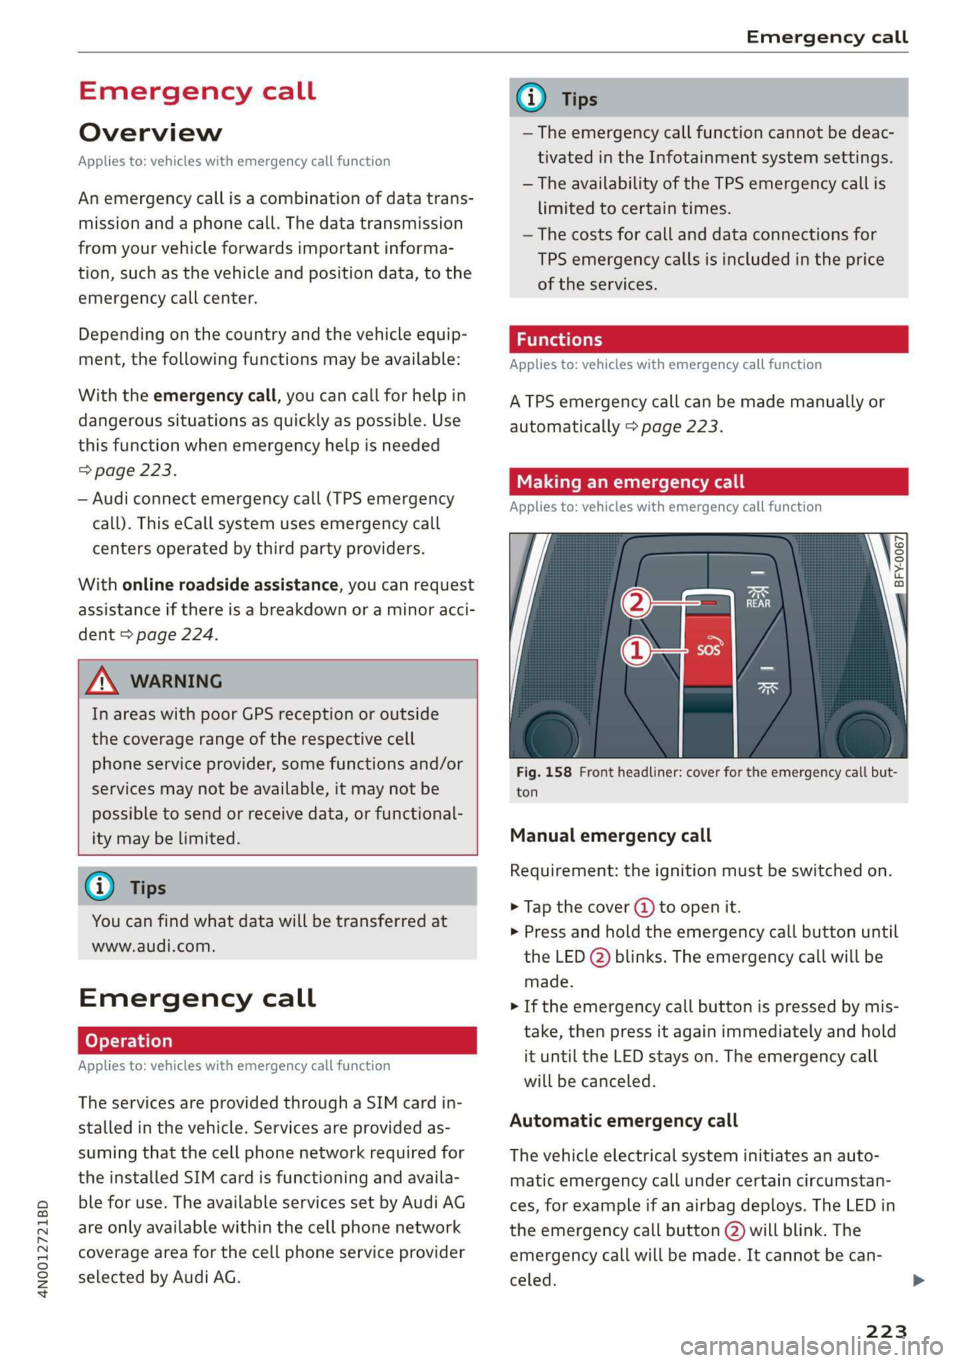
Fig. 158 Front headliner: cover for the emergency call but-
ton
Manual emergency call
Requirement: the ignition must be switched on.
> Tap the cover (4) to open it.
> Press and hold the emergency call button until
the LED (2) blinks. The emergency call will be
made.
> If the emergency call button is pressed by mis-
take, then press it again immediately and hold
it until the LED stays on. The emergency call
will be canceled.
Automatic emergency call
The vehicle electrical system initiates an auto-
matic emergency call under certain circumstan-
ces, for example if an airbag deploys. The LED in
the emergency call button @) will blink. The
emergency call will be made. It cannot be can-
celed.
223
Page 226 of 360
Emergency call
LED status
— Green - The emergency call function is availa-
ble.
— Red - There is a malfunction in the emergency
call function. Contact an authorized Audi dealer
or authorized Audi Service Facility. Note the
messages about the availability of the emer-
gency function > page 224.
— Off - The emergency call function is not availa-
ble, perhaps because no network is available.
@) Tips
If the emergency call is canceled due to a
poor connection, then the system automati-
cally tries to connect again.
Messages
Applies to: vehicles with emergency call function
BS Emergency call function: malfunction! Lim-
ited availability. Please contact Service
If this indicator light turns on and this message
appears, the emergency call function is restrict-
ed. For example, you cannot call the emergency
call center, but data may still be transmitted un-
der certain circumstances. Drive to an authorized
Audi dealer or authorized Audi Service Facility im-
mediately to have the malfunction corrected.
& Emergency call function: malfunction! Func-
tion unavailable. Please contact Service
If this indicator light turns on and this message
appears, you cannot make an emergency call.
Drive to an authorized Audi dealer or authorized
Audi Service Facility immediately to have the
malfunction corrected.
Online roadside
assistance
Applies to: vehicles with online roadside assistance
An online roadside assistance call )) is a combina-
tion of data transmission and a phone call. The
D_ The availability of the services offered depends on the
country and may change in the future.
224
data transmission from your vehicle forwards im-
portant information to the Audi service center,
such as the vehicle and position data.
Calling online roadside assistance
Applies to: vehicles with online roadside assistance
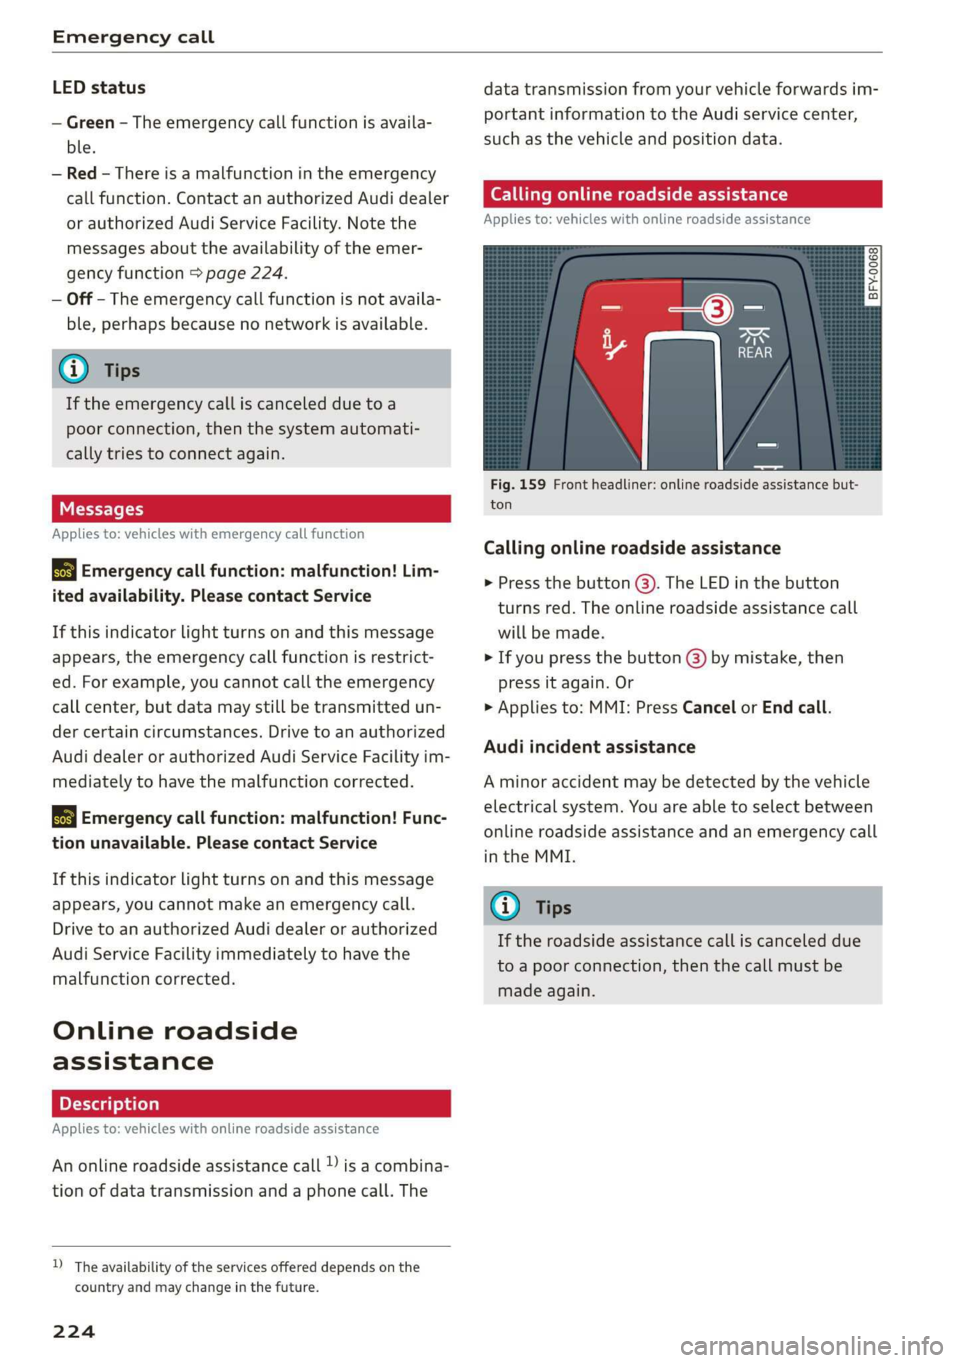
Fig. 159 Front headliner: online roadside assistance but-
ton
Calling online roadside assistance
> Press the button @). The LED in the button
turns red. The online roadside assistance call
will be made.
> If you press the button () by mistake, then
press it again. Or
> Applies to: MMI: Press Cancel or End call.
Audi incident assistance
A minor accident may be detected by the vehicle
electrical system. You are able to select between
online roadside assistance and an emergency call
in the MMI.
@) Tips
If the roadside assistance call is canceled due
to a poor connection, then the call must be
made again.
Page 232 of 360
Navigation
> Deleting destinations: select: Z > one or more
entries or Select all > Delete > (Done).
@) Note
Read the information about Audi connect, and
be sure to note the connectivity costs section
=@ in General information on page 216.
PE Ces)
Applies to: vehicles with navigation system
ca
° ony
clea
re
5
rAd
oo an u a i oaks Od
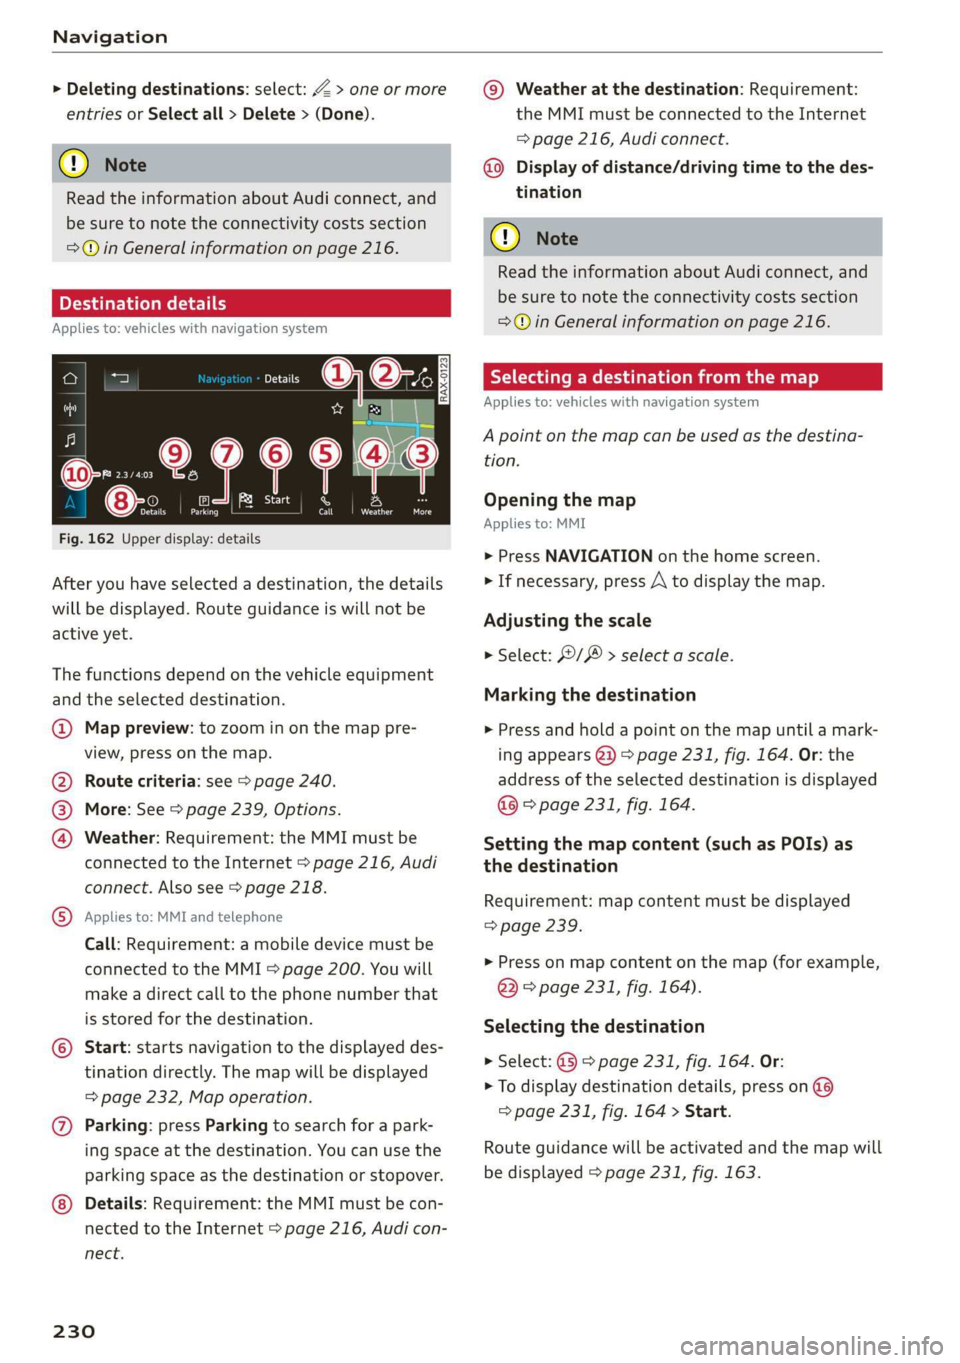
Fig. 162 Upper display: details
After you have selected a destination, the details
will be displayed. Route guidance is will not be
active yet.
The functions depend on the vehicle equipment
and the selected destination.
@ Map preview: to zoom in on the map pre-
view, press on the map.
@ Route criteria: see S page 240.
@ More: See > page 239, Options.
@ Weather: Requirement: the MMI must be
connected to the Internet > page 216, Audi
connect. Also see > page 218.
® Applies to: MMI and telephone
Call: Requirement: a mobile device must be
connected to the MMI = page 200. You will
make a direct call to the phone number that
is stored for the destination.
© Start: starts navigation to the displayed des-
tination directly. The map will be displayed
= page 232, Map operation.
@) Parking: press Parking to search for a park-
ing space at the destination. You can use the
parking space as the destination or stopover.
Details: Requirement: the MMI must be con-
nected to the Internet > page 216, Audi con-
nect.
230
@© Weather at the destination: Requirement:
the MMI must be connected to the Internet
= page 216, Audi connect.
Display of distance/driving time to the des-
tination
@) Note
Read the information about Audi connect, and
be sure to note the connectivity costs section
=@ in General information on page 216.
Selecting a destination from the map
Applies to: vehicles with navigation system
A point on the map can be used as the destina-
tion.
Opening the map
Applies to: MMI
> Press NAVIGATION on the home screen.
> If necessary, press A to display the map.
Adjusting the scale
> Select: / > select a scale.
Marking the destination
> Press and hold a point on the map until a mark-
ing appears @i) > page 231, fig. 164. Or: the
address of the selected destination is displayed
@ > page 231, fig. 164.
Setting the map content (such as POIs) as
the destination
Requirement: map content must be displayed
> page 239.
> Press on map content on the map (for example,
@ © page 231, fig. 164).
Selecting the destination
> Select: @ > page 231, fig. 164. Or:
> To display destination details, press on @
=> page 231, fig. 164 > Start.
Route guidance will be activated and the map will
be displayed > page 231, fig. 163.
Page 237 of 360

4N0012721BD
Navigation
Editing a home address or business address
Requirement: the favorites list must be dis-
played. Your home address or business address
must be stored.
> Press Home address or Business address until
the Options menu is displayed.
> Select: Change address > enter a destination >
(Set as destination) or (Add to address) > OK.
Editing a favorite
Requirement: the favorites list must be dis-
played. At least one favorite must be stored.
> Setting a favorite as a destination: press ona
favorite.
> Rename favorite: press on a favorite until the
Options menu is displayed. Select: Change
name > select ad name > OK.
> Deleting a favorite: select: Z > one or more
entries or Select all > Delete > (Done).
Requirement: the favorites list must be dis-
played. At least two favorites must be stored.
> Moving a favorite: press Z. Touch the > sym-
bol and move the entry to the desired position.
Press Done.
G) Tips
— After deleting the home address or business
address, only the address is deleted and the
entry will still be displayed in the favorites.
— Please note when moving favorites that
items 1 and 2 are reserved for the home ad-
dress and business address.
(eae erie iat mesial ately
Applies to: vehicles with navigation system
Two addresses (private/business) can be added
as destinations for each contact. Addresses for
contacts on your mobile device are displayed as a
mailing address.
Accessing contacts
> Applies to: MMI: Select on the home screen:
NAVIGATION > (G8) > Contacts.
Adding a destination to a contact
Requirement: a mobile device must be connected
to the MMI & page 200. Or: you must have im-
ported contacts > page 211, Importing and ex-
porting contacts. The Hide grayed-out contacts
option must be switched off > page 235. There
must be no business address or private address
stored for the desired contact.
> Select: a contact > |---| > Add destination.
> Follow the system instructions.
Settings
> Applies to: MMI: Select on the home screen:
NAVIGATION > (88) > Contacts > ©.
Hide grayed-out contacts
When the function is switched on, contacts that
have no address or navigation destination stored
will be hidden in navigation. You can find infor-
mation for additional settings under > page 211,
Directory settings.
@ Tips
If you add a navigation destination to a con-
tact, the destination will only be stored in the
MMI. The MMI does not change any contacts
on your phone.
Coyne de) rT eile]
Applies to: navigation system and on-street parking
In supported areas, you can display parking
along the route.
Requirement: the Parking notification must be
switched on > page 22, Notification center. The
MMI must be connected to the Internet
= page 216, Audi connect. Route guidance must
be active, you must be close to your destination,
and a notification must be displayed. Or: a point
is marked on the map.
> Press on the notification. Or: press on §| on the
map.
> To navigate to a parking: space, press ona col-
ored marking on the map.
> Select: F2 > Start.
235
Page 242 of 360
Navigation
— Overview: the entire route from the vehicle po-
sition to the destination or the next stopover is
displayed on the map. The map is oriented to
the north.
Automatic zoom
— On: the map scale adapts automatically de-
pending on the type of road being traveled (ex-
pressway, highway, other roads) so that you al-
ways have an optimal overview of the road
ahead. When route guidance is active, the scale
is adjusted automatically for a better detailed
view when there are upcoming maneuvers.
— Intersection: when route guidance is active, the
scale is adjusted automatically for a better de-
tailed view when there are upcoming maneu-
vers.
— Off
MMI map contents/Map content: You can switch
the display of additional information (such as
POIs) on the map in the upper display on or off.
Note the following for the 3D city model > ©.
Voice guidance
Voice guidance: you can adjust the navigation
prompts. With the Traffic setting, the MMI will
only give prompts if there are traffic incidents on
your route.
Voice guidance during phone call
Entertainment fader during navigation: the au-
dio playback volume is temporarily lowered when
navigation prompts are active.
Route criteria
You can adjust which route criteria should be al-
lowed or avoided for the route calculation.
HOV/carpool lanes
Highways
Toll roads
Ferries
Route information
When this function is switched on and route
guidance is active, route information @
240
=> page 231, fig. 163 is displayed. The next ma-
neuver will be displayed at the bottom. POIs and
traffic information will also be displayed. Press
route
information to display a preview of the next
maneuver on the map. You can switch the follow-
ing information on or off in route information.
— POIs along the route
— Traffic information
Personal route assistance
Personal route assistance is switched off at the
factory.
Your trips are recorded and destinations are sug-
gested by the MMI when this function is switched
on > page 233.
Trailer mode
Trailer mode is switched off at the factory.
When the function is switched on, the maximum
permitted speed for vehicles with trailers is in-
cluded during route guidance and the calculated
arrival time is adjusted accordingly. When the
function is switched on, the symbol @)
=> page 231, fig. 163 is displayed on the map.
Presentation mode
In presentation mode, the system simulates driv-
ing along the planned route without the vehicle
actually moving. You can use Specify starting
point when you would like to calculate a route
starting
from a location other than the current
vehicle position, for example. Simulating route
guidance: start route guidance and press Presen-
tation mode.
() Note
Read the information about Audi connect, and
be sure to note the connectivity costs section
=@ in General information on page 216.
Gi) Tips
You can adjust the volume of navigation
prompts during voice guidance using the
On/Off knob > page 20. Also see > page 266.
Page 248 of 360
Radio
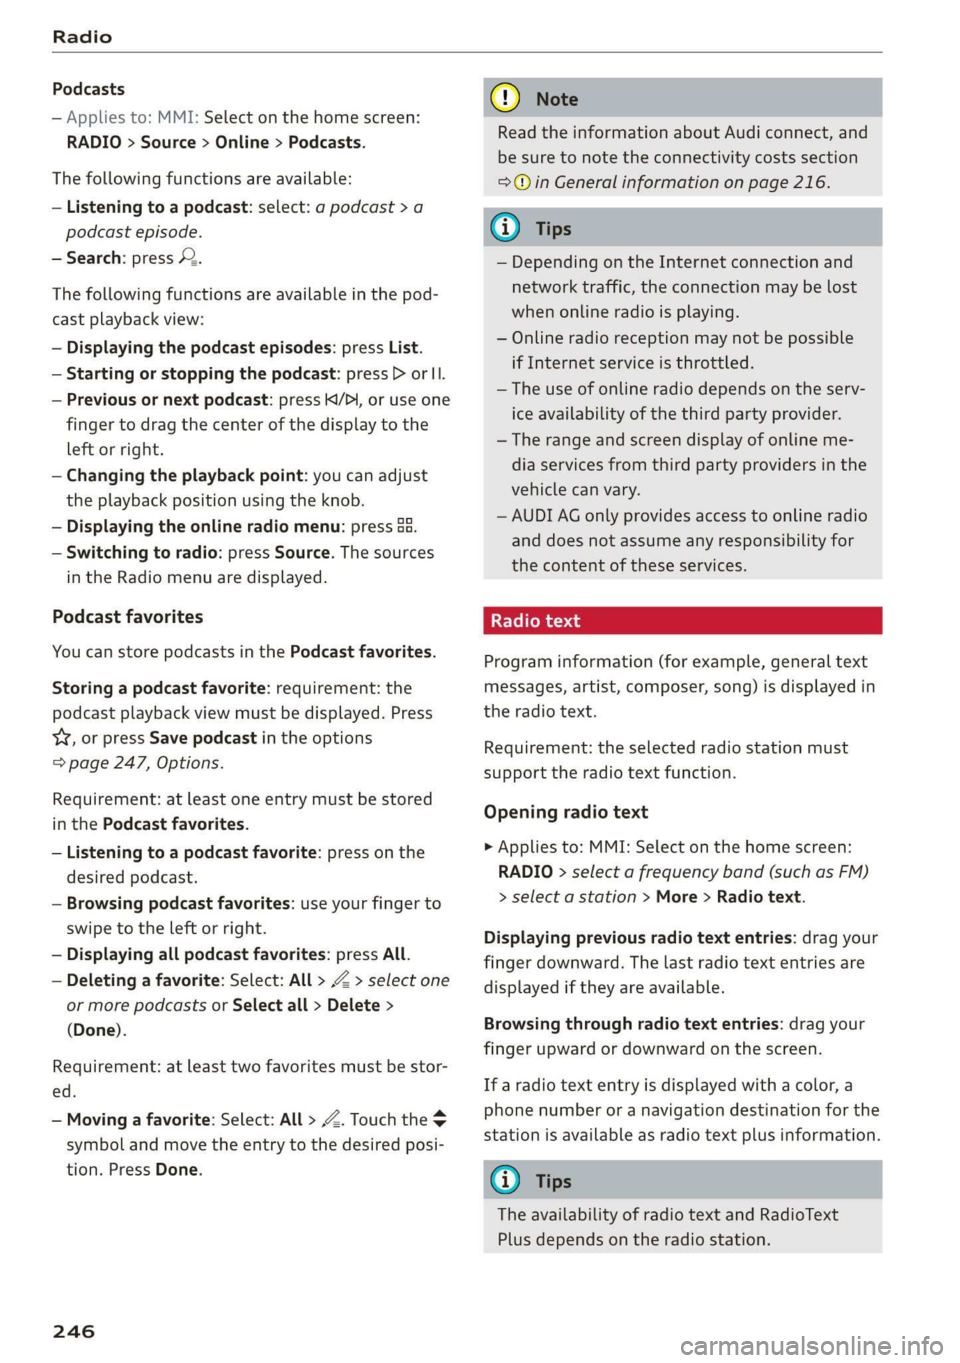
Podcasts
— Applies to: MMI: Select on the home screen:
RADIO > Source > Online > Podcasts.
The following functions are available:
— Listening to a podcast: select: a podcast > a
podcast episode.
— Search: press 2.
The following functions are available in the pod-
cast playback view:
— Displaying the podcast episodes: press List.
— Starting or stopping the podcast: press P orl.
— Previous or next podcast: press K/P, or use one
finger to drag the center of the display to the
left or right.
— Changing the playback point: you can adjust
the playback position using the knob.
— Displaying the online radio menu: press 5a.
— Switching to radio: press Source. The sources
in the Radio menu are displayed.
Podcast favorites
You can store podcasts in the Podcast favorites.
Storing a podcast favorite: requirement: the
podcast playback view must be displayed. Press
YY, or press Save podcast in the options
=> page 247, Options.
Requirement: at least one entry must be stored
in the Podcast favorites.
— Listening to a podcast favorite: press on the
desired podcast.
— Browsing podcast favorites: use your finger to
swipe to the left or right.
— Displaying all podcast favorites: press All.
— Deleting a favorite: Select: All > Z > select one
or more podcasts or Select all > Delete >
(Done).
Requirement: at least two favorites must be stor-
ed.
— Moving a favorite: Select: All > Z. Touch the
symbol and move the entry to the desired posi-
tion. Press Done.
246
@) Note
Read the information about Audi connect, and
be sure to note the connectivity costs section
=>@ in General information on page 216.
@) Tips
— Depending on the Internet connection and
network traffic, the connection may be lost
when online radio is playing.
— Online radio reception may not be possible
if Internet service is throttled.
— The use of online radio depends on the serv-
ice availability of the third party provider.
—The range and screen display of online me-
dia services from third party providers in the
vehicle can vary.
— AUDI AG only provides access to online radio
and does not assume any responsibility for
the content of these services.
Program information (for example, general text
messages, artist, composer, song) is displayed in
the radio text.
Requirement: the selected radio station must
support the radio text function.
Opening radio text
> Applies to: MMI: Select on the home screen:
RADIO > select a frequency band (such as FM)
> select a station > More > Radio text.
Displaying previous radio text entries: drag your
finger downward. The last radio text entries are
displayed if they are available.
Browsing through radio text entries: drag your
finger upward or downward on the screen.
If a radio text entry is displayed with a color, a
phone number or a navigation destination for the
station is available as radio text plus information.
G) Tips
The availability of radio text and RadioText
Plus depends on the radio station.
Page 250 of 360
Radio
Artist as SXM alert
The artist being currently played will be stored as
a SiriusXM alert > page 247.
Title as SXM alert
The title being currently played will be stored as
a SiriusXM alert > page 247.
Team 1 as game alert/Team 2 as game alert
The teams currently playing will be stored as a
game alert > page 247.
Radio through the Audi tablet
Applies to: vehicles with Audi tablet
Playback occurs on the respective Audi tablet.
Save podcast
See > page 246, Podcast favorites.
Save as a shortcut
See > page 23, Shortcuts.
> Applies to: MMI: Select on the home screen:
RADIO > ©.
Depending on the vehicle equipment, the follow-
ing settings may be available:
HD Radio FM/HD Radio AM
You can switch HD Radio reception on or off.
SiriusXM Tune Start
If you play a smart favorite when this function is
switched on, the song currently playing on the
channel will play from the beginning.
Managing SiriusXM alerts
See > page 247.
SiriusXM channel sorting
You can set how the channels are sorted in the
SiriusXM channel list:
— Channel number: the channels are sorted in as-
cending order according to their channel num-
ber.
248
— Channel name: the channels are listed in alpha-
betical order.
— First category, then channel number: the chan-
nels are sorted by their category and then by
their channel number.
— First category, then channel name: the chan-
nels are sorted by their category and then by
their channel names.
SiriusXM category filter
The stations shown in the station list can be fil-
tered by your personal preferences and by pro-
gram type. The program categories that you can
select depend on what is offered by your provid-
er. When the Unsubscribed channels function is
switched off, unsubscribed channels will be hid-
den.
SiriusXM subscription status
This option is available when your subscription is
about to expire or has already expired. The expi-
ration date for your license is displayed.
Call SiriusXM: the telephone number and radio
ID of your satellite radio provider are displayed.
To call your satellite radio provider using the
MMI, press Call SiriusXM.
Online additional data
Requirement: the MMI must be connected to the
Internet > page 216.
When the function is switched on, additional in-
formation (such as station logos, cover, artist,
track) will be loaded depending on the availabili-
ty from the different providers.
Preferred online radio data rate
You can set the data rate for online radio
=> page 245.
For optimal sound playback, press High. To re-
duce data usage, press Low.
() Note
Read the information about Audi connect, and
be sure to note the connectivity costs section
=>@ in General information on page 216. >
Page 254 of 360
Media
> Ejecting all CDs: press and hold the button @)
longer.
> Canceling the loading process: press the but-
ton @) again during the loading process.
Six CDs/DVDs can be loaded into the DVD chang-
er. For information on the properties of support-
ed data mediums, refer to > page 261.
The DVD drive is accessed and operated through
the MMI > page 255.
@) Tips
Always read the chapter > page 250, General
information.
Bluetooth audio player
Applies to: vehicles with Bluetooth audio player
With the Bluetooth audio player, you can play
music wirelessly through the MMI from your
Bluetooth-capable mobile device (such as a cell
phone).
Requirement: the vehicle must be stationary and
the ignition must be switched on. The Bluetooth
settings will open on your mobile device during
the connection setup. The Bluetooth function and
visibility of the MMI = page 267 and mobile de-
vice must be switched on.
Connecting a mobile device
> Applies to: MMI: Select on the home screen:
MEDIA > Source > Connect external device >
New connection. The available Bluetooth devi-
ces will be displayed after several seconds.
> Press on the desired mobile device in the list of
displayed Bluetooth devices.
> To update the list, press O.
> A PIN for a secure Bluetooth connection will be
generated.
> Confirm the PIN on your mobile device, or:
> Enter the PIN for the connection setup on your
mobile device. The time allowed for entering
the PIN is limited to approximately 30 seconds.
After connecting successfully, the mobile device
will be displayed in the Connected devices menu
as a Bluetooth audio player.
Playing media > page 255.
252
G) Tips
— Check for any connection requests on your
Bluetooth device.
— Multiple Bluetooth audio players can be
paired with the MMI, but only one at a time
can be active as a Bluetooth audio player
=> page 268.
— The supported media functions (such as
shuffle, list view, categories, search, op-
tions) depend on the Bluetooth device being
used.
— Note the volume setting on your Bluetooth
device. Audi recommends setting your mo-
bile device to the maximum volume when
using it as a Bluetooth audio player.
—Aselection of supported Bluetooth devices
can be found in the database for tested mo-
bile devices at www.audi.com/bluetooth.
Online media
Applies to: vehicles with Audi connect Infotainment and on-
line media
You can play and operate various online media
services, such as music streaming services, using
the MMI.
Requirement: a supported online media service
must be available in the country where the vehi-
cle is being operated.
Connect online media
> Connect the MMI to the Internet > page 216.
> Switch on the Wi-Fi hotspot in the MMI
=> page 221.
> Applies to: MMI: Select on the home screen:
MEDIA > Source > Connect online media.
> Switch the Wi-Fi function on in your mobile de-
vice and connect it to the MMI Wi-Fi hotspot
=> page 217.
> Install and start the myAudi app on your mo-
bile device.
> Log in to your myAudi account in the myAudi
app and select your vehicle.
Your mobile device must be connected to the
MMI and must be highlighted. When you press
the highlighted device, it will be disconnected. >