2020 AUDI A8 instrument cluster
[x] Cancel search: instrument clusterPage 206 of 360

Telephone
— You MUST cease operating this device im-
mediately if requested by ISED or a licensed
wireless service provider.
— WARNING: £911 location information may
not be provided or may be inaccurate for
calls served by using this device.
: se) s ve
Ov - er ne
— Only one mobile device at a time can be | | Ye)
|
ees) i
Using the telephone
ONT are mat) yada mired elie
Applies to: vehicles with telephone
charged wirelessly in the Audi phone box.
— You can switch the front and rear Audi
phone box charging function on and off sep-
arately.
— Strong transmission quality* cannot be
guaranteed if more than one mobile device
is in the box.
Fig. 155 Upper display: selection menu
Requirement: A mobile device must be connected
to the MMI > page 200.
> Applies to: MMI: Select on the home screen:
—To reduce the risk of malfunctions, make PHONE
sure the mobile device is positioned correct-
ly in the Audi phone box. The following phone functions will be available:
— Make sure there are no objects between the @ Search
Audi phone box and the mobile device. @ Calllist 00.0.0... eee 204
— Placing the mobile device in a bag or protec- @® Favorites ......... 0... eee eee 205
tive sleeve inside the Audi phone box can in- @® Contacts ..............222255. 205
terfere with the connection to the external © Voicemail 206
antenna*.
Dial OP ou © snseene © w seeninss « o somnase 206
— Metallic objects in the Audi phone box block 1) 3 hn _ ised
the wireless charging of your mobile device @ Swit Ing Retweenitwemoplsise 210
MIGOS! «axons s i conve vw anaminn + x swavaws a &
and calls made using the exterior antenna’*.
—The maximum charging output is 5 W.
— The charging time and temperature will vary
depending on the mobile device being used.
— If you are not using the Audi phone box with
the holder*, you can close the holder @)
The selected telephone functions will also be
available in the instrument cluster > page 212
and the Rear Seat Remote* > page 212.
Covey em ae] Me
> fig. 153. Applies to: vehicles with telephone
— You can purchase a USB adapter from an au-
thorized Audi dealer or authorized Audi Call list @-- eos
Smith, John “@ 2018-10-28 fo)
ee caeer 9:31AM
Service Facility, or at specialty stores.
— Audi recommends using Audi Genuine Ac- Albert, Simon (3) PONE S to)
cessories. Audi has verified their reliability,
safety, and suitability.
204
Pe ee ae eT
PUTT ale aeay
ec aR en cd
PNT Me ea
Mobile 001712345678
Fig. 156 Upper display: Call list
ErEn
2018-10-28
2:01PM
PO ate}
EL CS)
Requirement: the call list must contain a phone
number.
> Applies to: MMI: Select on the home screen:
PHONE > Call list.
Page 214 of 360

Telephone
Contacts in vCard format (.vcf) can be imported
or exported from the MMI.
— Applies to: MMI: Importing contacts from a
storage device: Select: Import contacts >
Search for import data > SD card 1 or USB de-
vice 1/USB device 2 > desired contacts or Se-
lect all contacts > Start import.
— Applies to: MMI: Exporting contacts to a stor-
age device: Requirement: Only previously im-
ported contacts can be exported. Select: Export
contacts > Find source for exporting > SD card
1 or USB device 1/USB device 2 > desired con-
tacts or Select all contacts > Start export.
@ Tips
— For more information about the myAudi ac-
count, visit my.audi.com.
— The imported contacts are stored in the lo-
cal MMI memory.
— Contacts that were downloaded from a mo-
bile device cannot be exported.
— There should be no other files or folders on
the storage medium containing the contacts
to be imported.
— Apple devices and MTP devices (such as
smartphones) are not recognized as USB
storage devices.
Mobile phone network settings
Applies to: vehicles with telephone
> Applies to: MMI: Select on the home screen:
SETTINGS > Connection settings > Mobile
phone network.
Switching the car phone or data module on
Applies to: vehicles with car phone/data module
See > page 211.
Instrument cluster
Telephone
Applies to: vehicles with multifunction steering wheel and
telephone
In the instrument cluster display, you can control
the MMI functions with the multifunction steer-
ing wheel. Operating > page 13 and > page 40,
Additional function buttons.
212
Requirement: the Telephone tab must be select-
ed in the instrument cluster.
> Press the [=] button.
Possible options:
— Call list: Requirement: the call list must con-
tain a phone number.
— Favorites: Requirement: favorites must be stor-
ed in the MMI.
— Switch telephones: Requirement: two cell
phones must be connected to the MMI.
— Back to call: Requirement: there must be a call
in progress.
i) Tips
Depending on the selected function, it may be
necessary to use the MMI.
Using the Rear Seat
Remote
Pairing a mobile device
Applies to: vehicles with Rear Seat Remote and Audi phone
box
You can make calls through the exterior antenna
on the vehicle using the Rear Seat Remote. Using
the exterior antenna helps when there is a low
signal and also provides better reception quality.
When making phone calls, you can leave the Rear
Seat Remote in the holder or remove it. If you
hold the Rear Seat Remote in your hand, the
screen will automatically switch to the Phone
menu when there is an active phone call. Pay at-
tention to the positioning of the screen so that
the other person on the call can hear you.
You can use the phone functions with the Rear
Seat Remote. You can adjust settings in the MMI,
for example, the Bluetooth settings for connect-
ing with the mobile device.
Connecting a mobile device
Requirement: The Bluetooth settings must be
open on your mobile device during the connec-
tion setup. The mobile device to be connected
must not be actively connected to any other Blue-
tooth device.
Page 227 of 360

4N0012721BD
Navigation
Navigation
Opening navigation
Applies to: vehicles with navigation system
The navigation system directs you to your desti-
nation, around traffic incidents, and on alterna-
tive routes, if desired.
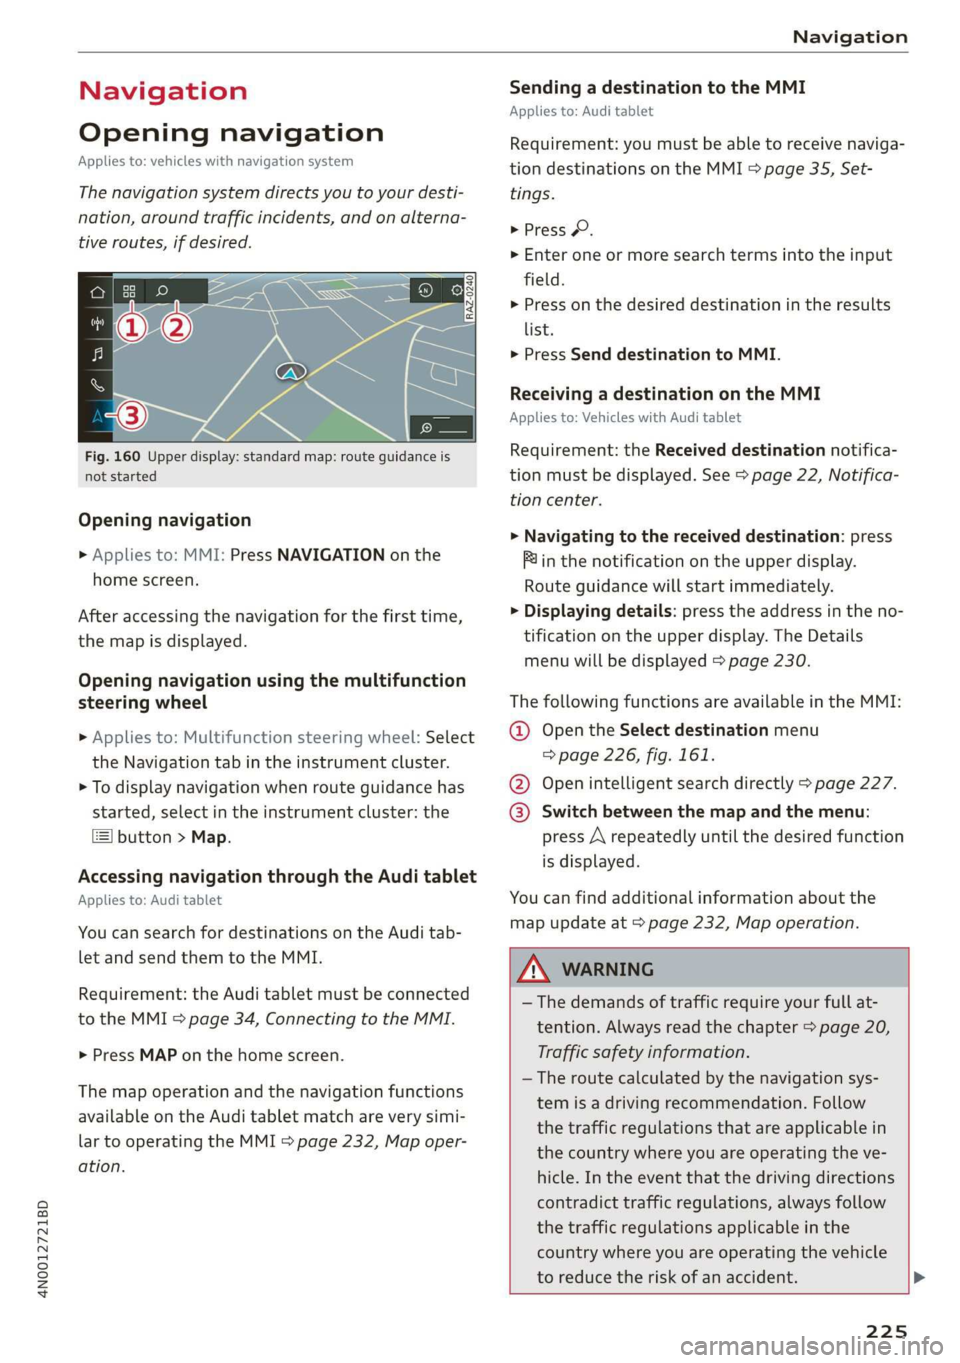
Fig. 160 Upper display: standard map: route guidance is
not started
Opening navigation
> Applies to: MMI: Press NAVIGATION on the
home screen.
After accessing the navigation for the first time,
the map is displayed.
Opening navigation using the multifunction
steering wheel
> Applies to: Multifunction steering wheel: Select
the Navigation tab in the instrument cluster.
> To display navigation when route guidance has
started, select in the instrument cluster: the
button > Map.
Accessing navigation through the Audi tablet
Applies to: Audi tablet
You can search for destinations on the Audi tab-
let and send them to the MMI.
Requirement: the Audi tablet must be connected
to the MMI > page 34, Connecting to the MMI.
> Press MAP on the home screen.
The map operation and the navigation functions
available on the Audi tablet match are very simi-
lar to operating the MMI > page 232, Map oper-
ation.
Sending a destination to the MMI
Applies to: Audi tablet
Requirement: you must be able to receive naviga-
tion destinations on the MMI & page 35, Set-
tings.
> Press ©.
> Enter one or more search terms into the input
field.
> Press on the desired destination in the results
list.
> Press Send destination to MMI.
Receiving a destination on the MMI
Applies to: Vehicles with Audi tablet
Requirement: the Received destination notifica-
tion must be displayed. See > page 22, Notifica-
tion center.
>» Navigating to the received destination: press
Pin the notification on the upper display.
Route guidance will start immediately.
> Displaying details: press the address in the no-
tification on the upper display. The Details
menu will be displayed > page 230.
The following functions are available in the MMI:
@ Open the Select destination menu
=> page 226, fig. 161.
@ Open intelligent search directly > page 227.
@® Switch between the map and the menu:
press A repeatedly until the desired function
is displayed.
You can find additional information about the
map update at > page 232, Map operation.
ZA WaRNING
— The demands of traffic require your full at-
tention. Always read the chapter > page 20,
Traffic safety information.
— The route calculated by the navigation sys-
tem is a driving recommendation. Follow
the traffic regulations that are applicable in
the country where you are operating the ve-
hicle. In the event that the driving directions
contradict traffic regulations, always follow
the traffic regulations applicable in the
country where you are operating the vehicle
to reduce the risk of an accident. >
225
Page 230 of 360

Navigation
Route guidance will be activated and the map will
be displayed > page 231, fig. 163.
Destination entry for a street intersection
> Select: Intersection > enter a street > Start.
Loading previous destinations
Applies to: vehicles with navigation system
Your last destinations and routes can be loaded
directly as a navigation destination.
As soon as you start route guidance, the destina-
tion is automatically saved in the last destina-
tions. Your previous destinations are marked with
the © symbol.
If you have met the requirements for myAudi
navigation, your previous destinations will be
synchronized with your myAudi account
=> page 226.
Accessing previous destinations
» Applies to: MMI: Select on the home screen:
NAVIGATION > (&5) > Last destinations > select
the desired destination > Start.
> Applies to: multifunction steering wheel: Select
in the instrument cluster: Navigation tab >
button > Last destinations > desired destina-
tion.
Changing and loading a previous destination
> Applies to: MMI: Select on the home screen:
NAVIGATION > (G2) > Last destinations > Z >
>
change the address > Use address > Start.
Restore last tour
Requirement: a route with at least two stopovers
must have already been canceled.
Your last route is labeled with the © symbol.
> Applies to: MMI: Select on the home screen:
NAVIGATION > (G5) > Last destinations > Re-
store last tour. Route guidance will start imme-
diately.
Deleting previous destinations
> Applies to: MMI: Select on the home screen:
NAVIGATION > (88) > Last destinations > Z >
228
select one or more entries or Select all > Delete
> (Done).
@) Tips
The last route will be automatically deleted
from the list if you start a new route guidance
after canceling the route.
Setting a favorite as the destination
Applies to: vehicles with navigation system
You can access frequent destinations in the fa-
vorites. You can quickly and easily start route
guidance using the home address or business ad-
dress function.
Requirement: a favorite must be stored
> page 234.
> Applies to: MMI: Select on the home screen:
NAVIGATION > (68) > Favorites > select a de-
sired destination > Start. Or
> Applies to: multifunction steering wheel: Select
in the instrument cluster: Navigation tab >
button > Favorites > desired destination.
POIs (Online Points of Interest)
Applies to: vehicles with a navigation system and Audi con-
nect Infotainment
Search for points of interest such as restaurants.
If the MMI is connected to the Internet, points of
interest will be automatically included in the
search.
> Applies to: MMI: Select on the home screen:
NAVIGATION > (éa) > Points of interest.
The system always searches in the search area
that is currently selected > table on page 229.
> Searching for points of interest: enter the
name of a POI.
> Searching for a point of interest in a specific
category: Select: a category (for example, res-
taurants) > a point of interest.
> Changing the search area: Requirement: route
guidance must be active. Press (a)/2:9/B! repeat-
edly until the desired search area > table on
page 229 is selected.
Sorting points of interest
Page 233 of 360

4N0012721BD
Navigation
Stopovers and route plan
Applies to: vehicles with navigation system
You can enter additional destinations during ac-
tive route guidance.
Entering a stopover
Requirement: route guidance must be active.
> Enter a destination > page 227.
Displaying stopovers or the route plan
All destinations are listed in the route plan.
> Press on 2) > page 231, fig. 163 on the map.
Editing stopovers
> Press on) > page 231, fig. 163 on the map.
> Adding a stopover: Select: Add destination >
select a destination > Add.
> Moving a stopover: press Z. Touch the $ sym-
bol and move the entry to the desired position.
Press Done.
> Deleting a stopover: Select: Z > one or more
entries or Select all > Delete > (Done).
Stopping route guidance
Applies to: vehicles with navigation system
Requirement: route guidance must be active and
the map must be displayed.
> Applies to: MMI: Press ® @ > page 231,
fig. 163.00
> Applies to: multifunction steering wheel: Select
in the instrument cluster: Navigation tab >
button > Cancel route guidance.
Map
Map functions
Applies to: vehicles with navigation system
map)
WES
ray 23] 13 A irae
Fig. 164 Upper display: marked map item (standard map)
Opening the map
Applies to: MMI
> Press NAVIGATION on the home screen.
> If necessary, press A to display the map.
The following list gives an overview of the infor-
mation displayed on the map. Press on any func-
tion (for example, alternative routes) to show ad-
ditional options.
Destination input > page 226
Intelligent search > page 227
Cancel route guidance > page 231
Current route
Request spoken prompt
Alternative routes > page 234
QOOOOLOHO Display active destinations, stopovers, or
route plan. The distance to the destination
including the calculated arrival time is dis-
played > page 231.
© For vehicles with trailer mode, the symbol in-
dicates that the function is switched on.
=> page 240
231
Page 235 of 360

4N0012721BD
Navigation
Zooming in on the map
> Place two fingers on the map and pull your fin-
gers apart. Or: double tap on the map with one
finger.
Zooming out on the map
> Place two fingers on the map and pull your fin-
gers together. Or: double tap on the map with
two fingers.
Rotating the map
> Rotate the map using two fingers.
Tilting the map
> Drag upward or downward with two fingers.
@) Tips
Certain gestures may not be available on all
touch displays or in every menu.
Navigation view with route guidance
started
Applies to: vehicles with navigation system
Fig. 165 Instrument cluster: default view: turning maneu-
ver when route guidance has started
Requirement: route guidance must be on
=> page 226.
The following information will be displayed in the
driver information system, if available:
@ Current vehicle position
@A bar graph appears when there is an upcom-
ing turn. The fewer the bars that are shown, the
shorter the distance is until the turn. If there is
no upcoming turn immediately ahead, the dis-
tance to the destination or stopover, the calculat-
ed arrival time, and a direction arrow for the up-
coming maneuver will be displayed in the right
speedometer. If there is no upcoming maneuver,
the distance to the next maneuver will be dis-
played.
@® Lane recommendation
Personal route
assistance
Applies to: vehicles with navigation system and personal
route assistance
Your MMI can learn the routes that you drive fre-
quently (such as your daily commute to work and
back) and suggest route guidance based on the
current vehicle position.
When the function is switched on, the MMI re-
cords the routes driven regardless of whether or
not you are using navigation.
Without starting route guidance, your MMI can
check the traffic conditions and shows possible
traffic incidents for the possible routes to be driv-
en.
Opening personal routes
Requirement: personal route assistance must be
switched on > page 240. Route guidance must
not be active. A notification is displayed.
> The MMI displays up to three suggestions.
Press on a suggestion. Route guidance will
start.
Better routes
If there are major traffic incidents, the MMI will
display a notification regardless of the selected
menu. If the MMI has calculated a better route,
you can select it as the route.
> Press on the notification.
As soon as you switch off personal route assis-
tance, your personal routes will no longer be re-
corded. Routes that were already stored remain
stored.
Deleting personal routes
> Applies to: MMI: Select on the home screen:
NAVIGATION > %} > Personal route assistance >
233
Page 241 of 360

4N0012721BD
Navigation
@) Tips
— Having the online traffic information func-
tion switched on provides the most accurate
reports of traffic situations and traffic fore-
casting. Your vehicle transmits and process-
es its anonymous, encrypted position infor-
mation at regular intervals to the traffic da-
ta provider. You can switch off data transfer
at any time > page 333.
— The online traffic information network is
not available in all countries, and the cover-
age is not nationwide.
Options and settings
Applies to: vehicles with navigation system
Context-specific functions and settings may be
available depending on the vehicle equipment.
> Press More, or
> Open a list with navigation destinations (such
as recent destinations) and press and hold an
item until the Options menu is displayed.
Storing a favorite
See > page 234.
Edit address
You can edit an address for the next destination
entry and navigate to the destination. Select: Ed-
it address > enter a street > Use address > Start.
If the address is permanently stored (for exam-
ple, in the favorites), the stored entry will not be
changed.
Change address
See > page 234, Favorites.
Entering an address
See > page 235, Contacts as navigation destina-
tions.
Change name
See > page 234, Favorites.
Weather
See > page 218, Services.
Save as a shortcut
See > page 23, Shortcuts.
Applies to: vehicles with navigation system
You can adjust the navigation system settings in
the instrument cluster and in the MMI display
separately. The settings depend on the country
and vehicle equipment.
Accessing settings
> Applies to: MMI: Select on the home screen:
NAVIGATION > ©
Accessing settings using the multifunction
steering wheel
>» Applies to: multifunction steering wheel: Select
in the instrument cluster: Navigation tab >
button.
Please note that a setting applied to the multi-
function steering wheel is only valid for the in-
strument cluster map.
Map settings
Satellite map: see > page 236.
Show range: See > page 236.
Traffic: you can display current traffic informa-
tion on the map. See > page 232, Traffic infor-
mation display on the map or map preview
— Free flow of traffic
— Traffic obstructions
— Traffic information
Map colors
— Automatic: the map display adapts to the light-
ing conditions (for example, by changing from
day to night when driving through a tunnel).
— Day or Night
Map orientation
— 2D map or 2D north: the current vehicle posi-
tion is displayed. The map is oriented in the di-
rection of travel or to the north.
— 3D map: the current vehicle position is shown
on a three-dimensional map and is oriented in
the direction of travel.
239
>
Page 271 of 360

4N0012721BD
Additional settings
Bluetooth profiles
You can switch desired profiles on or off sepa-
rately in the MMI.
Favorite
To set a paired mobile device as the default
phone, activate this function in the MMI.
When the mobile device is in range and the Blue-
tooth function on the mobile device and in the
MMI is switched on, the default phone will be
given priority over the other Bluetooth devices
and will be connected directly to the MMI.
Legal information
General information
Information on the software licenses can be
found online at www.audi.com/softwareinfo.
SelgureC mm aM ae
> Applies to: MMI: Select on the home screen:
SETTINGS > General.
License subscription
Version information
Legal information
Possible options:
— Software information
— About Audi connect
Teta ed)
Applies to: vehicles with Rear Seat Remote
> Applies to: Rear Seat Remote: Select on the
home screen: SETTINGS
Possible options:
— Software information
— Legal information
Audi tablet
Applies to: vehicles with Audi tablet
> Applies to Audi tablet: Select on the home
screen: SETTINGS > About the tablet.
Legal information
Information on licenses and legal information
can be accessed.
Regulatory information
Information about the device’s conformity with
applicable regulations will be displayed.
PAU ae eM ars]
Applies to: vehicles with Audi smartphone interface
Requirement: a smartphone must be connected
to the MMI > page 264.
> Applies to: MMI: Select on the home screen:
SETTINGS > Connected devices > Audi smart-
phone interface.
> Press and hold an item until the associated op-
tions are displayed.
> Press Legal notes.
sida area
Requirement: the vehicle must be stationary.
> Select in the instrument cluster: Vehicle func-
tions tab > page 13.
> Press the E] button on the multifunction steer-
ing wheel until the display appears.
Possible options:
— Engine code
— Software information
— Version information
Head-up display
Applies to: vehicles with head-up display
> Applies to: MMI: Select on the home screen:
SETTINGS > Display & brightness > Head-up
display > Display contents > Show the license
text in the head-up display. Information on
your licenses will be displayed.
269