2020 AUDI A8 tow
[x] Cancel search: towPage 33 of 360

4N0012721BD
Touch displays
Securing the Audi tablet
Requirement: the two buttons @) ° fig. 24 must
be in the retracted position.
> Hold the Audi tablet in both hands during the
entire process.
» Engage the Audi tablet at the contact strip @
> fig. 25.
> Carefully press the Audi tablet toward the Audi
tablet holder @) > fig. 25 until the Audi tablet
locks into place audibly.
@ Tips
If the Audi tablet is not in its holder and is ex-
posed to extremely high or low temperatures,
it may turn off automatically for safety rea-
sons.
Tilting the holder
Applies to: vehicles with Audi tablet
wy
RAH-8642|
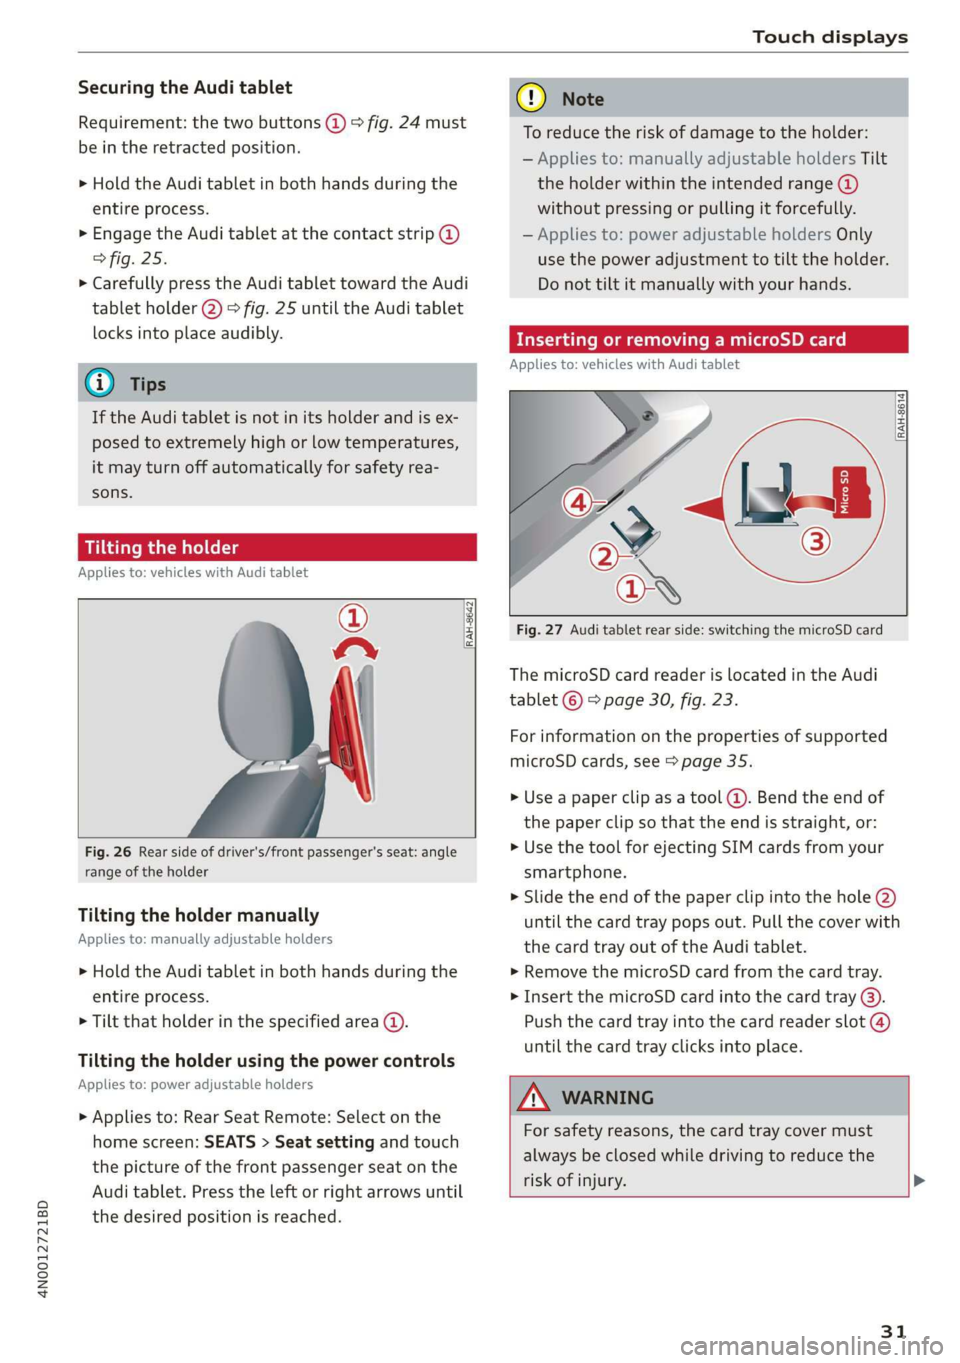
Fig. 26 Rear side of driver's/front passenger's seat: angle
range of the holder
Tilting the holder manually
Applies to: manually adjustable holders
> Hold the Audi tablet in both hands during the
entire process.
> Tilt that holder in the specified area @).
Tilting the holder using the power controls
Applies to: power adjustable holders
> Applies to: Rear Seat Remote: Select on the
home screen: SEATS > Seat setting and touch
the picture of the front passenger seat on the
Audi tablet. Press the left or right arrows until
the desired position is reached.
® Note
To reduce the risk of damage to the holder:
— Applies to: manually adjustable holders Tilt
the holder within the intended range @)
without pressing or pulling it forcefully.
— Applies to: power adjustable holders Only
use the power adjustment to tilt the holder.
Do not tilt it manually with your hands.
Inserting or removing a microSD card
Applies to: vehicles with Audi tablet
RAH-8614 fi
Fig. 27 Audi tablet rear side: switching the microSD card
The microSD card reader is located in the Audi
tablet © > page 30, fig. 23.
For information on the properties of supported
microSD cards, see > page 35.
» Use a paper clip as a tool (@). Bend the end of
the paper clip so that the end is straight, or:
> Use the tool for ejecting SIM cards from your
smartphone.
> Slide the end of the paper clip into the hole @)
until the card tray pops out. Pull the cover with
the card tray out of the Audi tablet.
» Remove the microSD card from the card tray.
> Insert the microSD card into the card tray @).
Push the card tray into the card reader slot @)
until the card tray clicks into place.
AN WARNING
For safety reasons, the card tray cover must
always be closed while driving to reduce the
risk of injury. >
31
Page 35 of 360

4N0012721BD
Touch displays
Menus and symbols
Applies to: vehicles with Audi tablet
emsa || | cea
Rats ® SETTINGS
Cy
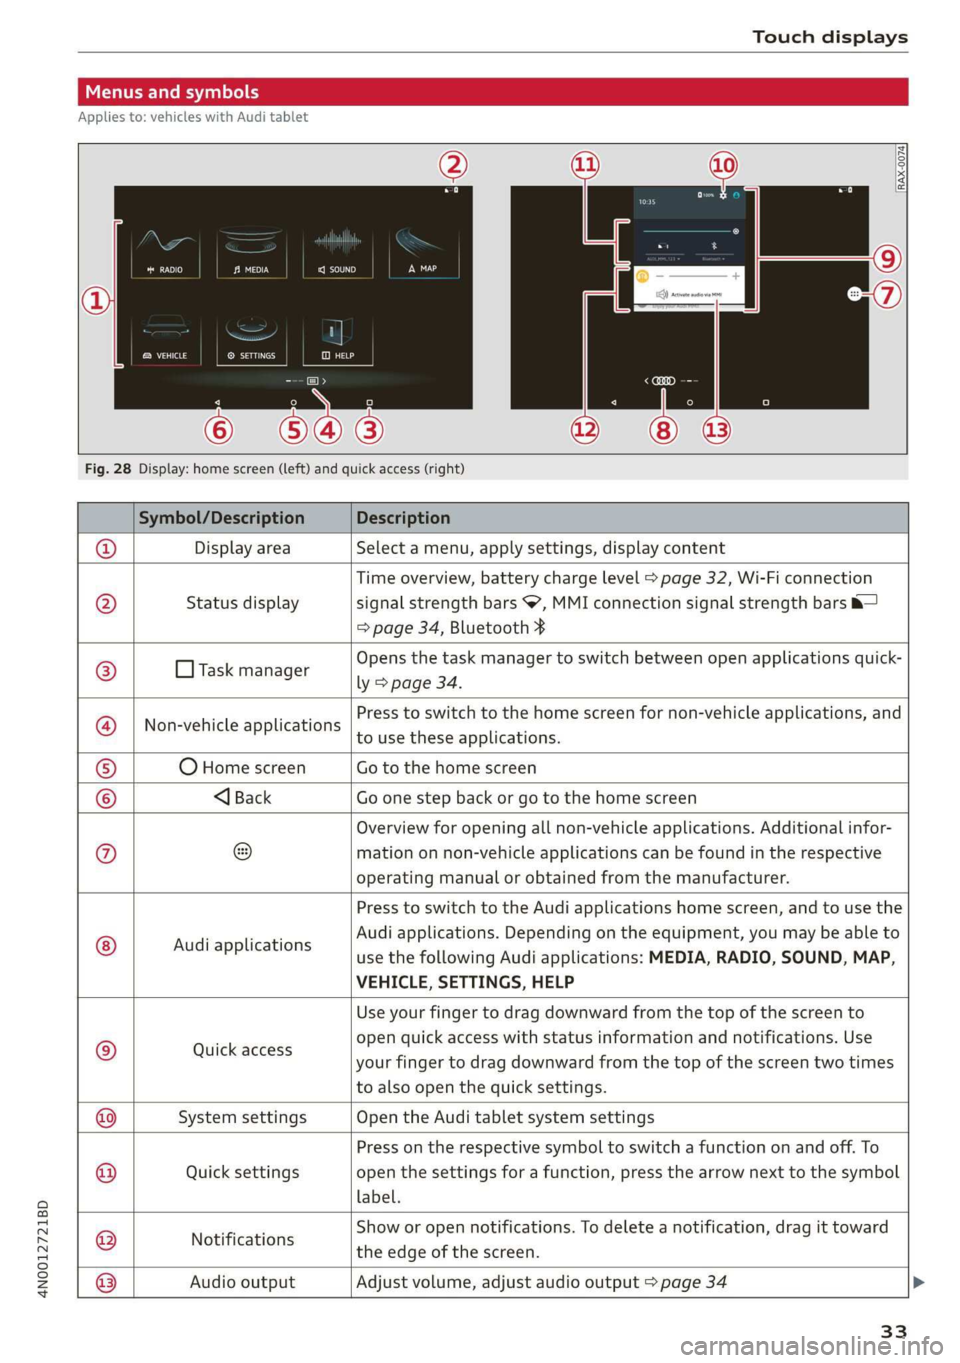
Fig. 28 Display: home screen (left) and quick access (right)
Symbol/Description Description
Display area Select a menu, apply settings, display content
Status display
Time overview, battery charge level > page 32, Wi-Fi connection
signal strength bars , MMI connection signal strength bars &—
=> page 34, Bluetooth ¥
O Task manager
Opens the task manager to switch between open applications quick-
ly > page 34.
Non-vehicle applications
Press to switch to the home screen for non-vehicle applications, and
to use these applications.
O Home screen Go to the home screen
®@
Ef
©|e|
©
|}
<1 Back Go one step back or go to the home screen
Overview for opening all non-vehicle applications. Additional infor-
mation on non-vehicle applications can be found in the respective
operating manual or obtained from the manufacturer.
© Audi applications
Press to switch to the Audi applications home screen, and to use the
Audi applications. Depending on the equipment, you may be able to
use the following Audi applications: MEDIA, RADIO, SOUND, MAP,
VEHICLE, SETTINGS, HELP
Quick access
Use your finger to drag downward from the top of the screen to
open quick access with status information and notifications. Use
your finger to drag downward from the top of the screen two times
to also open the quick settings.
@|
©
System settings Open the Audi tablet system settings
Quick settings
Press on the respective symbol to switch a function on and off. To
open the settings for a function, press the arrow next to the symbol
label.
Notifications
Show or open notifications. To delete a notification, drag it toward
the edge of the screen.
@|O|]
©
Audio output
Adjust volume, adjust audio output > page 34
33
Page 36 of 360

Touch displays
Switching between Audi applications and
non-vehicle applications
To switch between the home screens of both sec-
tions, press the buttons @) or @).
@) Tips
— AUDI AG merely provides access to non-ve-
hicle applications and does not assume any
responsibility for the content.
— Do not install any applications from unoffi-
cial or unknown sources.
Connecting to the MMI
Applies to: vehicles with Audi tablet
To use Audi tablet functions in connection with
the vehicle (for example, using MMI media sour-
ces), you can connect the Audi tablet to the MMI.
Requirement: the ignition must be switched on.
> To connect the Audi tablet to the MMI, secure it
in the retainer > page 30.
When a connection to the MMI is active, the &—
symbol is displayed in the status bar.
G) Tips
The connection to the MMI is also maintained
if you remove the Audi tablet from the holder.
For this to happen, the ignition must be
switched on and the Audi tablet must be with-
in range of the activated vehicle Wi-Fi hot-
spot.
Applies to: vehicles with Audi tablet
The task manager displays all active applications.
You have the option to close them or switch be-
tween active applications.
Opening the task manager
> Press L]@ © page 33, fig. 28.
Switching to an active application
> If necessary, use your finger to drag upward/
downward in the task manager until the de-
sired application is displayed as a thumbnail.
> Press on the application thumbnail.
34
Closing the application
> Press X in an application thumbnail, or
> Pull an application thumbnail toward the left/
right edge of the screen until the application
closes, or
> Press & to close all applications at once.
Closing the task manager
> Press LJ or <1.
G) Tips
The Audi tablet automatically closes any ap-
plications in the background to optimize de-
vice performance.
Adjusting the audio output
Applies to: vehicles with Audi tablet
The sound from the active audio source can be
played through the vehicle speakers or the head-
phones connected to the Audi tablet.
The audio output through the vehicle speakers
can be switched on for the left or right Audi tab-
let. The audio output for the other Audi tablet
can run through the headphones at the same
time.
Requirement: the Audi tablet must be connected
to the MMI & page 34. Audi tablet access to the
speakers must be permitted > page 35.
> To open the quick access @) > page 33, fig. 28,
use
your finger to swipe downward from the
top of the screen
> Select ‘@) Activate audio via MMI or (>t Audio
through headphones.
The following table gives an overview of the au-
dio output status. The respective symbol is dis-
played in the quick access:
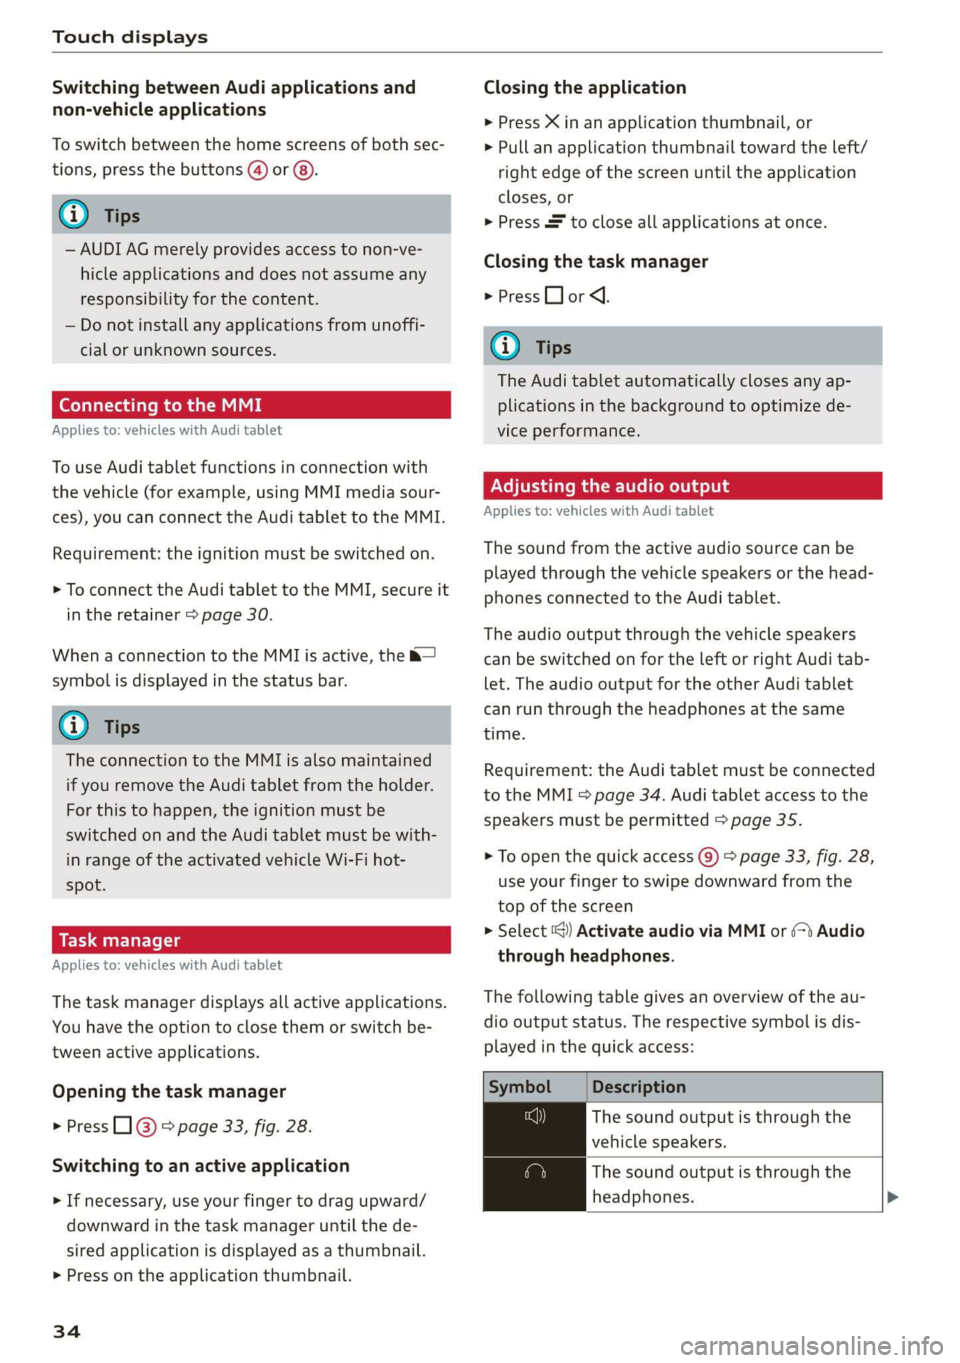
Symbol Description
The sound output is through the
vehicle speakers.
The sound output is through the
headphones. >
Page 40 of 360

Voice recognition system
Voice recognition system
General information
Applies to: vehicles with voice recognition system
You can operate many functions in the vehicle
easily using voice commands.
Using the voice recognition system optimally
> Speak clearly and distinctly at a normal volume.
Speak louder when driving faster.
> Emphasize the words in the commands evenly
and do not leave long pauses.
> Close the doors, the windows, and the sunroof*
to reduce background noise. Make sure that
passengers are not speaking when you are giv-
ing a voice command.
> Do not direct the vents toward the hands-free
microphone, which is in the roof headliner near
the front interior lights.
> Only the driver should speak to the system, be-
cause the handsfree microphone is aimed to-
ward this seating position.
ZA\ WARNING
— Direct your full attention to driving. As the
driver, you have complete responsibility for
safety in traffic. Only use the functions in
such a way that you always maintain com-
plete control over your vehicle in all traffic
situations.
— Do not use the voice recognition system in
emergencies because your voice may change
in stressful situations. The system may take
longer to dial the number or may not be
able to dial it at all. Dial the emergency
number manually.
G) Tips
There are no voice guidance* prompts when a
dialog is active.
38
Operating
Applies to: vehicles with voice recognition system
See
Dat)
Where is a
Connect
Diala
coy
Es
ea
cog
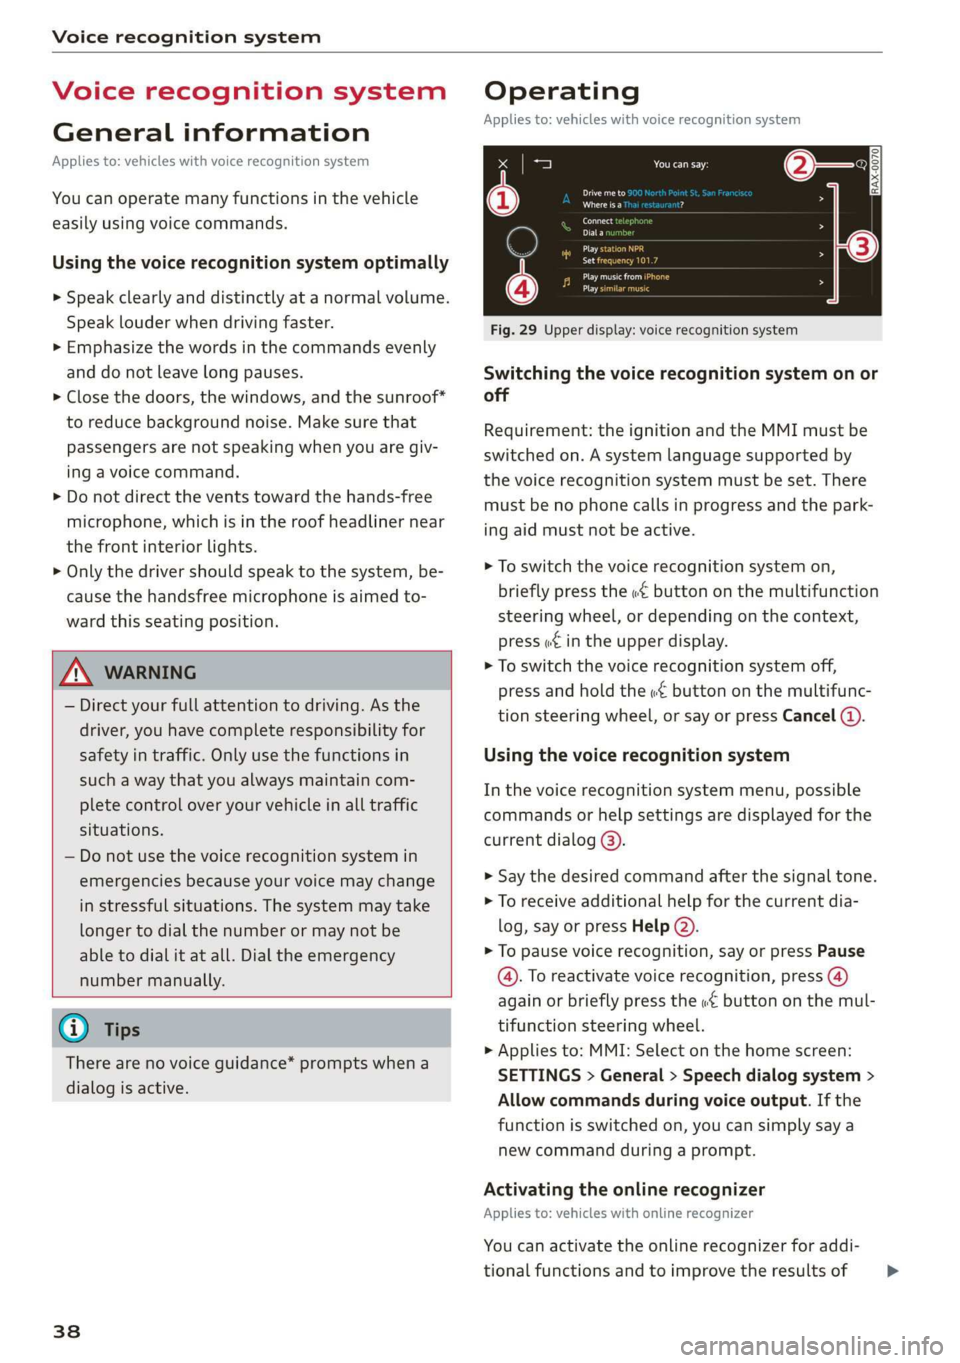
Fig. 29 Upper display: voice recognition system
Switching the voice recognition system on or
off
Requirement: the ignition and the MMI must be
switched on. A system language supported by
the voice recognition system must be set. There
must be no phone calls in progress and the park-
ing aid must not be active.
> To switch the voice recognition system on,
briefly press the «€ button on the multifunction
steering wheel, or depending on the context,
press w¢ in the upper display.
> To switch the voice recognition system off,
press and hold the « button on the multifunc-
tion steering wheel, or say or press Cancel (a).
Using the voice recognition system
In the voice recognition system menu, possible
commands or help settings are displayed for the
current dialog @).
> Say the desired command after the signal tone.
> To receive additional help for the current dia-
log, say or press Help (2).
> To pause voice recognition, say or press Pause
@. To reactivate voice recognition, press (@)
again or briefly press the «€ button on the mul-
tifunction steering wheel.
> Applies to: MMI: Select on the home screen:
SETTINGS > General > Speech dialog system >
Allow commands during voice output. If the
function is switched on, you can simply say a
new command during a prompt.
Activating the online recognizer
Applies to: vehicles with online recognizer
You can activate the online recognizer for addi-
tional functions and to improve the results of >
Page 49 of 360

4N0012721BD
Opening and closing
Interior/towing protection monitor
The alarm will be triggered if there are move-
ments detected in the vehicle interior (for exam-
ple, by animals) or if there is a change in the vehi-
cle angle (for example, when the vehicle is being
towed).
You can prevent the alarm from being triggered
by deactivating the interior/towing protection
monitor.
Deactivating the interior/towing protection
monitor
There are the following options for deactivating
the interior/towing protection monitor:
> Press the @ button on the vehicle key a second
time within two seconds. Or
» Applies to: vehicles with convenience key:
Touch the sensor on the door handle a second
time within two seconds. Or
> Turn the mechanical key in the door lock to the
close position a second time within 2 seconds.
If you lock the vehicle, then the interior/towing
protection monitor will stay off until the next
time the vehicle is unlocked.
ZA WARNING
No one, especially children, should stay in the
vehicle when it is locked from the outside, be-
cause the windows can no longer be opened
from the inside. Locked doors make it more
difficult for emergency workers to enter the
vehicle, which puts lives at risk.
@) Tips
The interior/towing protection monitor only
functions correctly when the windows and the
panorama glass roof* are closed.
=
.
:
Fig. 35 Your vehicle key set
@ Vehicle key
You can unlock and lock your vehicle with the ve-
hicle key.
@ Mechanical key and release button for
mechanical key
A mechanical key is integrated in the vehicle key.
To remove it, press the release button and re-
move the mechanical key.
Using the mechanical key, you can:
— Lock or unlock the glove compartment.
— Manually unlock and lock the doors > page 46.
— Unlock the luggage compartment lid using the
emergency release > page 52.
@ Key fob with vehicle code
Applies to: vehicles with Audi connect vehicle control
Open the key tag and scratch to reveal the vehicle
code. You can unlock the Audi connect vehicle
control services* for your vehicle with this vehicle
code. For additional information, see
= page 218. If a key fob is lost, contact an au-
thorized Audi dealer or authorized Audi Service
Facility.
@ PANIC button
In an emergency, you can press the PANIC button
to trigger the alarm for the anti-theft alarm sys-
tem. The vehicle horn and emergency flashers
will turn on if you trigger the alarm.
— To trigger the alarm, press the [PANIC but-
ton @ © fig. 35.
47
Page 57 of 360
![AUDI A8 2020 Owners Manual 4N0012721BD
Opening and closing
Convenience opening and closing the
sunshade*
Applies to: vehicles with power blinds
You can open or close all of the sunshades at
once.
> Press and hold [2:] AUDI A8 2020 Owners Manual 4N0012721BD
Opening and closing
Convenience opening and closing the
sunshade*
Applies to: vehicles with power blinds
You can open or close all of the sunshades at
once.
> Press and hold [2:]](/manual-img/6/57606/w960_57606-56.png)
4N0012721BD
Opening and closing
Convenience opening and closing the
sunshade*
Applies to: vehicles with power blinds
You can open or close all of the sunshades at
once.
> Press and hold [2:] on the lower display. Or:
> Press and hold the [2:] button in the rear door.
Or:
> Applies to: Rear Seat Remote: Select on the
home screen: Blinds. Press on the picture of
the sunshade to operate it.
ZA WARNING
— Never close the windows or panoramic glass
roof* carelessly or in an uncontrolled man-
ner, because this increases the risk of injury.
— For security reasons, the windows and the
panoramic glass roof* can only be opened
and closed with the vehicle key at a maxi-
mum distance of approximately 6.5 feet
(2 m) from the vehicle. Always pay attention
when using the f button to close the win-
dows and the panoramic glass roof* so that
no one is pinched. The closing process will
stop immediately when the ff button is re-
leased.
Panoramic glass roof
Operating the panoramic glass roof and
coe) mee dar-Le(-)
Applies to: vehicles with panoramic glass roof and roof sun-
shade
Fig. 45 Headliner: panoramic glass roof and sunshade*
buttons
The control buttons are equipped with a two-
stage function. Depending on the equipment, it
RAZ-0027
may also be possible to operate the roof and the
roof sunshade from the rear.
When tilting or opening the roof, the roof sun-
shade will open partially or completely if the sun-
shade is closed.
Operating the front roof sunshade
Requirement: the roof must be closed.
> Opening and closing the sunshade: push the
2D switch in the headliner @) briefly toward
the rear or forward to the second level. Or:
Push or pull the &> switch in the rear briefly
downward or upward to the second level.
> Partially opening the sunshade: press the A>
switch to the first level until the sunshade
reaches the desired position. Or:
> Applies to: Rear Seat Remote: Open or close the
sunshade: select on the home screen: Blinds.
Press on the picture of the sunshade to operate
it.
Operating the rear roof sunshade*
> Opening and closing the sunshade: push the -&
switch in the headliner @) briefly forward or to-
ward the rear to the second level. Or:
> Push or pull the switch in the rear door
briefly downward or upward to the second lev-
el.
> Partially opening the sunshade: press the
switch to the first level until the sunshade
reaches the desired position. Or:
> Applies to: Rear Seat Remote: Select on the
home screen: Blinds. Press on the picture of
the sunshade to operate it.
Operating the roof from the cockpit
> Tilting the roof: press the A> switch in the
headliner briefly upward to the second level (@).
> Closing the tilted roof: pull the 2> switch
downward briefly to the second level.
> Opening the roof: slide the 2s switch back
briefly twice in a row to the second level @).
> Closing the roof: push the 2> switch forward
briefly to the second Level.
> Opening or closing partially: slide the A>
switch to the first level and hold it there until
the roof reaches the desired position.
55
Page 66 of 360

Lights and Vision
Emergency flashers
Fig. 50 Center console: emergency flashers
The emergency flashers help to make other driv-
ers aware of your vehicle in dangerous situations.
> Press the A button to switch the emergency
flashers on or off.
When the emergency flashers are turned on, the
a and B&B indicator lights will flash at the same
time.
You can indicate a lane change or a turn when the
emergency flashers are switched on by using the
turn signal lever. The emergency flashers stop
temporarily.
The emergency flashers also work when the igni-
tion is turned off.
@ Tips
You should switch the emergency flashers on
if:
— you are the last car in a traffic jam so that
all other vehicles approaching from behind
can see your vehicle
— your vehicle has broken down or you are
having an emergency
— your vehicle is being towed or if you are tow-
ing another vehicle
Messages
If the Ea indicator light turns on, a bulb has
failed. The displayed message indicates the cause
and possible solutions. If one of the messages
does not turn off, drive immediately to an author-
ized Audi dealer or authorized Audi Service Facili-
ty to have the malfunction repaired.
64
Bg) Audi adaptive light: malfunction! See own-
er's manual
Adaptive light* is not working. The headlights
still function. Drive immediately to an authorized
Audi dealer or authorized Audi Service Facility to
have the malfunction repaired.
oue0} OLED tail light: malfunction! Switched off
permanently. See owner's manual
Drive immediately to an authorized Audi dealer
or authorized Audi Service Facility to have the
malfunction repaired.
High beam assistant: malfunction! See own-
er's manual
You can still switch the high beams on or off
manually. Drive immediately to an authorized
Audi dealer or authorized Audi Service Facility to
have the malfunction repaired.
High beam assistant: currently unavailable.
Camera view limited due to surroundings
This message appears if the camera's visual field
is blocked. The system will switch itself off. Try
switching the systems on again later.
& Automatic headlights: malfunction! See
owner's manual
The light/rain sensor is malfunctioning. The low
beams remain switched on at all times for safety
reasons with the AUTO light function. Drive im-
mediately to an authorized Audi dealer or author-
ized Audi Service Facility to have the malfunction
repaired.
Interior lighting
Front interior lighting
2 8 S
© > a o
Fig.
51 Headliner: interior lighting
Page 83 of 360

4N0012721BD
Sitting correctly and safely
Head restraints
General information
Applies to: vehicles with adjustable head restraints
B4G-0454
Fig. 70 Correctly adjusted head restraints
Make sure that:
— The upper edge of the head restraint is as even
as possible with the top of your head
— The head restraint is as close as possible to the
back of the head
— The head restraints on the occupied rear seats
are positioned all the way up or folded upward.
immediately by an authorized Audi dealer or
authorized Audi Service Facility.
Front head restraints
Applies to: vehicles with adjustable head restraints
Power head restraint adjustment
Applies to: vehicles with power head restraints
> To adjust the head restraint upward or down-
ward, push the button @) > page 73, fig. 60
upward or downward.
@) Tips
Applies to: vehicles with power adjustable
head restraints: To prevent the head re-
straints from making contact with the head-
liner, the power head restraints* automatical-
ly move forward or upward when the seat is
adjusted.
Taal eM ary
Applies to: vehicles with adjustable head restraints
Z\ WARNING
— There is one head restraint for each seat. All
vehicle occupants must adjust the head re-
straint correctly before every trip. Having
head restraints that are not adjusted cor-
rectly or not installed in the vehicle increas-
es the risk of a neck injury during sudden or
unexpected driving or braking maneuvers or
in a collision.
— Only remove the rear seat head restraints if
it
is necessary to install a child safety seat
= page 91. Stow the removed head re-
straints securely, for example in the luggage
compartment. Reinstall the head restraints
immediately once the child safety seat has
been removed. Driving without head re-
straints increases the risk of serious neck in-
juries.
— Depending on the equipment, the front
head restraints may be active head re-
straints. If triggered, a part of the head re-
straint will move several inches forward to
provide additional support to the head. If
triggered, have the head restraints serviced
Fig. 71 Rear seat: adjusting or removing the head restraint
Fig. 72 Center rear seat*: folding up the head restraint
81
>