2020 AUDI A4 Service
[x] Cancel search: ServicePage 150 of 296

Parking and maneuvering
forward faster than approximately 6 mph (10
km/h).
ZA\ WARNING
Follow the safety precautions and note the
limits of the assist systems, sensors, and
cameras > page 114.
@) Note
Keep enough distance from the curb to avoid
damage to the rims.
G) Tips
— If the parking aid is switched off, it can only
be reactivated automatically when one of
the following conditions is met:
— The vehicle speed exceeds 6 mph (10 km/h)
— The ignition was switched off and back on
again
— The parking brake was set and then released
— The “P” gear was engaged and released
again
Applies to: vehicles with parking aid plus
Fig. 129 Center display: distance display
If the sensors detect an obstacle, audible and vis-
ual signals will warn you.
Visual warnings
The visual warnings in the center display help you
to detect the critical vehicle area and to estimate
the distance to an obstacle.
Red segments (2) show detected obstacles that
are in your vehicle's path. The red lines 2) mark
the expected direction of travel based on the
steering angle. A white segment (8) indicates a
detected obstacle that is outside of the vehicle's
148
path. The closer your vehicle comes to the obsta-
cle, the closer the segments will move to the ve-
hicle. The collision area has been reached when
the next to last segment is displayed. Obstacles
in the collision area, including those outside of
the vehicle's path, are shown in red. Do not con-
tinue driving farther.
Audio signals
The closer your vehicle gets to a detected obsta-
cle, the shorter the time between the audible sig-
nals. A continuous tone sounds when an obstacle
is less than approximately 1 foot (0.30 m) away
from the front or rear of the vehicle. A continu-
ous tone sounds when an obstacle is less than
approximately 0.7 feet (0.20 m) away from the
sides* of the vehicle. Do not continue driving for-
ward or in reverse >@).
> To deactivate audio signals while parking, press
(Jin the center display. The audio signals will
be automatically activated again the next time
the parking aid is activated.
Adjusting the volume
You can adjust the volume to your preferences.
The settings depend on the vehicle equipment.
> Applies to: MMI: Select on the home screen:
VEHICLE > Parking aid. Or:
> Press L-] in the center display when the parking
aid is active.
Possible settings:
Front volume - Volume for the front and side*
area.
Rear volume - Volume for the rear area.
Entertainment fader - The volume of the audio/
video source is lowered when the parking aid is
activated.
The new level is demonstrated briefly* when the
volume is adjusted.
Error messages
If P4 appears, the sensor in the respective area
or the speaker is faulty. Drive immediately to an
authorized Audi dealer or authorized Audi Service
Facility to have the malfunction repaired.
Page 151 of 296

8W1012721BB
Parking and maneuvering
iff or is displayed when there is a malfunc-
tion, the parking aid functions may be unavaila-
ble or may be limited.
A message that indicates the cause and possible
solution may appear with some displays. The
weather conditions may be too poor or a sensor
may be covered. Clean the area in front of the
sensors > page 116, fig. 106 and try to turn on
the systems again later.
If the malfunction remains, drive to an author-
ized Audi dealer or authorized Audi Service Facili-
ty immediately to have the malfunction correct-
ed.
Z\ WARNING
— Follow the safety precautions and note the
limits of the assist systems, sensors, and
cameras > page 114.
— Sensors and cameras have spots in which
the surrounding area cannot be detected.
Objects, animals, and people may only be
detected with limitations may not be detect-
ed at all. Always monitor the traffic and the
vehicle's surroundings directly and do not
become distracted.
©) Note
— Keep enough distance from the curb to
avoid damage to the rims.
— Applies to: vehicles with park assist: If you
park in short parking spaces using park as-
sist, a continuous tone will sound from the
parking aid when the distance to an object is
less than approximately 0.7 ft (0.20 m). Do
not continue driving farther.
@ Tips
— The segments in the side area* are detected
and analyzed when passing. If you switch
the ignition off and on again or open the
door, or if the vehicle is stationary for a peri-
od of time, the surrounding area may have
changed in the meantime. In this scenario,
the side area* will appear black until the
area has been detected and evaluated.
— If the distance to an obstacle remains con-
stant, the volume of the distance warning
gradually lowers after a few seconds until it
is muted (this does not apply to the continu-
ous tone). If the obstacle comes closer than
it was before the sound was muted, the
tone will sound again. If the obstacle be-
comes farther away than it was before the
sound was muted, no tone will sound. Pay
attention to the vehicle's surroundings
when you start to drive.
Rearview camera and
peripheral cameras
Introduction
Applies to: vehicles with rearview camera/peripheral cameras
B8V-0629
Fig. 130 Orientation line display when parking
Depending on the vehicle equipment, a rearview
camera or multiple peripheral cameras may be
available.
The rearview camera helps you to park or maneu-
ver using the orientation lines.
The peripheral cameras expand the vehicle over-
view to include various views around the vehicle
that can be selected.
Z\ WARNING
Follow the safety precautions and note the
limits of the assist systems, sensors, and
cameras > page 114.
Activating/deactivating
Applies to: vehicles with rearview camera/peripheral cameras
Activating/deactivating
> Press the Pt button in the center console.
When activating, a brief tone will sound and
the LED in the button will turn on. Or
149
Page 152 of 296

Parking and maneuvering
> Press bin the center display if the visual dis-
tance indicator is shown > page 148, fig. 129.
The system can be activated at low speeds, such
when maneuvering.
Automatic activation
The system activates automatically when reverse
gear is engaged while the engine is running. A
brief tone will sound.
Automatic deactivation
The system will deactivate automatically once
the vehicle exceeds a certain speed while driving
forward.
ZA\ WARNING
Follow the safety precautions and note the
limits of the assist systems, sensors, and
cameras > page 114.
Clean rearview camera
Applies to: vehicles with rearview camera/peripheral cameras
Depending on vehicle equipment, you may be
able to manually initiate rear view camera clean-
ing.
> Move the window wiper lever S7 into the posi-
tion for cleaning the rear window & & page 55.
Z\ WARNING
Follow the safety precautions and note the
limits of the assist systems, sensors, and
cameras > page 114.
Applies to: vehicles with rearview camera/peripheral cameras
Fig. 131 Center display: aiming at a parking spot
150
When parking with the rearview camera or pe-
ripheral camera, the parking aid plus audio and
visual warnings* will also assist you > page 148.
Visual orientation lines
@ The orange orientation lines show the vehi-
cle's direction of travel > @®. Turn the steer-
ing wheel until the orange orientation lines
align with the parking space.
@ Use the blue markings to help you estimate
the distance to an obstacle. Each marking
represents approximately 3 feet (1 meter).
The blue area represents an extension of the
vehicle's outline by approximately 16 feet (5
meters) to the rear.
@ You can recognize the rear bumper in the
lower display.
@® You should stop driving in reverse when the
red orientation line touches the edge of an
object, at the latest.
Symbols
Applies to: vehicles with peripheral cameras
If *2/&2/< is displayed and the display area
represented by that symbol is not available, then
the camera on the that side is not available. The
power exterior mirrors may have been folded in
or a door or the luggage compartment lid may
have been opened.
If % is displayed, there is a system malfunction
and the display area represented by that symbol
is not available. The camera is not working in this
area.
If one of the symbols continues to be displayed,
drive immediately to an authorized Audi dealer or
authorized Audi Service Facility to have the mal-
function repaired.
Z\ WARNING
— Follow the safety precautions and note the
limits of the assist systems, sensors, and
cameras > page 114.
— Sensors and cameras have spots in which
the surrounding area cannot be detected.
Objects, animals, and people may only be
detected with limitations may not be detect-
ed at all. Always monitor the trafficand the |>
Page 155 of 296
8W1012721BB
Parking and maneuvering
Requirements
— The parking aid is switched on > page 147 or
reverse gear is selected.
— The speed when driving in reverse must not be
higher than approximately 9 mph (15 km/h).
Displays, warnings, and braking
— Display: the display @ appears only when the
parking aid is active. For vehicles with peripher-
al cameras, this only happens in the Rear and
Rear corner camera views. Arrows show the di-
rection from which the cross traffic is approach-
ing.
— Audible warnings: a continuous tone may
sound as an additional warning when driving in
reverse.
— Automatic brake activation: if you do not react
to a warning, a brief braking by the system can
warn you of a potential collision with an ap-
proaching object.
The audible warning signal and the automatic
brake activation occur only when driving in re-
verse.
Switching on and off
— Applies to MMI: Select on the home screen: VE-
HICLE > Parking aid > Rear cross-traffic assist.
Or:
— When the parking aid active, select L--| > Rear
cross-traffic assist in the center display.
Messages
if or » is displayed when there is a
malfunction, the rear cross traffic assist func-
tions may be unavailable or may be limited.
A message that indicates the cause and possible
solution may appear with some displays. The
weather conditions may be too poor or a sensor
may be covered. Clean the sensor area in the ve-
hicle rear and try to turn the systems on again
later.
If the malfunction remains, drive to an author-
ized Audi dealer or authorized Audi Service Facili-
ty immediately to have the malfunction correct-
ed.
ZA WARNING
— Follow the safety precautions and note the
limits of the assist systems, sensors, and
cameras > page 114.
—The rear cross-traffic assist will not provide
alerts about people and cannot warn you
about every type of approaching objects,
such as cyclists. Always monitor the traffic
as well as the vehicle's surroundings with di-
rect eye contact.
— The system may not react if objects are ap-
proaching very quickly.
—The rear cross-traffic assist will not provide
alerts if your vehicle is parallel or diagonally
parked or if your vehicle is pulled too far in-
to the parking space so that it is hidden by
adjacent vehicles.
@) Tips
— Once an automatic brake activation occurs,
the system cannot initiate another activa-
tion for several seconds.
— System functions may not be available if the
ESC is limited or switched off, or if there is a
malfunction.
—If there is an audio warning signal from the
rear cross-traffic assist, then the parking aid
may not be able to provide audio warnings
about detected obstacles under certain cir-
cumstances.
— For an explanation on conformity with the
FCC regulations in the United States and the
Industry Canada regulations, see
=> page 275.
— The coverage areas of the sensors > fig. 133
are diagrams and do not represent a true-
to-scale image of the sensor ranges.
Assisted parking
General information
Applies to: vehicles with park assist
If your vehicle is equipped with park assist, this
system helps you find suitable parking spaces.
Parking spaces are measured using ultrasonic
sensors on the sides of the vehicle.
153
Page 159 of 296
8W1012721BB
Parking and maneuvering
> Activate the turn signal on the desired side or
press that side next to the vehicle in the center
display.
> Remove your hands from the steering wheel.
> Pay attention to the path of the vehicle. If the
traffic situation permits, accelerate carefully
of.
> Follow the visual instructions in the display and
the warning tones until the vehicle has finished
exiting the parking space.
> The indicators in the center display show the
necessary direction of travel. Drive in the direc-
tion indicated by the arrows or symbols on the
roof in the parking aid image @) 9 page 154,
fig. 136.
> The process of exiting the parking space has
ended if additional corrective movements are
no longer necessary and the specified steering
wheel angle is sufficient to drive out of the
parking space. Resume control of the steering
wheel >@).
Park assist automatically steers the vehicle out of
the parking space while the driver presses the
pedals. The maximum speed for exiting a parking
space is 3 mph (5 km/h).
Z\ WARNING
— Follow the safety precautions and note the
limits of the assist systems, sensors, and
cameras © page 114.
— The park assist is an assist system. The driv-
er is still responsible for monitoring the ve-
hicle's surroundings and preventing colli-
sions when using the system.
— When using park assist to drive into or out
of a parking space, the steering wheel turns
quickly on its own. Reaching into the steer-
ing wheel spokes while this is happening can
result in injury.
@) Note
Resume steering immediately after the last
corrective movement and the takeover
prompt, so that the specified steering wheel
angle is not recentered.
Interrupting the park assists
Applies to: vehicles with park assist
Park assist will be canceled automatically in the
following scenarios:
— You switch the system off.
— You start steering.
— The speed is too high.
— The time limit is exceeded.
— An obstacle is detected.
— ESC intervenes.
Resume control of the vehicle, end the parking
process manually, or:
— You can resume the parking process in some sit-
uations. Press the Pe button in the center con-
sole.
— To continue exiting the parking space, switch
the engine off and on. Press the Pe button.
Z\ WARNING
Follow the safety precautions and note the
limits of the assist systems, sensors, and
cameras > page 114.
tLe Ly
Applies to: vehicles with park assist
If the & or indicator light turns on, the park
assist is not available or was interrupted.
A message that indicates the cause and possible
solution may appear with some displays. The
weather conditions may be too poor or a sensor
may be covered. Clean the area in front of the
sensors > page 116, fig. 106 and try to turn on
the systems again later.
If the malfunction remains, drive to an author-
ized Audi dealer or authorized Audi Service Facili-
ty immediately to have the malfunction correct-
ed.
157
Page 162 of 296
Telephone
Using the Audi phone
box
(eee eleurl ela)
Applies to: vehicles with Audi phone box
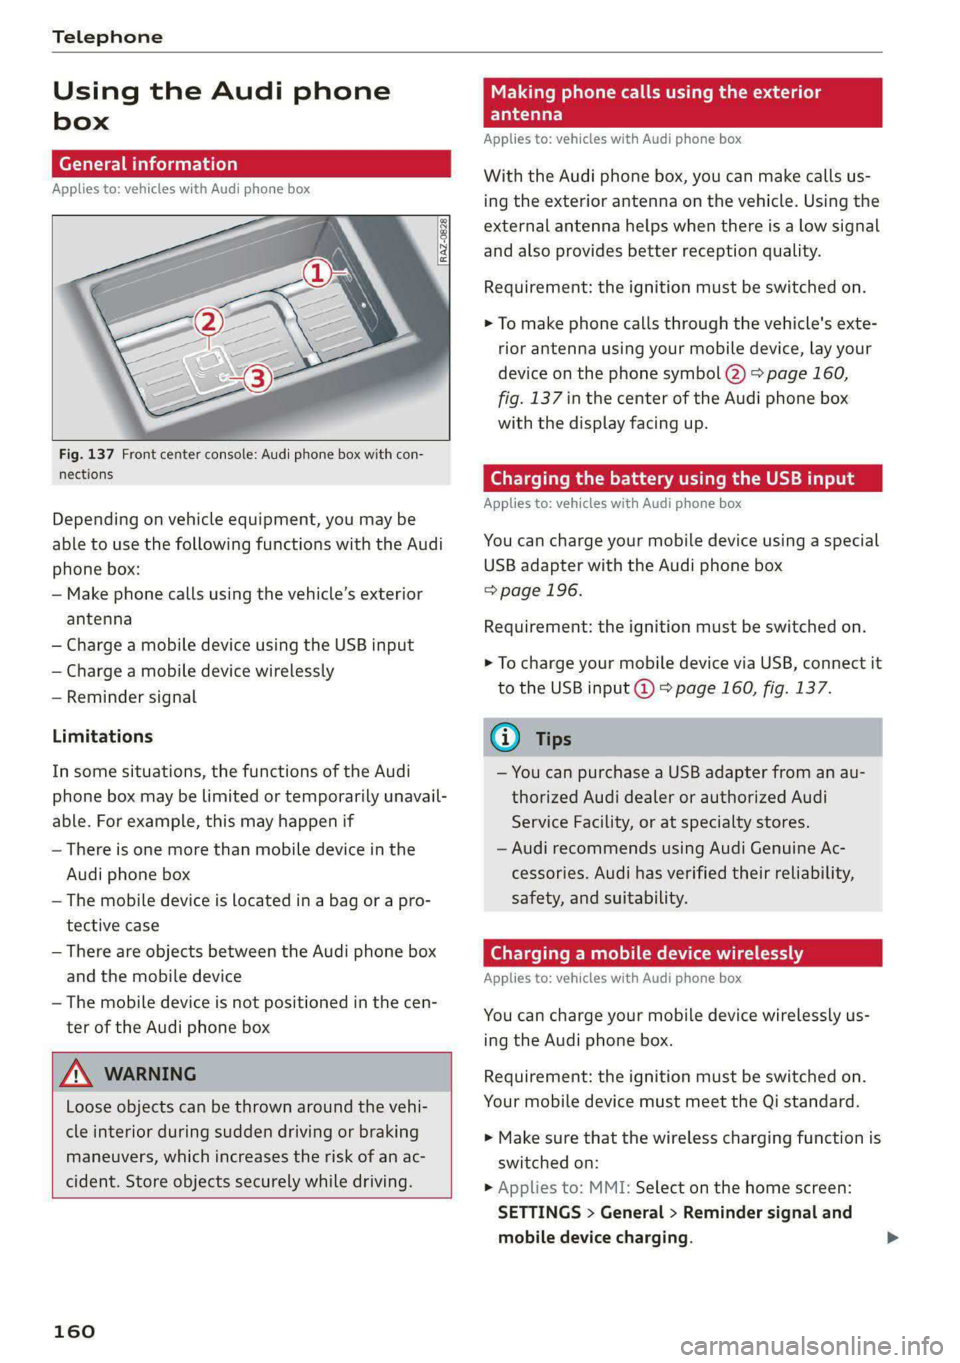
Fig. 137 Front center console: Audi phone box with con-
nections
Depending on vehicle equipment, you may be
able to use the following functions with the Audi
phone box:
— Make phone calls using the vehicle’s exterior
antenna
— Charge a mobile device using the USB input
— Charge a mobile device wirelessly
— Reminder signal
Limitations
In some situations, the functions of the Audi
phone box may be limited or temporarily unavail-
able. For example, this may happen if
— There is one more than mobile device in the
Audi phone box
— The mobile device is located in a bag or a pro-
tective case
— There are objects between the Audi phone box
and the mobile device
— The mobile device is not positioned in the cen-
ter of the Audi phone box
ZA WARNING
Loose objects can be thrown around the vehi-
cle interior during sudden driving or braking
maneuvers, which increases the risk of an ac-
cident. Store objects securely while driving.
160
Making phone calls using the exterior
antenna
Applies to: vehicles with Audi phone box
With the Audi phone box, you can make calls us-
ing the exterior antenna on the vehicle. Using the
external antenna helps when there is a low signal
and also provides better reception quality.
Requirement: the ignition must be switched on.
> To make phone calls through the vehicle's exte-
rior antenna using your mobile device, lay your
device on the phone symbol @) > page 160,
fig. 137 in the center of the Audi phone box
with the display facing up.
ema a mem mesma
Applies to: vehicles with Audi phone box
You can charge your mobile device using a special
USB adapter with the Audi phone box
=> page 196.
Requirement: the ignition must be switched on.
> To charge your mobile device via USB, connect it
to the USB input @ > page 160, fig. 137.
@ Tips
— You can purchase a USB adapter from an au-
thorized Audi dealer or authorized Audi
Service Facility, or at specialty stores.
— Audi recommends using Audi Genuine Ac-
cessories. Audi has verified their reliability,
safety, and suitability.
Charging a mobile device wirelessly
Applies to: vehicles with Audi phone box
You can charge your mobile device wirelessly us-
ing the Audi phone box.
Requirement: the ignition must be switched on.
Your mobile device must meet the Qi standard.
> Make sure that the wireless charging function is
switched on:
> Applies to: MMI: Select on the home screen:
SETTINGS > General > Reminder signal and
mobile device charging.
Page 163 of 296
Telephone
> Switch the Mobile device wireless charging
function on.
> To charge your mobile device wirelessly, lay it
on the @ symbol @ = page 160, fig. 137 in the
center of the Audi phone box with the display
facing up.
Z\ WARNING
— The mobile device may become hot during
wireless charging. Pay attention to the tem-
perature of your mobile device and be care-
ful when removing it from the Audi phone
box.
—An alternating magnetic field is used for
wireless charging. Maintain a minimum dis-
tance of approximately 2.4 in (6 cm) to the
Audi phone box charging plate. The thresh-
olds for prolonged exposure at this distance
comply with ICNIRP1998. Therefore, inter-
actions such as irritation of sensory organs,
malfunctions of active implants (such as
pacemakers, infusion pumps, or neurosti-
mulators) or effects on passive implants
(such as prosthetic limbs) is highly unlikely.
If you have an implant, consult a medical
specialist if you have any questions. You can
also switch the function for wireless charg-
ing in the Audi phone box on and off. You
can continue to charge your mobile device
using a cable connection.
@) Note
Applicable to U.S.A.
Operation of the Audi phone box is subject to
the following requirements of the Federal
Communications Commission:
— You MUST cease operating this device im-
mediately if requested by the FCC or a li-
censed wireless service provider.
— WARNING: E911 location information may
not be provided or may be inaccurate for
calls served by using this device.
CG) Note
Applicable to Canada
In Canada, operation of a Zone Enhancer,
such as an Audi Phone Box, is subject to the
following requirements of the Innovation,
Science and Economic Development Canada
(ISED):
— This is a CONSUMER device.
— BEFORE USE, you MUST meet all require-
ments set out in CPC-2-1-05.
— You MUST operate this device with approved
antennas
and cables as specified by the
manufacturer. Antennas MUST NOT be in-
stalled within 20 cm of any person.
— You MUST cease operating this device im-
mediately if requested by ISED or a licensed
wireless service provider.
— WARNING: £911 location information may
not be provided or may be inaccurate for
calls served by using this device.
@ Tips
—The maximum charging output is 5 W.
—The charging time and temperature will vary
depending on the mobile device being used.
Mobile device reminder signal
Applies to: vehicles with Audi phone box
When the device reminder signal is switched on,
you will be notified that your mobile device is still
in the Audi phone box when you leave the vehicle.
— This is a CONSUMER device.
— BEFORE USE, you MUST REGISTER THIS DE-
VICE with your wireless provider and have
your provider’s consent. Most wireless pro-
viders consent to the use of signal boosters.
Some providers may not consent to the use
of this device on their network. If you are
Requirement: your mobile device must be located
in the Audi phone box (if Qi capable) or connected
to the Audi music interface with a USB adapter,
and the Audi smartphone interface must be ac-
8W1012721BB
unsure, contact your service provider.
— You MUST operate this device with approved
antennas
and cables as specified by the
manufacturer. Antennas MUST be installed
at least 20 cm (8 inches) from any person.
tive or your iPhone must be connected to the
MMI via Bluetooth and charging using a USB
adapter
connected to the Audi music interface.
161
Page 166 of 296
Telephone
> Sending an e-mail: press on an e-mail address.
Listening to voicemail
Applies to: vehicles with telephone
> Applies to: MMI: Select on the home screen:
PHONE > Voicemail.
Requirement: there must be no voicemail num-
ber stored.
> Entering the voicemail number: enter the de-
sired number. Press OK.
Requirement: a voicemail number must be stor-
ed.
> Dialing the voicemail number: press Voice-
mail. The call begins immediately.
i) Tips
This service must be set up and activated by
the mobile phone service provider.
Dialing a phone number
Applies to: vehicles with telephone
Depending on the vehicle equipment, you may
have the following options for dialing a phone
number:
— Using text input in the MMI = page 21.
— Using voice operation > page 24.
Call options
Applies to: vehicles with telephone
> To accept or end a call, press the @ button on
the multifunction steering wheel. For opera-
tion, see > page 12.
Depending on your mobile device, the following
options may be available in the MMI when there
is an incoming call:
— Answer
— Decline
— Message
If you exit the vehicle during a phone call, the
Bluetooth connection will be disconnected. De-
pending on your mobile device, phone calls in
progress may be automatically transferred from
the MMI to your mobile device.
164
G) Tips
The radio or media playback is muted during a
phone call.
During a phone call
Applies to: vehicles with telephone
Depending on your mobile device and the type of
connection, the following options may be availa-
ble during a call:
— End call...
— Mute
Sending a tone sequence
Press Numbers. You can enter tone sequences
(DTMF) and send them to the other party on the
call.
Hold
Puts the current call on hold. To resume the call,
press Resume.
Answering an incoming call
One of these options will be available, depending
on the mobile phone service provider:
— Answer: the current phone call will be put on
hold. The incoming call will be answered.
— Replace: the active call will be replaced with
the incoming call.
Declining an incoming call
If you select Decline, the incoming call will be de-
clined.
Conference
Requirement: two phone calls must be in prog-
ress.
Depending on your mobile phone service provid-
er, you can add a call on hold and up to five active
callers to a conference call.
Swap call
Requirement: two phone calls must be in prog-
ress.
You can alternate between two phone calls. >