2020 AUDI A3 center console
[x] Cancel search: center consolePage 87 of 400

8V2012721BK
Driving
Manually switching the Start/Stop system
koi
Applies to: vehicles with Start/Stop system
If you do not wish to use the system, you can
switch it off manually.
2 +
3}
g > & oO
Fig. 93 Center console: Start/Stop system button
> To switch the Start/Stop system off/on manual-
ly, press the [| button. The LED in the button
turns on when the system is switched off.
G) Tips
If you switch the system off during a Stop
phase, the engine will start again automati-
cally.
ee melee
Applies to: vehicles with Start/Stop system
Start/stop system: deactivated. Please start
engine manually
This message appears when specific conditions
are not met during a Stop phase. The Start/Stop
system will not be able to restart the engine. The
engine must be started manually.
Start/stop system: malfunction! Function
unavailable
There is a malfunction in the Start/Stop system.
Drive the vehicle to an authorized Audi dealer or
authorized Service Facility as soon as possible to
have the malfunction corrected.
Brakes
General information
You can apply the vehicle's brakes using the brake
pedal.
Operating noise
Noises may occur when braking depending on the
speed, braking force, and outside conditions such
as temperature and humidity.
Braking effect
The response time from the brakes depends on
the weather and environmental conditions. If the
brake system becomes damp, for example after
driving in heavy rain, the braking effect may be
delayed. Other factors that could temporarily in-
crease the response time of the brakes include:
— Wet conditions
— Low temperatures, ice, and snow
— Roads covered in salt
— Dirty brake pads
To ensure the optimal braking effect, the brake
system is cleaned at regular intervals. This is
done by applying the brake pads to the brake ro-
tors for a short period of time when driving at
high speeds when the windshield wipers are
switched on.
Corrosion
Corrosion may form on the brake rotors if there is
no heavy braking, if the vehicle is not driven for
long periods of time, or if the vehicle is not driv-
en frequently or for long distances. This can
cause noises when braking as well as an uneven
braking effect. In this case, braking heavily sever-
al times while driving at high speeds can clean
the brake rotors > A\.
Brake pads
New brake pads do not achieve their full braking
effect during the first 250 miles (400 km). They
must be “broken in” first. However, you can com-
pensate for the slightly reduced braking force by
pressing firmly on the brake pedal. Avoid heavy
braking during the break-in period.
Brake pad wear depends largely on the way the
vehicle is driven and on operating conditions.
Brake pad wear increases when driving frequently
in the city or short distances or when using a very
sporty driving style. >
8s
Page 89 of 400

8V2012721BK
Driving
Electromechanical
parking brake
Operating the parking brake
The electromechanical parking brake is used to
secure the vehicle from rolling away
unintentionally.
The @) switch is located under the selector lever
in the center console. It turns on when the park-
ing brake is set. You can release the parking brake
manually or automatically when you start to
drive.
Setting and releasing the parking brake
> Setting: pull the ©) switch.
> ris @ appears, the parking brake is hold-
ing the vehicle. You can remove your foot from
the brake pedal.
> Releasing: when the ignition is switched on,
press and hold the brake pedal and press the ©)
button.
If the red indicator light flashes, the braking
force has not built up enough or it has decreased.
You can also secure the vehicle by selecting the
“P” gear or pressing the brake pedal. Make sure
the indicator light is off before you start driving.
Automatically releasing the parking brake
when starting to drive
Requirement: the driver's door must be closed
and the driver’s safety belt must be fastened.
> Press the accelerator pedal to start to drive.
ZA\ WARNING
—To reduce the risk of an accident, always
make sure the vehicle is situated safely
while stationary.
— If the parking brake is set, it can release au-
tomatically when the accelerator pedal is
pressed. To reduce the risk of an accident,
do not inadvertently press the accelerator
pedal and always shift into “P” when the ve-
hicle is stopped.
— If the power supply fails, you cannot set the
parking brake once it is released, or release
it if it is set. In this case, park the vehicle on
level ground and secure it by engaging the
"P” gear. Contact an authorized Audi dealer
or authorized Audi Service Facility for assis-
tance.
@) Tips
— On steep inclines, especially when in trailer
mode, the vehicle may roll backwards unin-
tentionally when starting to drive. To re-
duces the risk of this happening, pull and
hold the ©) switch while pressing the accel-
erator pedal. If enough drive power has
built up at the wheels and the vehicle does
not roll backwards, then release the switch
to start to drive.
— If you leave the vehicle when “D” or “R” are
engaged, the parking brake will be set auto-
matically.
— Noises when the parking brake is set and re-
leased are normal and are not a cause for
concern.
— The parking brake goes through a self-test
cycle at regular intervals when the vehicle is
stopped. Any noises associated with this are
normal.
Emergency braking function
Emergency braking should only be used in an
emergency, if the standard brake pedal is mal-
functioning or obstructed. When the emergency
braking function is activated, the braking effect is
similar to a heavy braking maneuver.
> Pull and hold the ©) switch while driving.
> An audio warning signal will sound and emer-
gency
braking will begin.
> If you press the accelerator pedal, emergency
braking will be canceled.
Z\ WARNING
Heavy braking while driving through curves or
in poor road or weather conditions can cause
the vehicle to slide or the rear of the vehicle to
swerve, which increases the risk of an acci-
dent.
87
Page 93 of 400

8V2012721BK
Driving dynamic
Driving dynamic
Audi drive select
Introduction
Applies to: vehicles with Audi drive select
Drive select makes it possible to experience dif-
ferent types of vehicle characteristics in one vehi-
cle. With different driving modes, the driver can
switch the setting, for example from sporty to
comfortable. This allows you to adjust the set-
tings to your personal preferences. This makes it
possible to combine settings such as a sporty
drivetrain setting with comfortable steering.
Selecting an Audi drive select mode
Applies to: vehicles with Audi drive select
The ssise button is located above the selector lever
in the center console.
> Press the sis@ button repeatedly until the de-
sired mode appears in the instrument cluster or
center display, or:
> In the Infotainment system, select: [MENU
button > Vehicle > left control button > Audi
drive select.
You can change the driving mode when the vehi-
cle is stationary or while driving. If traffic per-
mits, briefly remove your foot from the accelera-
tor pedal after changing modes so that the mode
you have selected will be activated for the drive
system.
The following modes may be available depending
on the equipment:
comfort - Provides a comfort-oriented vehicle
setup and is suited for long drives on highways.
auto - Provides an overall comfortable yet dy-
namic driving feel and is suited for everyday use.
dynamic - Gives the driver a sporty driving feel
and is suited to a sporty driving style.
individual - Provides the option for personalized
vehicle settings > page 91.
@) Tips
When the ignition is being switched on, indi-
vidual systems, such as the drive system, will
be reset to a balanced setting. Select the cur-
rent mode again to attain its full configura-
tion.
Adjusting the “individual” mode
> Select in the Infotainment system: [MENU] but-
ton > Vehicle > Audi drive select> Individual >
right control button.
The equipment in your vehicle will determine
which settings you can adjust.
Engine/transmission
The drive system will react to accelerator pedal
moves more quickly or in a more balanced man-
ner. The shift points are Located in higher or low-
er engine speed ranges on vehicles with automat-
ic transmissions.
Steering
The power steering will adapt. Light steering is
suitable for long trips on highways or smooth
driving around curves, for example.
quattro
The all wheel drive system controls balanced to
sporty profiles.
Engine sound
The engine sound adapts and can be subtle to
sporty.
ACC
The driving behavior of the adaptive cruise con-
trol adjusts based on the acceleration and reac-
tion to vehicles driving ahead.
Suspension control
The suspension adjusts to be tighter or more
comfort-oriented when it comes to compensat-
ing for uneven spots on the road.
91
Page 96 of 400
Driving dynamic
Electronic Differential Lock (EDL)
The EDL applies the brakes to wheels that are
slipping and transfers the drive power to the oth-
er wheels. This function is not available at higher
speeds.
In extreme cases, EDL automatically switches off
to keep the brake on the braked wheel from over-
heating. The vehicle is still functioning correctly.
EDL will switch on again automatically when con-
ditions have returned to normal.
Power steering
The ESC can also support vehicle stability
through steering.
Selective wheel torque control
Selective wheel torque control is used when driv-
ing on curves. Braking is targeted toward the
wheels on the inside of the curve as needed. This
allows more precise driving in curves.
Automatic post-collision braking system
The automatic post-collision braking system can
help to reduce the risk of sliding and of addition-
al collisions after an accident. If the airbag con-
trol module detects a collision, the vehicle is
braked by the ESC.
The vehicle does not brake automatically if one of
the following occurs:
— The driver presses the accelerator pedal, or
— The braking force generated by the pressed
brake pedal is greater than the braking force
that
would be initiated by the system
— The ESC, the brake system, or the vehicle elec-
trical system is not functioning
ing risks. This could increase your risk of a
collision.
— Please note the risk of a collision increases
when driving fast, especially through curves
and on slippery or wet roads, and when driv-
ing too close to objects ahead. There is still
a risk of accidents because the ESC and its
integrated systems cannot always prevent
collisions.
— Accelerate carefully when driving on
smooth, slippery surfaces such as ice and
snow. The drive wheels can spin even when
these control systems are installed and this
can affect driving stability and increase the
risk of a collision.
ZA\ WARNING
— The ESC and its integrated systems cannot
overcome the limits imposed by natural
physical laws. This is especially important on
slippery or wet roads. If the systems begin
acting to stabilize your vehicle, you should
immediately alter your speed to match the
road and traffic conditions. Do not let the in-
creased safety provided tempt you into tak-
94
G) Tips
— The ABS and ASR only function correctly
when all four wheels have a similar wear
condition. Different tire sizes can lead toa
reduction in engine power.
— You may hear noises when the systems de-
scribed are working.
The 0 button is located above the selector lev-
er in the center console.
The ESC is automatically switched on when the
ignition is switched on. It may make sense in
some situations to limit the ESC so that the
wheels can spin:
— Rocking the vehicle to free it when it is stuck
— Driving in deep snow, on unpaved ground, or
with snow chains
Limiting ESC (sport mode)
—To limit the ESD, press the 0 button briefly.
The B indicator light turns on.
— To completely reactivate the ESC stabilization
function, press the button again. The indicator
light turns off.
Switching off ESC
—To switch off the ESC, press and hold the oF
button for more than three seconds. The B
and Ea indicator lights turn on.
Page 140 of 400
Parking aid
Switching on and off
Applies to: vehicles with parking system plus/park assist
2 + 3
S| 2 ©
a.
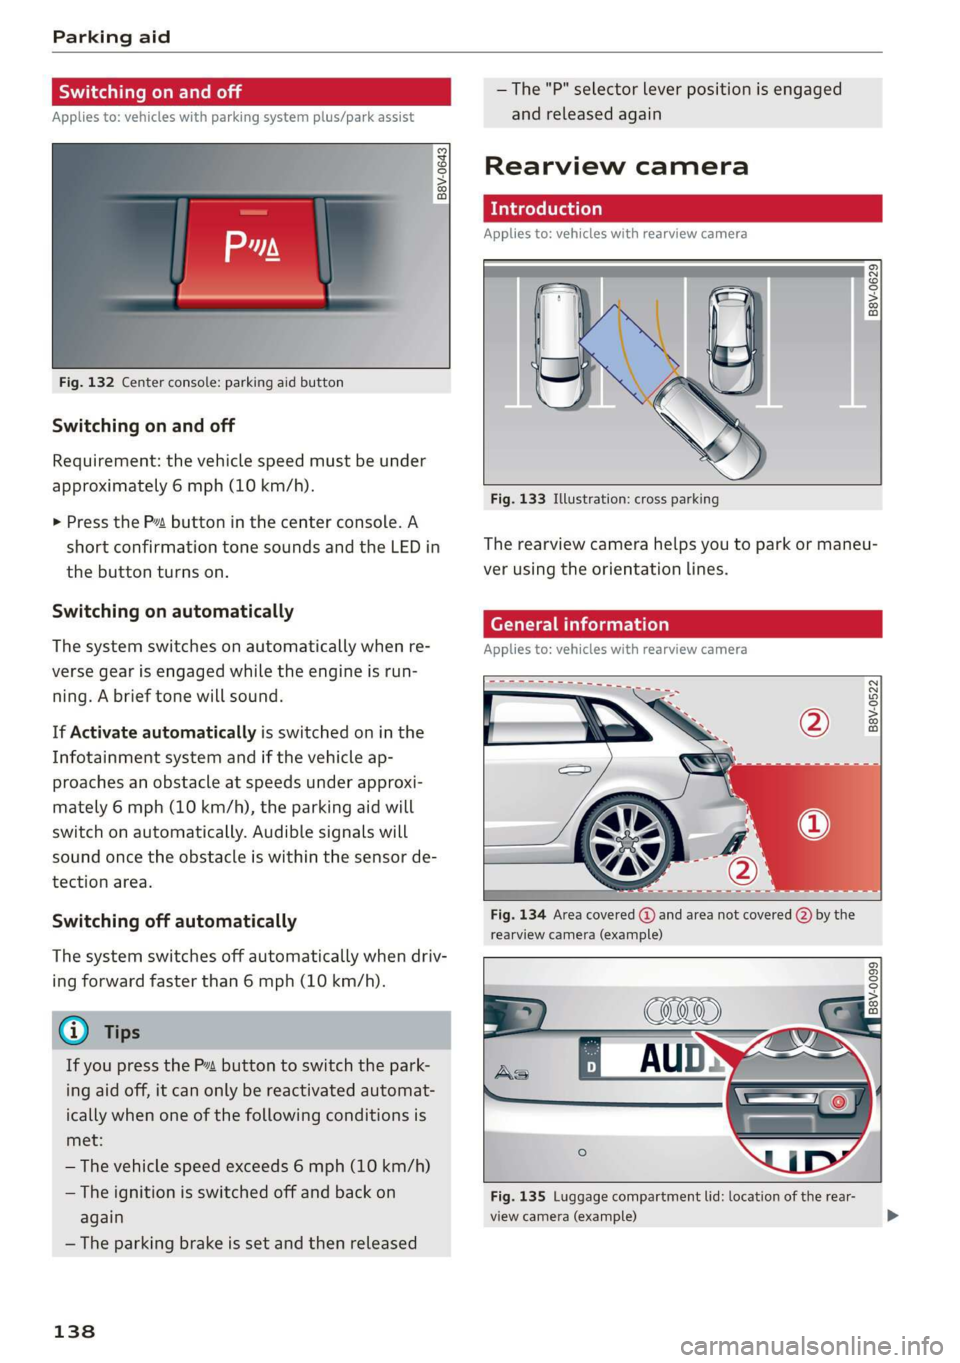
Fig. 132 Center console: parking aid button
Switching on and off
Requirement: the vehicle speed must be under
approximately 6 mph (10 km/h).
> Press the Pvt button in the center console. A
short confirmation tone sounds and the LED in
the button turns on.
Switching on automatically
The system switches on automatically when re-
verse gear is engaged while the engine is run-
ning. A brief tone will sound.
If Activate automatically is switched on in the
Infotainment system and if the vehicle ap-
proaches an obstacle at speeds under approxi-
mately 6 mph (10 km/h), the parking aid will
switch on automatically. Audible signals will
sound once the obstacle is within the sensor de-
tection area.
Switching off automatically
The system switches off automatically when driv-
ing forward faster than 6 mph (10 km/h).
@ Tips
If you press the Ps button to switch the park-
ing aid off, it can only be reactivated automat-
ically when one of the following conditions is
met:
— The vehicle speed exceeds 6 mph (10 km/h)
— The ignition is switched off and back on
again
— The parking brake is set and then released
138
—The "P" selector lever position is engaged
and released again
Rearview camera
Introduction
Applies to: vehicles with rearview camera
B8V-0629
Fig. 133 Illustration: cross parking
The rearview camera helps you to park or maneu-
ver using the orientation lines.
Cee Mc Lo)
Applies to: vehicles with rearview camera
B8V-0522
Fig. 134 Area covered @ and area not covered (2) by the
rearview camera (example)
'8V-0099 Bi
Fig. 135 Luggage compartment lid: location of the rear-
view camera (example)
Page 141 of 400
8V2012721BK
Parking aid
The rearview camera is located above the rear li-
cense plate bracket. Make sure that the lens for
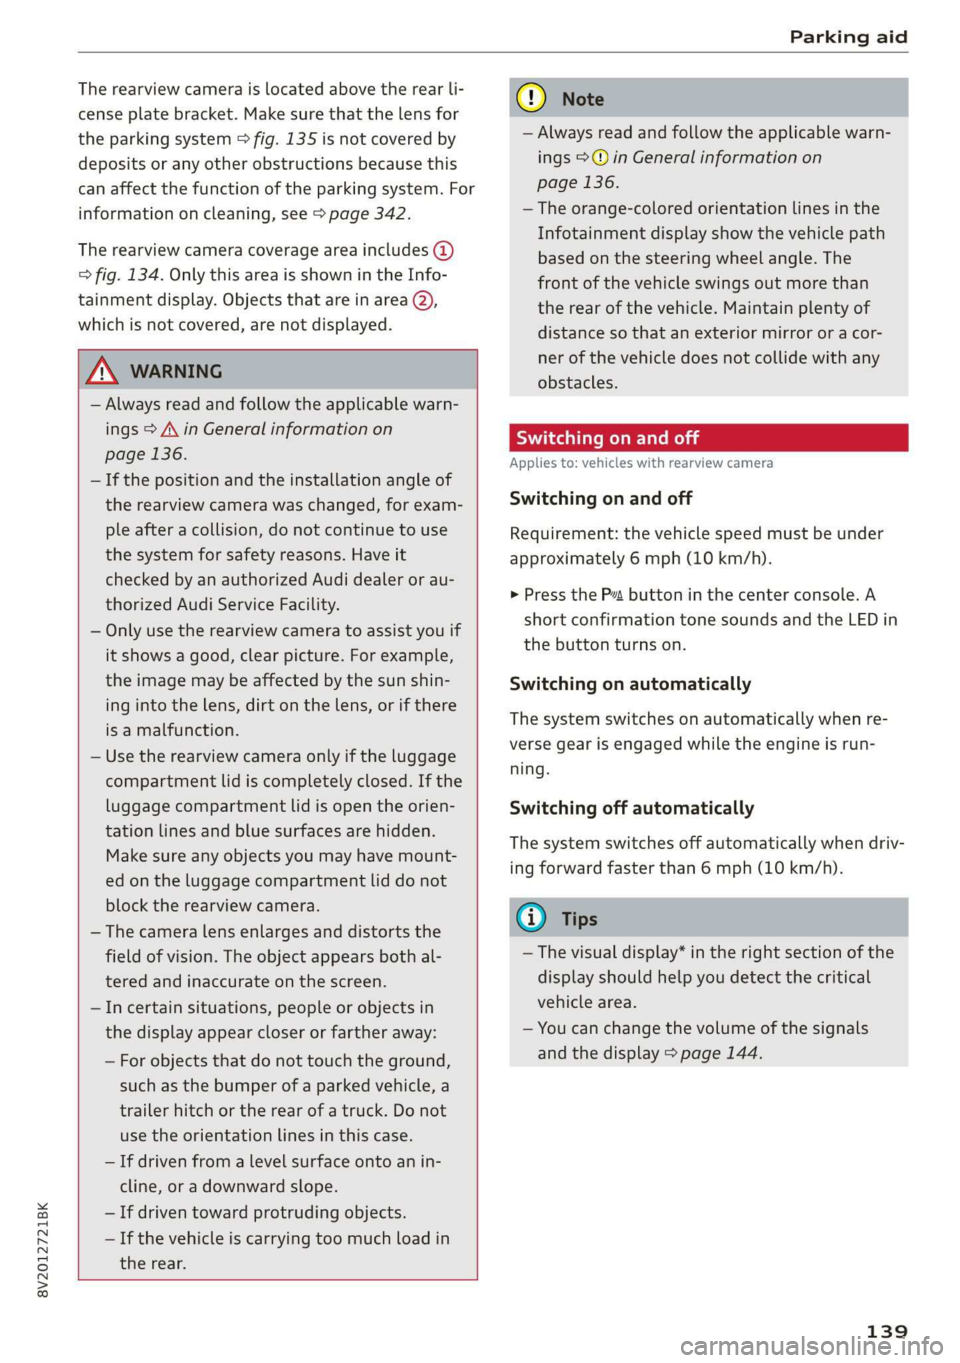
the parking system > fig. 135 is not covered by
deposits or any other obstructions because this
can affect the function of the parking system. For
information on cleaning, see > page 342.
The rearview camera coverage area includes ()
> fig. 134. Only this area is shown in the Info-
tainment display. Objects that are in area Q),
which is not covered, are not displayed.
Z\ WARNING
— Always read and follow the applicable warn-
ings > A\ in General information on
page 136.
— If the position and the installation angle of
the rearview camera was changed, for exam-
ple after a collision, do not continue to use
the system for safety reasons. Have it
checked by an authorized Audi dealer or au-
thorized Audi Service Facility.
— Only use the rearview camera to assist you if
it shows a good, clear picture. For example,
the image may be affected by the sun shin-
ing into the lens, dirt on the lens, or if there
is a malfunction.
— Use the rearview camera only if the luggage
compartment lid is completely closed. If the
luggage compartment lid is open the orien-
tation lines and blue surfaces are hidden.
Make sure any objects you may have mount-
ed on the luggage compartment lid do not
block the rearview camera.
— The camera lens enlarges and distorts the
field of vision. The object appears both al-
tered and inaccurate on the screen.
—Incertain situations, people or objects in
the display appear closer or farther away:
— For objects that do not touch the ground,
such as the bumper of a parked vehicle, a
trailer hitch or the rear of a truck. Do not
use the
orientation lines in this case.
—If driven from a level surface onto an in-
cline, or a downward slope.
— If driven toward protruding objects.
— If the vehicle is carrying too much load in
the rear.
CG) Note
— Always read and follow the applicable warn-
ings >@ in General information on
page 136.
— The orange-colored orientation lines in the
Infotainment display show the vehicle path
based on the steering wheel angle. The
front of the vehicle swings out more than
the rear of the vehicle. Maintain plenty of
distance so that an exterior mirror or a cor-
ner of the vehicle does not collide with any
obstacles.
Sct Remo
Applies to: vehicles with rearview camera
Switching on and off
Requirement: the vehicle speed must be under
approximately 6 mph (10 km/h).
> Press the Pv button in the center console. A
short confirmation tone sounds and the LED in
the button turns on.
Switching on automatically
The system switches on automatically when re-
verse gear is engaged while the engine is run-
ning.
Switching off automatically
The system switches off automatically when driv-
ing forward faster than 6 mph (10 km/h).
@) Tips
— The visual display* in the right section of the
display should help you detect the critical
vehicle area.
— You can change the volume of the signals
and the display > page 144.
139
Page 219 of 400
8V2012721BK
Media
— Depending on the mobile device being used,
there may be interruptions during media
playback and when using the myAudi app.
To prevent interruptions when using a mo-
bile device, do not lock the screen on your
mobile device and keep the myAudi app in
the foreground.
— Contact an authorized Audi dealer or au-
thorized Audi Service Facility for additional
information about online media.
Multimedia connections
USB adapter for Audi music interface
oe ®
S2
<&
7
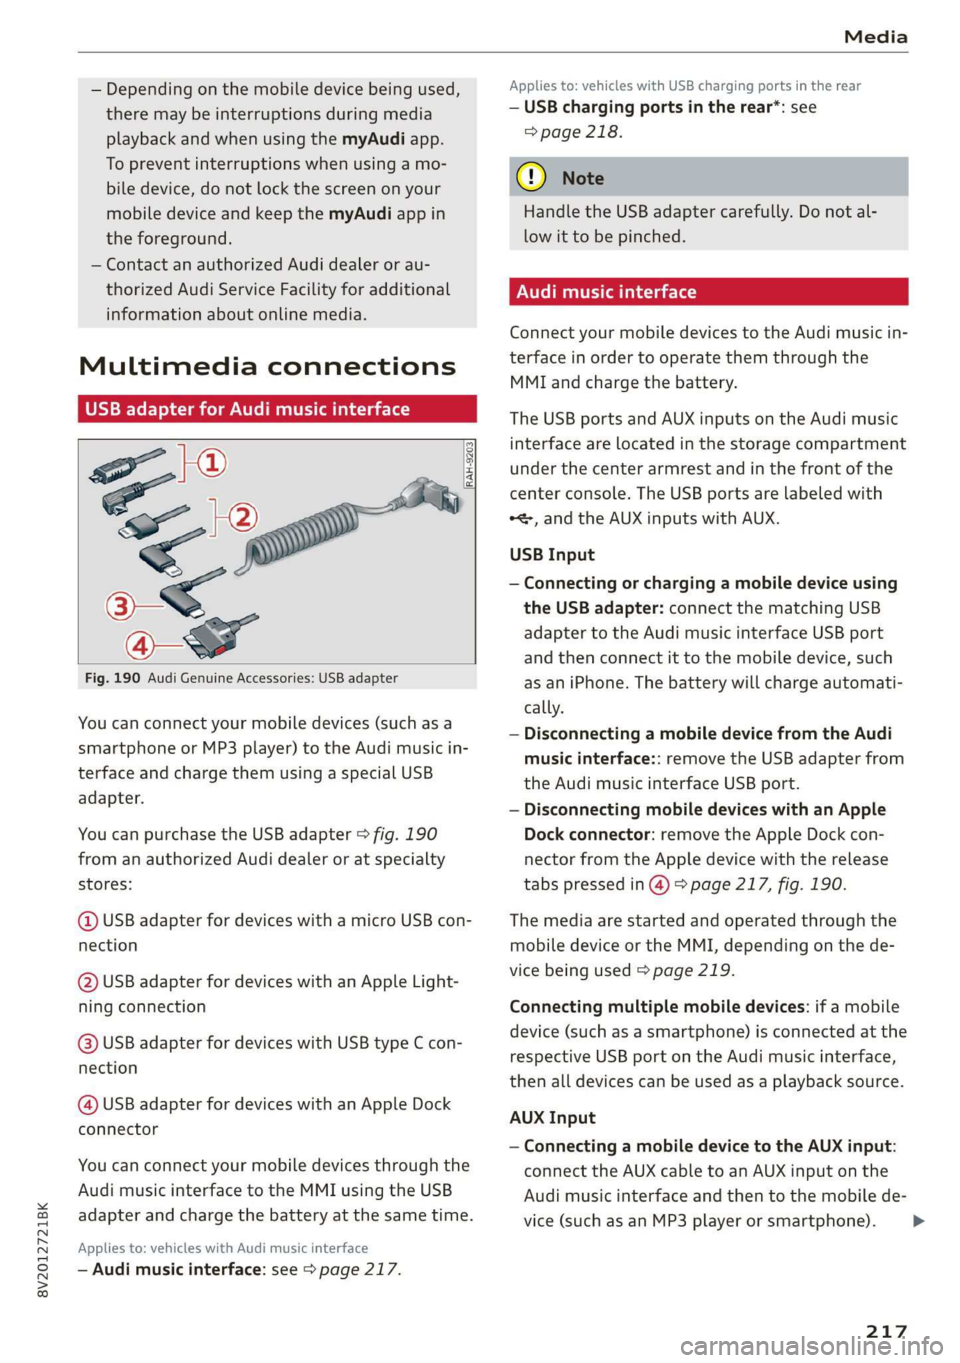
Fig. 190 Audi Genuine Accessories: USB adapter
[RAH-9203]
You can connect your mobile devices (such as a
smartphone or MP3 player) to the Audi music in-
terface and charge them using a special USB
adapter.
You can purchase the USB adapter > fig. 190
from an authorized Audi dealer or at specialty
stores:
@ USB adapter for devices with a micro USB con-
nection
@ USB adapter for devices with an Apple Light-
ning connection
@ USB adapter for devices with USB type C con-
nection
@ USB adapter for devices with an Apple Dock
connector
You can connect your mobile devices through the
Audi music interface to the MMI using the USB
adapter and charge the battery at the same time.
Applies to: vehicles with Audi music interface
— Audi music interface: see > page 217.
Applies to: vehicles with USB charging ports in the rear
— USB charging ports in the rear*: see
=> page 218.
@) Note
Handle the USB adapter carefully. Do not al-
low it to be pinched.
Audi music interface
Connect your mobile devices to the Audi music in-
terface in order to operate them through the
MMI and charge the battery.
The USB ports and AUX inputs on the Audi music
interface are located in the storage compartment
under the center armrest and in the front of the
center console. The USB ports are labeled with
*<, and the AUX inputs with AUX.
USB Input
— Connecting or charging a mobile device using
the USB adapter: connect the matching USB
adapter to the Audi music interface USB port
and then connect it to the mobile device, such
as an iPhone. The battery will charge automati-
cally.
— Disconnecting a mobile device from the Audi
music interface:: remove the USB adapter from
the Audi music interface USB port.
— Disconnecting mobile devices with an Apple
Dock connector: remove the Apple Dock con-
nector from the Apple device with the release
tabs pressed in @) > page 217, fig. 190.
The media are started and operated through the
mobile device or the MMI, depending on the de-
vice being used > page 219.
Connecting multiple mobile devices: if a mobile
device (such as a smartphone) is connected at the
respective USB port on the Audi music interface,
then all devices can be used as a playback source.
AUX Input
— Connecting a mobile device to the AUX input:
connect the AUX cable to an AUX input on the
Audi music interface and then to the mobile de-
vice (such as an MP3 player or smartphone).
217
Page 221 of 400
8V2012721BK
Media
Two USB charging ports* are located at the back
of the center console.
— USB adapter: refer to > page 217, USB adapter
for Audi music interface.
— Charging a mobile device using the USB
adapter: connect your mobile device to a USB
charging port using a suitable USB adapter.
— Disconnecting a mobile device from the charg-
ing port: remove the USB adapter from the USB
charging port.
— Disconnecting mobile devices with an Apple
Dock connector: remove the Apple Dock con-
nector from the Apple device with the release
tabs pressed in.
ZA\ WARNING
Driving requires your complete and undivided
attention. As the driver, you have complete re-
sponsibility for safety in traffic. Never operate
your mobile devices while driving, because
this increases the risk of an accident.
@ Note
Extremely high or low temperatures that can
occur inside vehicles can damage mobile devi-
ces and/or impair their performance. Never
leave mobile devices in the vehicle in ex-
tremely high or low temperatures.
G) Tips
— Always follow the information found in
=> page 59.
— When you switch the ignition off, the USB
ports are still supplied with power until the
energy management intervenes.
— Do not use any additional USB extension ca-
bles or adapters to connect mobile devices
to the USB charging port that have already
been connected by a USB adapter. Using an
additional adapter or US extension cable
may impair functionality.
— USB hubs are not supported.
— Refer to the manufacturer's operating man-
ual for important information regarding the
operation of your mobile device.
— Correct function of all mobile devices can-
not be guaranteed.
— The vehicle battery drains when mobile de-
vices are turned on but the engine is off.
Playing media
\ La Coton
(2
©-«n ei]
So
eTocs
yee Per
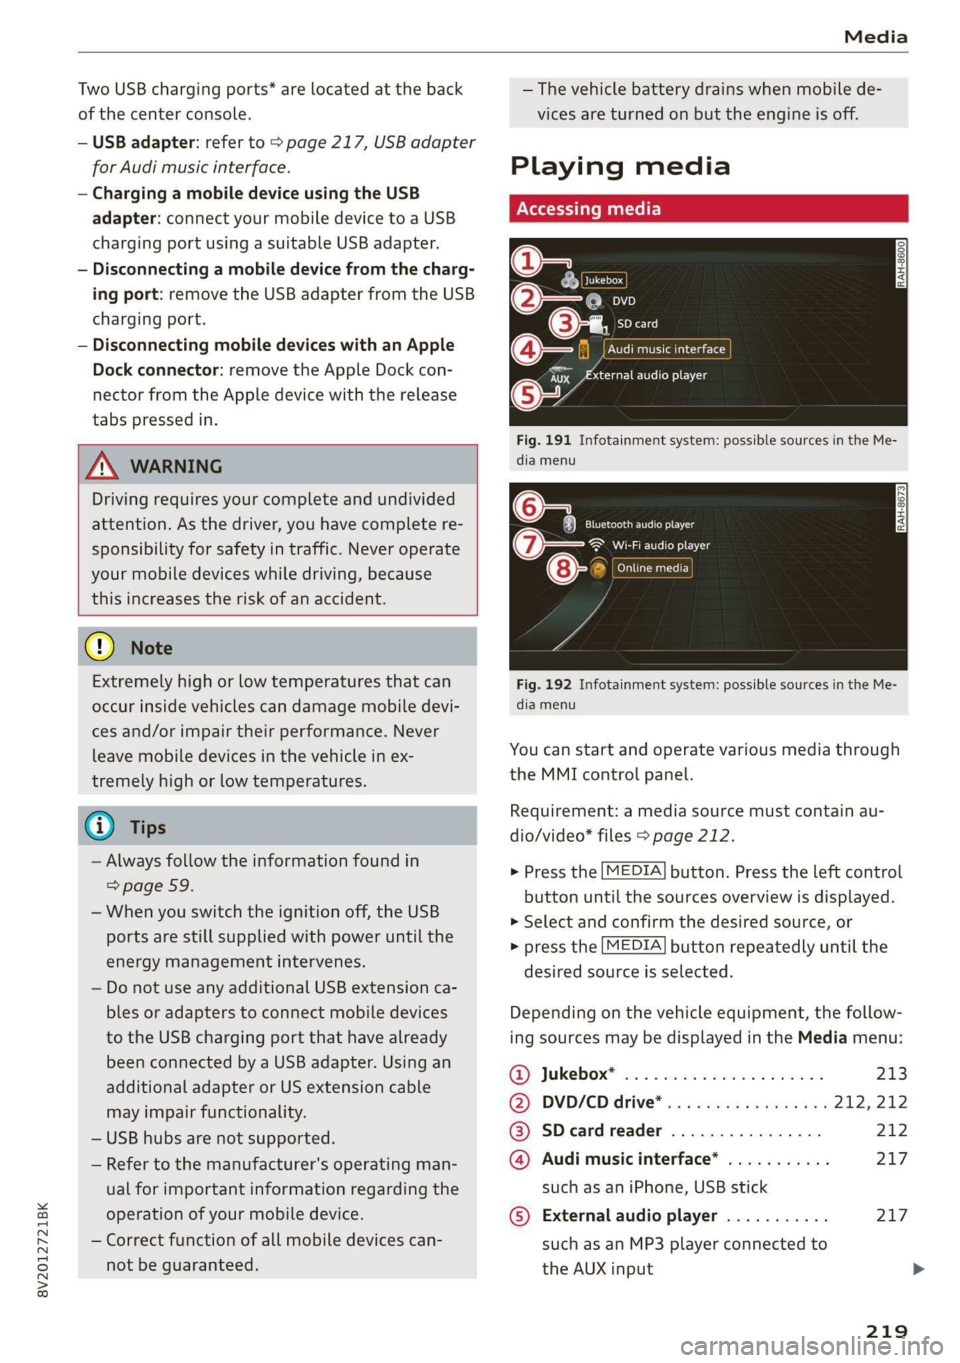
Fig. 191 Infotainment system: possible sources in the Me-
dia menu
o~ Se eC e Ng
Cela ttn ant)
Eitan en Ns
7:
Fig. 192 Infotainment system: possible sources in the Me-
dia menu
You can start and operate various media through
the MMI control panel.
Requirement: a media source must contain au-
dio/video* files > page 212.
> Press the [MEDIA] button. Press the left control
button until the sources overview is displayed.
> Select and confirm the desired source, or
> press the [MEDIA] button repeatedly until the
desired source is selected.
Depending on the vehicle equipment, the follow-
ing sources may be displayed in the Media menu:
GD) Jukebox? sc. so secose so series ween ns 213
@) DVD/CD drive® ss ¢ « seas: eames ne 212, 212
@ SDeardreader ................ 212
@ Audi music interface* ........... 217
such as an iPhone, USB stick
© External audio player ........... 217
such as an MP3 player connected to
the AUX input >
219