Page 196 of 701
195
uuAdjusting the Seats uSecond Row Seats
Continued
Controls
Models with captain seat
Seat-back Angle
Adjustment
Pull up the lever to change
the angle.Horizontal Position
Adjustment
Pull up the bar to move the
seat, then release the bar.
20 ACURA MDX-31TZ56600.book 195 ページ 2019年4月24日 水曜日 午後5時44分
Page 198 of 701

197
uuAdjusting the Seats uSecond Row Seats
Controls
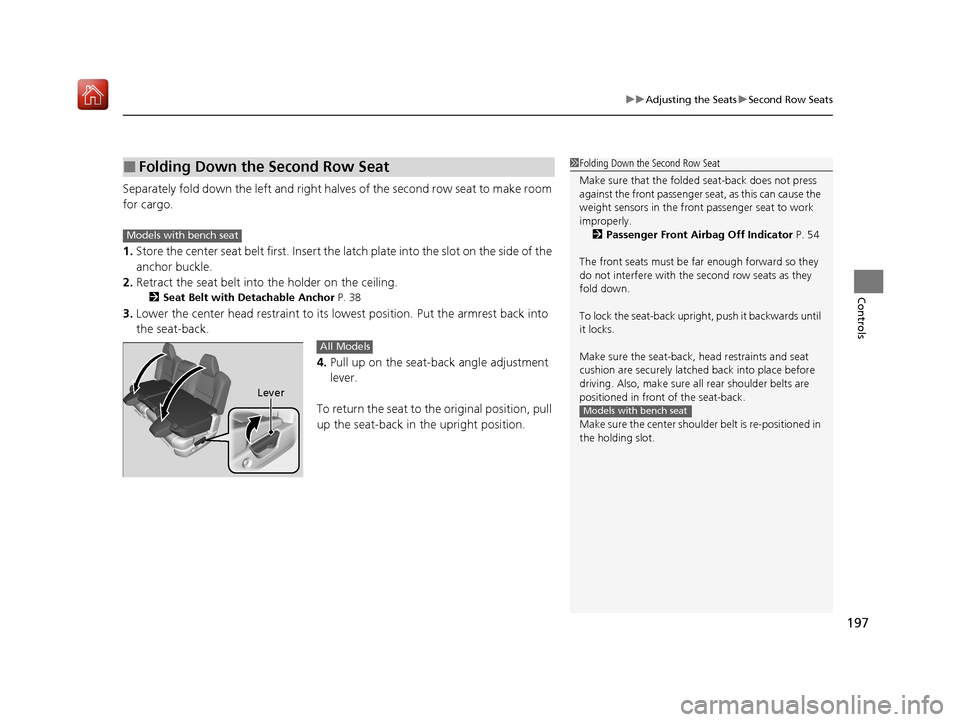
Separately fold down the left and right ha lves of the second row seat to make room
for cargo.
1. Store the center seat belt first. Insert the la tch plate into the slot on the side of the
anchor buckle.
2. Retract the seat belt into the holder on the ceiling.
2 Seat Belt with Detachable Anchor P. 38
3.Lower the center head restraint to its lo west position. Put the armrest back into
the seat-back.
4.Pull up on the seat-back angle adjustment
lever.
To return the seat to th e original position, pull
up the seat-back in the upright position.
■Folding Down the Second Row Seat1 Folding Down the Second Row Seat
Make sure that the folded seat-back does not press
against the front passenger seat, as this can cause the
weight sensors in the front passenger seat to work
improperly. 2 Passenger Front Airbag Off Indicator P. 54
The front seats must be far enough forward so they
do not interfere with the second row seats as they
fold down.
To lock the seat-back upri ght, push it backwards until
it locks.
Make sure the seat-back, head restraints and seat
cushion are securely latche d back into place before
driving. Also, make sure all rear shoulder belts are
positioned in front of the seat-back.
Make sure the center shoulde r belt is re-positioned in
the holding slot.
Models with bench seat
Models with bench seat
Lever
All Models
20 ACURA MDX-31TZ56600.book 197 ページ 2019年4月24日 水曜日 午後5時44分
Page 201 of 701

uuAdjusting the Seats uHead Restraints
200
Controls
A passenger sitting in the second row center
seating position should adjust the height of
their head restraint to an appropriate position
before the vehicle begins moving.
To raise the head restraint:
Pull it upward.
To lower the head restraint:
Push it down while pressing the release
button.
Head restraints can be removed for cleaning or repair.
To remove a head restraint:
Pull the restraint up as far as it will go. Then push the release button, and pull the
restraint up and out.
To reinstall a head restraint:
Insert the legs back in place, then adjust the head restraint to an appropriate height
while pressing the release butto n. Pull up on the restraint to make sure it is locked
in position.
■Changing the Second Row Center Seat Head Restraint
Position*
■Removing and Reinstalling the Head Restraints1 Removing and Reinstalling the Head Restraints
3WARNING
Failure to reinstall, or correctly reinstall, the
head restraints can result in severe injury
during a crash.
Always replace the he ad restraints before
driving.
Front and second row head restraints
* Not available on all models
20 ACURA MDX-31TZ56600.book 200 ページ 2019年4月24日 水曜日 午後5時44分
Page 207 of 701

206
Controls
Interior Lights/Interior Convenience Items
Interior Lights
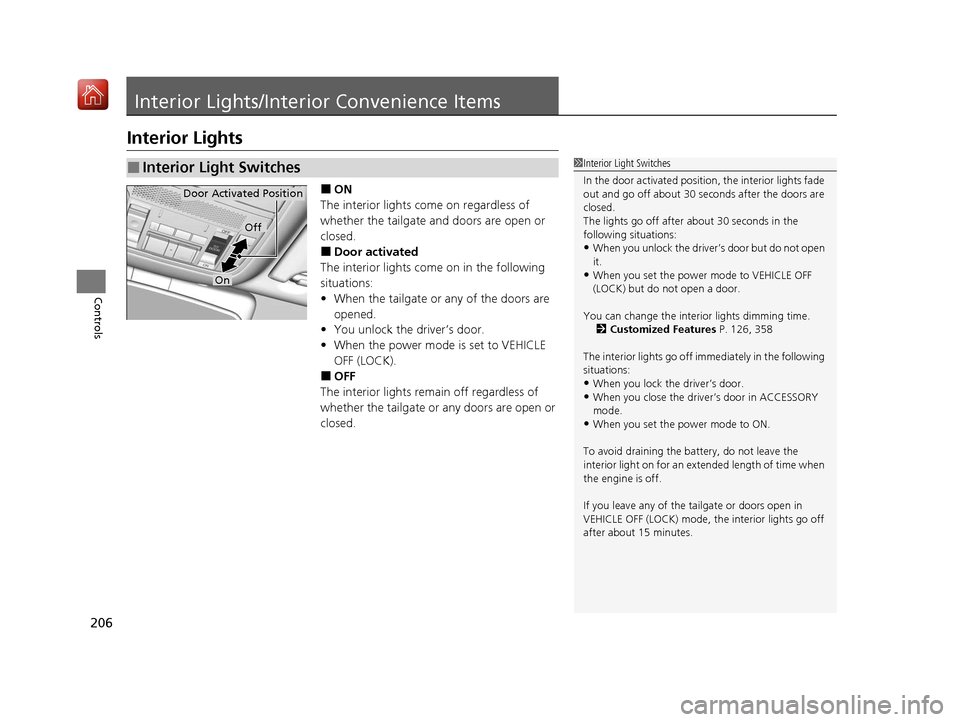
■ON
The interior lights come on regardless of
whether the tailgate and doors are open or
closed.
■Door activated
The interior lights come on in the following
situations:
• When the tailgate or any of the doors are
opened.
• You unlock the driver’s door.
• When the power mode is set to VEHICLE
OFF (LOCK).
■OFF
The interior lights remain off regardless of
whether the tailgate or any doors are open or
closed.
■Interior Light Switches1 Interior Light Switches
In the door activated position, the interior lights fade
out and go off about 30 se conds after the doors are
closed.
The lights go off after about 30 seconds in the
following situations:
•When you unlock the driver’s door but do not open
it.
•When you set the power mode to VEHICLE OFF
(LOCK) but do not open a door.
You can change the interi or lights dimming time.
2 Customized Features P. 126, 358
The interior lights go off im mediately in the following
situations:
•When you lock the driver’s door.•When you close the driver’s door in ACCESSORY
mode.
•When you set the power mode to ON.
To avoid draining the ba ttery, do not leave the
interior light on for an extended length of time when
the engine is off.
If you leave any of the tailgate or doors open in
VEHICLE OFF (LOCK) mode, th e interior lights go off
after about 15 minutes.
Door Activated Position
Off
On
20 ACURA MDX-31TZ56600.book 206 ページ 2019年4月24日 水曜日 午後5時44分
Page 213 of 701
212
uuInterior Lights/Interior Convenience Items uInterior Convenience Items
Controls
■Second row seat beverage holders*
Fold the armrest down to use the rear seat
beverage holders.
Are located in the console between the
second row seats.
■Third row seat beverage holders
Models with bench seat
Models with rear console compartment
* Not available on all models
20 ACURA MDX-31TZ56600.book 212 ページ 2019年4月24日 水曜日 午後5時44分
Page 219 of 701

uuInterior Lights/Interior Convenience Items uInterior Convenience Items
218
Controls
The power mode must be in ON to use the
seat heaters.
Press the seat heater button:
Once - The HI setting (three indicators on)
Twice - The MID setting (two indicators on)
Three times - The LO setting (one indicator on)
Four times - The OFF se tting (no indicators on)
Pull the tab and roll up the sunshade all the
way. Use the hooks to hang it.
■Second Row Outer Seat Heaters*1 Second Row Outer Seat Heaters*
Do not use the seat heaters even in LO when the
engine is off. Under such conditions, the battery may
be weakened, making the engine difficult to start.
After a certain period of time, the strength setting for
the seat heaters will automatically be reduced by one
level at a time until the seat heater shuts off. The
elapsed time varies according to the interior
environment.
3WARNING
Heat induced burns are possible when
using seat heaters.
Persons with a diminished ability to sense
temperature (e.g., persons with diabetes,
lower-limb nerve damage, or paralysis) or
with sensitive skin should not use seat
heaters.
■Integrated Sunshades*
1Integrated Sunshades*
Use the sunshades only when the windows are fully
closed. Using the shade while a window is open can
unhook and blow off the sh ade, hitting and hurting
anyone sitting near the window.
Tab
Hook
* Not available on all models
20 ACURA MDX-31TZ56600.book 218 ページ 2019年4月24日 水曜日 午後5時44分
Page 224 of 701

Continued223
uuClimate Control System uUsing Automatic Climate Control
Controls
■SYNC on and off
1.Select SYNC.
2. Select On for synchronization mode.
u When in synchronization mode, the front
passenger’s side temperature and the
rear passenger compartment become
the same as the driv er’s side settings.
3. Adjust the temperature or change the
mode from the driver’s side.
■Changing the fan speed
1.Select .
u When the left or right side of the
is selected, the fan speed level goes up or
down one level at a time.
2. Change the fan speed with one of the
following:
The fan speed level indicators: Select your
desired speed level. The smaller indicator is
for a slower speed, and the larger for a
faster speed.
(+/(-: To go up or down one level at a
time.
Front Fan AUTO : The system automatically
selects the fan speed most suitable to the
ambient environment.
1 SYNC on and off
When you press the button or select the Front
icon, the system synchronizes the driver’s and
front passenger’s temp erature settings.
When the system is not in SYNC mode, the driver's
side temperature, the front passenger’s side
temperature and the rear passenger compartment (if
it is on) can be set separately.
You can also turn off SYNC mode by changing the
front passenger’s side temperature or rear
passenger’s temperature.
1 Changing the fan speed
While the climate control system is in auto, Front
Fan AUTO is highlighted.
Fan Speed Level Indicators
20 ACURA MDX-31TZ56600.book 223 ページ 2019年4月24日 水曜日 午後5時44分
Page 234 of 701

233
uuAudio System uUSB Ports
Continued
Features
USB Ports
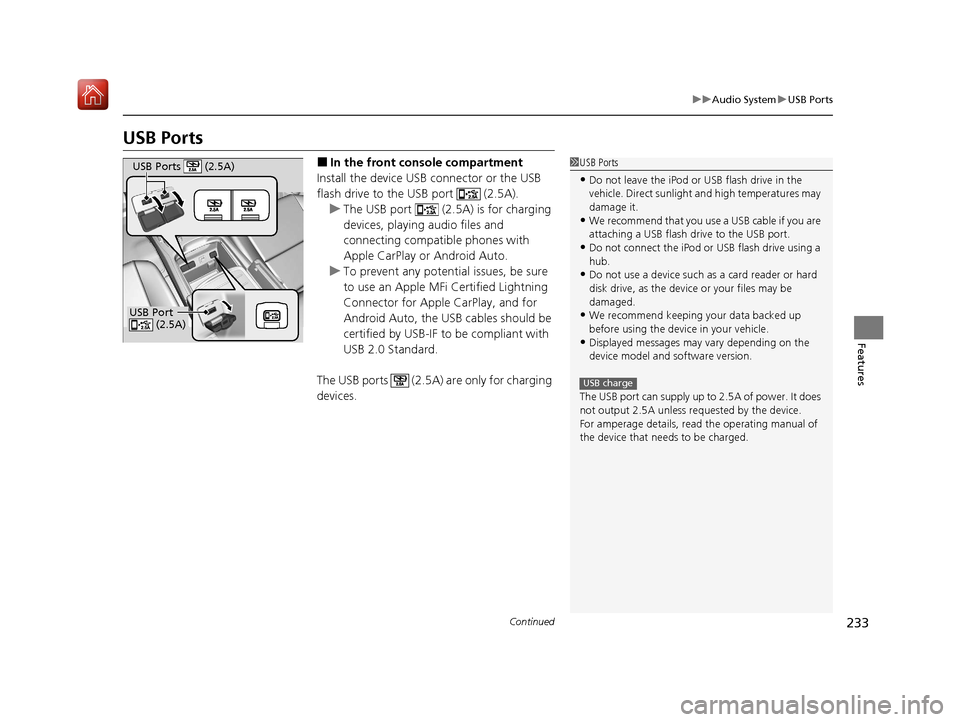
■In the front console compartment
Install the device USB connector or the USB
flash drive to the USB port (2.5A). u The USB port (2.5A) is for charging
devices, playing audio files and
connecting compatib le phones with
Apple CarPlay or Android Auto.
u To prevent any potenti al issues, be sure
to use an Apple MFi Certified Lightning
Connector for Apple CarPlay, and for
Android Auto, the USB cables should be
certified by USB-IF to be compliant with
USB 2.0 Standard.
The USB ports (2.5A) are only for charging
devices.1 USB Ports
•Do not leave the iPod or USB flash drive in the
vehicle. Direct sunlight and high temperatures may
damage it.
•We recommend that you us e a USB cable if you are
attaching a USB flash drive to the USB port.
•Do not connect the iPod or USB flash drive using a
hub.
•Do not use a device such as a card reader or hard
disk drive, as the device or your files may be
damaged.
•We recommend keeping y our data backed up
before using the device in your vehicle.
•Displayed messages may vary depending on the
device model and software version.
The USB port can supply up to 2.5A of power. It does
not output 2.5A unless requested by the device.
For amperage details, read the operating manual of
the device that ne eds to be charged.
USB charge
USB Port
(2.5A)
USB Ports (2.5A)
20 ACURA MDX-31TZ56600.book 233 ページ 2019年4月24日 水曜日 午後5時44分