2019 YAMAHA XT1200Z air condition
[x] Cancel search: air conditionPage 9 of 118

Safety information
1-3
1
Avoi
d Car bon Monoxi de Poisonin g
All engine exhaust contains carbon
monoxide, a deadly gas. Breathing
carbon monoxide can cause head-
aches, dizziness, drowsiness, nausea,
confusion, and eventually death.
Carbon Monoxide is a colorless, odor-
less, tasteless gas which may be pres-
ent even if you do not see or smell any
engine exhaust. Deadly levels of car-
bon monoxide can collect rapidly and
you can quickly be overcome and un-
able to save yourself. Also, deadly lev-
els of carbon monoxide can linger for
hours or days in enclosed or poorly
ventilated areas. If you experience any
symptoms of carbon monoxide poi-
soning, leave the area immediately, get
fresh air, and SEEK MEDICAL TREAT-
MENT. Do not run engine indoors. Even if
you try to ventilate engine exhaust
with fans or open windows and
doors, carbon monoxide can rap-
idly reach dangerous levels.
Do not run engine in poorly venti-
lated or partially enclosed areas
such as barns, garages, or car-
ports.
Do not run engine outdoors where
engine exhaust can be drawn into
a building through openings such
as windows and doors.
Loa din g
Adding accessories or cargo to your
motorcycle can adversely affect stabil-
ity and handling if the weight distribu-
tion of the motorcycle is changed. To
avoid the possibility of an accident, use
extreme caution when adding cargo or
accessories to your motorcycle. Use extra care when riding a motorcycle
that has added cargo or accessories.
Here, along with the information about
accessories below, are some general
guidelines to follow if loading cargo to
your motorcycle:
The total weight of the operator, pas-
senger, accessories and cargo must
not exceed the maximum load limit.
Operation of an overloa
ded vehicle
coul d cause an acci dent.
When loading within this weight limit,
keep the following in mind: Cargo and accessory weight
should be kept as low and close to
the motorcycle as possible. Se-
curely pack your heaviest items as
close to the center of the vehicle
as possible and make sure to dis-
tribute the weight as evenly as
possible on both sides of the mo-
torcycle to minimize imbalance or
instability.
Shifting weights can create a sud-
den imbalance. Make sure that
accessories and cargo are se-
curely attached to the motorcycle
before riding. Check accessory
mounts and cargo restraints fre-
quently.
• Properly adjust the suspension for your load (suspension-ad-
justable models only), and
check the condition and pres-
sure of your tires.
• Never attach any large or heavy items to the handlebar, front
fork, or front fender. These
items, including such cargo as
Maximum loa d:
212 kg (467 lb)
UBP8E1E0.book Page 3 Friday, September 14, 2018 11:35 AM
Page 26 of 118

Instrument and control functions
3-12
3
elapsed time
air intake temperature
coolant temperature
average fuel consumption
instantaneous fuel consumption
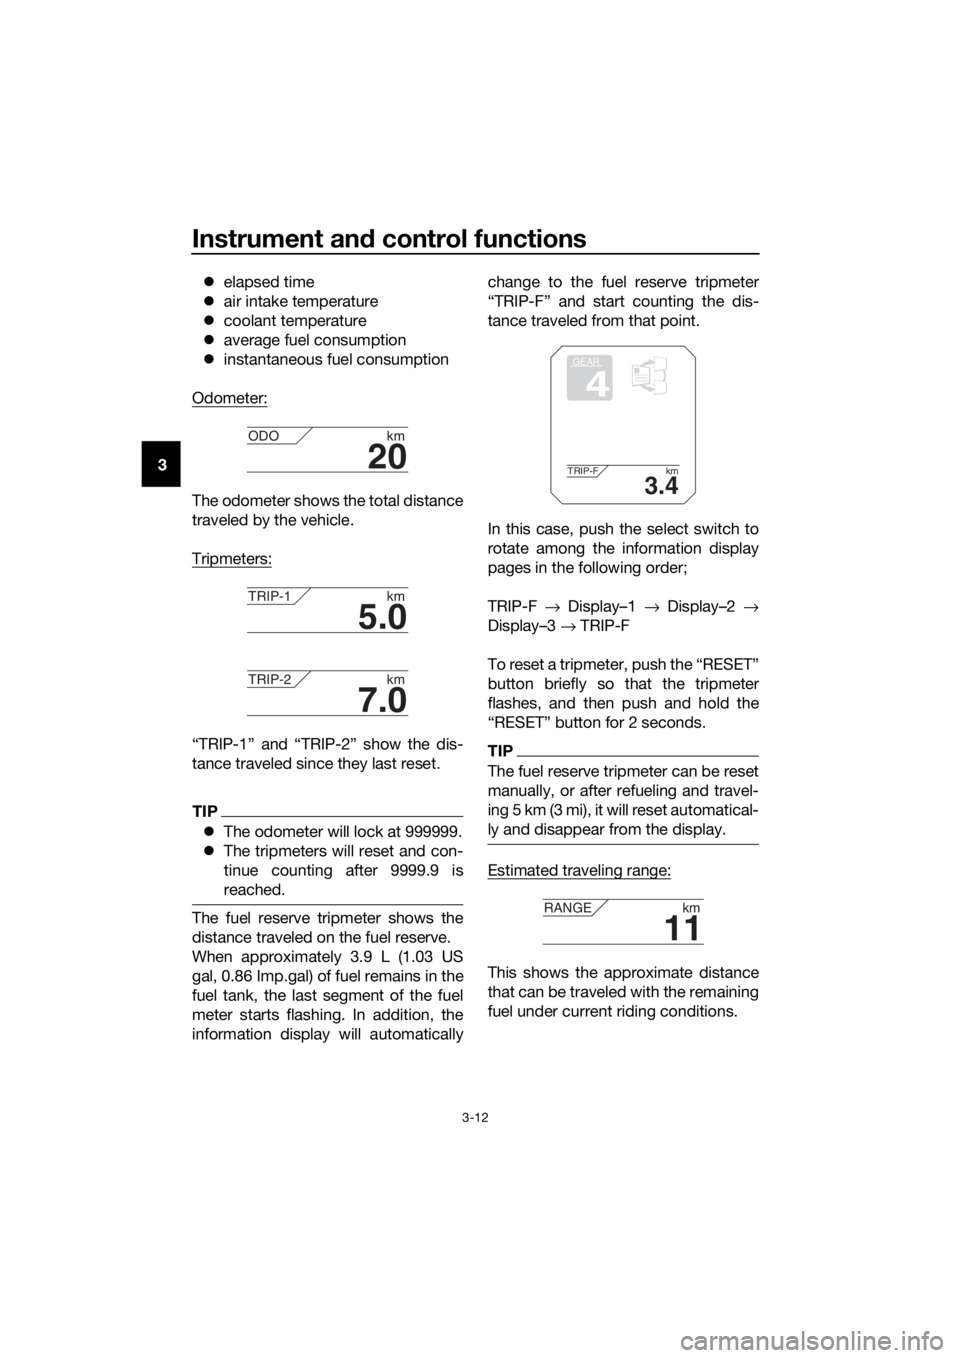
Odometer:
The odometer shows the total distance
traveled by the vehicle.
Tripmeters:
“TRIP-1” and “TRIP-2” show the dis-
tance traveled since they last reset.
TIP
The odometer will lock at 999999.
The tripmeters will reset and con-
tinue counting after 9999.9 is
reached.
The fuel reserve tripmeter shows the
distance traveled on the fuel reserve.
When approximately 3.9 L (1.03 US
gal, 0.86 Imp.gal) of fuel remains in the
fuel tank, the last segment of the fuel
meter starts flashing. In addition, the
information display will automatically change to the fuel reserve tripmeter
“TRIP-F” and start counting the dis-
tance traveled from that point.
In this case, push the select switch to
rotate among the information display
pages in the following order;
TRIP-F
→ Display–1 → Display–2 →
Display–3 → TRIP-F
To reset a tripmeter, push the “RESET”
button briefly so that the tripmeter
flashes, and then push and hold the
“RESET” button for 2 seconds.
TIP
The fuel reserve tripmeter can be reset
manually, or after refueling and travel-
ing 5 km (3 mi), it will reset automatical-
ly and disappear from the display.
Estimated traveling range:
This shows the approximate distance
that can be traveled with the remaining
fuel under current riding conditions.
20
ODO km
5.0
TRIP-1km
7.0
TRIP-2km
GEAR
4
3.4
TRIP-F km
11
RANGEkm
UBP8E1E0.book Page 12 Friday, September 14, 2018 11:35 AM
Page 57 of 118

For your safety – pre-operation checks
4-2
4
Throttle grip • Make sure that operation is smooth.
• Check throttle grip free play.
• If necessary, have Yamaha dealer adjust throttle grip
free play and lubricate cable and grip housing. 6-18,
6-26
Wheels an d tires •Check for damage.
• Check tire condition and tread depth.
• Check air pressure.
• Correct if necessary. 6-19,
6-22
Brake an d shift pe dals • Make sure that operation is smooth.
• Lubricate pedal pivoting points if necessary.
6-27
Brake an d clutch le-
vers • Make sure that operation is smooth.
• Lubricate lever pivoting points if necessary.
6-27
Si destan d • Make sure that operation is smooth.
• Lubricate pivot if necessary. 6-28
Chassis fasteners • Make sure that all nuts, bolts and screws are properly
tightened.
• Tighten if necessary. —
Instruments, li ghts,
si gnals an d switches • Check operation.
• Correct if necessary.
—
Si destan d switch • Check operation of ignition circuit cut-off system.
• If system is not working correctly, have Yamaha dealer
check vehicle. 3-40
ITEM CHECKS PAGE
UBP8E1E0.book Page 2 Friday, September 14, 2018 11:35 AM
Page 82 of 118

Periodic maintenance an d a djustment
6-19
6
EAU21403
Valve clearance
The valves are an important engine
component, and since valve clearance
changes with use, they must be
checked and adjusted at the intervals
specified in the periodic maintenance
chart. Unadjusted valves can result in
improper air-fuel mixture, engine
noise, and eventually engine damage.
To prevent this from occurring, have
your Yamaha dealer check and adjust
the valve clearance at regular intervals.
TIP
This service must be performed when
the engine is cold.
EAU64412
Tires
Tires are the only contact between the
vehicle and the road. Safety in all con-
ditions of riding depends on a relatively
small area of road contact. Therefore, it
is essential to maintain the tires in good
condition at all times and replace them
at the appropriate time with the speci-
fied tires.
Tire air pressure
The tire air pressure should be
checked and, if necessary, adjusted
before each ride.
WARNING
EWA10504
Operation of this vehicle with im-
proper tire pressure may cause se-
vere injury or d eath from loss of
control. The tire air pressure must be
checked and a djuste d on col d
tires (i.e., when the temperature
of the tires equals the am bient
temperature).
The tire air pressure must be
a d juste d in accor dance with the
ri din g speed and with the total
wei ght of ri der, passen ger, car-
g o, an d accessories approve d
for this mo del.
UBP8E1E0.book Page 19 Friday, September 14, 2018 11:35 AM
Page 92 of 118

Periodic maintenance an d a djustment
6-29
6
EAU23273
Checkin g the front fork
The condition and operation of the
front fork must be checked as follows
at the intervals specified in the periodic
maintenance and lubrication chart.
To check the con dition
Check the inner tubes for scratches,
damage and excessive oil leakage.
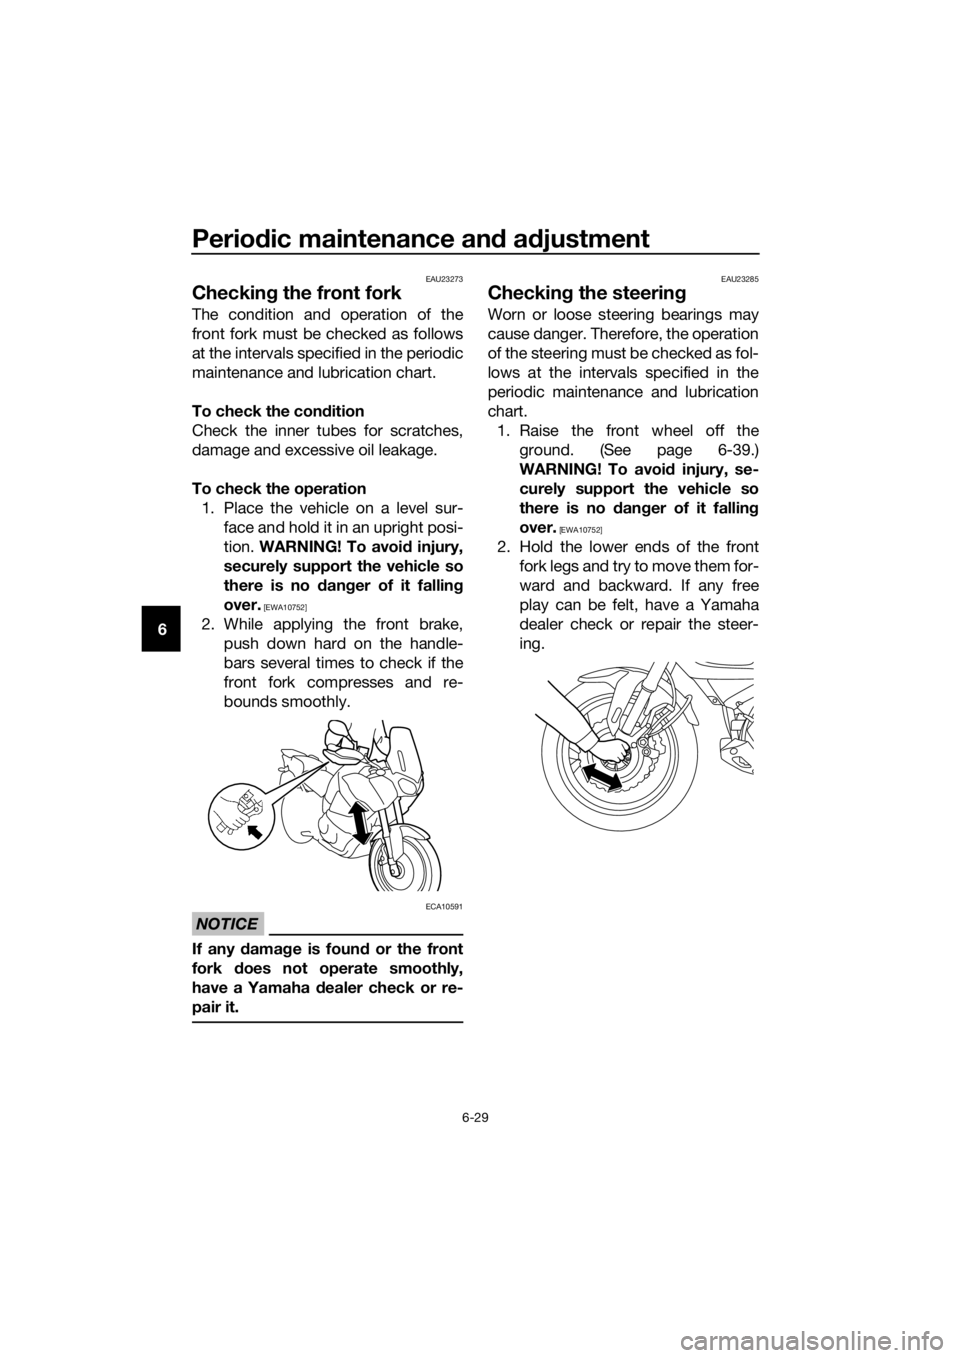
To check the operation 1. Place the vehicle on a level sur- face and hold it in an upright posi-
tion. WARNING! To avoi d injury,
securely support the vehicle so
there is no dan ger of it fallin g
over.
[EWA10752]
2. While applying the front brake, push down hard on the handle-
bars several times to check if the
front fork compresses and re-
bounds smoothly.
NOTICE
ECA10591
If any d amage is foun d or the front
fork does not operate smoothly,
have a Yamaha dealer check or re-
pair it.
EAU23285
Checkin g the steerin g
Worn or loose steering bearings may
cause danger. Therefore, the operation
of the steering must be checked as fol-
lows at the intervals specified in the
periodic maintenance and lubrication
chart.
1. Raise the front wheel off the ground. (See page 6-39.)
WARNING! To avoi d injury, se-
curely support the vehicle so
there is no dan ger of it fallin g
over.
[EWA10752]
2. Hold the lower ends of the front fork legs and try to move them for-
ward and backward. If any free
play can be felt, have a Yamaha
dealer check or repair the steer-
ing.
UBP8E1E0.book Page 29 Friday, September 14, 2018 11:35 AM