2019 VOLVO XC60 TWIN ENGINE height
[x] Cancel search: heightPage 80 of 695

||
SAFETY
* Option/accessory.78
WARNING
DEATH or SERIOUS INJURY can
occur
Follow all instructions on this
child restraint and in the vehicle's
owner's manual.
Make sure the booster cushion is
securely locked before the child
is seated.
Use this booster cushion only with chil-dren whose height and weight are withinthe permitted limits shown in the table.
Use only the vehicle's lap and shoulderbelt system when restraining the child inthis booster cushion.
In the event of a collision while the inte-grated booster cushion was occupied, theentire booster cushion and seat belt mustbe replaced. The booster cushion shouldalso be replaced if it is badly worn ordamaged in any way. This work should beperformed by a trained and qualifiedVolvo service technician only.
NOTE
The integrated booster cushion cannot bemoved directly from the upper position to thelower position. From the upper position, thebooster cushion must first be folded downcompletely into the rear seat and then raisedto the lower position.
Related information
Integrated booster cushion* (p. 75)
Folding down the integrated booster cush-ion* (p. 78)
Folding down the integrated
booster cushion*
When the integrated booster cushion in the rearseat is not in use, it should be stowed (foldeddown).
NOTE
The integrated booster cushion cannot bemoved directly from the upper position to thelower position. From the upper position, thebooster cushion must first be folded downcompletely into the rear seat and then raisedto the lower position.
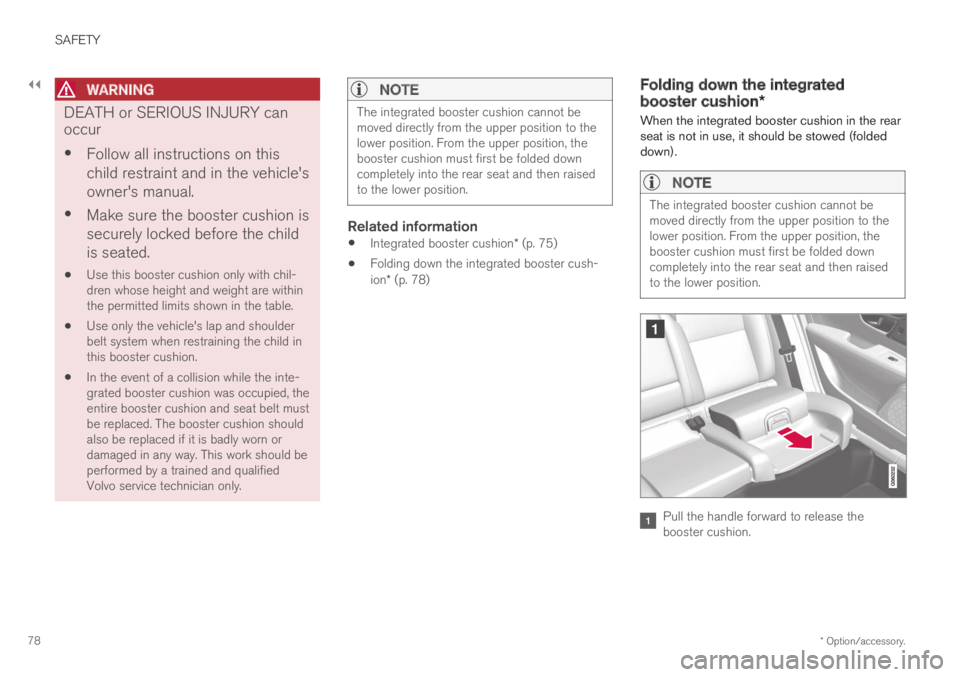
Pull the handle forward to release thebooster cushion.
Page 81 of 695

SAFETY
* Option/accessory.79
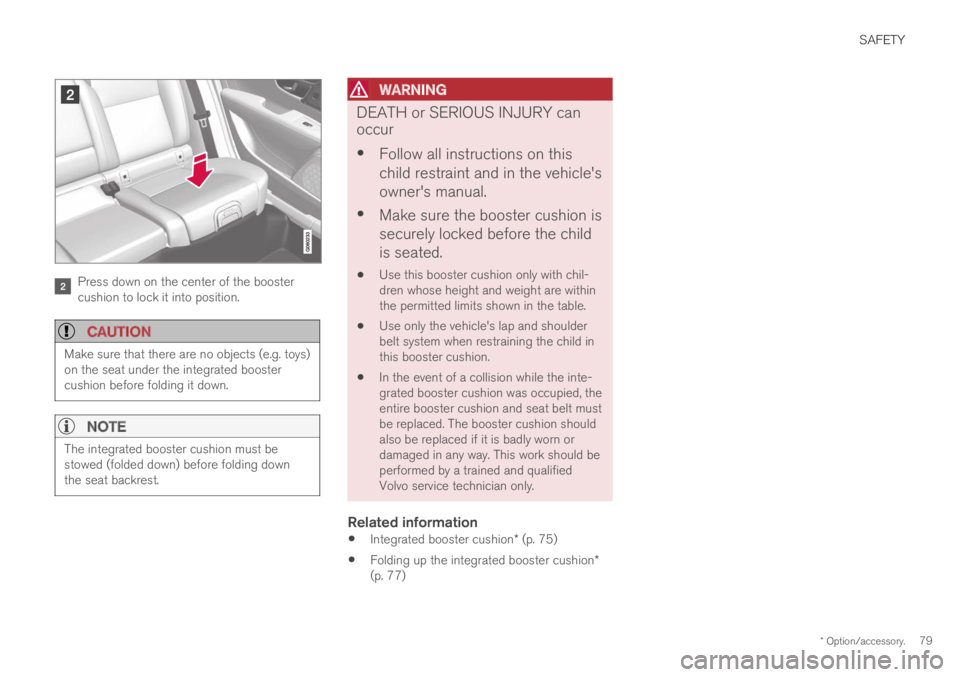
Press down on the center of the boostercushion to lock it into position.
CAUTION
Make sure that there are no objects (e.g. toys)on the seat under the integrated boostercushion before folding it down.
NOTE
The integrated booster cushion must bestowed (folded down) before folding downthe seat backrest.
WARNING
DEATH or SERIOUS INJURY can
occur
Follow all instructions on this
child restraint and in the vehicle's
owner's manual.
Make sure the booster cushion is
securely locked before the child
is seated.
Use this booster cushion only with chil-dren whose height and weight are withinthe permitted limits shown in the table.
Use only the vehicle's lap and shoulderbelt system when restraining the child inthis booster cushion.
In the event of a collision while the inte-grated booster cushion was occupied, theentire booster cushion and seat belt mustbe replaced. The booster cushion shouldalso be replaced if it is badly worn ordamaged in any way. This work should beperformed by a trained and qualifiedVolvo service technician only.
Related information
Integrated booster cushion* (p. 75)
Folding up the integrated booster cushion*(p. 77)
Page 84 of 695

DISPLAYS AND VOICE CONTROL
* Option/accessory.82
Instruments and controls in left-hand drive vehicles
The overviews show the location of the vehicle'sdisplays and controls.
Steering wheel and dashboard
Parking lights, daytime running lights, lowbeams, high beams, turn signals, rear foglight, trip computer reset
Steering wheel paddles for manual shifting*
Head-up display*
Instrument panel
Wipers and washers, rain sensor*
Right-side steering wheel keypad
Steering wheel adjustment
Horn
Left-side steering wheel keypad
Hood open
Display lighting, tailgate unlock/open*/close*, halogen headlight height adjustment
Ceiling console
Front reading lights and courtesy lighting
Panoramic roof*
Ceiling console display ON CALL button
HomeLink®*
Center and tunnel console
Center display
Hazard warning flashers, defrosting, media
Gear selector
Start knob
Drive modes
Parking brake
Auto-hold brakes
Driver's door
Page 146 of 695

DISPLAYS AND VOICE CONTROL
* Option/accessory.144
Head-up display settings*
Adjusting settings for the head-up display.
Settings can be adjusted when the vehicle isstarted and a projected image is displayed on thewindshield.
Selecting display options
Select the functions to be shown in the head-updisplay.
1.Tap Settings in the center display's Topview.
2.Tap My CarDisplaysHead-UpDisplay Options.
3.Select one or more functions:
Show Navigation
Show Road Sign Information
Show Driver Support
Show Phone.
This setting is stored as a personal setting in thedriver profile.
Adjusting brightness and height
position
1.Press the Head-up Display Adjustmentsbutton in the center display's Function view.
2.Adjust the brightness of the projected imageand the height position in the driver's field ofvision using the right-side steering wheellever.
Decreasing brightness
Increasing brightness
Raising position
Lowering position
Confirm
The brightness of the graphic is automaticallyadapted to the light conditions in its background.Brightness is also affected by adjustments to thebrightness of the other displays in the vehicle.
The height position can be stored in the frontpower seat's* memory function using the keypadin the driver's door.
Page 172 of 695

WINDOWS, GLASS AND MIRRORS
* Option/accessory.170
Adjusting the rearview mirrordimming function
Bright light entering the vehicle from behind, e.g.from the headlights of following vehicles, couldreflect in the rearview mirror and door mirrorsand cause a glare. Use the dimming functionwhen light from behind is distracting.
Auto-dim
If bright light enters the vehicle from behind, thedoor mirrors will automatically dim. Auto-dim isalways active when the engine is running, exceptwhen reverse gear is engaged.
NOTE
Adjustments to the sensitivity level will not benoticeable immediately but will instead takeeffect after a short period of time.
The sensitivity level for dimming will affect boththe rearview mirror and door mirrors.
To change the dimming sensitivity level:
1.Tap Settings in the Top view in the centerdisplay.
2.Tap My CarMirrors and Convenience.
3.Under Rearview Mirror Auto Dimming,select Normal, Dark or Light.
The rearview mirror instead has two sensors -one pointing forward and one pointing rearward -
which work together to identify and eliminateglare. The forward-pointing sensor monitorsambient light, while the rearward-pointing sensormonitors light from the headlights of followingvehicles.
For the door mirrors to be equipped with auto-dim, the rearview mirror must also be equippedwith auto-dim.
NOTE
If the sensors are obstructed by e.g. a parkingpermit, transponder, sunshade or objects onthe seats or in the cargo compartment in away that prevents light from reaching the sen-sors, the auto-dim function in the door andrearview mirrors will be reduced.
Related information
Rearview/door mirrors (p. 169)
Adjusting the door mirrors (p. 170)
Adjusting the door mirrors
To improve visibility to the rear, the door mirrorsneed to be adjusted to the driver's height andseating position. There are several automaticsettings that can also be connected to the mem-ory function buttons for the power seat*.
Controls used for door mirrors
Door mirror controls.
The joystick in the drivers' door control panel isused to adjust the position of the door mirrors.The ignition must be in at least mode I.
1.Press the L button for the left door mirror orR for the right door mirror. The button willlight up.
2.Adjust the position using the joystick locatedbetween the buttons.
3.Press the L or R button again. The light inthe button will go out.
Page 187 of 695

SEATS AND STEERING WHEEL
}}
* Option/accessory.185
Power* front seats
The power front seats can be adjusted in a num-ber of different ways for optimal comfort andergonomics. The power seat can be moved for-ward/backward and up/down. The height andlength* of the seat cushion and the tilt of thebackrest can be adjusted. Lumbar support* can
be adjusted up, down, forward and backward3.
The power seats can be adjusted for a certainperiod of time after the door is unlocked withoutthe engine running. The seats can always beadjusted while the engine is running. They canalso be adjusted for a short period after theengine is turned off.
CAUTION
The power seats have an overload protectorthat is triggered if a seat is blocked by anyobject. If this occurs, remove the object andattempt to adjust the seat again.
Related information
Manual front seats (p. 184)
Adjusting the power* front seats (p. 185)
Storing positions for seats, mirrors and head-up display* (p. 186)
Using stored positions for seats, mirrors andhead-up display* (p. 187)
Adjusting front seat massage settings*(p. 189)
Adjusting* front seat cushion length (p. 189)
Front seat massage* settings (p. 188)
Adjusting front seat side bolster settings*(p. 190)
Adjusting front seat lumbar support* (p. 191)
Adjusting the passenger seat from the driv-er's seat* (p. 192)
Adjusting the power* front seats
Set the desired seating position using the con-trols on the front seat cushion. To set the con-venience functions, turn the multifunction con-
trol4 upward/downward.
The illustration shows the controls in a vehicle with four-way lumbar support*. Vehicles with two-way lumbar sup-port* do not have the rotary multifunction control.
In vehicles with four-way lumbar support*,
turn the multifunction control4 up/down toset the convenience functions. In vehicleswith two-way lumbar support*, use the roundbutton to adjust the lumbar support forward/rearward.
Raise/lower the front edge of the seat cush-ion by moving the control up/down.
3Applies for four-way lumbar support*. Two-way lumbar support* is adjusted forward/rearward.
Page 198 of 695

SEATS AND STEERING WHEEL
* Option/accessory.196
Adjusting the rear seat headrestraints
Adjust the center head restraint in the rear seatto the seat occupant's height. Fold down theoutboard head restraints* to improve rear visibil-ity.
Adjusting the center seat head restraint
The center head restraint should be adjusted tosuit the passenger's height. The entire back ofthe head should be covered if possible. Manuallymove the restraint up or down as needed.
To lower the restraint, push and hold the button(see illustration) while carefully lowering the headrestraint.
WARNING
The center seat head restraint must be in itslowest position when the seat is not occupied.When the center seat is occupied, the headrestraint must be correctly adjusted to thepassenger's height, covering the entire backof the head if possible.
Folding the rear seat outboard head
restraints using the center display *
The outer head restraints can be folded via thecenter display's function view. The head restraintcan be folded down when the vehicle is in igni-tion mode 0.
Tap the Headrest Fold buttonto activate/deactivate folding.
Manually push the head restraint until it clicksinto position.
WARNING
Do not lower the head restraint if there arepassengers in any of the rear seats.
WARNING
The head restraint must be locked in theupright position after it has been folded up.
Page 200 of 695

||
SEATS AND STEERING WHEEL
* Option/accessory.198
Horn
The horn is located in the center of the steering wheel.
Related information
Adjusting the steering wheel (p. 198)
Adjusting the steering wheel
The steering wheel can be adjusted to variouspositions.
The steering wheel's reach and height can be adjusted.
WARNING
Adjust the steering wheel and ensure it locksinto position before driving. Never adjust thesteering wheel while driving.
Steering wheel force can be adjusted withspeed-dependent power steering. Steering wheelforce is adjusted according to the vehicle's speedto give the driver an enhanced sense of controland stability.
Steering wheel adjuster lever.
1. Move the lever forward to release the steer-ing wheel.
2.Adjust the steering wheel to the desiredposition.
3. Pull the lever back to lock the steering wheelinto place. If the lever is difficult to move,press the steering wheel lightly while pullingthe lever.
Related information
Steering wheel controls and horn (p. 197)
Adjusting the power* front seats (p. 185)