2019 VOLKSWAGEN TRANSPORTER Pressure
[x] Cancel search: PressurePage 16 of 486

Instrument cluster
Warning and indicator lamps
The warning and indicator lamps indicate various warnings ::.&.faults ::.(D or certain functions. Some warning and indicator lamps light up when the ignition is switched on and should go out once the engine is running or the vehicle is in motion.
Depending on the vehicle's equipment level, addi-tional text messages could appear in the display on the instrument cluster to provide further infor-mation or to ask you to perform certain tasks ::.page 19, Instruments.
Symbol Meaning=:>&
Do not drive on I
Depending on the vehicle equipment level, sym-bols may be displayed in the instrument cluster in-stead of warning lamps.
Signal tones are given when some warning or indi-cator lamps light up.
For details on indicator lamps which light up in the light switch see Chapter "Lighting" ::.page 106.
See
Lit up: ·i:-Do not drive ont
-F-Coolant level too low. coolant temperature too high, or coolant ::.page 358 system is faulty.
Flashing: fault in engine coolant system. ::.page 358
Do not drive ont ::.page 353 "t:::r. Engine oil pressure too low.
oG The en£ine cannot be restarted! AdBiue level too low. ::.page 346
oG
with The engine cannot be restarted! Fault in the Ad Blue® system. ::.page 346
CRl ::0 Do not drive on I ::.page 45 .... At least one vehicle door is opened or not properly closed .
c:::5 Do not drive on I ::.page 49 The tailgate or wing doors are open or not properly closed. ::.page 52
!6 'er Driver seat belt is not fastened. ::.page 79
Changing gear ::.page 260
({5)) Depress the brake pedal. Brakes ::.page 269 Adaptive cruise con-trol (ACC) ::.page 298
Adaptive cruise control (ACC) not available. ::.page 298
0 Fault in the alternator. ::.page 362
m DSG® dual clutch gearbox is too hot. ::.page 260
Overv1cw of the vehicle
Page 17 of 486
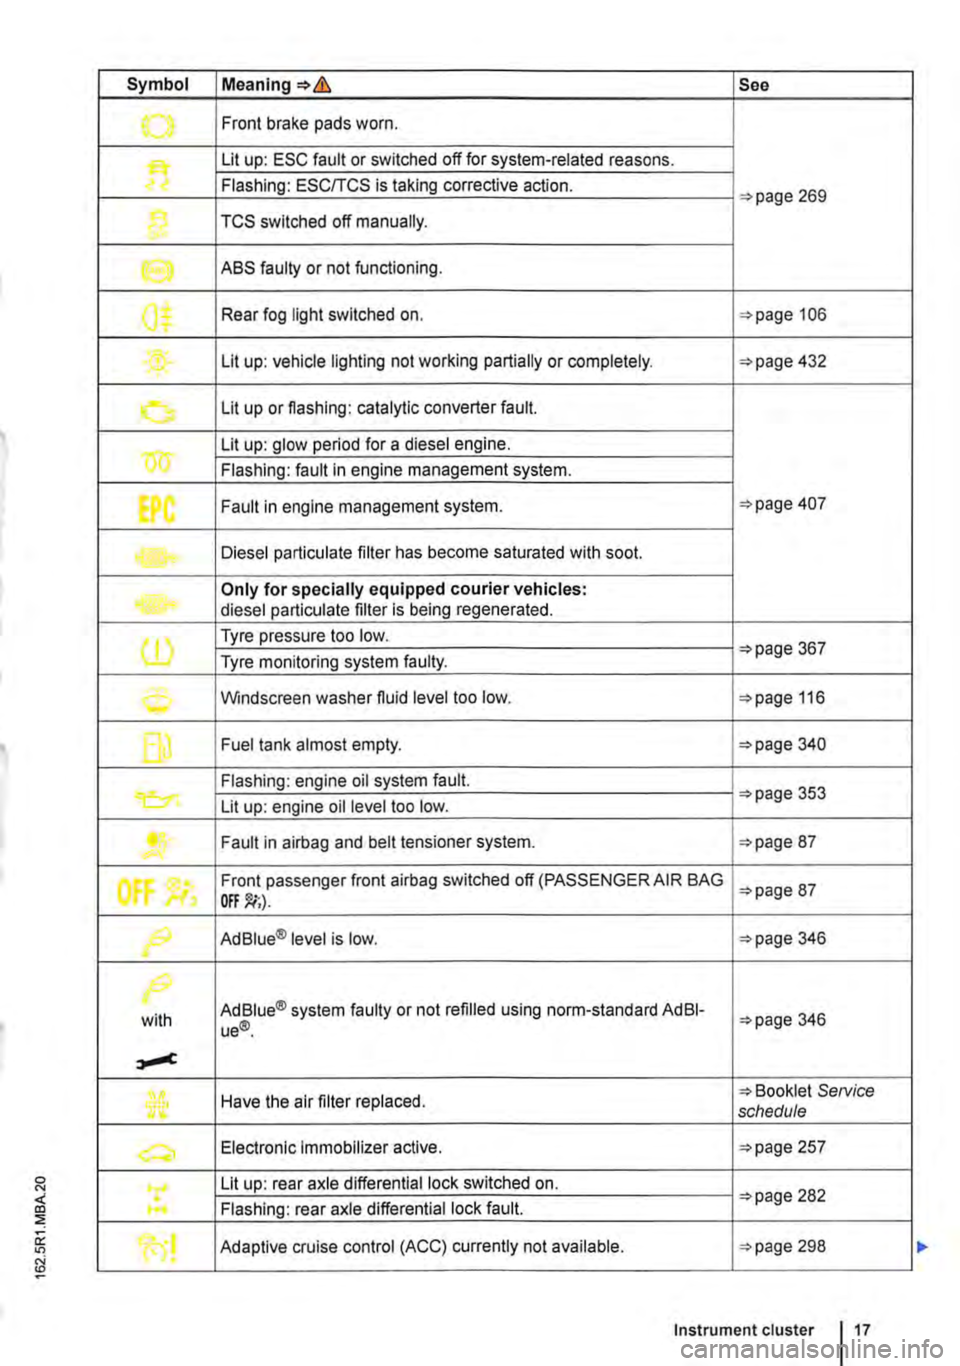
Symbol Meaning=>& See
.......,. Front brake pads worn .
Lit up: ESC fault or switched off for system-related reasons.
Flashing: ESC/TCS is taking corrective action. =>page 269
1} TCS switched off manually.
e ABS faulty or not functioning.
0$ Rear fog light switched on. =>page 106
Lit up: vehicle lighting not working partially or completely. =>page 432
0 Lit up or flashing: catalytic converter fault.
w Lit up: glow period for a diesel engine.
Flashing: fault in engine management system.
EPC Fault in engine management system. =>page 407
Diesel particulate filter has become saturated with soot.
Only for specially equipped courier vehicles: diesel particulate filter is being regenerated.
(1) Tyre pressure too low. =>page 367 Tyre monitoring system faulty.
0 Windscreen washer fluid level too low. =>page 116
f] Fuel tank almost empty. =>page 340
Flashing: engine oil system fault.
Lit up: engine oil level too low. =>page 353
....... Fault in airbag and belt tensioner system. =>page 87
tf'
Front passenger front airbag switched off (PASSENGER AIR BAG =>page 87
f9 Ad Blue® level is low. =>page 346
/>.
with Ad Blue® system faulty or not refilled using norm-standard AdBI-ue®. =>page 346
Have the air filter replaced. => Booklet SeNice schedule
a, Electronic Immobilizer active. =>page 257
Lit up: rear axle differential lock switched on. =>page 282 .... Flashing: rear axle differential lock fault.
Adaptive cruise control (ACC) currently not available. =>page 298
Instrument cluster 17
Page 26 of 486
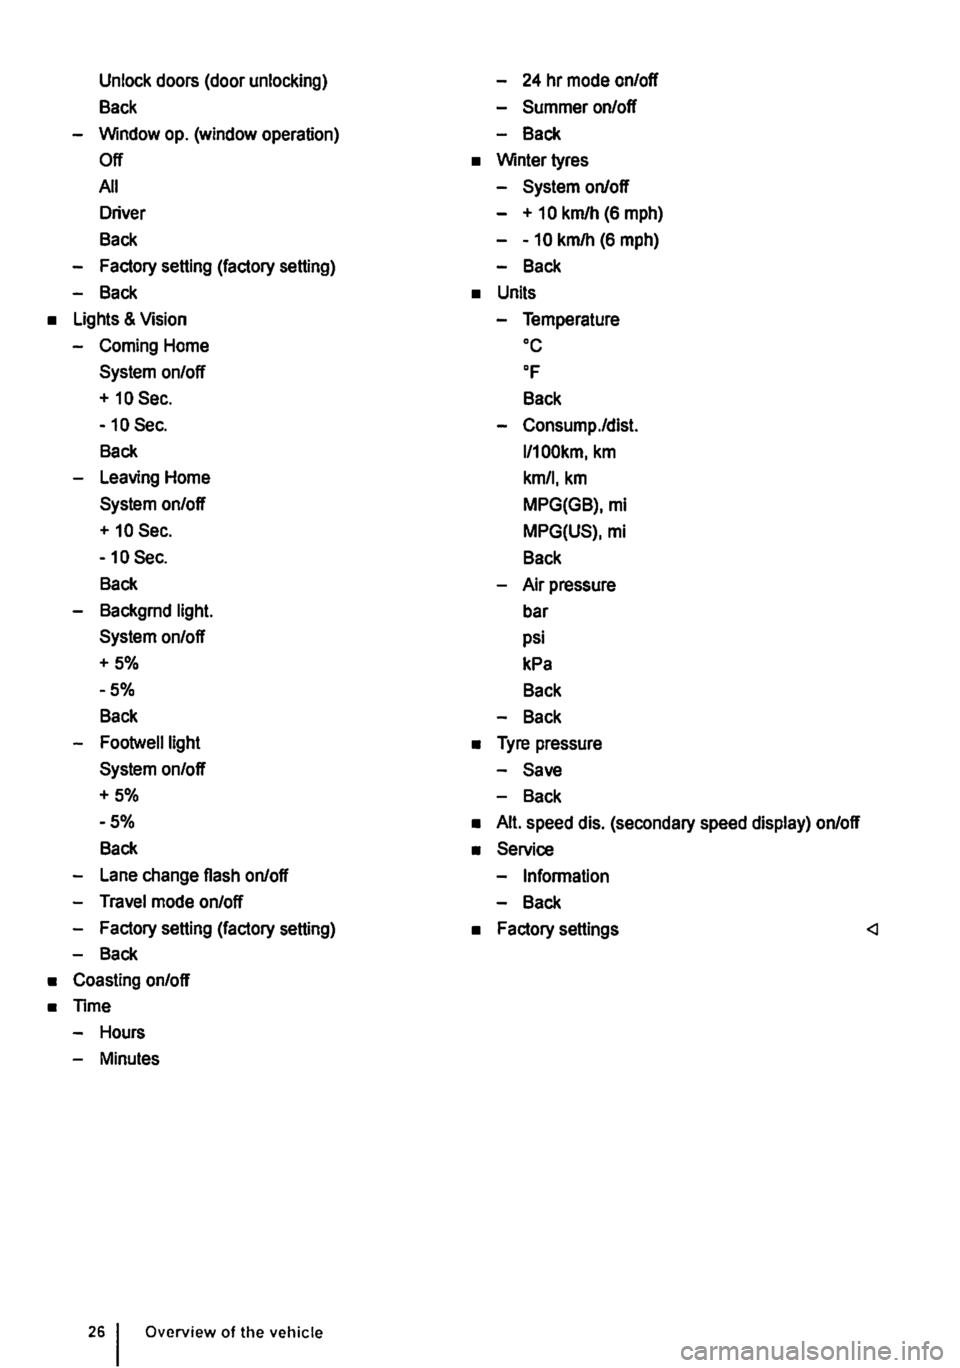
Unlock doors (door unlocking)
Back
-Window op. (window operation)
Off
All
Driver
Back
-Factory setting (factory setting)
-Back
• Lights & Vision
-Coming Home
System on/off
+ 10 Sec.
-10 Sec.
Back
-Leaving Home
System on/off
+ 10 Sec.
-10 Sec.
Back
-Backgrnd light.
System on/off
+5%
-5%
Back
-Footwelllight
System on/off
+5%
-5%
Back
-Lane change flash on/off
-Travel mode on/off
-Factory setting (factory setting)
-Back
• Coasting on/off
• Time
-Hours
-Minutes
Overview of the vehicle
-24 hr mode on/off
-Summer on/off
-Back
• Winter tyres
-System on/off
- + 10 km/h (6 mph)
--10 km/h (6 mph)
-Back
• Units
-Temperature oc
OF
Back
-Consump./dist.
l/100km, km
km/1, km
MPG(GB), mi
MPG(US), mi
Back
-Air pressure
bar
psi
kPa
Back
-Back
• Tyre pressure
-Save
-Back
• Alt. speed dis. (secondary speed display) on/off
• Service
-Information
-Back
• Factory settings
Page 30 of 486

Settings menu
rn First read and observe the introductory information and safety warnings & on page 24.
Settings menu Function
Assist systems Settings for the various driver assist systems =:.page 30, Assist systems sub-menu.
Language Setting the language for the display texts and messages in the navigation system.
MFD data Settings for which MFD display items should appear in the instrument cluster dis-play. A '1ick" indicates that a display item is activated.
Convenience Settings for the vehicle's convenience functions 31, Convenience sub-menu.
Lights & Vision Settings for the vehicle lighting =:.page 31, Lights & Vision submenu.
Coasting Switching coasting for 7-speed dual clutch gearbox DSG® on or off=:. page 260.
Setting the hours and minutes for the clock in the instrument cluster and in the nav-Time igation system. The time can be shown in a 12 and 24 hour display. An S may be shown in the upper part of the display to indicate that summer time Is selected.
Winter tyres Setting the visual and acoustic speed warning. Use this function only when winter tyres are fitted which are not designed for the vehicle's top speed.
Units Setting the units for temperature, consumption values and distances.
Tyre pressure Store the tyre pressures of all tyres in the tyre monitoring system again.
Switching the second speed display on or off. A "tick" indicates that a display item Alt. speed dis. is activated. it is not possible to switch off the second speedometer display in those countries where the law stipulates that the display cannot be deactivated.
Service Calling up service messages or resetting service interval displays.
Factory setting The functions in the Settings menu are reset to the factory settings.
Back The display returns to the main menu.
Assist systems submenu
rn First read and observe the introductory information and safety warnings & on page 24.
Assist systems submenu
Side Assist
Front Assist
ACC
Driver alert
Function
Switches the lane change assist system on or off and adjusts the base brightness of the warning =:.page 312.
Switches the Front Assist system and related warnings on or off =:.page 307.
Activation or deactivation of the last selected distance. The following functions can be set: -Gearbox programme, -Active distance setting (time interval to the vehicle ahead) when the adaptive cruise control (ACC) is switched on ::.page 298.
Switching the Driver Alert System (recommendation for rest breaks) on and off ::.page 315.
Page 33 of 486

Before the journey
Before setting off
Driving tips
CO Introduction
This chapter contains information on the following subjects:
Preparing for a journey and driving safely
Driving abroad ...................... .
Driving through water on roads ........ .
33 34
35
An engine and transmission guard may prove use-ful, depending on the conditions in which the vehi-cle is to be driven. An engine and transmission guard can reduce the risk of damage to the vehi-cle's underbody and engine oil sump, for example when driving over kerbs, driveways or unsurfaced roads. Volkswagen Commercial Vehicles recom-mends using a Volkswagen Commercial Vehicles dealership for this purpose.
Additional Information and warnings:
• Sitting correctly and safely 61
• Transporting 125
• Starting the engine, changing gear and parking the vehicle 257
• Driving with respect for the environment =>page 278
• Consumer information 404
A WARNING
Driving under the Influence of alcohol, drugs, medication or narcotics can cause serious accidents and fatal Injuries.
• Alcohol, drugs, medication and narcotics can severely impair perception, reaction times and driving safety. This could cause you to lose control of the vehicle.
l""""('n First read and observe the Introductory L-Wl Information and safety warnings th on page 33.
Checklist
Observe the following Information both before and during the journey to ensure your own safety and the safety of passengers and other road users
..( Check that all lights and turn signals are working properly.
Check the tyre pressure 367 and fuel level 340.
..( Ensure that you have a good, clear view through all of the windows.
..( Air intake to the engine must not be obstruc-ted, and the engine must not be covered with any kind of insulating materials th in ell Introduction on page 351.
0::
g!
..(
..(
..(
..(
..(
..(
..(
Secure any objects and luggage in the stowage compartments, the luggage corn-partment or on the roof 125 .
Ensure that you are able to operate the ped-als freely at all times .
Secure any children travelling in the vehicle in a restraint system suitable for their weight and size =>page 96.
Adjust the front seats, head restraints and mirrors properly in accordance with the size of the occupants 61.
Wear shoes that provide good grip for your feet when using the pedals.
The floor mat in the footwell on the driver side must leave the pedal area free and must be securely fastened .
Assume a correct sitting position before set-ling off and maintain this position while driv-ing. This also applies to all passengers =>page 61. ..
Before setting off 33
Page 67 of 486
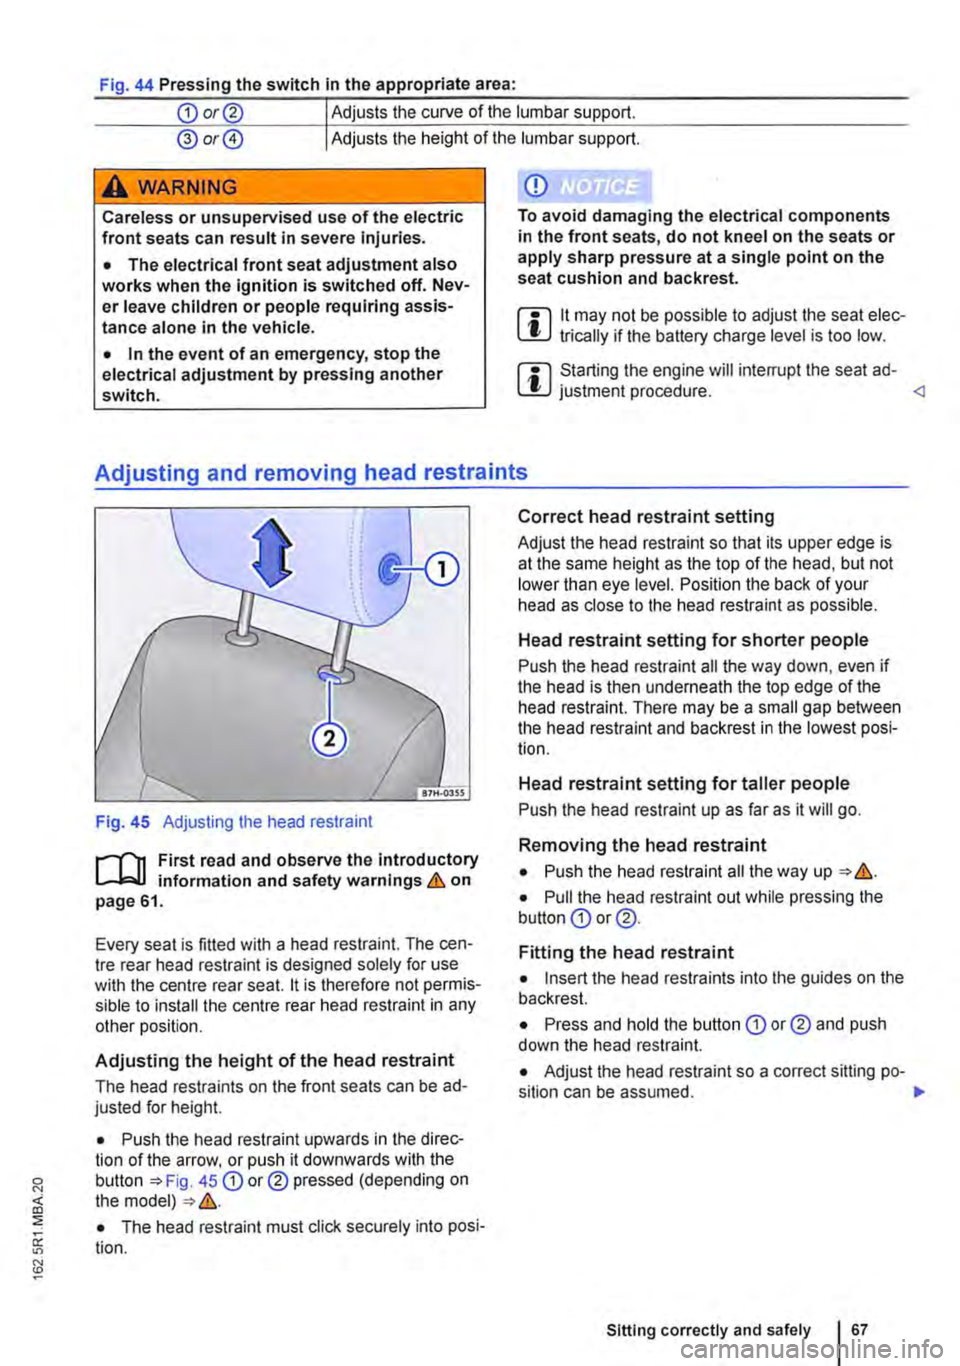
Fig. 44 Pressing the switch In the appropriate area:
CD or@ Adjusts the curve of the lumbar support.
@ or@ Adjusts the height of the lumbar support.
A wARNING
Careless or unsupervised use of the electric front seats can result in severe Injuries.
• The electrical front seat adjustment also works when the ignition is switched off. Nev-er leave children or people requiring assis-tance alone in the vehicle.
• In the event of an emergency, stop the electrical adjustment by pressing another switch.
CD
To avoid damaging the electrical components in the front seats, do not kneel on the seats or apply sharp pressure at a single point on the seat cushion and backrest.
m 11 may not be possible to adjust the seat elec-l!J trically if the battery charge level is too low.
m Starting the engine will interrupt the seat ad-l!J justment procedure.
Fig. 45 Adjusting the head restraint
r--("'n First read and observe the introductory L--J,::.U information and safety warnings & on page 61.
Every seat is fitted with a head restraint. The cen-tre rear head restraint is designed solely for use with the centre rear seat. 11 is therefore not permis-sible to install the centre rear head restraint in any other position.
Adjusting the height of the head restraint
The head restraints on the front seats can be ad-justed for height.
• Push the head restraint upwards in the direc-tion of the arrow, or push it downwards with the button 45 CD or® pressed (depending on the model) &.
• The head restraint must click securely into posi-tion.
Correct head restraint setting
Adjust the head restraint so that its upper edge is at the same height as the top of the head, but not lower than eye level. Position the back of your head as close to the head restraint as possible.
Head restraint setting for shorter people
Push the head restraint all the way down, even if the head is then underneath the top edge of the head restraint. There may be a small gap between the head restraint and backrest in the lowest posi-tion.
Head restraint setting for taller people
Push the head restraint up as far as it will go.
Removing the head restraint
• Push the head restraint all the way up &.
• Pull the head restraint out while pressing the button CD or @.
Fitting the head restraint
• Insert the head restraints into the guides on the backrest.
• Press and hold the button CD or® and push down the head restraint.
• Adjust the head restraint so a correct sitting po-sition can be assumed. .,.
Sitting correctly and safely 167
Page 70 of 486
• The seat cushion is damp or wet.
• The interior or exterior temperature is above 2s•c (7rF).
Function
Switching on
Adjusting the heating output
Switching off
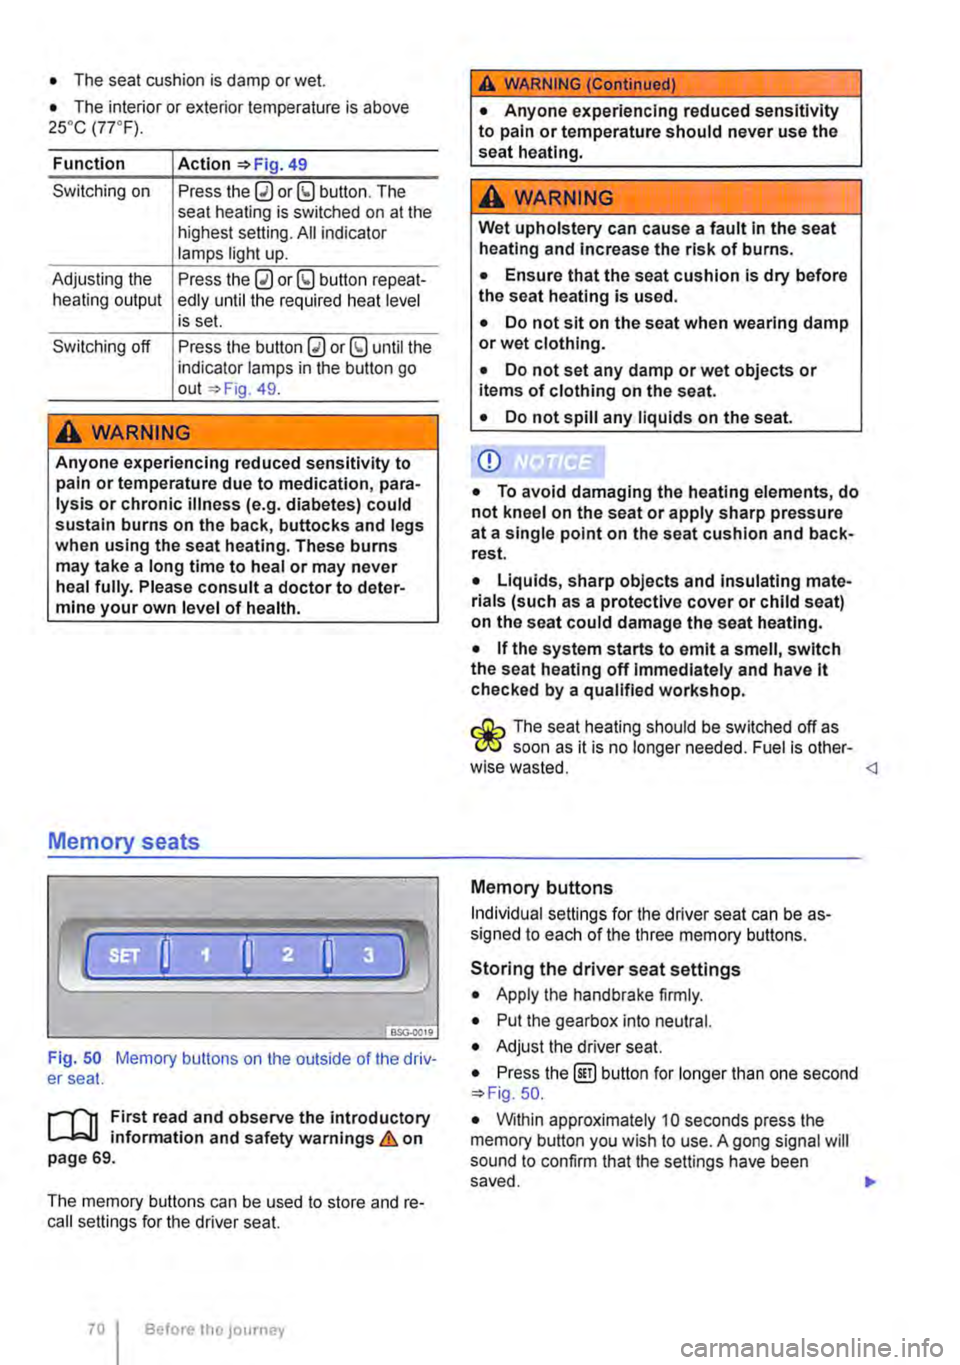
Action 49
Press the 0 or (9 button. The seat heating is switched on at the highest setting. All indicator lamps light up.
Press the 0 or (9 button repeat-edly until the required heat level is set.
Press the button 0 or (9 until the indicator lamps in the button go out 49.
A WARNING
Anyone experiencing reduced sensitivity to pain or temperature due to medication, para-lysis or chronic illness (e.g. diabetes) could sustain burns on the back, buttocks and legs when using the seat heating. These burns may take a long time to heal or may never heal fully. Please consult a doctor to deter-mine your own level of health.
Memory seats
Fig. 50 Memory buttons on the outside of the driv-er seat.
r"''l1 First read and observe the introductory L-JcJ.I information and safety warnings & on page 69.
The memory buttons can be used to store and re-call settings for the driver seat.
Before the JOurney
A WARNING (Continued)
• Anyone experiencing reduced sensitivity to pain or temperature should never use the seat heating.
A wARNING
Wet upholstery can cause a fault In the seat heating and Increase the risk of burns.
• Ensure that the seat cushion is dry before the seat heating is used.
• Do not sit on the seat when wearing damp or wet clothing.
• Do not set any damp or wet objects or items of clothing on the seat.
• Do not spill any liquids on the seat.
Q)
• To avoid damaging the heating elements, do not kneel on the seat or apply sharp pressure at a single point on the seat cushion and back-rest.
• Liquids, sharp objects and Insulating mate-rials (such as a protective cover or child seat) on the seat could damage the seat heating.
• If the system starts to emit a smell, switch the seat heating off Immediately and have lt checked by a qualified workshop.
r:O:-, The seat heating should be switched off as C!JtJ soon as it is no longer needed. Fuel is other-wise wasted.
Individual settings for the driver seat can be as-signed to each of the three memory buttons.
Storing the driver seat settings
• Apply the handbrake firmly.
• Put the gearbox into neutral.
• Adjust the driver seat.
• Press the @] button for longer than one second 50.
• Within approximately 10 seconds press the memory button you wish to use. A gong signal will sound to confirm that the settings have been saved. .,..
Page 95 of 486
A wARNING
Incorrect use of the driver and front passen-ger seat could hinder the proper function of the combined curtain and side airbags and cause serious injury.
• Never remove the front seats from the ve-hicle or alter any components of these seats.
Curtain airbags
A WARNING (Continued)
• If too much pressure is applied to the back rest side bolster, the combined curtain and side airbags may not be triggered cor-rectly, may not trigger at all or may trigger unexpectedly.
• Any damage to the original seat uphols-tery or around the seams of the combined curtain and side airbag units must be re-paired immediately by a qualified workshop.
r-111 First read and observe the introductory l..-W information and safety warnings & on page 87.
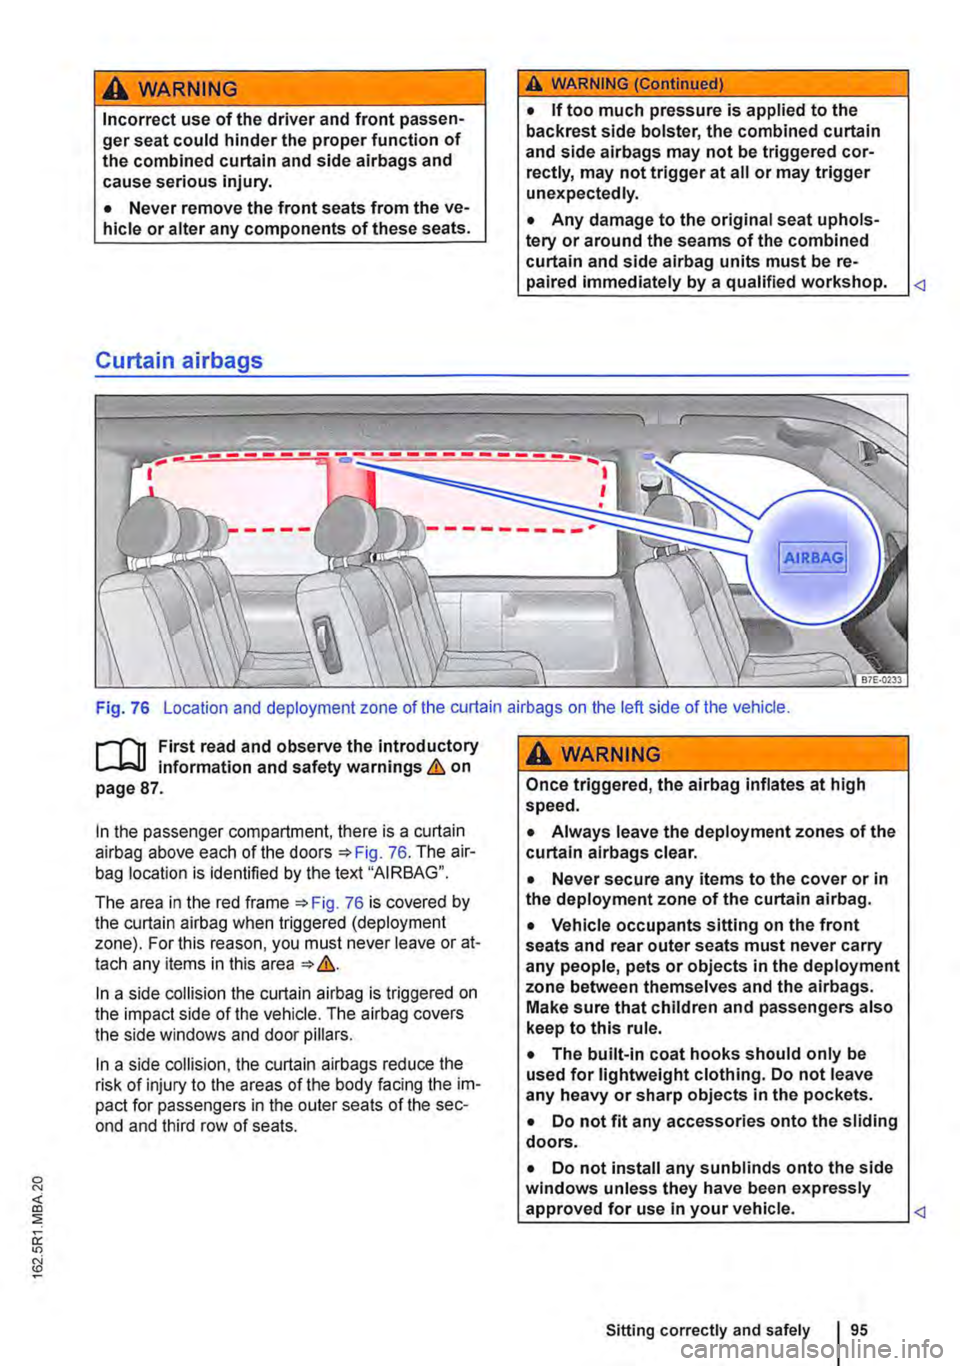
In the passenger compartment, there is a curtain airbag above each of the doors =>Fig. 76. The air-bag location is identified by the text "AIRBAG".
The area in the red frame =>Fig. 76 is covered by the curtain airbag when triggered (deployment zone). For this reason, you must never leave or at-tach any items in this area => &.
In a side collision the curtain airbag is triggered on the impact side of the vehicle. The airbag covers the side windows and door pillars.
In a side collision, the curtain airbags reduce the risk of injury to the areas of the body facing the im-pact for passengers in the outer seats of the sec-ond and third row of seats.
A WARNING
Once triggered, the airbag inflates at high speed.
• Always leave the deployment zones of the curtain alrbags clear.
• Never secure any items to the cover or in the deployment zone of the curtain airbag.
• Vehicle occupants sitting on the front seats and rear outer seats must never carry any people, pets or objects in the deployment zone between themselves and the airbags. Make sure that children and passengers also keep to this rule.
• The built-in coat hooks should only be used for lightweight clothing. Do not leave any heavy or sharp objects in the pockets.
• Do not fit any accessories onto the sliding doors.
• Do not install any sun blinds onto the side windows unless they have been expressly approved for use In your vehicle.