2019 VOLKSWAGEN TRANSPORTER Menu in the instrument cluster display
[x] Cancel search: Menu in the instrument cluster displayPage 11 of 486

Key to Fig. 6 and Fig. 7:
CD Light switch ·'f;i.· ... 106
-Light switched off+
-Automatic headlight control -AUTO-
-Side light and dipped beam o.-o
-Fog lights i'O 0$
@ Lever for: .......... . 106
-Main beam headlights ID
-Headlight flasher =:o
-Turn signal "'" -Parking light
-Switch and rocker switch for the cruise control system (CCS) ON-CANCEL-OFF-RES/+-SET/-. . . . . . . . . . . . . . . . . . . . . . . . . . . . . . . . . . . . . . . . . . . . . . . . . . . . 295
@ Controls on the multifunction steering wheel ....... .
-Volume setting for the radio, navigation announcements or a telephone conversation 3d-:;.,
-Mute function for the radio or activating the voice control system _...
-Opening the main telephone menu or accepting a telephone call J
-Control buttons for the Volkswagen information system c.-<2,-"?-v, OK, ..=,
@ Instrument cluster:
-Instruments ..
-Display
-Warning and indicator lamps ..... .
® Horn (works only when the ignition is switched on)
® Lever for wipers and washers . . . . . .....................................•
-Wipers HGH-LOW
-Interval wipe for the windscreen . ·••
-"Flick wipe" 1x
-Windscreen wipers.;;:>
-Wash and wipe system for the windscreen
-Rear wiper ll;J
-Wash and wipe system for the rear window
-Lever with buttons for operating the Volkswagen information system TRIP, OK/RESET
0 Ignition lock .......... .
® Pedals .................. .
®
® @
Lever for adjusting the steering column ..................•.....
Driver front airbag ........ .
Headlight range control (o .
Brightness control for instrument and switch lighting C't ...••.•...
Handle for releasing the bonnet ...
@
®
0 Button for interior monitoring next to the driver seat (not shown) ....................... .
Vehicle interior 11
24
19
19
16
116
24
257
260
61
87
106
106
350
39
Page 20 of 486

Instrument overview
Fig. 14 Instrument cluster in the dash panel.
m First read and observe the Introductory Information and safety warnings & on page 19.
Descriptions of the instruments 14:
G) Setting button for the clock 1)
-Press the (
-Press the (o.o 1 sn) button to continue Q). Press and hold to scroll through quickly.
-Press the (
® Rev. counter (running engine speed in revolutions x 1,000 per minute).
The start or the red zone on the dial indicates the maximum engine speed that may be used in each gear when the engine is wanm and after it has been run in properly. You should change up a gear or move the selector lever to D (or lift your foot off the accelerator) before the needle reaches the red zone =:o(D.
@ Coolant temperature dlsplay.J,. 358.
0) Displays =:opage 21.
® Speedometer
® Fuel gauge =:opage 340.
CD Reset button for the trip recorder display (trip).
-Press the [o.o 1 sn) button to reset to zero.
CD
• When the engine Is cold, avoid high engine speeds, driving at full throttle and overloading the engine.
&... Changing up a gear early will help to save W fuel and reduce engine noise.
r:il The instruments and displays may vary de-L!J pending on the equipment level of the vehi-cle.
20 Ovcrvtew of the vchtclc
Page 21 of 486

Displays
r-T'n First read and observe the introductory L-J,:.,U information and safety warnings & on page 19.
The types of information displayed in the instru-ment cluster=:. Fig. 14@ vary according to the ve-hicle's equipment level:
• Warning and information messages
• Mileage displays
• Time
• Outside temperature
• Compass display
• Selector lever positions =:.page 260
• Gear-change indicator =>page 260
• Multifunction display (MFD) and menus for vari-ous settings =>page 24
Type of message Symbol Explanation colour
• Service interval display =:.page 22
• Second speed (Settings menu =>page 24)
• Fuel gauge =:.page 340
• Start/stop system status display =:.page 22
Warning and information messages
The system runs a check on certain components and functions in the vehicle when the ignition is switched on or while the vehicle is in motion. Func-tional faults are indicated by red and yellow sym· bols with warning and text messages in the instru-ment cluster display (warning and indicator lamps =>page 16). An acoustic warning is also given in certain cases. Different instrument cluster designs will have different displays.
Priority 1 warning message. Red
The symbol flashes or lights up (sometimes together with a signal tone). te Do not drive onl Danger=:.&,! Check the fault and correct the cause. Seek expert assistance if neces-sary.
Priority 2 warning message. Yellow
The symbol flashes or lights up (sometimes together with a signal tone). Your vehicle could be damaged or break down if there is a fault or if service fluids are running low Check the fault as soon as possible. Seek expert assistance if necessa-ry.
Information mes-sage. Information about various procedures within the vehicle.
Mileage displays
The odomelerregisters the total distance travelled by the car.
The trip recorder(trip) shows the distance travel-led since the trip recorder was last reset. The last digit of the trip recorder indicates distances of 100 metres or tenths of a mile.
Outside temperature display
If the outside temperature falls below +4 ·c (+39.F), the temperature display also shows a "snowflake symbol"{(-. This symbol flashes and then remains constantly lit until the outside temper-ature rises above +6•c (+43.F)
If the vehicle is stationary, the supplementary heat-ing system (=>page 332) is on or the vehicle is travelling at very low speeds, the temperature dis-played may be slightly higher than the actual out-side temperature due to heat radiated from the en-gine.
The measuring range lies between -4o•c (·40.F) and +so•c (+122°F).
Compass display
When the ignition and navigation system are switched on, the instrument cluster display shows the current direction of travel.
Selector lever position
The gear selected is displayed on the side of the selector lever and on the display in the instrument cluster. The display may also show which gear has been selected if the lever is in D or 5, or in Tiptron-ic mode.
Gear-change indicator
While the vehicle is in motion, the instrument clus-ter may show which gear should be selected to re-duce fuel consumption =>page 260. .-
Instrument cluster 21
Page 22 of 486
Second speed display (m ph or km/h)
In addition to the tachometer display, the speed can also be displayed in another unit of measure-ment (m ph or km/h) in the instrument cluster dis-play while you are driving. To do this select the menu option A 1 t. speed di s. in the Settings menu =>page 24.
Vehicles without menu display on the instrument cluster:
• Start the engine.
• Press the Ice: 1 e)j button three times. The odom-eter in the instrument cluster display flashes.
• Press the button !o.o 1 SErl once. The vehicle speed in "km/h" or "mph" is shown briefly in the dis-play instead of the odometer.
• This activates the second speed display. lt can be deactivated in the same manner.
lt is not possible to switch off the second speedom-eter display in those countries where the law stipu-lates that the display cannot be deactivated.
StarUstop system status display
The instrument cluster display shows information about the current status =>page 282.
A wARNING
Failure to observe illuminated warning lamps and text messages can lead to your vehicle breaking down In traffic, and can cause acci-dent and serious injury.
• Never Ignore any illuminated warning lamps or text messages.
• Stop the vehicle as soon as possible and when safe to do so.
Service interval display
)'"""'"('n First read and observe the introductory L-W.I information and safety warnings & on page 19.
The service display is shown on the instrument cluster=> Fig. 14 @.
Service schedules at Volkswagen Commercial Ve-hicles are divided into two categories, oil change service and inspections. The service interval dis-play provides information on the next service which
Overview of the vehicle
A WARNING (Continued)
• Any broken-down vehicle poses an In-creased accident risk both for you and for other road users. If the situation requires, switch on the hazard warning lights and set up the warning triangle as a warning to other road users.
• Stop the vehicle at a safe distance away from moving traffic and ensure that no part of the exhaust system can come Into contact with any inflammable material underneath the vehicle, e.g. dry grass or fuel.
A WARNING
Streets and bridges can also be iced over at outside temperatures above freezing.
• The snowflake symbol indicates that there is a risk of black Ice.
• There may be black Ice on the roads even when outside temperatures are above +4•c (+39°F), even when no snowflake symbol is displayed.
• You should never rely solely on the out-side temperature display I
CD
Failure to observe illuminated indicator lamps and text messages can lead to your vehicle be-ing damaged.
m Differenl instrument clusters are available, L!J which means that the versions and displays may vary. In displays without warning or informa-tion texts, faults are indicated exclusively by the in-dicator lamps.
m If several warning reports are detected, the L!J symbols will appear for several seconds, one after another. The symbols will continue to appear until the faults are rectified.
The service appointment currently displayed can be found at Vehicles without text messages on the top right of the instrument cluster display:
• 1: inspection.
• 2: oil change service. ..
Page 23 of 486

In vehicles with fixed oil change service, services take place at predefined intervals.
The service intervals are calculated on an Individu-al basis in vehicles with flexible oil change serv-Ice. Advances in technology have brought about a considerable reduction in servicing requirements. The flexible oil change is a new service offered by Volkswagen to ensure that the oil is only changed when necessary. The length between the oil change services (maximum of 2 years) is also de-termined by the conditions under which the vehicle is used and personal driving style. The service re-minder is displayed 20 days before the service is due. The distance is rounded to the nearest 100 km; the remaining time is rounded to full days. The current service information cannot be opened until you have driven 500 km since the last service. Until this point the display only shows lines.
Service reminder
If the vehicle is due to be serviced, a service re-minder will appear on the display when the ignition is switched on.
In vehicles without text messages a spanner sym-bol will appear on the instrument cluster along with a display in km and a clock symbol e> showing the time left before the next service appointment is due in days. The number of kilometres shown cor-responds to the maximum number of kilometres that can still be driven until the service appoint-ment is due. In addition, a symbol in the top right corner of the display specifies which service ap-pointment the reminder is for (1 for inspection, 2 for oil change service).
If the service reminder is displayed for both service appointments (1 and 2 in the top right corner of the instrument cluster display), the distance and the display in days for the next service appointment applies in vehicle without text messages.
In vehicles with text messages, Oi 1 change or Inspection in---km or ---days appears in the instrument cluster display.
Service event
If a service Is due, a signal will sound and the spanner symbol will appear for a few seconds when the ignition is switched on. In vehicles with text messages, Oil change now! or Inspec-tion now! appears In the instrument cluster dis-play.
Accessing a service message
You can access the current service messages whenever the ignition is switched on, the engine is not running and the vehicle is stationary.
• Press the button in the instrument cluster as often as possible until the spanner symbol and 1 in the top right corner of the display appears. The values shown apply to the oil change service.
• Press the lCCJie>J button on the instrument cluster again. The spanner symbol appear and the number 2 will appear on the top right hand corner of the display. The values shown apply to the in-spection.
• OR: select the Settings menu.
• Select the menu option Info in the Service submenu.
If a service Is overdue, this is indicated by a mi-nus sign in front of the mileage or trip reading.
Resetting oil change service
If the oil change service was not performed by a Volkswagen Commercial Vehicles workshop, it can be reset as follows:
Vehicles with text messages:
Switch off the ignition.
Press and hold down the lo.o/SETJ button in the in-strument cluster.
Restart the ignition.
Release the lo.o/sn) button.
Confirm the selection on the instrument cluster by pressing the laKJRESET) button on the wiper lever or the I!) button on the multifunction steering wheel.
Vehicles without text messages:
Switch off the ignition.
Press and hold down the lo.o1sn) button in the in-strument cluster.
Restart the ignition.
Release the lo.o/SETJ button and press the li:Q'e>J but-ton within approximately 20 seconds.
Do not reset the display between service intervals. This can lead to Incorrect information being dis-played.
If you manually reset the service interval display while flexible oil change service is valid, "fixed oil change service" will be activated. The service inter-val will no longer be calculated on an Individual ba-sis =*Booklet Service schedule.
Resetting Inspection
If the inspection was not performed by a Volkswa-gen Commercial Vehicles workshop. it can be reset asfollows:
Instrument cluster
Page 24 of 486
Vehicles with text messages:
Switch off the ignition.
Switch on the hazard warning lights.
Press and hold down the [o.o/S!T) button in the in-strument cluster.
Restart the ignition.
Release the (o.o/S!Tl button.
Confirm the selection on the instrument cluster by pressing lhe (OK/RES!!) button on lhe wiper lever or the @ button on the multifunclion steering wheel.
Switch off the hazard warning lights.
Vehicles without text messages:
Switch off the ignition.
Switch on the hazard warning lights.
Press and hold down the (o.oJS!l) button in the In-strument cluster.
Restart the ignition.
Release lhe [o.O/S!T) button and press the (:cJeJ) but-ton within approximately 20 seconds.
Switch off the hazard warning lights.
Volkswagen information system
COl Introduction
This chapter contains information on the following subjects:
Overview of the menu structure . . . . 25
Using the menus in the instrument cluster . . . 27
Main menu . . . . . . . . . . . . . . . . . . . . . . . 28
MFD (mullifunction display) menu . . . . . . . . . . . 28 Settings menu . . . . . . . . . . . . . . . . 30
Assist systems submenu.. . . . . . . . . . . . 30
Convenience submenu ... Lights & Vision submenu ..
The Volkswagen information system al-
lows you to access various functions and
information in the instrument cluster dis-
play when the ignition is switched on.
31
31
There are no buttons on the wiper lever in vehicles equipped with a multifunction steering wheel. The mullifunction display is controlled using the buttons on the multifunction steering wheel only.
Overview of the V!!hiclc
m The service message will disappear after a W few seconds, when the engine is running, or when the (OKIRES!T) button on the wiper lever or the@ button on the mullifunction steering wheel is press-ed.
m If the vehicle battery is disconnected for long W periods in a vehicle with flexible oil change service, the system will not be able to calculate the lime when the next service is due. The service dis-plays could then display incorrect information. If this is the case then please observe the maximum service Intervals shown in =:o Booklet Service schedule.
Qualified workshops can programme and modify other functions depending on the vehicle equip-ment level. Volkswagen Commercial Vehicles rec-ommends using a Volkswagen Commercial Vehi-cles dealership for this purpose.
Some menu options can only be opened when the vehicle is stationary.
If any priority 1 warning reports are being dis-played, you will be unable to open any menus. Some warnings can be confirmed and switched off with the@ button.
Additional information and warnings:
• Driver assist systems =:o page 282
• Radio or navigation system =:o Booklet Radio, provision for mobile telephone, infotainment sys-tem, navigation system
• Provision mobile telephone =:o Booklet Radio, provision for mobile telephone, infotainment sys-tem, navigation system 111>
Page 25 of 486

A WARNING
Accidents and injuries can occur if the driver is distracted.
• Never open the menus on the instrument cluster display while the vehicle is in motion.
r::l After starting the engine with a discharged l!..J vehicle battery, or after the battery has been changed, system settings (time, date, personal
Overview of the menu structure
nl1 First read and observe the introductory 1-J,::.JJ Information and safety warnings & on page 24.
The following menu structure shows how the Volkswagen information system menus on the in-strument cluster display are structured. The size and layout of the Volkswagen information system menu depends on the vehicle electronics and the level of vehicle equipment.
MFD (multlfunctlon display) 28
• Travel time
• Curr. consum. (current fuel consumption)
• Av. consum. (average consumption)
• Fuel range
• SCR range (Ad Blue® remaining range)
• Distance
• Av. speed (average speed)
• Digit. speed (digital speed display)
• Digital oil temp. (digital oil temperature display)
• Speed warning
ACC =>page 298
Audio Radio, provision for mobile telephone, infotainment system, navigation system
Navigation Radio, provision for mo-bile telephone, infotainment system, navigation system
Telephone Radio, provision for mo-bile telephone, infotainment system, navigation system
Vehicle status 21, Displays and 22, Service Interval display
convenience settings and programming) may have been changed or deleted. Check and correct the settings as necessary once the vehicle battery has been sufficiently charged.
• Assist systems
-Side Assist
System on/off
Brightness
Back
-Front Assist
System on/off
Acoustic warning/advance warning
Dist. warn. (distance warning)
Back
-ACC
Basic sett. (basic settings)
Distance
Back
-Back
• Language
• MFD data
-Travel time on/off
-Current consumption (current fuel consump-tion) on/off
-Av. consum. (average consumption) on/off
-Distance on/off
-Av. speed (average speed) on/off
-Digital speed (digital speed display) on/off
-Digital oil temp. (digital oil temperature dis-play) on/off
-Speed warn. (speed warning) on/off
-Back
• Convenience
-ATA confirm on/off
-Central locking (central locking system)
Auto lock (automatic locking) on/off
Auto unlock (automatic unlocking) on/off
Instrument cluster 25
...
Page 27 of 486
Using the menus in the instrument cluster
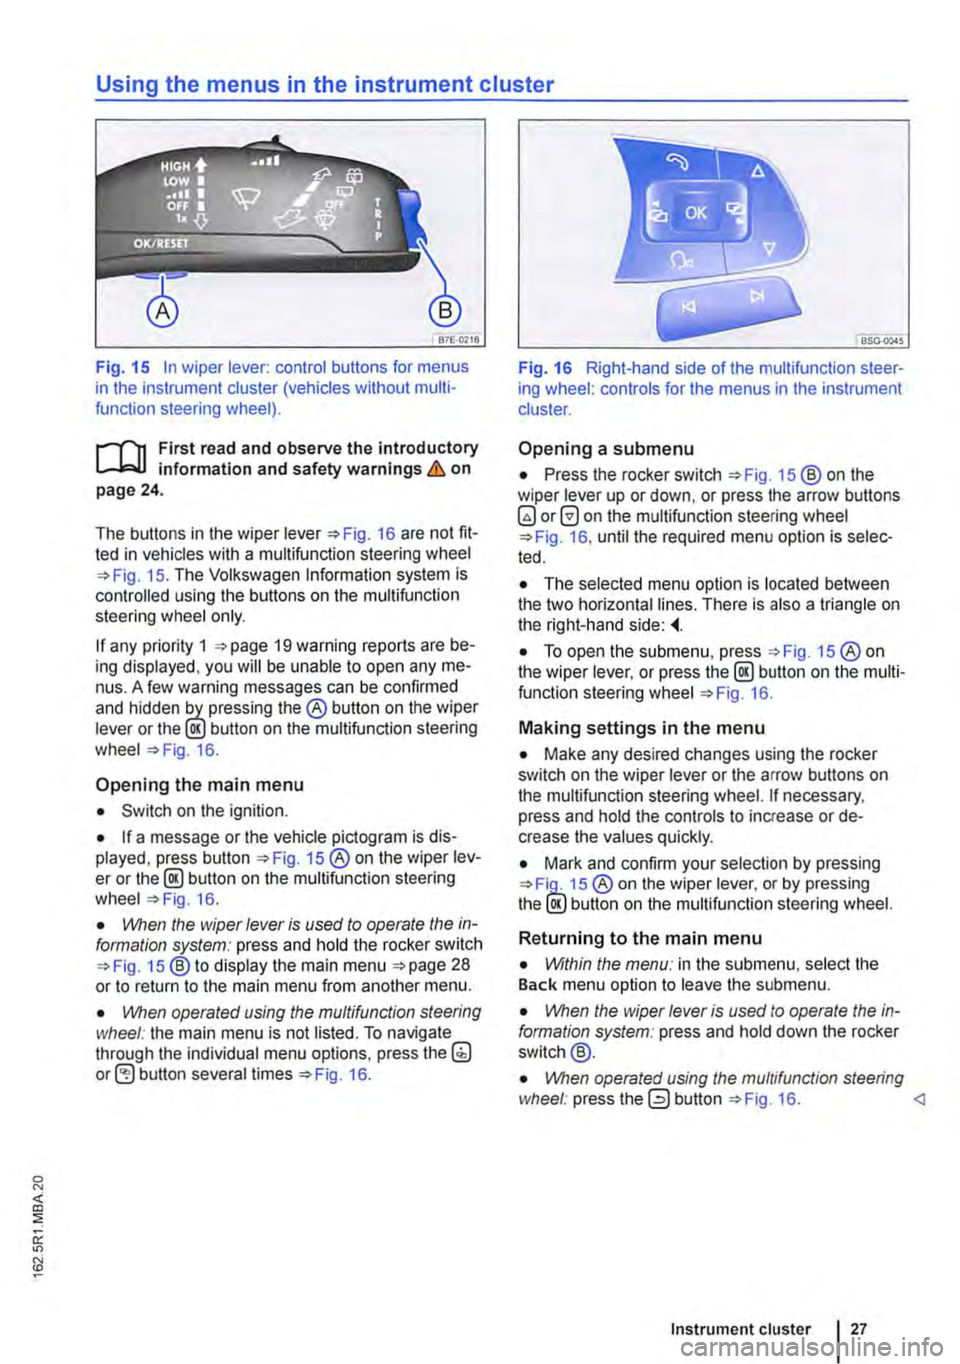
Fig. 15 In wiper lever: control buttons for menus in the instrument cluster (vehicles without multi-function steering wheel).
r--f"n First read and observe the introductory L-J,:.lJ information and safety warnings & on page 24.
The buttons in the wiper Fig. 16 are not fit-ted in vehicles with a multifunction steering wheel 15. The Volkswagen Information system is controlled using the buttons on the multifunction steering wheel only.
If any priority 1 19 warning reports are be-ing displayed, you will be unable to open any me-nus. A few warning messages can be confirmed and hidden the® button on the wiper lever or the lE!.) button on the multifunction steering wheel 16.
Opening the main menu
• Switch on the ignition.
• If a message or the vehicle pictogram is dis-played, press button 15 ®on the wiper lev-er or the@ button on the multifunction steering wheel 16.
• VVhen the wiper lever is vsed to operate the in-formation system: press and hold the rocker switch 15 ®to display the main menu 28 or to return to the main menu from another menu.
• \!Vhen operated vsing the mvltifvnction steering wheel: the main menu is not listed. To navigate through the individual menu options, press the(;) button several times 16.
Fig. 16 Right-hand side of the multifunction steer-ing wheel: controls for the menus in the instrument cluster.
Opening a submenu
• Press the rocker switch 15 ®on the wiper lever up or down, or press the arrow buttons 0 on the multifunction steering wheel 16, until the required menu option is selec-ted.
• The selected menu option is located between the two horizontal lines. There is also a triangle on the right-hand side:
• To open the submenu, press 15 ®on the wiper lever, or press the @ button on the multi-function steering wheel 16.
Making settings in the menu
• Make any desired changes using the rocker switch on the wiper lever or the arrow buttons on the multifunction steering wheel. If necessary, press and hold the controls to increase or de-crease the values quickly.
• Mark and confirm your selection by pressing 15 ® on the wiper lever, or by pressing the lE!.) button on the multifunction steering wheel.
Returning to the main menu
• Within the menv: in the submenu, select the Back menu option to leave the submenu.
• \!Vhen the wiper lever is vsed to operate the in-formation system: press and hold down the rocker switch@.
• \!Vhen operated vsing the mvltifvnc/ion steering wheel: press the 0 button 16.