2019 VOLKSWAGEN TRANSPORTER Oil
[x] Cancel search: OilPage 121 of 486

Recommended windscreen washer fluid
• For warm weather: summer windscreen wash G 052 184 A 1. Dilution 1:100 (1 part concen-trate, 100 parts water) in the washer fluid reservoir.
• All-year washer fluid G 052 164 A2. Dilution in winter to -18°C (0°F) approx. 1 :2 (1 part concen-trate, 2 parts water), otherwise dilute one part con-centrate to four parts water (1 :4) in the washer fluid reservoir.
Capacities
The capacity of the washer fluid reservoir is ap-proximately 3. 7 litres or approximately 5.0 litres in vehicles with a headlight washer system.
A WARNING
Never mix coolant additive or other unsuita-ble additives into the windscreen washer flu-id. An oily film may otherwise be left on the windscreen or rear window which will restrict the field of vision.
Mirrors
o:n Introduction
This chapter contains information on the following subjects:
Interior mirror .............. . 122
Exterior mirrors ............ . . .... 123
For safety reasons it is important that the driver po-sitions the exterior and interior mirrors correctly be-fore starting a journey '* &.
You can use the exterior mirrors and the interior mirror to observe traffic behind you and adjust driv-ing style accordingly. Looking in the exterior mir-rors and the interior mirror does not allow the driver to see the entre side and rear area of the vehicle. The area that cannot be seen is known as the blind spot. There may be objects and other road users in the blind spot.
Additional information and warnings:
• Exterior views '* page 5
• Changing gear '*page 260
• Braking, stopping and parking '*page 269
A WARNING (Continued)
• Use clean, clear water (not distilled water) with a washer fluid recommended by Volks-wagen Commercial Vehicles.
• A suitable anti-freeze agent should be added to the windscreen washer fluid If nec-essary.
CD
• Never mix other cleaning agents with the cleaning agents recommended by Volkswagen Commercial Vehicles. This can cause the ingre-dients to separate and block the windscreen washer jets.
• When refilling or changing service fluids, please ensure that the correct fluids are added through the correct openings. Incorrect service fluids can cause serious functional problems and engine damage.
Adjusting the exterior and interior mirrors while driving may cause the driver to become distracted. This can lead to accidents and se-rious Injuries.
• Exterior and interior mirrors should only be adjusted when the vehicle is stationary.
• When parking, changing lane, or perform-ing an overtaking or turning manoeuvre, al-ways pay careful attention to the area around the vehicle as objects and other road users may be located In the blind spot.
• Always ensure that the mirrors are posi-tioned correctly and that the rear view Is not restricted by ice, snow, condensation or any other objects.
A WARNING
Automatic anti-dazzle mirrors contain an electrolyte fluid which could leak If the mirror is broken.
• The leaking electrolyte fluid can cause lrri-tation to the skin, eyes and respiratory or-gans, especially In people who suffer from
Lights and vision 121
Page 127 of 486
Always stow all items of luggage in the vehicle securely.
• Distribute items in the vehicle, on the roof and on the trailer as evenly as possible.
• Place heavy objects as far forward in the lug-gage compartment as possible. Position the rear seat backrests securely in the upright position.
• Secure luggage in the luggage compartment to the fastening rings with suitable straps 130.
• Adjust the headlight range 106.
• Adjust the tyre pressure according to the vehi-cle load. Adhere to the tyre pressure plate 367.
• In vehicles with a tyre monitoring system, set the new vehicle load level as necessary 318.
Stowing cargo
r-111 First read and observe the introductory L-l=:.LI information and safety warnings & on page 125.
Stow the load securely in the vehicle or on the load surface
• Before loading the vehicle, place a sturdy mat or similar cover flush with the vehicle floor. Where necessary, do not cover protruding parts of the ve-hicle floor.
• If necessary, remove the seats to increase the load area.
• The vehicle floor must be free of oil and dust, dry and fully clean in order to help prevent the load from sliding.
• Observe gross axle weight ratings and the gross vehicle weight rating.
• Distribute items in the vehicle, on the load sur-face, on the roof and on the trailer as evenly as possible.
• Stow heavy objects directly on the floor and above or in front of the rear axle and engage the rear seat backrests securely in an upright position.
CD
Hard objects on the shelf can chafe against the wires of the heating element in the rear window and cause damage.
m • Observe any information concerning the l!J loading of a trailer 139 .
• Observe any information concerning the load-ing of a roof carrier 137.
• Protect the seat rails or seat anchor points from damage.
• Secure luggage with suitable securing straps on the fastening rings 130.
• Adjust the headlight range 106.
• Adjust the tyre pressure according to the vehi-cle load. Adhere to the tyre pressure plate 367.
• In vehicles with a tyre monitoring system, set the new vehicle load level as necessary 318.
CD
Hard objects on the shelf can chafe against the wires of the heating element in the rear window and cause damage.
m • Observe any information concerning the l!J loading of a trailer =>page 139 .
• Observe any information concerning the load-ing of a roof carrier =>page 137 .
Page 134 of 486
t"""""fl1 First read and observe the introductory l..--bll information and safety warnings & on page 133.
Removing plastic covers
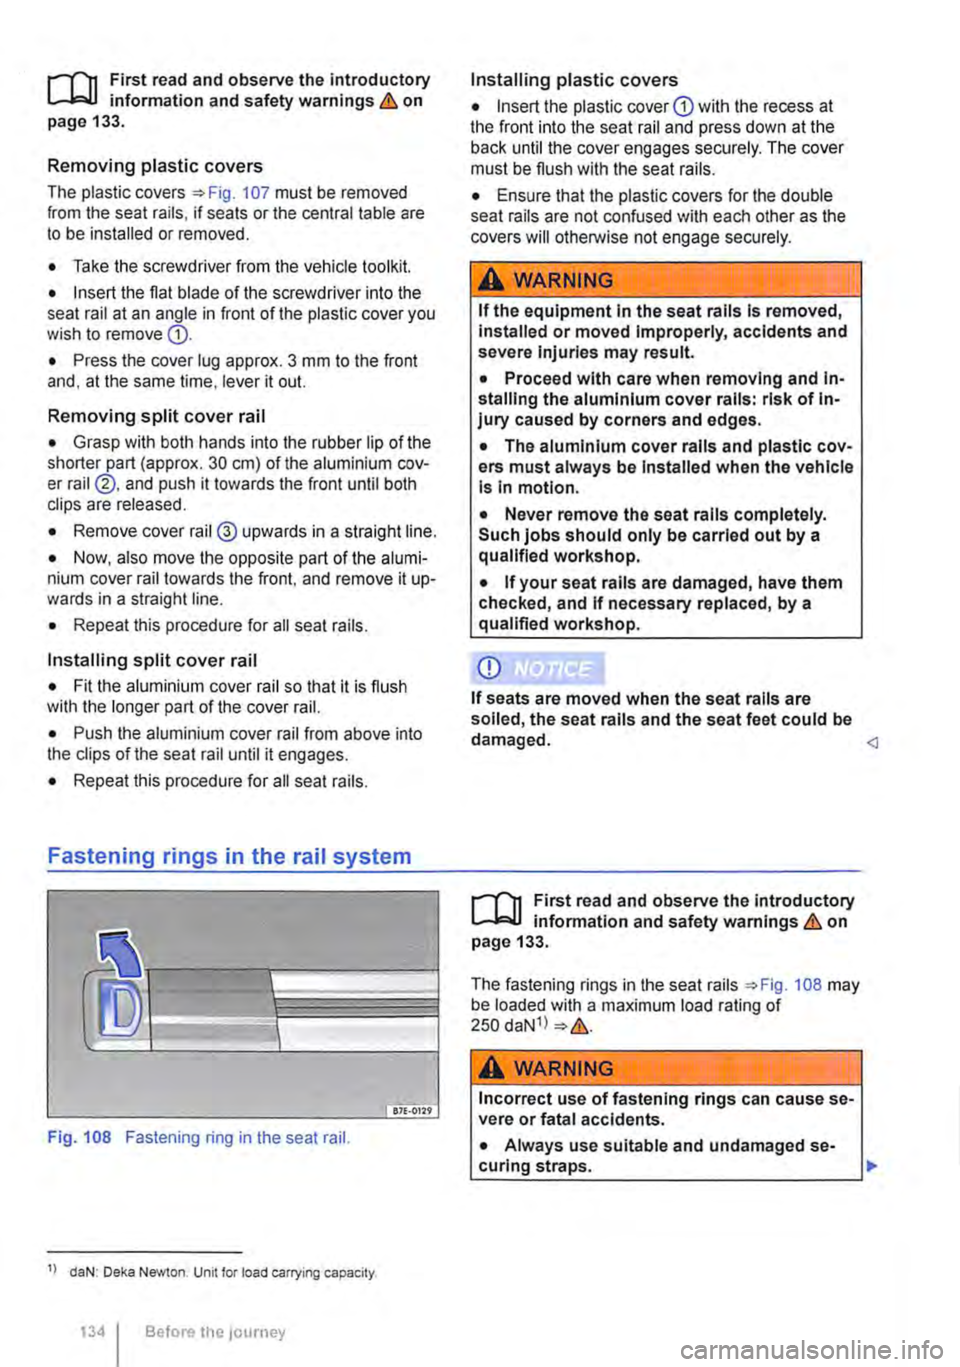
The plastic covers=:. Fig. 107 must be removed from the seat rails, if seats or the central table are to be installed or removed.
• Take the screwdriver from the vehicle tootkit.
• Insert the flat blade of the screwdriver into the seat rail at an angle in front of the plastic cover you wish to remove G).
• Press the cover lug approx. 3 mm to the front and, at the same time, lever it out.
Removing split cover rail
• Grasp with both hands into the rubber lip of the shorter part (approx. 30 cm) of the aluminium cov-er rail ®. and push it towards the front until both clips are released.
• Remove cover rail@ upwards in a straight line.
• Now, also move the opposite part of the alumi-nium cover rail towards the front, and remove it up-wards in a straight line.
• Repeat this procedure for all seat rails.
Installing split cover rail
• Fit the aluminium cover rail so that it is flush with the longer part of the cover rail.
• Push the aluminium cover rail from above into the clips of the seat rail until it engages.
• Repeat this procedure for all seat rails.
Fastening rings in the rail system
Fig. 108 Fastening ring in the seat rail.
1> daN: Deka Newton. Unit for load carrying capacity.
134 Before the JOUrney
Installing plastic covers
• Insert the plastic cover CD with the recess at the front into the seat rail and press down at the back until the cover engages securely. The cover must be flush with the seat rails.
• Ensure that the plastic covers for the double seat rails are not confused with each other as the covers will otherwise not engage securely.
A WARNING
If the equipment In the seat rails Is removed, Installed or moved Improperly, accidents and severe Injuries may result.
• Proceed with care when removing and In-stalling the aluminium cover rails: risk of In-jury caused by corners and edges.
• The aluminium cover rails and plastic cov-ers must always be Installed when the vehicle Is In motion.
• Never remove the seat rails completely. Such jobs should only be carried out by a qualified workshop.
• If your seat rails are damaged, have them checked, and If necessary replaced, by a qualified workshop.
CD
If seats are moved when the seat rails are soiled, the seat rails and the seat feet could be damaged.
The fastening rings in the seat rails ::.Fig. 108 may be loaded with a maximum load rating of 250 daN1l ::.&.
A wARNING
Incorrect use of fastening rings can cause se-vere or fatal accidents.
• Always use suitable and undamaged se-curing straps. ..,.
Page 144 of 486
A WARNING (Continued)
• If the ball coupling will not fit properly, the towing bracket should be checked by a quali-fied workshop.
• Do not use the towing bracket If the ball coupling does not engage properly or if you are unable to set it to the "ready" position.
• Do not use the towing bracket if you are unable to remove the key from the handwheel once the ball coupling has been mounted. This means that ball coupling Is not locked properly.
Removing the ball coupling
r--T'n First read and observe the Introductory L-J.:.IJ information and safety warnings & on page 139.
• Unhitch the trailer => &.
• Remove the cover =>Fig. 113 ®from the lock on the handwheel.
• Insert the key® into the lock and turn it clock-wise.
• Hold the ball coupling tightly in your left hand =>&.
• Use your right hand to pull out the handwheel 0 in the direction of arrow 1 and keep it in this po-sition.
• Turn the handwheel 0 in the direction of arrow 2 until it engages.
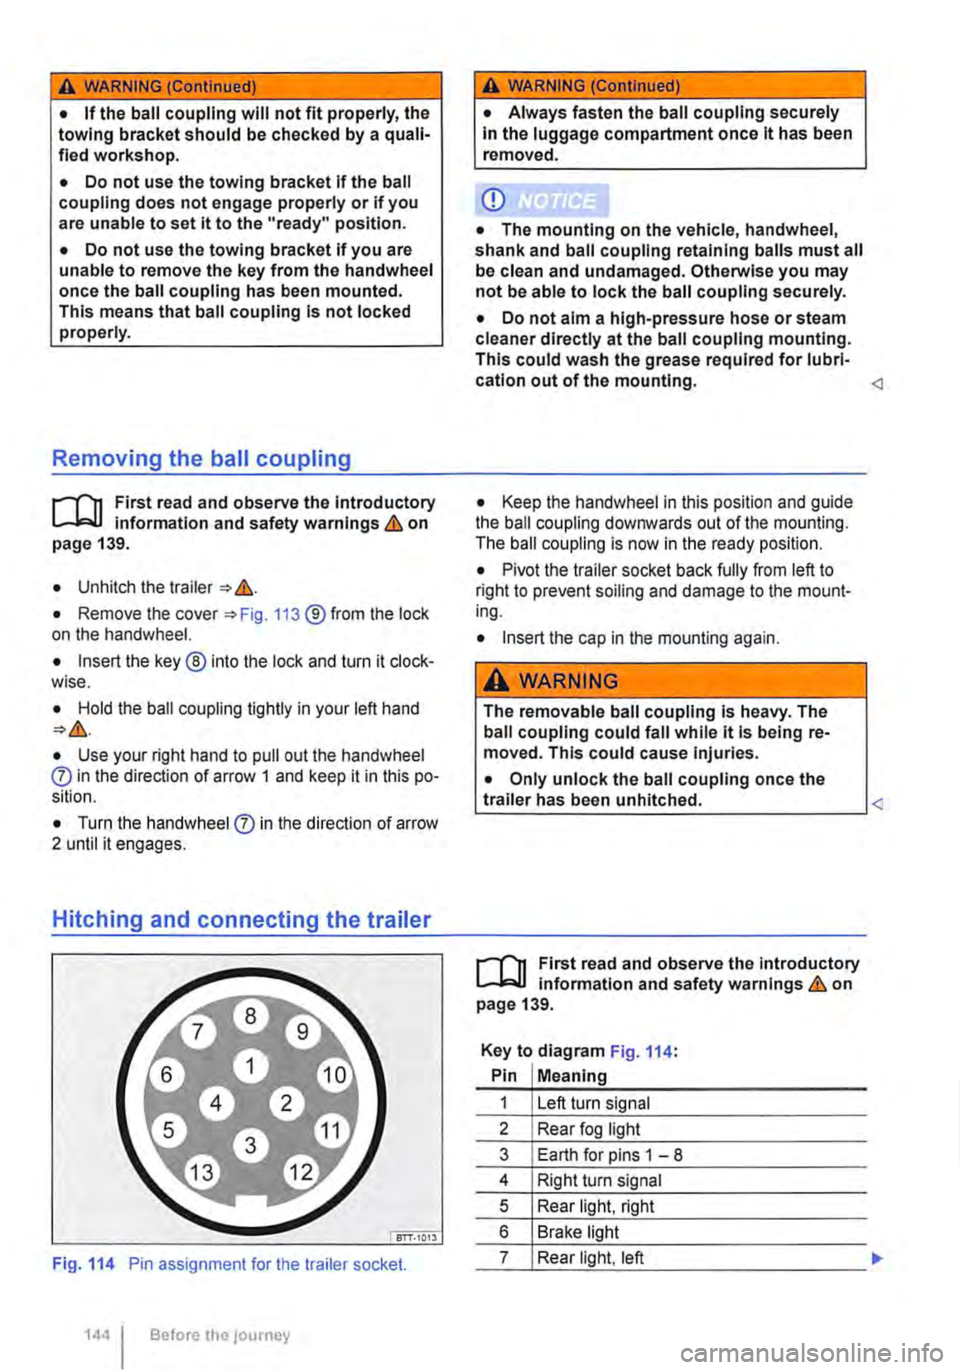
Hitching and connecting the trailer
Fig. 114 Pin assignment for the trailer socket.
1441 Before the journey
A WARNING (Continued)
• Always fasten the ball coupling securely In the luggage compartment once it has been removed.
CD
• The mounting on the vehicle, handwheel, shank and ball coupling retaining balls must all be clean and undamaged. Otherwise you may not be able to lock the ball coupling securely.
• Do not aim a high-pressure hose or steam cleaner directly at the ball coupling mounting. This could wash the grease required for lubri-cation out of the mounting.
• Pivot the trailer socket back fully from left to right to prevent soiling and damage to the mount-ing.
• Insert the cap in the mounting again.
A WARNING
The removable ball coupling Is heavy. The ball coupling could fall while it Is being re-moved. This could cause Injuries.
• Only unlock the ball coupling once the L-tr_a_ile_r_h_a_s __ be_e_n __ u_n_hi_tc_h_e_d_. ____________
r--T'n First read and observe the Introductory L-J.:.IJ information and safety warnings & on page 139.
Key to diagram Fig. 114:
Pin Meaning
1 Left turn signal
2 Rear fog light
3 Earth for pins 1 -8
4 Right turn signal
5 Rear light, right
6 Brake light
7 Rear light, left
Page 158 of 486
Removing the central table
The central table can be removed more easily by two people than by one person.
• Remove front protective covers from the central seat rails.
• Turn the single seats so that they face the di-rection of travel.
• Adjust the back rest of single seats to an upright position.
• Fold up the armrests of the single seats.
• Pull the handle @ up and hold the central table with the handle and the handle recess@.
• Push the central table forwards to the point where it can be lifted out of the slots in the seat rails.
• Lift the central table out.
• Put down the central table carefully so that the rollers and feet are not soiled or damaged.
• Place the removed covers on the open slots in the seat rails.
Fitting the central table
The central table can be installed more easily by two people than by one person.
• Remove front protective covers from the central seat rails.
• Turn the single seats so that they face the di-rection of travel.
Cool box
c:cn Introduction
This chapter contains information on the following subjects:
Fitting and removing the cool box
Switching the cool box on and off 159 161
The cool box may be used while the vehicle is in motion only if it is fitted to the adapter plate.
Power for the cool box can be supplied by any of the 12-volt sockets in the vehicle. The power con-sumption is approx. 33 watts. The cool box has a capacity of 32 litres.
Follow instructions provided for the installation and use of the cool box and keep it in the vehicle wal-let.
As far as possible, keep food and drinks in the cool box in leak-proof containers. Do not overfill the cool box such that air circulation is impaired.
158 Before the journey
• Adjust the backrest of single seats to an upright position.
• Fold up the armrests of the single seats.
• Pull the handle @ up and hold the central table with the handle and the handle recess®.
• Insert the central table guides into the recesses in the seat rails.
• Insert the central table into the seat rails and push them back, so that the removed covers can be placed on the open slots in the seat rails.
• Fold the handle@ back to engage the central table in the seat rails.
• Check that the central table is locked securely. it should now no longer be possible to move the central table.
• Do not raise the table module when the cen-tral table Is located between the single seats. This could cause damage to the table.
The vehicle battery will be drained if the cool box is used when the engine is switched off. For this rea-son, the cool box is fitted with a battery monitor. The battery monitor will switch the cool box off if the vehicle battery has a low charge level. The bat-tery monitor will switch the cool box on again as soon as the battery has reached a suitable charge level, for example, after a long journey.
Additional information and warnings:
• Seat functions, front =>page 69
• Seat functions, rear =>page 72
• Seat functions, rear, Business =>page 182
• Seat functions, rear, California =>page 193
• Electrical sockets =>page 163
• Battery =>page 350
Page 182 of 486
Seat functions, rear, Business
ct:lJ Introduction
This chapter contains information on the following subjects:
Controls of the 2-seat arrangement. . . . . . . . . 183
Seat heater in the 2-seat arrangement . . . . . . 183
Armrests . . . . . . . . . . . . .. . . . .. .. .. . .. .. .. 184
Moving the 2-seat arrangement . . . . . . . . . . . 185
Centre console of the 2-seat arrangement . . 185
Refrigerator box . . . . . . . . . . . . . . . . . . . . . . . 186
The seats of the 2-seat arrangement are not suita-ble for the attachment of child seats => &.
Features of the 2-seat arrangement
• Optimised seat belts for both seats.
• Head restraints and seat belts can be electrical-ly adjusted for height.
• The height, forwards/backwards position and angle of the seat cushion can be adjusted electri-cally.
• The backrest angle can be adjusted electrically.
• Electrically adjustable lumbar support.
• seat heating.
• Armrests with stowage compartment.
Additional information and warnings:
• Sitting correctly and safely =>page 61
• Seat functions. rear =>page 72
• Seat belts => page 79
• Airbag system =>page 87
• Child seats (accessories) =>page 96
• Luggage compartment =>page 130
• Stowage =>page 150
• Central table =>page 155
A WARNING
Incorrect use of the seat functions can cause serious Injuries.
• Always assume a correct sitting position before you drive and maintain this position throughout the trip. This also applies to all passengers.
• Keep hands, fingers, feet and other body parts away from the moving parts of the seats.
1821 Before the journey
A WARNING
The seats of the 2-seat arrangement are not suitable for the attachment of child seats of any kind.
• Never use a child seat on the 2-seat ar-rangement.
A WARNING
Incorrect adjustment or removal and Installa-tion of single seats and/or the 2-seat arrange-ment can cause accidents and severe Inju-ries.
• All adjustments as well as removing/In-stalling should be carried out only when the vehicle Is stationary; otherwise the single seats and/or the 2-seat arrangement could move unexpectedly when the vehicle Is in motion. Furthermore, an Incorrect seating po-sition Is adopted while adjusting the seat.
• All single seats and the 2-seat arrange-ment must always be fitted In the seat rails and must be securely engaged.
• Never use the table while the vehicle is in motion. All backrests must be In the upright position and securely engaged In this posi-tion while the vehicle Is In motion.
• While the vehicle Is In motion the feet of a fitted single seat must not be positioned close to the removable covers In the seat rails.
• Never move single seats and/or the 2-seat arrangement when the vehicle is on a steep slope. The single seats and/or the 2-seat ar-rangement could move unexpectedly and cause Injuries.
• The area for adjustment of the single seats and/or the 2-seat arrangement should not be restricted by any Items.
• While fitting and removing the single seats and/or the 2-seat arrangement, make sure that the seat feet are not soiled or dam-aged.
• The rotating single seats In the passenger compartment can be engaged securely only when facing either the front or rear of the ve-hicle. .,.
Page 194 of 486
Additional information and warnings:
• Sitting correctly and safely 61
. • Seat functions, rear 72
• Seat belts 79
• Airbag system 87
• Child seats (accessories) 96
• Luggage compartment 130
• Stowage 150
• Central table 155
,A WARNING
Incorrect use of the seat functions can cause serious Injuries.
• Always assume a correct sitting position before you drive and maintain this position throughout the trip. This also applies to all passengers.
• Keep hands, fingers, feet and other body parts away from the moving parts of the seats.
,A WARNING
Incorrect adjustment or removing and fitting single seats and/or the bench seat can cause accidents and severe injuries.
• All adjustments as well as removing/fitting should be carried out only when the vehicle is stationary; otherwise the single seats and/ or the bench seat could move suddenly when the vehicle is in motion. Furthennore, an in-correct seating position is adopted while ad-justing the seat.
• All single seats and the bench seat must always be fitted in their seat rails and must be securely engaged.
194 I Before the journey
A WARNING (Continued)
• Never use the table or the bed while the vehicle Is In motion. All backrests must be In the upright position and securely engaged In this position while the vehicle Is In motion.
• Never fit single seats behind the bench seat.
• Never fit two 3-seat benches In the vehi-cle.
• While the vehicle is In motion the feet of the fitted single seats and/or the bench seat must not be positioned close to the remova-ble covers of the seat rails.
• Never move single seats and/or the bench seat when the vehicle Is on a steep slope. The single seats and/or the bench seat could move automatically and cause Injuries.
• The area for adjustment of the single seats and/or the bench seat should not be re-stricted by any Items.
• While fitting and removing the single seats and/or the bench seat, make sure that the seat feet are not soiled or damaged.
• The rotating single seats in the passenger compartment can be engaged securely only when facing either the front or rear of the ve-hicle.
• Never use child seats in the groups 0 or 0+ on single seats that face the rear of the vehicle.
A CAUTION
Improper use of the bed can cause Injury.
• Never step in the area between the seat Lc_u_s_h_io_n __ a_n_d_t_h_e_b_a_c_kr_e_s_t. ______________
Page 234 of 486
A WARNING (Continued)
• In addition, a leak/function check must be carried out on the gas system by a qualified workshop every time the system is repaired or the gas system connections are opened.
A WARNING
Improper use of the gas system can cause serious Injury.
• The cover on the gas bottle holder must be screwed on securely whenever the gas bottle is In the holder.
• Never connect the gas system to the town gas/gas mains.
• Close all gas shut-off valves before driv-lng and when not using the cooker for long periods.
• Never allow the vents In the floor of the gas bottle holder to become blocked by snow slush, cleaning rags, or any other object. Check the floor vents regularly to make sure they are free from obstruction.
A WARNING
There is a danger of fire any time a gas burn-er is lit.
• Never leave a lit burner unattended -es-pecially when children are nearby.
• Make sure the gas flame never extends beyond the edge of the pot or pan.
• The refrigerator box lid must always be kept closed from the moment the gas flame is lit until it is turned off again.
• The blind on the window behind the gas cooker must always be kept open from the moment the gas flame is lit until it is turned off again.
234 I Before the journey
A WARNING (Continued)
• Make sure that no inflammable Items are left close to the burners, e.g. cooking fat or oil.
• Keep towels, clothing, paper, plastic and other inflammable materials well away from the gas cooker.
• Never overheat oil or cooking fat.
A WARNING
Improper use of the gas cooker can cause se-rious injury.
• Never allow the handles of pots and pans to protrude over the edge of the gas cooker. Otherwise, they could be knocked off the gas cooker.
• Never use the gas cooker while the vehi-cle is in motion.
• Close all gas shut-off valves before driv-ing and when not using the cooker for long periods.
A WARNING
Damp or wet oven mitts or potholders can be-come very hot and cause scalding.
• Use only dry oven mitts and potholders .
CD
Never place hot objects, e.g. pots or pans, on the surface of the kitchen unit, on the refriger-ated box, or on table tops. Such objects could damage these surfaces.