2019 VOLKSWAGEN T-ROC interior lights
[x] Cancel search: interior lightsPage 1 of 502

Front view
Fig. 2 Front view of the vehicle.
Key to Fig. 2
Windscreen:
Vehicle identification number Technical data
Windscreen wipers WipersWiper blades
Rain/light sensor in the area of the interior mirror Rain/light sensorCaring for and cleaning the
vehicle exterior
Sensor for lighting functions Caring for and cleaning the vehicle exterior
Bonnet opening lever In the engine compartment
Behind the Volkswagen badge: radar sensor for assist systems Caring for and cleaning the
vehicle exterior
Sensors for assist systems Caring for and cleaning the vehicle exteriorDriver assist systems
Behind a cover: mounting for towing eye Tow-starting or towing
Lights in the bumper LightsChanging bulbs
Page 9 of 502

Front passenger side
Fig. 10 Overview of the front passenger side (left-hand drive vehicles). The location is mirrored in
right-hand drive vehicles.
Key to Fig. 10
Vents Heating and air conditioning system
At the side of the dash panel: key-operated switch for disabling the front passenger front airbag
Airbag system
Operating lever for the stowage compartment Stowage areas
Controls in the roof
Symbol Meaning
Buttons for interior and reading lights Interior lighting.
Switch for glass roof Glass roof.
Buttons for the sun blind Protection from the sun.
Buttons for emergency call service, information call and breakdown call In an
emergency
Driver information
Symbols in instrument cluster
The warning and indicator lamps indicate various warnings, faults or certain functions. Some
warning and indicator lamps light up when the ignition is switched on and must go out once the
engine is running or the vehicle is in motion.
Depending on the vehicle equipment level, symbols may be displayed in the instrument cluster
instead of warning lamps.
Page 86 of 502

When pushing the vehicle by hand, do not press on the tail light clusters, the rear spoiler or large
panels. This could damage the vehicle and the rear spoiler could become detached.
The 12-volt vehicle battery will discharge if the hazard warning lights are left on over a long period of
time even when the ignition is switched off.
Depending on the vehicle equipment, the brake lights flash rapidly if you brake sharply or initiate full
braking at a speed of more than 80 km/h (50 mph). This is a particularly effective way of attracting
the attention of vehicles behind you. If you then continue to brake, the hazard warning lights will be
switched on automatically at speeds under approximately 10 km/h (6 mph). Once you start to
accelerate, the hazard warning lights will switch off again automatically.
Equipment for an emergency
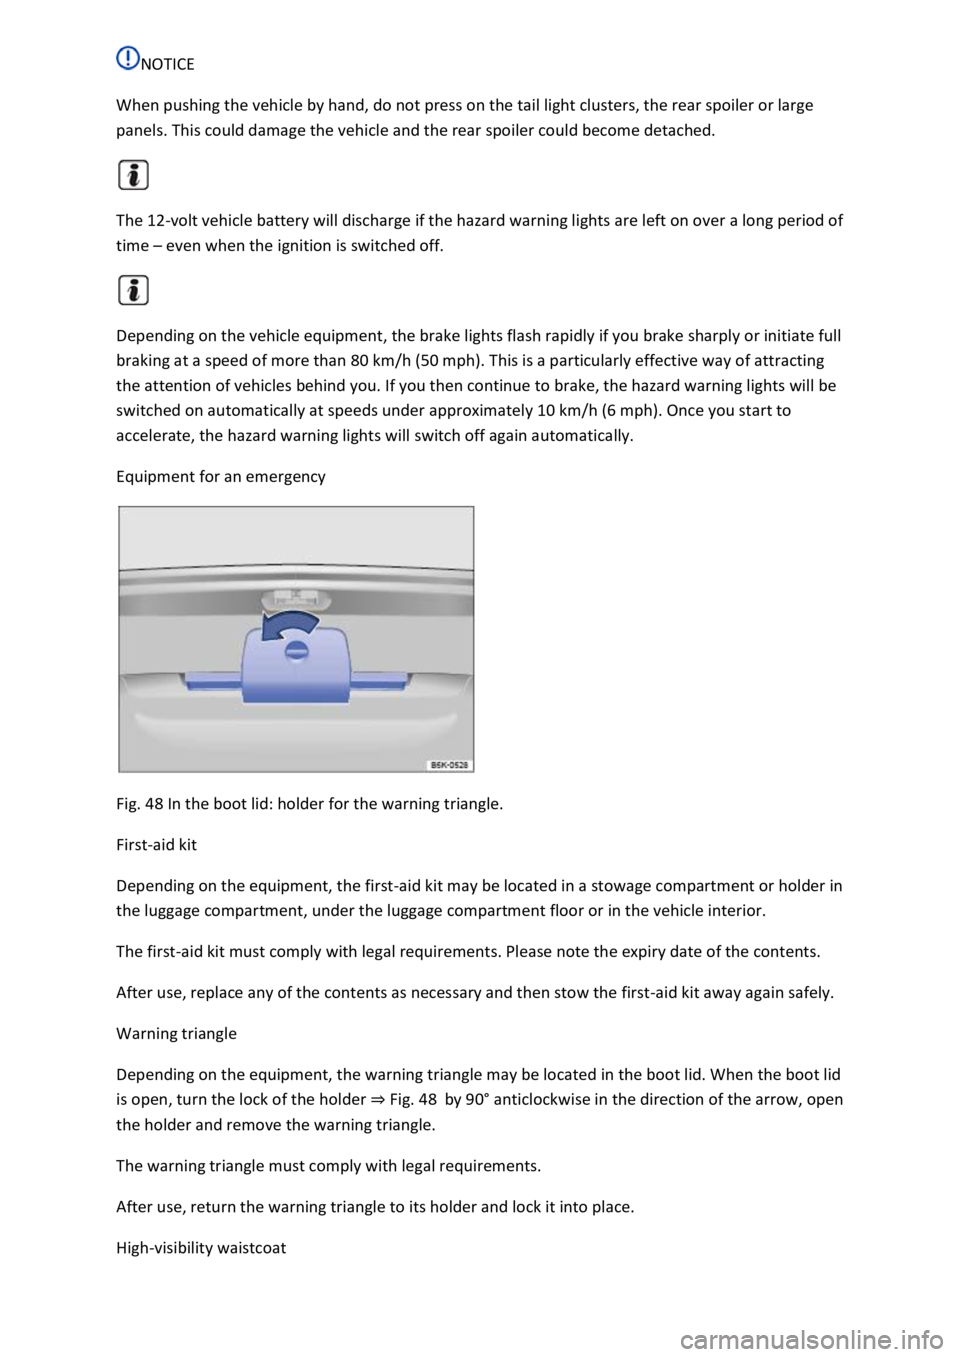
Fig. 48 In the boot lid: holder for the warning triangle.
First-aid kit
Depending on the equipment, the first-aid kit may be located in a stowage compartment or holder in
the luggage compartment, under the luggage compartment floor or in the vehicle interior.
The first-aid kit must comply with legal requirements. Please note the expiry date of the contents.
After use, replace any of the contents as necessary and then stow the first-aid kit away again safely.
Warning triangle
Depending on the equipment, the warning triangle may be located in the boot lid. When the boot lid
is open, turn the lock of the holder Fig. 48by 90
Page 101 of 502

SAFELOCK deactivates the door release levers if the vehicle has been locked. This makes it more
difficult to break into the vehicle. The doors can no longer be opened from the inside
Press the button on the vehicle key once.
Press the button on the vehicle key twice in quick succession.
Vehicles with the Keyless Access locking and starting system: touch the sensor on the outside of the
door handle twiceUnlocking or locking the vehicle with Keyless Access
OR: press the central locking button in the driver door once Central locking button
There may be an indication of the activated SAFELOCK in the display of the instrument cluster
(SAFELOCK).
Deactivating SAFELOCK
Switch on the ignition.
OR: deactivate interior monitoring and the anti-tow alarm Temporarily switching off the interior
monitoring system and anti-tow alarm
Before locking the vehicle, temporarily deactivate the interior monitoring and the anti-tow alarm in
the Vehicle Settings menu in the Infotainment system Infotainment sy
The following applies when SAFELOCK is deactivated:
The interior monitoring and the anti-tow alarm are activated and deactivated in the Vehicle settings
menu in the Infotainment system Infotainment system controls and display
WARNING
Careless or unsupervised use of SAFELOCK can cause serious injuries.
Never leave other persons in the vehicle if the vehicle has been locked using the vehicle key. The
doors can no longer be opened from the inside once SAFELOCK is activated.
If you unlock the driver door mechanically using the vehicle key, only the driver door is unlocked,
and not the whole vehicle. The doors are released (but not unlocked) and the central locking button
is activated only when the ignition is switched on.
Troubleshooting
First read and observe the introductoryinformation and safety warnings
Indicator lamp lights up continuously
The red LED in the vehicle door flashes at short intervals and then lights up continuously.
Page 109 of 502

button again moves the boot lid back into the starting position.
Signal tones
If the boot lid is opened or closed from the vehicle interior or using the vehicle key, signal tones will
sound.
Changing and storing the opening angle
If the area behind or above the vehicle is smaller than the path of the boot lid, the opening angle of
the boot lid can be changed.
Stop the opening procedure at the desired open position (at least half open).
In the boot lid, press and hold the button Fig. 63until the hazard warning lights flash.
The changed opening angle will be stored.
The hazard warning lights flash and an acoustic signal sounds to confirm that the changed opening
angle has been stored.
Resetting and storing the opening angle
The opening angle must be reset and stored again in order for the boot lid to open fully again.
Push the opened boot lid up as far as it will go by hand. You will need to use increased force for this.
In the boot lid, press and hold the button Fig. 63until the hazard warning lights flash.
The opening angle will be reset.
The hazard warning lights flash and an acoustic signal sounds to confirm that the opening angle has
been reset.
NOTICE
Before opening or closing the boot lid, please check that there is enough space to open and close it,
for example when in a garage.
Unlocking the boot lid manually
Page 140 of 502

If you have to drive a right-hand drive vehicle in a left-hand drive country, or vice versa, the
asymmetric dipped beam headlights may dazzle oncoming traffic. The headlights must therefore be
switched over when you travel to these countries.
With some equipment levels, the headlight alignment can be adjusted in the Infotainment system in
the Vehicle settings menu Infotainment system controls and displays
In vehicles in which the headlights cannot be switched over in the menu, masking stickers should be
applied to certain parts of the headlight lenses, or the headlights should be adjusted by a qualified
workshop. A qualified workshop can provide you with further information. Volkswagen recommends
using a Volkswagen dealership for this purpose.
Travel mode may be used only for a short period. Please contact a qualified workshop for a
permanent conversion. Volkswagen recommends using a Volkswagen dealership for this purpose.
Interior lighting
Instrument and switch lighting
The brightness of the instrument and switch lighting can be adjusted in the Infotainment system in
the Vehicle settings menu Infotainment system controls and displays
The brightness setting is automatically adjusted to the changing light conditions in the vehicle.
When the light switch is in position , a sensor will switch the dipped beam and the lighting in
the instruments and switches on and off automatically depending on the ambient brightness level.
When the light is switched off and the ignition switched on, the instrument and switch lighting
(needles and scales) is switched on. As the ambient light becomes lower, the illumination of the
scales is automatically reduced and may be switched off entirely. This function is intended to remind
the driver to switch on the dipped beam in good time, i.e. when driving through tunnels.
Interior and reading lights
Press the appropriate button or move the switch to the appropriate position:
Switch off the interior light.Switch on the interior lights.The interior lights are switched on
automatically when the vehicle is unlocked, a door is opened or the vehicle key is removed from the
ignition.Switch the reading light on or off.
Stowage compartment and luggage compartment lights
A light will be switched on and off when the stowage compartment on the front passenger side or
the boot lid is opened or closed.
Background lighting
Page 141 of 502

pending on the equipment level, the background lighting provides indirect light in various areas of
the vehicle interior.
The front footwell may also be illuminated.
The brightness of the background lighting can be adjusted in the Infotainment system in the Vehicle
settings menu Infotainment system controls and displays
The lights go out when the vehicle is locked or after a delay of a few minutes when the vehicle key is
removed from the ignition lock. This prevents the 12-volt vehicle battery from discharging.
Some settings can be stored in the user accounts of the personalisation function and therefore
change automatically when the user account changes Personalisation
Visibility
Wipers
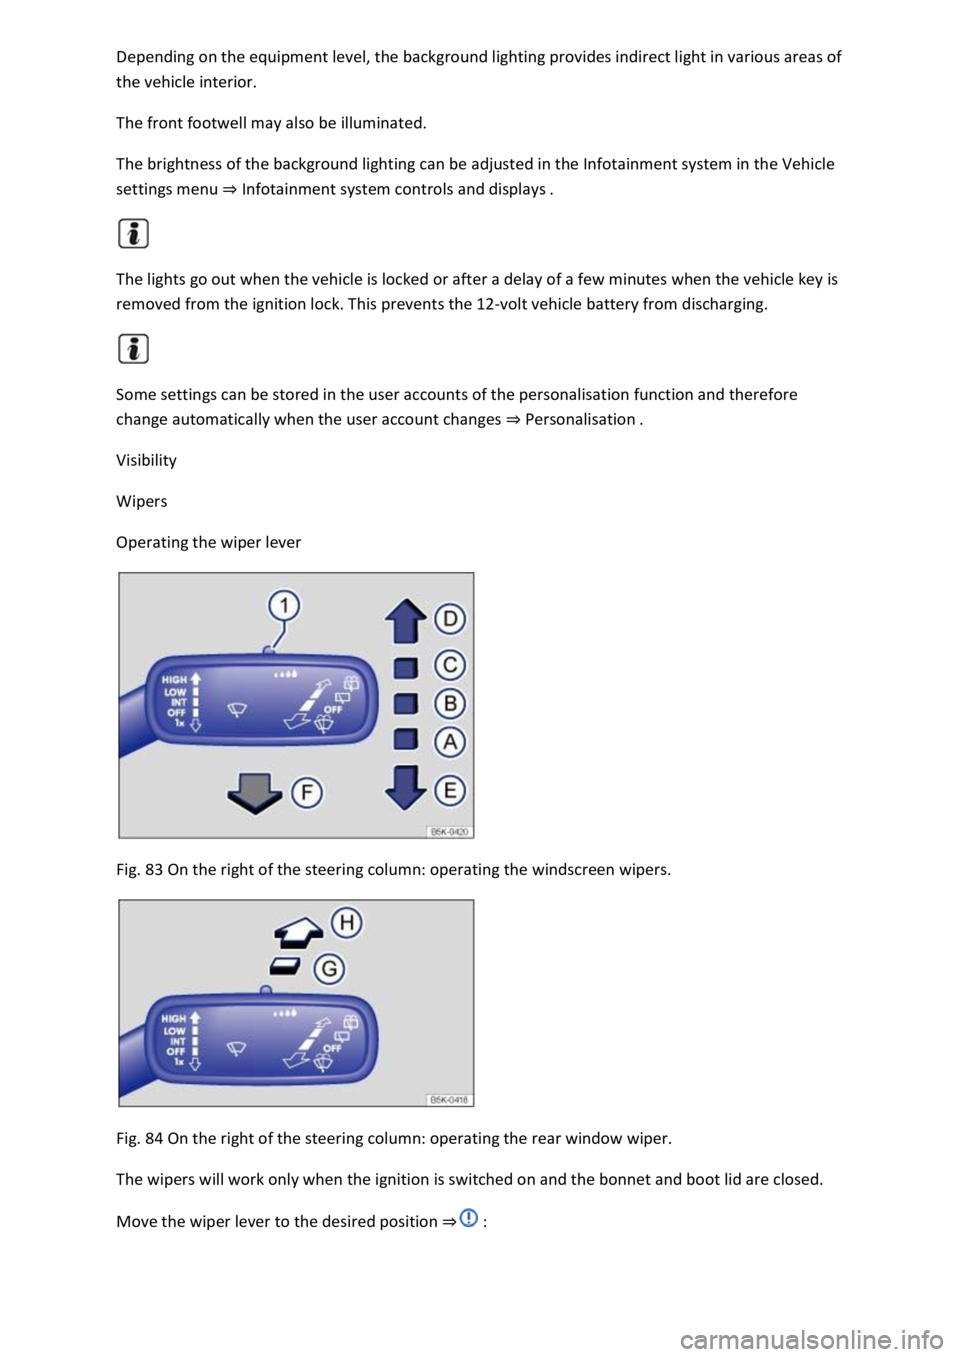
Operating the wiper lever
Fig. 83 On the right of the steering column: operating the windscreen wipers.
Fig. 84 On the right of the steering column: operating the rear window wiper.
The wipers will work only when the ignition is switched on and the bonnet and boot lid are closed.
Move the wiper lever to the desired position
Page 145 of 502

The wipers do not wipe.
The indicator lamp lights up yellow.
Switch the ignition off and on.
If the problem persists, go to a qualified workshop.
Changes in the activation behaviour of the rain/light sensor
Possible causes for faults and misinterpretations relating to the sensitive surface of the rain/light
sensor
Damaged wiper blades: a film of water or smears caused by damaged wiper blades can increase the
time the wipers are switched on, can shorten the length of the intervals between wipes or cause the
wipers to run quickly and continuously.
Insects: insects hitting the windscreen can cause the wipers to be activated.
Salt deposits: in winter, salt deposits can cause the wipers to continue to wipe the windscreen when
it is almost dry.
Dirt: dry dust, wax, windscreen coatings (lotus effect), or detergent deposits (from an automatic car
wash) can cause the rain/light sensor to become less sensitive and react too slowly, or prevent it
from reacting at all. Clean the sensitive surface of the rain/light sensor Caring for and cleaning the
vehicle exteriorat regular intervals and inspect the wiper blades for damage.
Crack in the windscreen: a wipe cycle will be triggered if the rain/light sensor is on when the
windscreen is impacted by a stone. The rain/light sensor will then register the impairment of the
sensitive surfaces and adjust accordingly. Depending on the size of the stone impact, the activation
behaviour of the rain/light sensor may be changed.
We recommend that you use an alcohol-based glass cleaner to remove wax and polish.
The wipers will try to wipe away any obstacles that are on the window. The wiper will stop moving if
the obstacle continues to block its path. Remove the obstacle and switch the wiper back on again.
Mirrors
Introduction
This chapter contains information on the followingsubjects:
Interior mirror
Exterior mirrors
You can use the exterior mirrors and the interior mirror to observe traffic behind you and adjust
your driving style accordingly.