2019 VOLKSWAGEN T-ROC buttons
[x] Cancel search: buttonsPage 35 of 502

Technical progress has made it possible to considerably reduce servicing requirements. An oil change
service must only be carried out when required by the vehicle. The individual conditions in which the
vehicle is used and the driver's personal driving style are taken into account. The service reminder is
displayed 30 days before the service is due. The distance is rounded to the nearest 100 km and the
remaining time is rounded to full days.
Service alert
If a service or inspection is due soon, a service alert will appear the next time the ignition is switched
on.
The number of kilometres or amount of time shown correspond to the maximum number of
kilometres or maximum time that can still be driven before the next service.
Service event
In the event of a due service or a due inspection, a signal tone will be given when the ignition is
switched on and the spanner symbol will be displayed for several seconds on the instrument
cluster display. One of the following displays will also appear Fig. 19
Inspection now!
Oil service now!
Oil service and inspection now!
Checking service schedules
You can access the current scheduled service information when the ignition is switched on, the
engine is not running, and the vehicle is stationary:
Accessing the service schedule in the Infotainment system.
Press the button or function button.
Press the Vehicle and function buttons Infotainment system controls and displays
Select the Service menu option to display the service information.
Vehicles with analogue instrument cluster.
Press and hold the button in the instrument cluster Instrument clusteruntil the text Service
appears in the display.
Release the button. The current scheduled service will be shown in the display.
Vehicles with digital instrument cluster.
Information on the scheduled service can be accessed only via the Service menu Service menu
Resetting the service interval display
Page 37 of 502

ng wheel
Operating using the wiper lever
WARNING
Accidents and injuries can occur if the driver is distracted.
Never operate the menus on the instrument cluster display while the vehicle is in motion.
Check the system settings after charging or replacing the 12-volt vehicle battery. System settings
may be changed or deleted if the power supply is interrupted.
Operating using the wiper lever
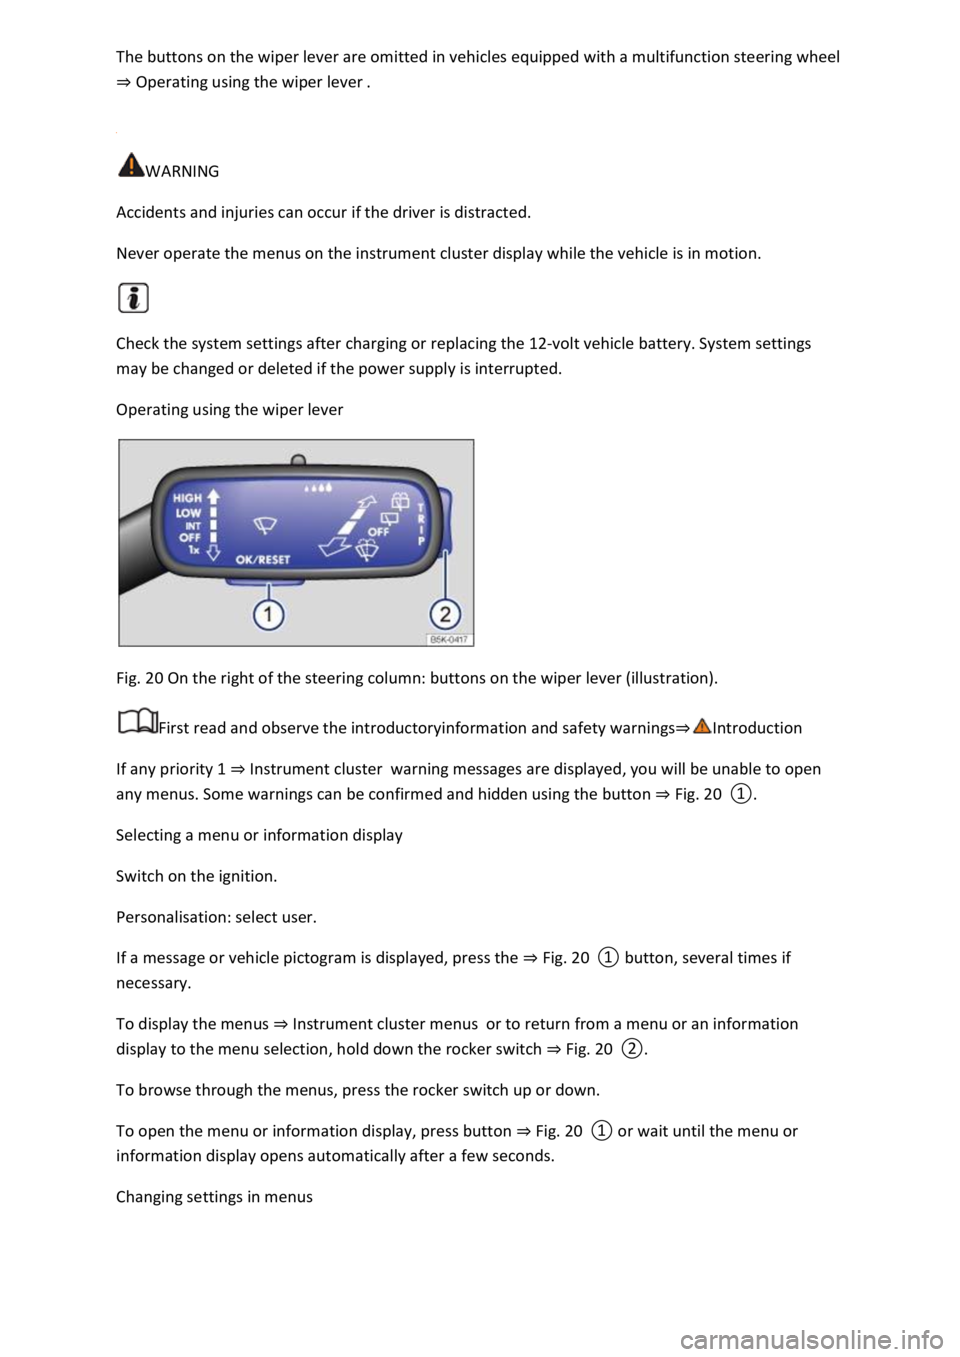
Fig. 20 On the right of the steering column: buttons on the wiper lever (illustration).
First read and observe the introductoryinformation and safety warnings
If any priority 1 Instrument clusterwarning messages are displayed, you will be unable to open
any menus. Some warnings can be confirmed and hidden using the button Fig. 20
Selecting a menu or information display
Switch on the ignition.
Personalisation: select user.
If a message or vehicle pictogram is displayed, press the Fig. 20
To display the menus Instrument cluster menusor to return from a menu or an information
display to the menu selection, hold down the rocker switch Fig. 20
To browse through the menus, press the rocker switch up or down.
To open the menu or information display, press button Fig. 20
a few seconds.
Changing settings in menus
Page 40 of 502

Introduction
This chapter contains information on the followingsubjects:
Vehicle settings menu
Performance monitor
Lap timer
Personalisat
The Infotainment system combines key vehicle systems in a central operating unit, e.g. menu
settings, radio or navigation system.
General information on operation
The following section contains relevant information on the settings that can be adjusted in the
Vehicle settings menu. Basic information on operating the Infotainment system and on warning and
safety instructions is contained in a separate manual Infotainment system,.
Systems settings and vehicle information display
After pressing the button or touching the function button followed by the Vehicle function
button, touch the corresponding function buttons to display information or make settings. The
current status of systems can be checked or system faults displayed by touching the function
button in the Vehicle status menu.
Vehicle settings (setup) Vehicl
Think Blue. Trainer. Think Blue. Trainer.
Performance monitor Performance monitor
Lap timer Lap timer
Offroad display Offroad driving situations
Auxiliary heater settings Auxiliary heater and ventilation
Active media.
Driving data.
Vehicle status.
Convenience consumers.
Radio station selection.
WARNING
Accidents and injuries can occur if the driver is distracted. Operating the Infotainment system can
distract you from the road.
Page 41 of 502

When you start the engine after the 12-volt vehicle battery has been totally discharged or changed,
you may find that system settings (time, date, personal convenience settings and programming) and
user accounts have been changed or deleted. Check and correct the settings as necessary once the
12-volt vehicle battery has been sufficiently charged.
Vehicle settings menu
First read and observe the introductoryinformation and safety warnings
You can switch individual functions and systems on and off and make settings in the vehicle settings
of the Infotainment system.
Opening the Vehicle settings menu
Switch on the ignition.
Switch on Infotainment system if necessary.
Press the button or function button.
Touch the Vehicle and function buttons to open the Vehicle settings menu.
Touch the corresponding function buttons to open additional menus in the Vehicle settings menu or
to make settings in the menu options.
If the checkbox in the function button is ticked , the respective function is switched on.
Touch the function button to return to the previous menu.
Performance monitor
First read and observe the introductoryinformation and safety warnings
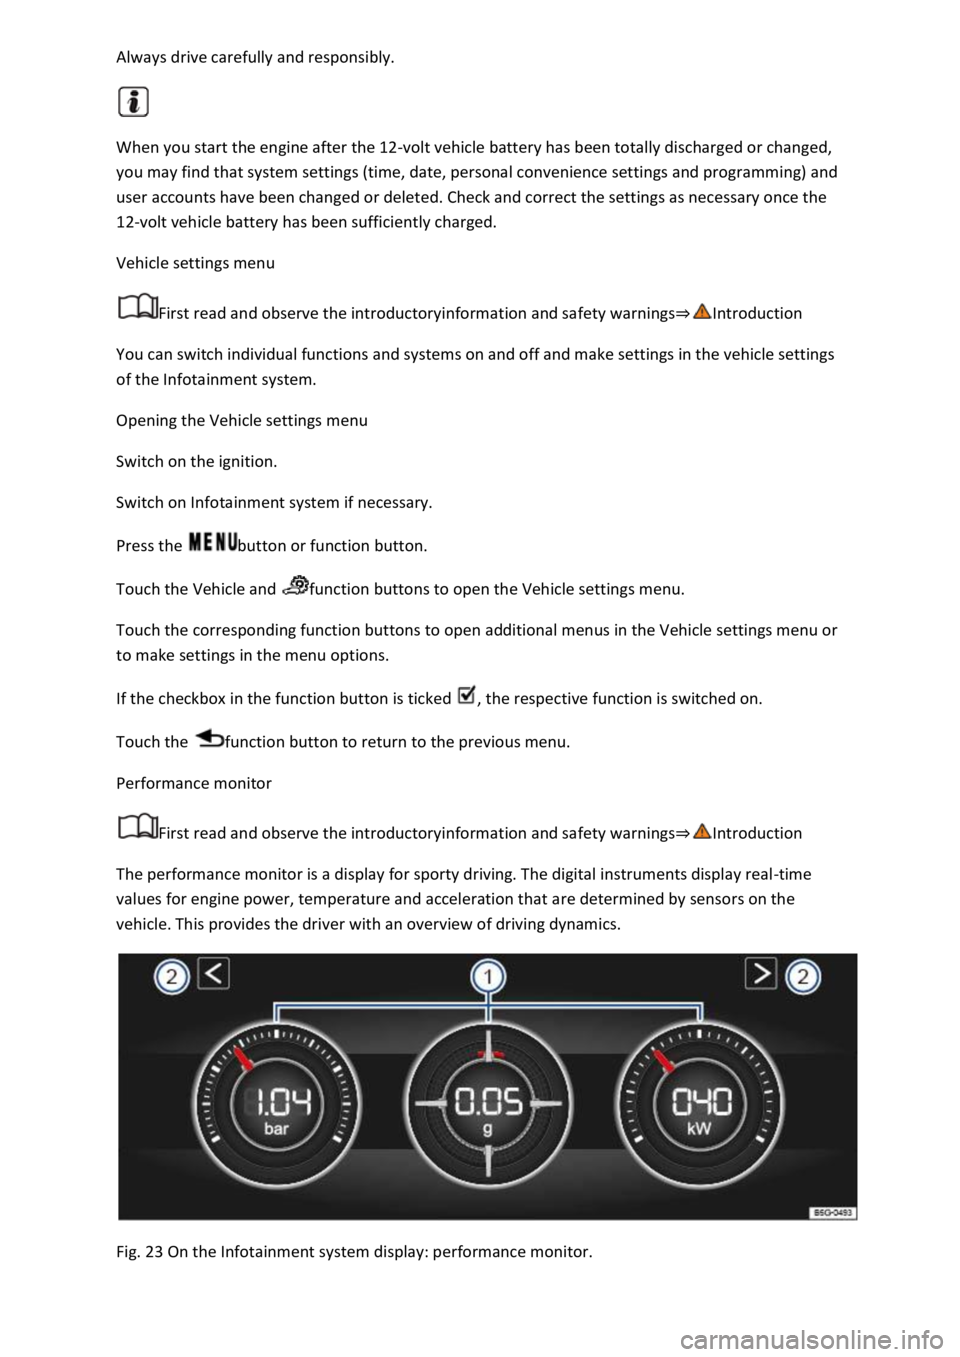
The performance monitor is a display for sporty driving. The digital instruments display real-time
values for engine power, temperature and acceleration that are determined by sensors on the
vehicle. This provides the driver with an overview of driving dynamics.
Fig. 23 On the Infotainment system display: performance monitor.
Page 42 of 502

Fig. 23
Display areas.
Arrow buttons for changing to the lap timer.
Opening the performance monitor
Press the MENU button or function button on the Infotainment system.
Touch the Vehicle function button.
Touch the Selection function button.
Touch the Sport function button.
If you would like to switch between the performance monitor and the lap timer Lap timer
one of the arrow buttons on the left and right above the instruments Fig. 23
Selecting instruments and setting units
The display can show a maximum of three instruments at the same time. Each instrument can be
selected for each display area Fig. 23
To change between instruments, swipe vertically over the display. The currently selected instrument
will then disappear and a new instrument will appear.
The units can be adjusted for some instruments in the Infotainment system Vehicle settings
menu
The following instruments can be displayed:
Charge pressure display: the charge pressure display Fig. 23
ar). The further to the right the
needle on the scale, the higher the engine power output.
Accelerometer (G-meter): the accelerometer (G-meter) Fig. 23
-type area shows the
acceleration level and the direction of the acting force (in the opposite direction according to
physical laws). If you drive to the left, for example, the red marking will move in the right area of the
instrument (and vice versa). If you accelerate, the red marking will move down. If you brake, the red
marking will move up. The level of acceleration is indicated by the position of the red marking which
moves outwards. If the acceleration increases, the red marking will move away from the centre area.
Power display: the power display Fig. 23
Coolant temperature display: the needle may move further in a clockwise direction under high
engine loads and with high outside temperatures. This is no cause for concern unless the
indicator lamp in the instrument cluster display is lit up or flashing Coolant temperature display
Oil temperature display: the needle is in the middle area under normal driving conditions. If the
needle is in the bottom left area, this means that the engine has not yet reached its operating
temperature. Avoid excessively high speeds and acceleration when the engine has not yet reached
Page 45 of 502

Press the MENU button or function button, depending on the version of the Infotainment system.
Touch the Vehicle function button.
Touch the Selection function button.
Touch the Sport function button. The performance monitor is displayed.
Touch one of the arrow buttons Fig. 23
You can change between the lap timer and performance monitor at any time using the arrow
buttons Fig. 23Fig. 24
Measuring lap times
The stopwatch measures the lap time in two areas:
The red needle and the numerical value in the centre show the running time in seconds. The smaller
display in the inner area shows minutes and hours.
The display on the right side shows the current lap time with an accuracy of 1/100 seconds. There is
no difference between the stopwatch and lap times if there are not yet any laps with split times
stored in the lap timer.
WARNING
Avoid operating the lap timer when the vehicle is in motion if possible.
Make lap timer settings and access statistics only when the vehicle is stationary.
When the vehicle is in motion, use the lap timer only in driving situations which are easy to control.
Personalisation
First read and observe the introductoryinformation and safety warnings
The personalisation function allows personalised vehicle settings, such as air conditioning system,
instrument cluster or lighting settings, to be saved in a user account. Four user accounts are
available. Users are identified by the vehicle keys upon unlocking the vehicle. A user account is
assigned to each vehicle key.
Changes to the settings will be assigned to the active user account and saved upon locking the
vehicle or changing the user account.
Welcome and user account selection
When personalisation is activated, the name of the current user account appears on the instrument
cluster display for approximately ten seconds after you switch on the ignition.
During this time, you can select a user account using the buttons on the wiper lever or multifunction
steering wheel Infotainment system controls and displays
Page 87 of 502

-visibility waistcoat may be located in a stowage
compartment in the front door trim or in the stowage compartment on the front passenger side
Driver doorFr
The high-visibility waistcoat must comply with legal requirements.
Fire extinguisher
Depending on the equipment, a fire extinguisher may be located in a holder in the footwell under
the front passenger seat.
The fire extinguisher must meet legal requirements, be ready for use at all times and be checked on
a regular basis (see inspection seal on the fire extinguisher).
WARNING
In the event of a sudden driving or braking manoeuvre or accident, loose objects could be flung
though the vehicle and cause severe injuries.
Always secure the first-aid kit, warning triangle and fire extinguisher safely in the holders in the
vehicle.
Stow the high-visibility waistcoat in the stowage compartments so that it can be easily accessed.
Information call, breakdown call and emergency call service
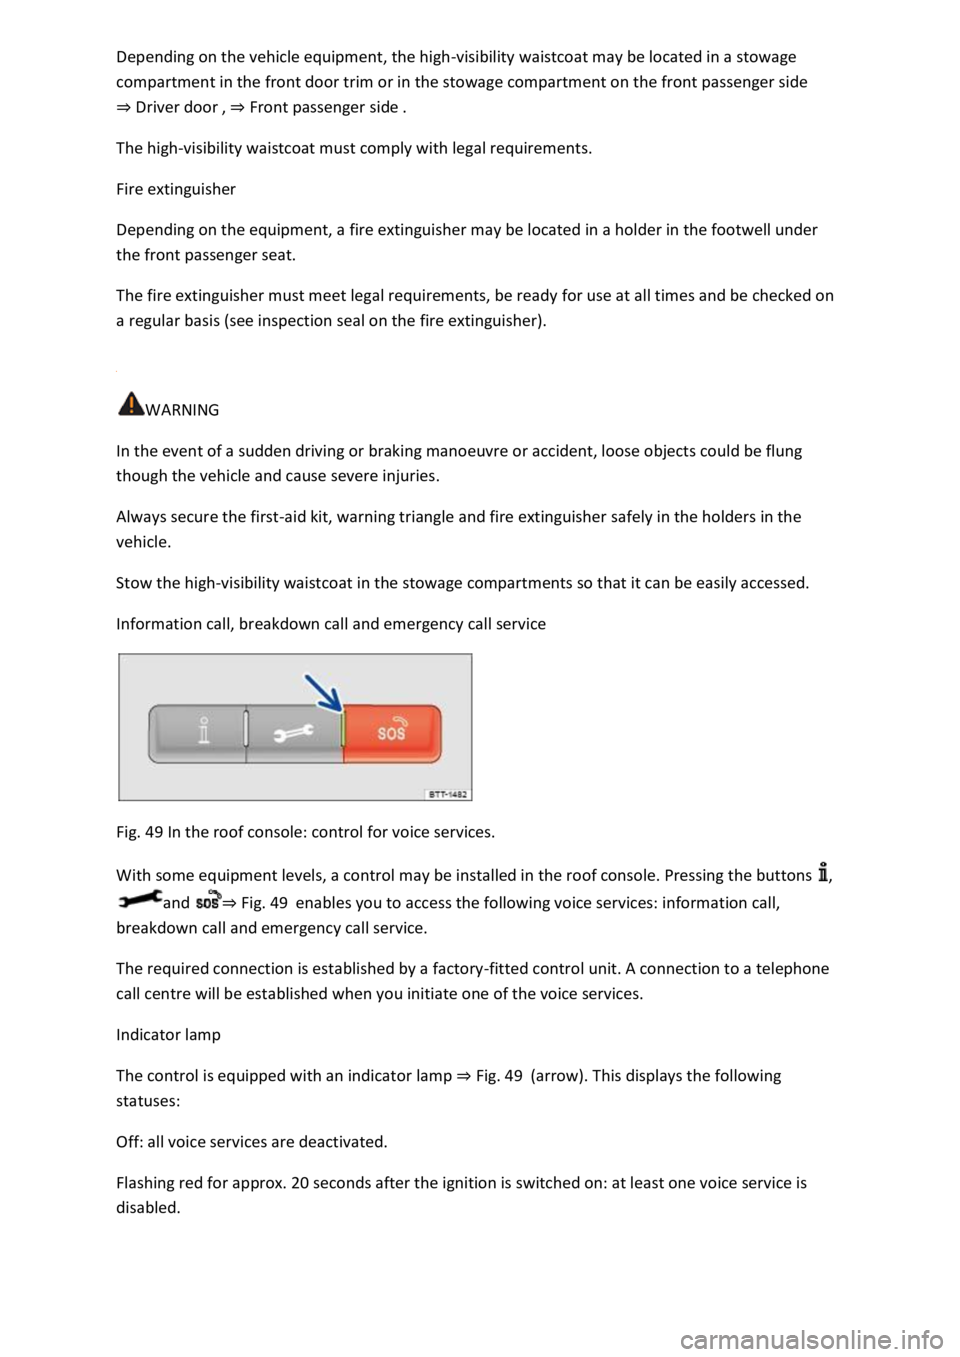
Fig. 49 In the roof console: control for voice services.
With some equipment levels, a control may be installed in the roof console. Pressing the buttons ,
and Fig. 49enables you to access the following voice services: information call,
breakdown call and emergency call service.
The required connection is established by a factory-fitted control unit. A connection to a telephone
call centre will be established when you initiate one of the voice services.
Indicator lamp
The control is equipped with an indicator lamp Fig.
Off: all voice services are deactivated.
Flashing red for approx. 20 seconds after the ignition is switched on: at least one voice service is
disabled.
Page 97 of 502

Depending on the settings made for central locking in the Infotainment system, it may be the case
that all of the doors and the boot lid are unlocked only when the button has been pressed twice.
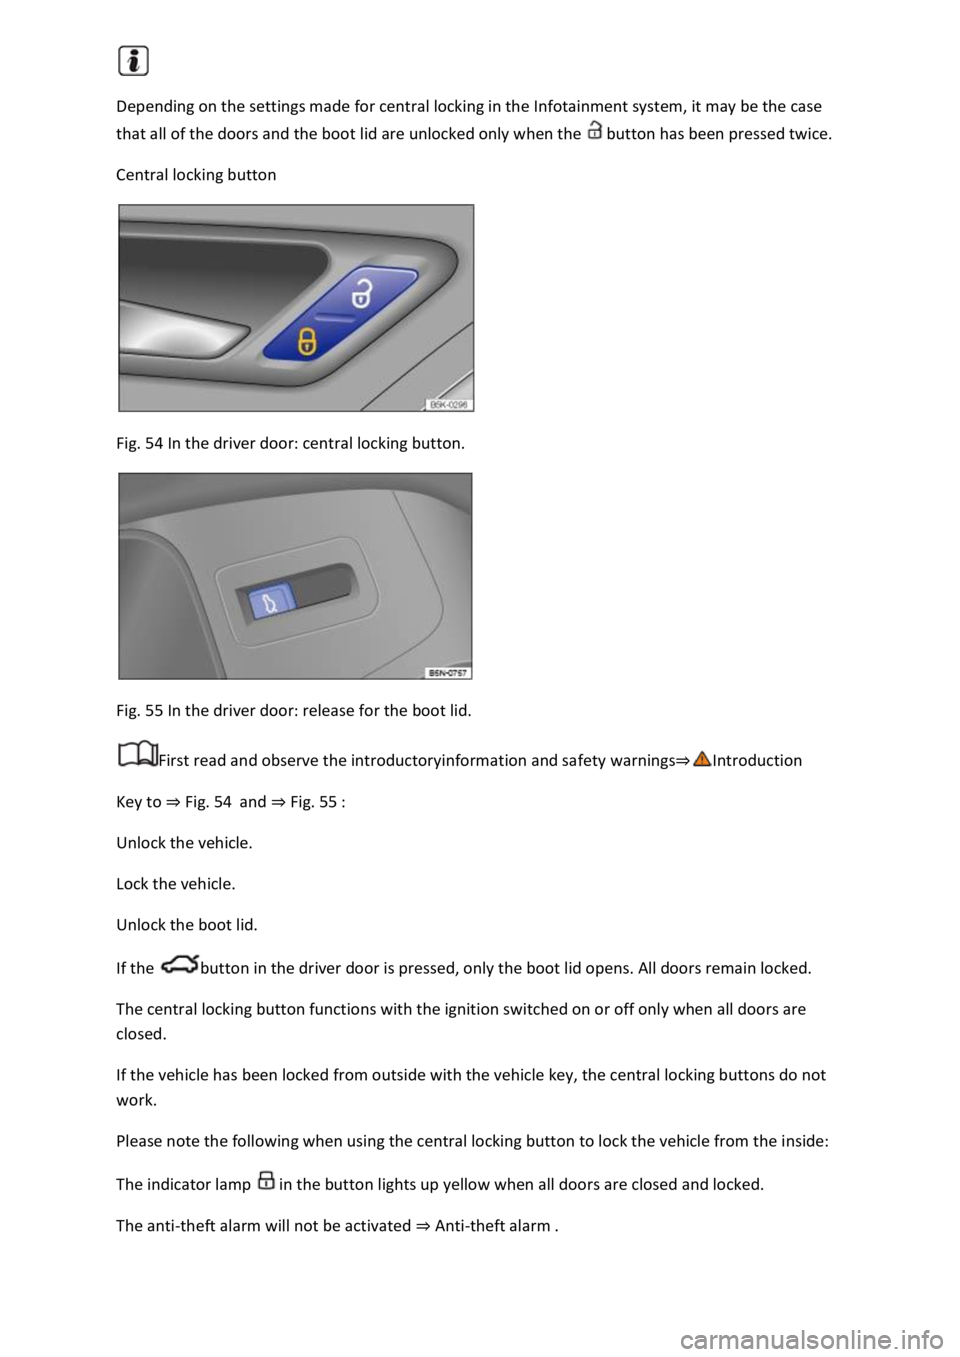
Central locking button
Fig. 54 In the driver door: central locking button.
Fig. 55 In the driver door: release for the boot lid.
First read and observe the introductoryinformation and safety warnings
Key to Fig. 54and Fig. 55
Unlock the vehicle.
Lock the vehicle.
Unlock the boot lid.
If the button in the driver door is pressed, only the boot lid opens. All doors remain locked.
The central locking button functions with the ignition switched on or off only when all doors are
closed.
If the vehicle has been locked from outside with the vehicle key, the central locking buttons do not
work.
Please note the following when using the central locking button to lock the vehicle from the inside:
The indicator lamp in the button lights up yellow when all doors are closed and locked.
The anti-theft alarm will not be activated Anti-theft alarm