Page 502 of 700

5027-3. Do-it-yourself maintenance
YARIS_F_OM_Europe_OM52K19E
You may drain the fuel filter yourself. However, as the operation is dif-
ficult, we recommend having it drained by any authorized Toyota
retailer or Toyota authorized repairer, or any reliable repairer. Even if
you decide to drain it yourself, contact any authorized Toyota retailer
or Toyota authorized repairer, or any reliable repairer.
Vehicles with monochrome display: The water in the fuel filter needs
to be drained if the fuel filter warning light comes on. (P. 579)
Vehicles with color display: The water in the fuel filter needs to be
drained if the fuel filter warning message is shown on the multi-infor-
mation display. (P. 587)
Turn the engine switch to the “LOCK” position (vehicles without a
smart entry & start system) or off (vehicles with a smart entry & start
system).
Place a small tray under the drain plug to catch the water and any
fuel that comes out.
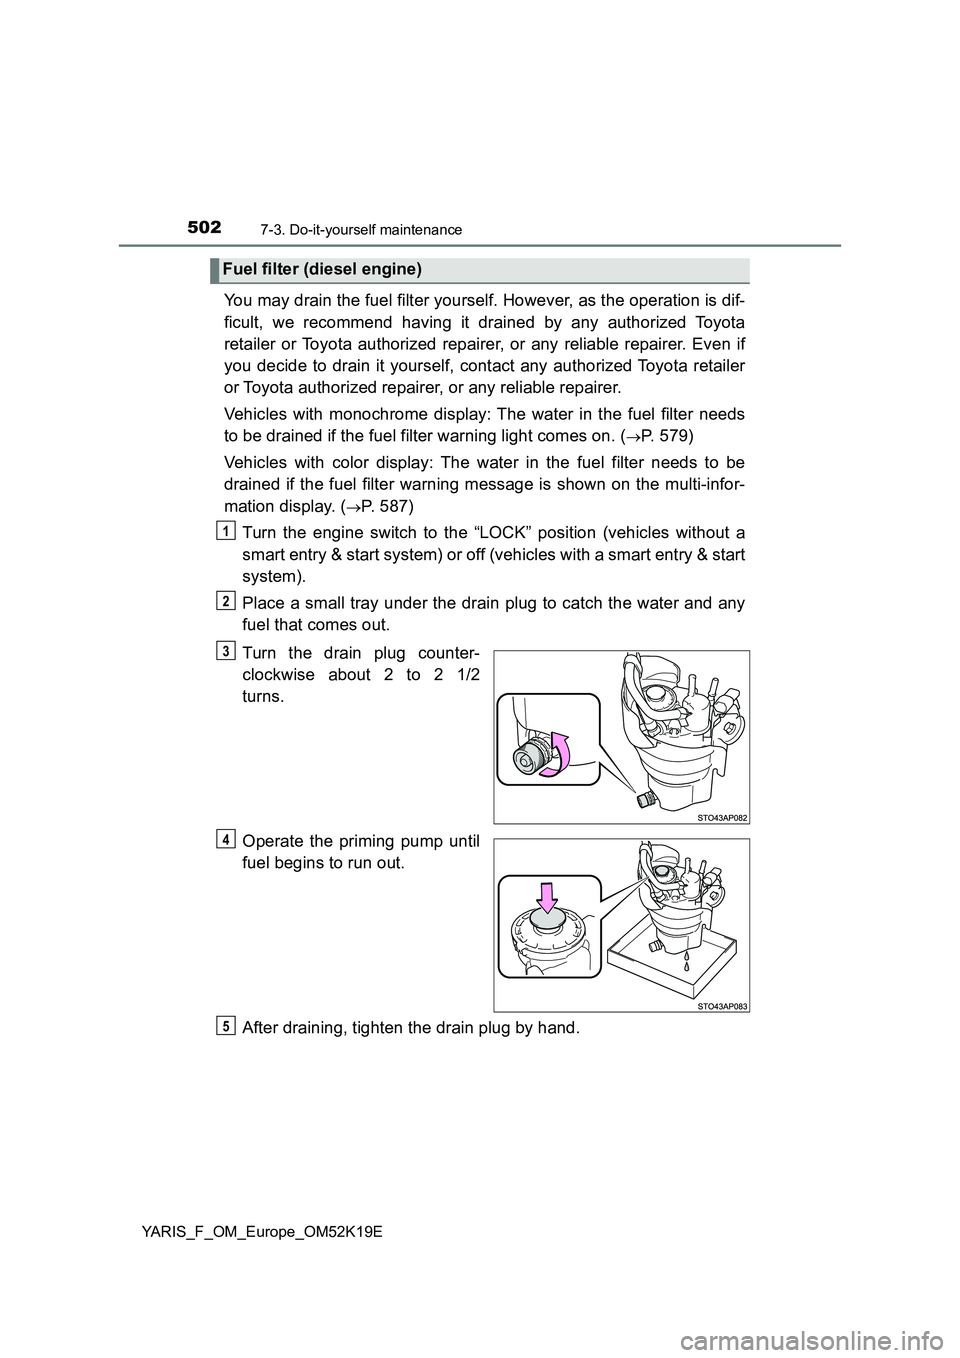
Turn the drain plug counter-
clockwise about 2 to 2 1/2
turns.
Operate the priming pump until
fuel begins to run out.
After draining, tighten the drain plug by hand.
Fuel filter (diesel engine)
1
2
3
4
5
Page 506 of 700

5067-3. Do-it-yourself maintenance
YARIS_F_OM_Europe_OM52K19E
■How to initialize the tire pressure warning system
Park the vehicle in a safe place and turn the engine switch to the
“LOCK” position (vehicles without a smart entry & start system)
or off (vehicles with a smart entry & start system).
Initialization cannot be performed while the vehicle is moving.
Adjust the tire inflation pressure to the specified cold tire inflation
pressure level. ( P. 663)
Make sure to adjust the tire pressure to the specified cold tire inflation
pressure level. The tire pressure warning system will operate based on
this pressure level.
Turn the engine switch to the “ON” position (vehicles without a
smart entry & start system) or IGNITION ON mode (vehicles with
a smart entry & start system).
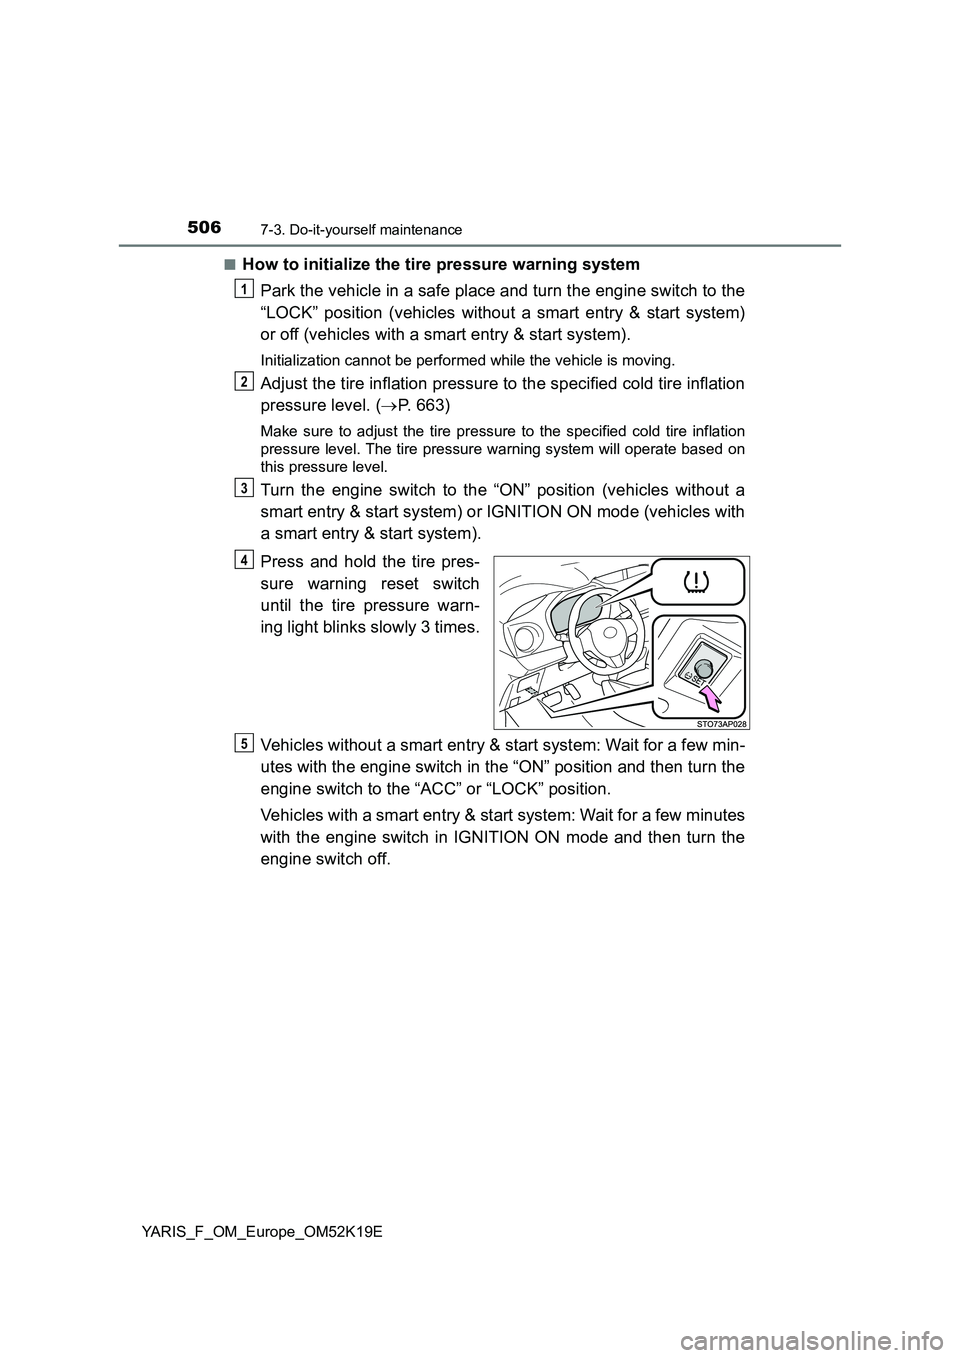
Press and hold the tire pres-
sure warning reset switch
until the tire pressure warn-
ing light blinks slowly 3 times.
Vehicles without a smart entry & start system: Wait for a few min-
utes with the engine switch in the “ON” position and then turn the
engine switch to the “ACC” or “LOCK” position.
Vehicles with a smart entry & start system: Wait for a few minutes
with the engine switch in IGNITION ON mode and then turn the
engine switch off.
1
2
3
4
5
Page 529 of 700
5297-3. Do-it-yourself maintenance
7
Maintenance and care
YARIS_F_OM_Europe_OM52K19E
Air conditioning filter
Turn the engine switch to the “LOCK” position (vehicles without a
smart entry & start system) or off (vehicles with a smart entry & start
system).
Open the glove box and slide
off the damper.
Push in each side of the glove
box to disconnect the upper
claws.
Pull out the glove box and dis-
connect the lower claws.
The air conditioning filter must be changed regularly to maintain
air conditioning efficiency.
Removal method
1
2
3
4
Page 530 of 700
5307-3. Do-it-yourself maintenance
YARIS_F_OM_Europe_OM52K19E
Remove the filter cover.
Unlock the filter cover.
Move the filter cover in the
direction of the arrow, and
then pull it out of the claws.
Remove the air conditioning fil-
ter and replace it with a new
one.
The “ UP” marks shown on the fil-
ter should be pointing up.
■ Checking interval
Inspect and replace the air conditioning filter according to the maintenance
schedule. In dusty areas or areas with heavy traffic flow, early replacement
may be required. (For scheduled maintenance information, please refer to the
“Toyota Service Booklet” or “Toyota Warranty Booklet”.)
■ If air flow from the vents decreases dramatically
The filter may be clogged. Check the filter and replace if necessary.
5
1
2
6
Page 536 of 700
5367-3. Do-it-yourself maintenance
YARIS_F_OM_Europe_OM52K19E
Checking and replacing fuses
Turn the engine switch to the “LOCK” position (vehicles without a
smart entry & start system) or off (vehicles with a smart entry & start
system).
Open the fuse box cover.
Engine compartment: type A and B fuse boxes
Type A fuse box
Push the tab in and lift the lid off.
Type B fuse box
Push the tab in and lift the lid off.
If any of the electrical components do not operate, a fuse may
have blown. If this happens, check and replace the fuses as nec-
essary.
1
2
1
2
Page 546 of 700
5467-3. Do-it-yourself maintenance
YARIS_F_OM_Europe_OM52K19E
Projector type
Turn the bulb base counter-
clockwise.
Pull the bulb out while press-
ing the lock release of the
connector.
Replace the light bulb, plug
the connector, and then
install the bulb base.
Align the 3 tabs on the light bulb
with the mounting and insert.
Turn and secure the bulb
base.
Shake the bulb base gently to
check that it is not loose, turn
the headlights on once and visu-
ally confirm that no light is leak-
ing through the mounting.
1
2
3
14
Page 548 of 700
5487-3. Do-it-yourself maintenance
YARIS_F_OM_Europe_OM52K19E
Unplug the connector while
pressing the lock release.
Turn the bulb base counter-
clockwise.
Set the new light bulb.
Align the 3 tabs on the light bulb
with the mounting, and insert.
Turn and secure the bulb.
5
6
7
8
Page 550 of 700
5507-3. Do-it-yourself maintenance
YARIS_F_OM_Europe_OM52K19E
■Front position lights/daytime running lights (bulb type)
Turn the bulb base counterclockwise.
Remove light bulb.
When installing, reverse the steps listed.
1
Type AType B
2
Type AType B
3