Page 3 of 505

.
.
Over view
Instrument panels 13Indicator and warning lamps 15Distance recorders 36Lighting dimmer 37Trip computer 38Touch screen 41Setting the date and time 44
Key 45Key, remote control 45"Smart Entry & Start System" 52Locking / unlocking from inside 64Front doors 65Manual sliding side d o o r (s) 6 6Electric sliding side d o o r (s) 6 8Kick-activated side doors opening and locking 75Rear wing doors with glass windows 79Rear tailgate 81Tailgate rear screen 82Alarm 83Electric windows 86
Steering wheel adjustment 87Front seats 872-seat front bench seat 93Fixed one-piece bench seat 95Fixed rear seat and bench seat 98Rear seat and bench seat on rails 101Captain seat(s) on rails 105Interior fittings 110Seating area fittings 115Skyview® 120Folding and sliding table 121Manual air conditioning 125Dual-zone automatic air conditioning 127Front demist - defrost 131Door mirrors demist - defrost 132Rear screen demist - def rost 13 3Rear Heating - Air Conditioning 136Fuel burner heater/Remote controlled fuel burner heater 137Courtesy lamps 140
M i r r o r s 141Lighting control stalk 144Daytime running lamps 147Automatic illumination of headlamps 147Automatic headlamp dipping 151Interior mood lighting 153Manual headlamp beam height adjustment 153Wiper control stalk 154Automatic rain sensitive wipers 155
Hazard warning lamps 158ER A-GLONASS emergency call system 15 8Hor n 159Electronic stability control (ESC) 159Toyota Traction Select 162Seat belts 164Airbags 168Child seats 173Deactivating the passenger's front airbag 176ISOFIX mountings 183Manual child lock 190Electric child lock 190Child lock on rear windows 191
Eco-driving
Instruments
Access
Ease of use and comfortLighting and visibility
Safety
Labels 10
Contents
Page 9 of 505

8
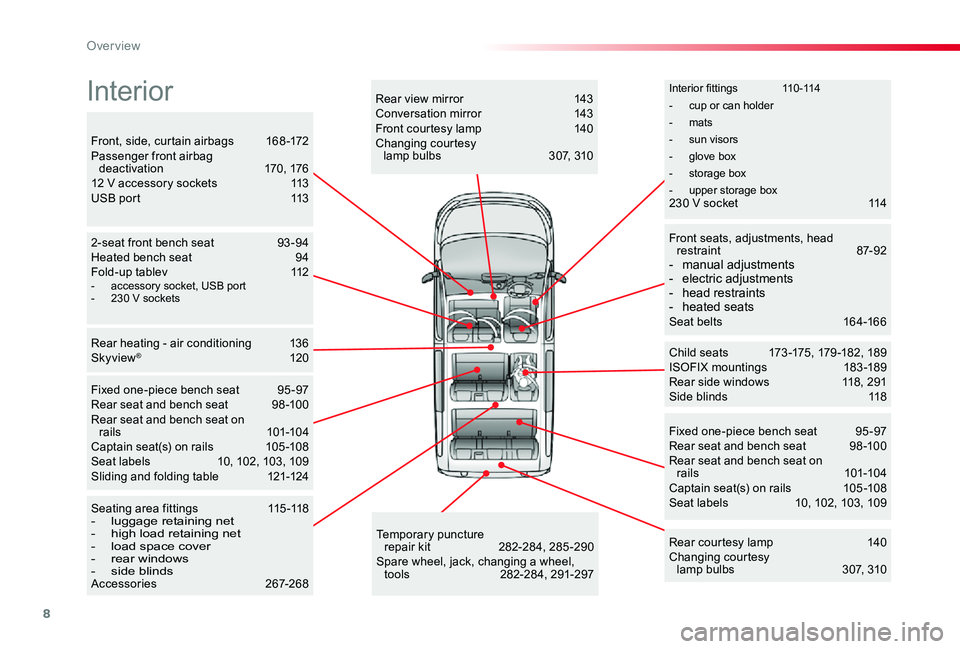
Interior fittings 110-114
- cup or can holder
- mats
- sun visors
- glove box
- storage box
- upper storage box
Child seats 173 -175, 179 -182, 189ISOFIX mountings 183 -189Rear side windows 118, 291Side blinds 118
Fixed one-piece bench seat 95 -97Rear seat and bench seat 98 -100Rear seat and bench seat on rails 101-104Captain seat(s) on rails 105 -108Seat labels 10, 102, 103, 109
2-seat front bench seat 93 -94Heated bench seat 94Fold-up tablev 112
Rear heating - air conditioning 136Skyview® 120
Temporary puncture repair kit 282-284, 285 -290Spare wheel, jack, changing a wheel, tools 282-284, 291-297
Seating area fittings 115 -118- luggage retaining net- high load retaining net- load space cover- rear windows- side blindsAccessories 267-268
Rear courtesy lamp 140Changing courtesy lamp bulbs 307, 310
Rear view mirror 143Conversation mirror 143Front courtesy lamp 140Changing courtesy lamp bulbs 307, 310Front, side, curtain airbags 168 -172Passenger front airbag deactivation 170, 17612 V accessory sockets 113USB port 113
Front seats, adjustments, head restraint 87-92- manual adjustments- electric adjustments- head restraints- heated seatsSeat belts 164-166
Fixed one-piece bench seat 95 -97Rear seat and bench seat 98 -100Rear seat and bench seat on rails 101-104Captain seat(s) on rails 105 -108Seat labels 10, 102, 103, 109Sliding and folding table 121-124
Interior
- accessory socket, USB port- 230 V sockets
230 V socket 114
Tool box 282-283
Over view
Page 18 of 505

17
Warning / indicator lampStateCauseAction / Observations
Seat belt(s) not fastened / unfastened
fixedor flashing accompanied by an audible signal.
A seat belt has not been fastened or has been unfastened.Pull the strap then insert the tongue in the buckle.
* Depending on the country of sale.
Battery charge*fixed.The battery charging circuit has a
fault (dirty or loose terminals, slack or cut alternator belt, ...).
The warning lamp should go off when the engine is started.If it does not go off, contact an authorized Toyota dealer or repairer, or another duly qualified and equipped professional immediately.
Engine oil pressurefixed.There is a fault with the engine lubrication system.You must stop as soon it is safe to do so.Park, switch off the ignition and contact an authorized Toyota dealer or repairer, or another duly qualified and equipped professional immediately.
Maximum coolant temperature
fixed with the needle in the red zone.The temperature of the cooling system is too high.You must stop as soon as it is safe to do so.Wait until the engine has cooled down before topping-up the level, if necessary.
If the problem persists, contact an authorized Toyota dealer or repairer, or another duly qualified and equipped professional immediately.
1
Instruments
Page 23 of 505

22
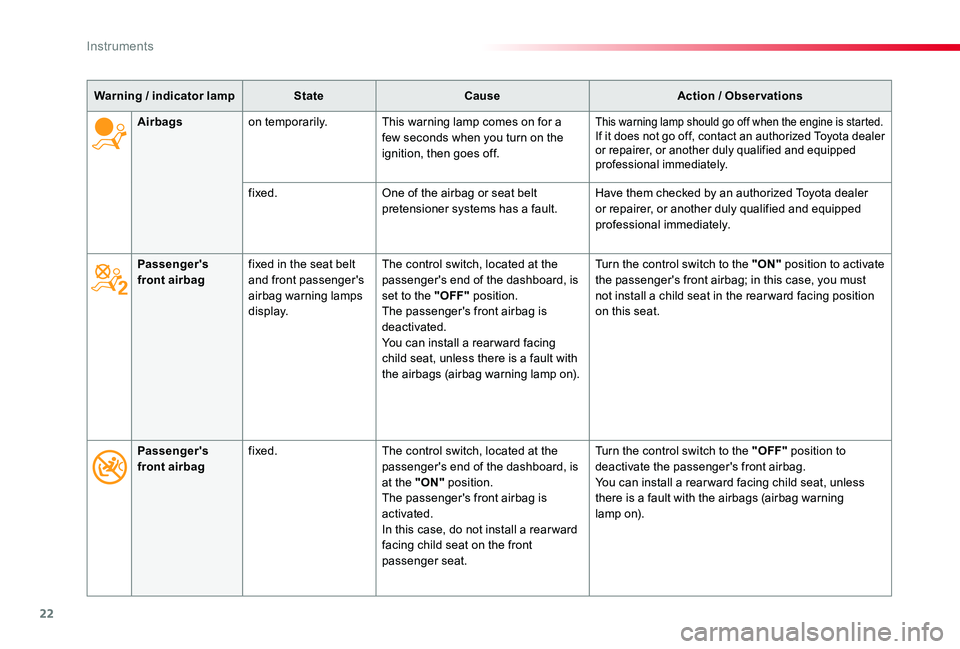
Warning / indicator lampStateCauseAction / Observations
Passenger's front airbagfixed in the seat belt and front passenger's airbag warning lamps display.
The control switch, located at the passenger's end of the dashboard, is set to the "OFF" position.The passenger's front airbag is deactivated.You can install a rearward facing child seat, unless there is a fault with the airbags (airbag warning lamp on).
Turn the control switch to the "ON" position to activate the passenger's front airbag; in this case, you must not install a child seat in the rear ward facing position on this seat.
Airbagson temporarily.This warning lamp comes on for a few seconds when you turn on the ignition, then goes off.
This warning lamp should go off when the engine is started.If it does not go off, contact an authorized Toyota dealer or repairer, or another duly qualified and equipped professional immediately.
fixed.One of the airbag or seat belt pretensioner systems has a fault.Have them checked by an authorized Toyota dealer or repairer, or another duly qualified and equipped professional immediately.
Passenger's front airbagfixed.The control switch, located at the passenger's end of the dashboard, is at the "ON" position.The passenger's front airbag is activated.In this case, do not install a rear ward facing child seat on the front passenger seat.
Turn the control switch to the "OFF" position to deactivate the passenger's front airbag.You can install a rear ward facing child seat, unless there is a fault with the airbags (airbag warning lamp on).
Instruments
Page 89 of 505
88
F Turn the knob to adjust the backrest.
Backrest angle
F Turn the knob manually to obtain the desired level of lumbar support.
Lumbar
For more information on the Seat belts, refer to the corresponding section.
F Pull the control fully up and move the backrest for ward or backward.
Ease of use and comfort
Page 91 of 505
90
Electric front seat
Forwards-backwardsBackrest angle
Height
To avoid discharging the battery, carry out these adjustments with the engine running.
F Push the control for wards or rear wards to slide the seat.F Tilt the control for wards or rear wards to adjust the angle of the seat backrest.
F Tilt the control upwards or downwards to obtain the desired height.
Before moving the seat backwards, ensure that there is nothing that might prevent the full travel of the seat, so as to avoid the risk of jamming the seat caused by the presence of objects on the floor behind the seat or rear passengers. If the seat jams, stop the movement immediately.
For more information on the Seat belts, refer to the corresponding section.
Ease of use and comfort
Page 94 of 505
93
Head restraint height
adjustment
F To raise the head restraint, pull it upwards.F To remove the head restraint, press the lug A and pull the head restraint upwards.F To put the head restraint back in place, engage the head restraint stems in the openings keeping them in line with the seat back.F To lower the head restraint, press the lug A and the head restraint at the same time.
The head restraint rods have notches which prevent the head restraint lowering; this is a safety device in case of impact.The adjustment is correct when the upper edge of the head restraint is level with the top of the head.Never drive with the head restraints removed; they must be in place and adjusted correctly.
2-seat front bench seat
If fitted to your vehicle, this is fixed and has a seat belt on the backrest for the seat alongside the driver.
For more information on the Seat belts, refer to the corresponding section.
3
Ease of use and comfort
Page 96 of 505

95
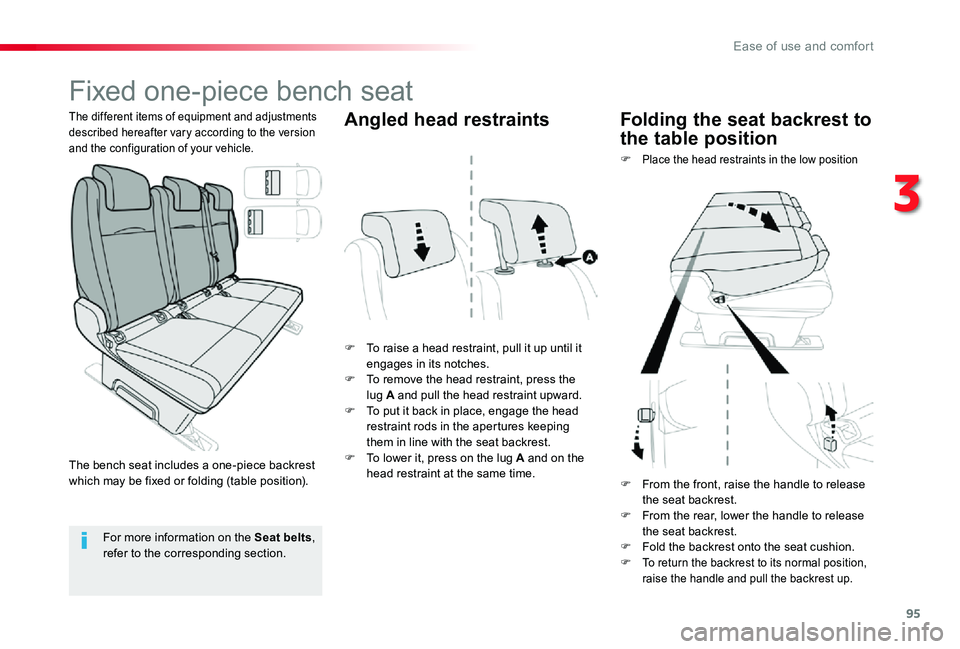
Fixed one-piece bench seat
F To raise a head restraint, pull it up until it engages in its notches.F To remove the head restraint, press the lug A and pull the head restraint upward.F To put it back in place, engage the head restraint rods in the apertures keeping them in line with the seat backrest.F To lower it, press on the lug A and on the head restraint at the same time.
F Place the head restraints in the low position
The different items of equipment and adjustments described hereafter vary according to the version and the configuration of your vehicle.
Angled head restraintsFolding the seat backrest to
the table position
For more information on the Seat belts,
refer to the corresponding section.
The bench seat includes a one-piece backrest which may be fixed or folding (table position).F From the front, raise the handle to release the seat backrest.F From the rear, lower the handle to release the seat backrest.F Fold the backrest onto the seat cushion.F To return the backrest to its normal position, raise the handle and pull the backrest up.
3
Ease of use and comfort